Zenith HydroTap G5 User Manual
Hide thumbs
Also See for HydroTap G5:
- Quick start installation manual (36 pages) ,
- Installation instructions manual (32 pages) ,
- Quick start installation manual (20 pages)

Related Manuals for Zenith HydroTap G5


Summary of Contents for Zenith HydroTap G5
- Page 1 User Guide HydroTap G5 ® Visit our website to download the manuals 806835NZ v1.05 03.22 G5 User guide...
- Page 2 806835NZ v1.05 03.22 G5 User guide...
-
Page 3: Table Of Contents
Table of contents SECTION 1: SAFETY ........5 1.1 Explanation of symbols .......... 5 1.2 Before you start ............. 5 SECTION 2: Using the HydroTap ....6 2.1 Classic Plus, Elite Plus ..........7 2.2 Touch-Free Wave ..........8 2.3 Arc, Cube and Celsius ........... 10 2.4 Classic .............. - Page 4 Register product • Navigate to the register product menu. • Scan the QR code and follow the on screen steps to register your product. REGISTER PRODUCT 12:12 PM Congratulations on purchasing a HydroTap system. Scan the QR code on your phone to register your product.
-
Page 5: Section 1: Safety
SECTION 1: SAFETY 1.1 Explanation of symbols Read the instructions WARNING Danger of electric shock Hot surface 1.2 Before you start Read the WARNINGS and PRECAUTIONS. Download & read the complete Command Centre installation instruction manual and user guide. Read the instructions supplied with individual kit components for safe use and installation of replacement consumables. -
Page 6: Section 2: Using The Hydrotap
SECTION 2: Using the HydroTap Classic Plus, Elite Plus See page 6 Touch-Free Wave See page 7 Arc, Cube and Celsius See page 9 Classic See page 10 HydroTap Mixer Taps See page 11 806835NZ v1.05 03.22 G5 User guide... -
Page 7: Classic Plus, Elite Plus
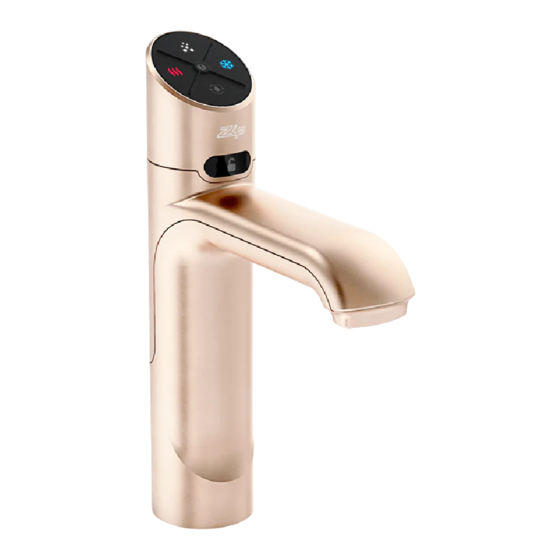
SECTION 2: Using the HydroTap 2.1 Classic Plus, Elite Plus Controls Press to dispense Simply press to dispense chosen water type Safety lock Lights Service Safety FLASHING lock Change filter or CO2. ON Safety lock on. OFF Safety lock off. Ready to dispense. -
Page 8: Touch-Free Wave
SECTION 2: Using the HydroTap 2.2 Touch-Free Wave Controls Touch-free Safety sensors on the tap top, sensor back and sides. (at back) Dispense sensors Clearance requirements 100mm 100mm Lights RED Boiling & safety sensors activated, water dispensed. Light BLUE Chilled sensor activated, water dispensed. - Page 9 SECTION 2: Using the HydroTap 2.2 Touch-Free Wave continued Dispense options Sensor range 1 - 5 cm. To dispense, hold hand within range of the sensors. Tap will not operate and light will flash if the sensors are touched or if your hand is too close. Boiling Boiling Water Chilled...
-
Page 10: Arc, Cube And Celsius
SECTION 2: Using the HydroTap 2.3 Arc, Cube and Celsius Controls Bottle fill Indicator displays system status. (timed dispense) Select touch to select water type. Manual Boiling SELECT dispense Chilled SELECT Sparkling SELECT Safety When safety lock is on, touch twice to flash. -
Page 11: Classic
SECTION 2: Using the HydroTap 2.4 Classic Controls Push for manual dispense Pull for bottle fill (timed dispense) Lights Filter Boiling ready Chilled / sparkling Safety ready lock SAFETY ON active OFF inactive FILTER Ready to dispense. Filter within lifespan. SAFETY SAFETY FLASHING SLOWLY... -
Page 12: Hydrotap Mixer Taps
SECTION 2: Using the HydroTap 2.5 HydroTap Mixer taps Controls mixed water Cold Lift and rotate the lever to dispense mixed warm water. 806835NZ v1.05 03.22 G5 User guide... -
Page 13: Section 3: Command Centre Screen
SECTION 3: Command Centre Screen 3.1 How to use the Command Centre screen The Command Centre has a colour touch screen liquid crystal display. The screen turns OFF after 5 minutes of non-use. Touch the screen to reactivate. Navigate to the required screen. Here's an example : Set the language - from the home screen Touch the ‘top left’... - Page 14 SECTION 3: Command Centre Screen OFF screen Touch the power button to turn the Command Centre ON or OFF. The LCD screen visually shows OFF when it is non- operational. You will hear the sound of an internal “click” as the HydroTap Command Centre turns ON or OFF.
-
Page 15: Home Screen
SECTION 3: Command Centre Screen 3.2 Home screen Status screens shown here are representative and may vary. Use the home screen to monitor the HydroTap status. Touch each icon to view the system status. Boiling temperature set Chilled temperature set point point (Chilled models) CO2 gas remaining (Sparkling models) -
Page 16: Main Menu
SECTION 3: Command Centre Screen 3.3 Main menu Use the Main menu to configure your HydroTap and access features and settings. Touch each icon to access further options. 3.4 General settings Language 806835NZ v1.05 03.22 G5 User guide... - Page 17 Press the tick to confirm and save. DATE & TIME 12:12 PM 2021 24 hr Time Network Connect to Wi Fi (available with optional Zenith Assist kit). NETWORK 12:12 Zip Wi-Fi Wi-Fi Cloud Fault Hotspot...
-
Page 18: System Settings
SECTION 3: Command Centre Screen 3.5 System settings Configure your HydroTap to suit your needs. Navigate to system settings screen for all system settings. 806835NZ v1.05 03.22 G5 User guide... -
Page 19: Filter Settings
SECTION 3: Command Centre Screen 3.5.1 Filter settings FILTER SETTINGS 12:12 PM Filter Tank Filter Filter Flush Flush Reset Life Filter flush Use Filter flush during commissioning of a new installation, and after every filter change. See page 35 for filter change instructions. Flush line tap Open filter door, uncoil flush line. - Page 20 SECTION 3: Command Centre Screen Start flush. Approximately 10L of water will flow, for 2 minutes. FILTER FLUSH 12:12 RUNNING..Water is now being flushed through the filter. This process is automatic and will take 2 minutes. Press pause to pause filter flush. The screen will show the filter has been flushed.
- Page 21 SECTION 3: Command Centre Screen Filter reset Reset the filter counters after filter replacement and flush. FILTER RESET 12:12 PM This will reset the usage counters for the chosen item. Select an item and press reset to confirm. Internal External filter filter Filter life...
-
Page 22: Temperature Settings
SECTION 3: Command Centre Screen 3.5.2 Temperature settings Boiling / Chilled set point Adjust as required. COLD/HOT SETPOINT 12:12 PM Chill Set Point Boiling Set Point °C °C Chilled models Default chill set point: 5-9ºC Commercial, 6-10ºC Residential. Scroll to select alternatives. Sparkling models Chill set point: 3-6ºC Commercial, 3-7ºC Residential. - Page 23 SECTION 3: Command Centre Screen Boiling calibration Take care during boiling calibration as hot steam may vent from the tap spout. On start-up, the HydroTap self-calibrates, or go to this menu to recalibrate. Calibration will take around 10 minutes. External Booster For selected commercial Boiling models, an external booster is supplied or may be purchased as an upgrade to increase Boiling capacity.
-
Page 24: Co2 Settings
SECTION 3: Command Centre Screen 3.5.3 CO2 settings CO2 SETTINGS 12:12 PM Purge Reset Life CO2 purge Purge the gas lines when fitting a new CO2 gas cylinder. Press the green start icon. The purge runs for 30 seconds. Water may be dispensed before CO2 gas escapes from the tap. - Page 25 SECTION 3: Command Centre Screen CO2 life CO2 life may be adjusted by months or litres. The Home screen displays a warning when the CO2 level reaches 20% (see page 14). CO2 life defaults to grams absorbed. Months of use may also be selected to trigger a reminder to prepare a replacement CO2 cylinder.
-
Page 26: Dispense Times
SECTION 3: Command Centre Screen 3.5.4 Dispense times Set the “bottle fill” dispense time for each water type. Minimum dispense time: 5 seconds. Maximum dispense time: 15 seconds (default). 3.5.5 Light sensor Follow the on screen instructions. Ensure the ambient light in the room is typical for operating conditions. -
Page 27: Quiet Mode
SECTION 3: Command Centre Screen 3.5.6 Quiet mode Lowering the fan speed can reduce noise. Increasing it may improve chilling performance. Residential models: 75% / 100% / Auto (default). Commercial models: 100% (default) / Auto. 3.5.7 Advanced settings 1 ADVANCED SETTINGS 1 12:12 PM Periodic Pulse Reduced Cavitation Mode Hot setpoint must be <... -
Page 28: Advanced Settings 2 (Wave Tap Only)
SECTION 3: Command Centre Screen 3.5.8 Advanced settings 2 (Wave Tap only) ADVANCED SETTINGS 2 12:12 PM Wave Tap Sensor Demister Mode Allows Control of Heating of Wave Tap Wave Tap Lock Mode Dual Sensors Required for Chilled/Sparkling Wave Tap Sensor Demister Mode •... -
Page 29: Safety & Security
SECTION 3: Command Centre Screen 3.6 Safety & security 3.6.1 Boiling safety (Not applicable to Touch-Free Wave Tap) BOILING SAFETY 12:12 PM Boiling safety lock Use the safety button to dispense hot water Hot isolation (additional boiling safety) 3 slow safety button presses required prior to dispensing Boiling safety lock •... -
Page 30: Passcode Protect
SECTION 3: Command Centre Screen 3.6.2 Passcode protect Activate passcode protection to limit access to certain settings. Users will be prompted for this passcode when attempting to access settings. Create a 4-digit passcode and re-enter, as prompted. The passcode will be deactivated if the HydroTap is reset (powered off and on again). -
Page 31: Energy Saving
SECTION 3: Command Centre Screen 3.7 Energy saving 3.7.1 Sleep mode • Disabled (default). • Enabled: Any attempt to dispense water will bring the HydroTap out of sleep mode. Allow sufficient time for the water to reach the set temperature. Sleep when... -
Page 32: On/Off Timer
SECTION 3: Command Centre Screen When sleeping Choose between the following modes: • Keep hot water at 68°C (default). Chilled water will be kept at setpoint, for chilled models. • Turn system OFF: boiling and chilled water will be OFF. 3.7.2 On/Off Timer The option that is in effect is highlighted. -
Page 33: Energy Use
SECTION 3: Command Centre Screen 3.7.2 On/Off Timer continued Select the day or range of days, then set the desired Off/ On times. Touch the tick to confirm and save. SET TIMER 12:12 PM Off at On at 3.7.3 Energy Use Track energy usage of your HydroTap by viewing the total energy consumed and the energy consumed since the last energy use reset. -
Page 34: Info & Logs
SECTION 3: Command Centre Screen 3.8 Info & logs INFO & LOGS 12:12 PM Filter System Recent About Logs Faults Faults System Filter Logs, System Faults, Recent Faults View the filter reset history, current and recent fault history. About System View the system information. -
Page 35: Section 4: User Maintenance
SECTION 4: User maintenance 4.1 Changing the internal filter The tap and screen will indicate that a filter needs to be changed. Depending on local water quality conditions and usage, the filter may require changing before the filter change indication is shown. You may also need to replace the filter if you notice an increase in chlorine, taste or odour. - Page 36 SECTION 4: User maintenance Moisten connector o-rings. Insert Rotate Push up Fit new filter. Initiate the filter flush programme by scrolling through the menu screen (see page 19). Clean up and dispose of old cartridge and packaging. If the HydroTap is switched off for a long period of time (e.g.
-
Page 37: Air Inlet Filter Maintenance
SECTION 4: User maintenance 4.2 Air inlet filter maintenance Remove and clean quarterly. Rinse off with tap water. Gently dry with a cloth or towel. Maintain at least a 50mm air gap in front of the air inlet screen at all times. Take care to keep the air inlet clear of blockage. -
Page 38: Cleaning
SECTION 4: User maintenance 4.3 Cleaning To clean all taps, Command Centre and ancillaries, wipe external surfaces with a gentle cleaning agent or a damp cloth and then wipe dry immediately with a clean, dry cloth. Do not use strong, corrosive, spray or abrasive cleaners. -
Page 39: Co2 Cylinder And Regulator
SECTION 4: User maintenance 4.4 CO2 cylinder and regulator Significant concentrations of CO2 gas can cause harm. To prevent leaks, read and use the instructions and safety documents provided with the replacement cylinder, together with these instructions. Components Cylinder valve Regulator Hose Regulator to... - Page 40 SECTION 4: User maintenance Universal G5 CO2 regulator Cylinder pressure Outlet Gas hose pressure connection Set to 3.0 bar Regulator control knob Cylinder connection 1.2kg cylinder non-adjustable regulator Regulator control knob Braided hose connection Cylinder connection 806835NZ v1.05 03.22 G5 User guide...
-
Page 41: Changing The 2.64Kg Co2 Cylinder
Adjust outlet pressure 3.0 bar. Test for leaks by brushing with soapy water and looking for bubbles. Reseal if leaking, or call Zenith for advice and assistance. Purge, reset and set the CO life, (see page 24). Test for leaks in these areas... -
Page 42: Changing The 1.2Kg Co2 Cylinder
3.0 bar. Test for leaks by brushing with soapy water and looking for bubbles. Reseal if leaking, or call Zenith for advice and assistance. Purge, reset and set the CO life, (see page 24). Test for leaks in these areas... - Page 43 Strap in place. valve. Test for leaks by brushing with soapy water and looking for bubbles. Reseal if leaking, or call Zenith for advice and assistance. Purge, reset and set the CO life, (see page 24). Test for leaks in these areas...
- Page 44 Zenith Heaters Limited IRD/GST No. 95 640 729 18 Kawakawa Place, Westgate, Auckland 0814 New Zealand Ph: +(64 9) 838 8612 | Free Call 0800 558 055 zenithwater.co.nz WMKA00099 AU02691 AS 3498 806835NZ v1.05 03.22 G5 User guide...