Table of Contents
Advertisement
Quick Links
Advertisement
Table of Contents

Related Manuals for Asus H97I-PLUS


Summary of Contents for Asus H97I-PLUS
- Page 1 H97I-PLUS...
- Page 2 INCIDENTAL, OR CONSEQUENTIAL DAMAGES (INCLUDING DAMAGES FOR LOSS OF PROFITS, LOSS OF BUSINESS, LOSS OF USE OR DATA, INTERRUPTION OF BUSINESS AND THE LIKE), EVEN IF ASUS HAS BEEN ADVISED OF THE POSSIBILITY OF SUCH DAMAGES ARISING FROM ANY DEFECT OR ERROR IN THIS MANUAL OR PRODUCT.
-
Page 3: Table Of Contents
Contents Safety information ...................... iv About this guide ......................iv Package contents ....................... vi H97I-PLUS specifications summary ................. vi Chapter 1: Product introduction Before you proceed ..................1-1 Motherboard overview ................. 1-2 Central Processing Unit (CPU) ..............1-4 System memory ................... 1-8 Expansion slots .................. -
Page 4: Safety Information
Safety information Electrical safety before relocating the system. When adding or removing devices to or from the system, ensure that the power cables for the devices are unplugged before the signal cables are connected. If possible, disconnect all power cables from the existing system before you add a device. Before connecting or removing signal cables from the motherboard, ensure that all power cables are unplugged. - Page 5 Refer to the following sources for additional information and for product and software updates. ASUS websites The ASUS website provides updated information on ASUS hardware and software products. Refer to the ASUS contact information. Optional documentation that may have been added by your dealer. These documents are not part of the standard package.
-
Page 6: Package Contents
* Hyper DIMM support is subject to the physical characteristics of individual CPUs. Please refer to Memory QVL (Qualified Vendors List) for details. ** Refer to www.asus.com for the Memory QVL (Qualified Vendors List). Expansion slots 1 x PCI Express 3.0 x16 slot ®... - Page 7 ASUS High-Quality Solid Capacitors - 2.5x Longer lifespan with excellent durability ASUS Stainless Steel Back I/O - 3x More durable corrosion-resistant coating Gaming Scenario ASUS audio features: Feel the sound power with different usage scenarios Steam OS Support (continued on the next page)
- Page 8 - Push Notice - Monitor your PC status with smart devices in real time - UEFI BIOS EZ Mode - featuring friendly graphics user interface - ASUS CrashFree BIOS 3 - ASUS EZ Flash 2 ASUS Q-Design - ASUS Q-Slot...
- Page 9 BIOS features 64 Mb Flash ROM, UEFI AMI BIOS, PnP, DMI 2.0, WfM 2.0, SM BIOS 2.8, ACPI 2.0a, Multi-language BIOS, ASUS EZ Flash 2, ASUS CrashFree function, F3 Shortcut functions, and ASUS DRAM SPD (Serial Presence Detect) memory information Manageability WfM 2.0, DMI 2.0, WOL by PME, PXE...
-
Page 11: Chapter 1: Product Introduction
Take note of the following precautions before you install motherboard components or change any motherboard settings. to static electricity. bag that came with the component. switched off or the power cord is detached from the power supply. Failure to do so ASUS H97I-PLUS... -
Page 12: Motherboard Overview
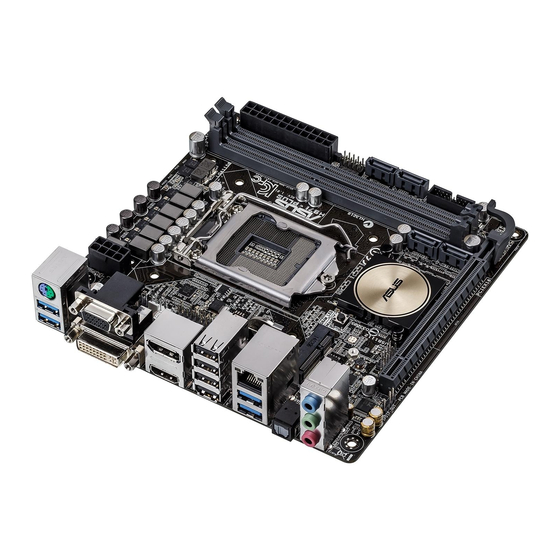
Motherboard overview cause you physical injury and damage to motherboard components. 1.2.1 Placement direction with external ports goes to the rear part of the chassis as indicated in the image. 1.2.2 Screw holes Place six screws into the holes indicated by circles to secure the motherboard to the chassis. Place this side towards the rear of the chassis... - Page 13 1.2.3 Motherboard layout 17cm(6.7in) KBMS_USB3_56 EATX12V CHA_FAN1 CHA_FAN2 CPU_FAN HDMI LGA1150 1442K Super USB7-10 LAN_USB3_34 MemOK! DRAM_LED Mini PCIe Intel ® AAFP SPDIFO 64Mb BIOS Intel I218V AUDIO CLRTC USB1112 PCIEX16 SPDIF_OUT ASUS H97I-PLUS...
-
Page 14: Central Processing Unit (Cpu)
1.2.4 Layout contents Connectors/Headers/Slots/LEDs Page 1-16 1-21 1-21 1-16 1-19 ® 1-14 1-11 1-14 1-19 Central Processing Unit (CPU) ® Pentium ® ® processors. H97I-PLUS CPU socket LGA1150 Chapter 1: Product introduction... - Page 15 1.3.1 Installing the CPU ASUS H97I-PLUS...
- Page 16 1.3.2 CPU heatsink and fan assembly installation before you install the heatsink and fan if necessary. Chapter 1: Product introduction...
- Page 17 To install the CPU heatsink and fan assembly To uninstall the CPU heatsink and fan assembly ASUS H97I-PLUS...
-
Page 18: System Memory
System memory 1.4.1 Overview Channel Sockets H97I-PLUS 240-pin DDR3 DIMM sockets 1.4.2 Memory configurations sockets. operation. ® ® ® motherboard. ® support site at less. 2.5 Ai Tweaker menu for manual memory www.asus.com Chapter 1: Product introduction... - Page 19 1.4.3 Installing a DIMM To remove a DIMM ASUS H97I-PLUS...
-
Page 20: Expansion Slots
Expansion slots the slots and the expansion cards that they support. cause you physical injury and damage motherboard components. 1.5.1 Installing an expansion card To install an expansion card: make the necessary hardware settings for the card. use. seated on the slot. 1.5.2 Configuring an expansion card 1.5.3... -
Page 21: Headers
– – Headers Clear RTC RAM (2-pin CLRTC) CLRTC Normal Clear CMOS Values (Open) (Short) H97I-PLUS Clear RTC RAM To erase the RTC RAM: Turn OFF the computer and unplug the power cord. enter data. battery. ASUS H97I-PLUS 1-11... -
Page 22: Connectors
Connectors 1.7.1 Rear panel connectors PS/2 Mouse/Keyboard combo port. keyboard. Video Graphics Adapter (VGA) port. DisplayPort. This port connects a display monitor or a home-theater system. USB 2.0 ports 7 ~ 10. LAN (RJ-45) port. LAN port LED indications Activity/Link LED Speed LED Status Description... - Page 23 Optical S/PDIF Out port. USB 3.0 ports 3 and 4. ® operating system. ® HDMI port. content. DVI-D port. ® ® display architecture design supports the following maximum supported pixel USB 3.0 ports 5 and 6. ASUS H97I-PLUS 1-13...
- Page 24 RSATA_TXP4 RSATA_TXN2 RSATA_TXN4 RSATA_RXN2 RSATA_RXN4 RSATA_RXP2 RSATA_RXP4 H97I-PLUS SATA 6.0Gb/s connectors AHCI RAID 2.6.3 PCH Storage Configuration for details. [AHCI] 2.6.3 PCH Storage Configuration for details. Digital audio connector (4-1 pin SPDIF_OUT) opening at the back of the system chassis.
- Page 25 IntA_P2_SSTX- IntA_P1_SSTX+ IntA_P2_SSTX+ IntA_P1_D- IntA_P2_D- IntA_P1_D+ IntA_P2_D+ H97I-PLUS USB3.0 connector ® USB 2.0 connector (10-1 pin USB1112) then install the module to a slot opening at the back of the system chassis. This connection speed. USB1112 PIN 1 H97I-PLUS USB2.0 connector...
- Page 26 Advanced Mode > Monitor > Chassis Fan 1/2 Q-Fan Control items in Speaker connector (4- pin SPEAKER) This 4-pin connector is for the chassis-mounted system warning speaker. The speaker allows you to hear system beeps and warnings. SPEAKER Speaker Out PIN 1 H97I-PLUS Speaker out connector 1-16 Chapter 1: Product introduction...
- Page 27 Front panel audio connector (10-1 pin AAFP) AAFP PIN 1 PIN 1 HD-audio-compliant Legacy AC’97 pin definition compliant definition H97I-PLUS Front panel audio connector HD Audio AC97]. M.2 Socket 3 M.2(SOCKET3) H97I-PLUS M.2(SOCKET3) ® ® ASUS H97I-PLUS...
- Page 28 Power OK -5 Volts +5 Volts +5 Volts PSON# +3 Volts -12 Volts +3 Volts +3 Volts PIN 1 H97I-PLUS ATX power connectors system will not boot. for details. TPM connector (20-1 pin TPM) PIN 1 PCICLK FRAME PCIRST# LAD3 LAD2...
- Page 29 HDD_LED+ PWR_LED+ PIN 1 H97I-PLUS System panel connector This connector is for the system power button. Pressing the power switch for more than This 2-pin connector is for the chassis-mounted reset button for system reboot without turning off the system power.
-
Page 30: Onboard Buttons And Switches
Onboard buttons and switches to enhance system performance. MemOK! button memory compatibility tuning for successful boot. H97I-PLUS MemOK! button 1.9 Onboard LEDs ® www.asus.com. www.asus.com Chapter 1: Product introduction... -
Page 31: Onboard Leds
Onboard LEDs Standby Power LED SB_PWR H97I-PLUS Onboard LED DRAM LED problem within a second. DRAM_LED H97I-PLUS DRAM LED ASUS H97I-PLUS 1-21... -
Page 32: Software Support
1.10 Software support 1.10.1 Installing an operating system ® ® ® detailed information. 1.10.2 Support DVD information To run the Support DVD The following screen is for reference only. Click an icon to display Support DVD/motherboard information Click an item to install 1-22 Chapter 1: Product introduction... -
Page 33: Chapter 2: Bios Information
Managing and updating your BIOS 2.1.1 EZ Update EZ Update Click to automatically update your motherboard’s driver, software and firmware Click to find and Click to select Click to select the BIOS a boot logo update the from file BIOS ASUS H97I-PLUS... - Page 34 2.1.2 ASUS EZ Flash 2 To update the BIOS using EZ Flash 2: Advanced Mode Tool ASUS EZ Flash 2 Utility Drive Folder Info Chapter 2: Getting started...
- Page 35 2.1.3 ASUS CrashFree BIOS 3 utility H97IPLUS.CAP Recovering the BIOS To recover the BIOS: 2.1.4 ASUS BIOS Updater Before updating BIOS ASUS H97I-PLUS...
- Page 36 ENTER to select boot device ESC to boot using defaults P2: ST3808110AS (76319MB) aigo miniking (250MB) UEFI: (FAT) ASUS DRW-2014L1T(4458MB) P1: ASUS DRW-2014L1T(4458MB) UEFI: (FAT) aigo miniking (250MB) Enter Setup ISOLINUX 3.20 2006-08-26 Copyright (C) 1994-2005 H. Peter Anvin A Bootable DVD/CD is detected.
- Page 37 8390656 2014-03-13 21:14:34 Drives Files panel panel Note [Enter] Select or Load [Tab] Switch [V] Drive Info [Up/Down/Home/End] Move [Esc] Exit Are you sure you want to update the BIOS? the Load Optimized Defaults Exit 2.10 Exit Menu ASUS H97I-PLUS...
-
Page 38: Bios Setup Program
BIOS setup program Entering BIOS Setup at startup To enter BIOS Setup at startup: Entering BIOS Setup after POST To enter BIOS Setup after POST: www.asus.com Load Optimized Defaults 2.10 Exit Menu 1.6 Headers for information BIOS menu screen EZ Mode and Advanced Mode... - Page 39 Displays the Rapid Storage Technology bootable devices Advanced mode menus Displays the CPU Fan’s speed. Click the button to manually Saves the changes Selects the boot tune the fans and resets the device priority system Loads optimized default settings ASUS H97I-PLUS...
- Page 40 2.2.2 Advanced Mode Advanced Mode EzMode(F7) Q-Fan control EZ Tuning Wizard MyFavorite Quick Note Language Hot Keys Menu bar Last modified Sub-menu item General help Configuration Scroll bar settings fields Menu items Goes back to EZ Mode Displays the CPU/motherboard temperature, CPU and memory voltage output Chapter 2: Getting started...
- Page 41 Menu bar My Favorites Main Ai Tweaker Advanced Monitor Boot Tool Exit Menu items Main Submenu items Language MyFavorites (F3) 2.3 My Favorites Q-Fan Control (F6) 2.2.3 QFan Control EZ Tuning Wizard (F11) 2.2.4 EZ Tuning Wizard ASUS H97I-PLUS...
- Page 42 Quick Note (F9) Hot keys Scroll bar General help Configuration fields Last Modified button 2-10 Chapter 2: Getting started...
- Page 43 Click to activate DC Click to activate to be configured Mode PWM Mode Select a profile to apply Click to apply to your fans the fan setting Click to undo Click to the changes go back to main menu ASUS H97I-PLUS 2-11...
- Page 44 Configuring fans manually Select Manual Click to manually Speed points configure your fans Apply Exit (ESC) 2-12 Chapter 2: Getting started...
- Page 45 2.2.4 EZ Tuning Wizard System OC setup RAID setup Tuning your system settings Next Daily Computing or Gaming/Media Editing Next Box cooler Tower cooler Water cooler Next I’m not sure Next ASUS H97I-PLUS...
- Page 46 Creating RAID RAID Next ® Easy Backup or Super Speed Next Next Easy Backup (RAID1) or Easy Backup (RAID10) Next Super Speed (RAID0) or Super Speed (RAID5) Next 2-14 Chapter 2: Getting started...
-
Page 47: My Favorites
My Favorites ASUS H97I-PLUS 2-15... - Page 48 Adding items to My Favorites Main menu panel Selected shortcut items Submenu panel Exit (ESC) 2-16 Chapter 2: Getting started...
-
Page 49: Main Menu
Main menu 2.4.1 Language [English] 狺甄勐 2.4.2 Security 1.6 Headers Administrator or User Password Not Installed Installed Administrator Password ASUS H97I-PLUS... - Page 50 To set an administrator password: Administrator Password Create New Password To change an administrator password: Administrator Password Enter Current Password Create New Password Administrator Password Not Installed User Password User Password Not Installed Installed To set a user password: User Password Create New Password To change a user password: User Password...
-
Page 51: Ai Tweaker Menu
Ai Tweaker menu 2.5.1 CPU Core Ratio [Auto] ® ASUS H97I-PLUS 2-19... - Page 52 CPU Core Ratio to [Sync All Cores] or [Per Core] 1-Core Ratio Limit [Auto] 2-Core Ratio Limit [Auto] 2.5.2 Min. CPU Cache Ratio [Auto] 2.5.3 Max. CPU Cache Ratio [Auto] 2.5.4 BCLK Frequency: DRAM Frequency Ratio [Auto] 2.5.5 DRAM Frequency [Auto] 2.5.6 Max.
- Page 53 EPU Power Saving Mode [Disabled] 2.5.9 DRAM Timing Control 2.5.10 External DIGI+ Power Control CPU Load-Line Calibration [Auto] CPU VRM Switching Frequency [Auto] [Manual] Fixed CPU VRM Switching Frequency (KHz) [300] CPU Power Phase Control [Auto] [Power Phase Response] ASUS H97I-PLUS 2-21...
- Page 54 [Power Phase Response] Power Phase Response [Fast] CPU Power Duty Control [T.Probe] CPU Current Capability [Auto] CPU Power Thermal Control [120] DRAM Current Capability [100%] DRAM Switching Frequency [Auto] [Manual] to [Manual] Fixed DRAM Switching Frequency (KHz) [300] 2-22 Chapter 2: Getting started...
- Page 55 Turbo Mode [Enabled] [Enabled] Turbo Mode Parameters Long Duration Package Power Limit [Auto] Package Power Time Window [Auto] Short Duration Package Power Limit [Auto] CPU Integrated VR Current Limit [Auto] CPU Internal Power Switching Frequency Frequency Tuning Mode [Auto] ASUS H97I-PLUS...
- Page 56 CPU Internal Power Fault Control Thermal Feedback [Auto] CPU Integrated VR Fault Management [Auto] CPU Internal Power Configuration CPU Integrated VR Efficiency Management [Auto] Power Decay Mode [Auto] Idle Power-in Response [Auto] Idle Power-out Response [Auto] Power Current Slope [Auto] Power Current Offset [Auto] Power Fast Ramp Response [Auto] 2-24...
- Page 57 Power Saving Level 3 Threshold [Auto] 2.5.12 Extreme Over-voltage [Disabled] 2.5.13 CPU Core Voltage [Auto] [Manual Mode] CPU Core Voltage Override [Auto] [Offset Mode] Offset Mode Sign [+] CPU Core Voltage Offset 2.5.14 CPU Cache Voltage [Auto] ASUS H97I-PLUS 2-25...
- Page 58 [Manual Mode] CPU Cache Voltage Override [Auto] Offset Mode Sign [+] CPU Cache Voltage Offset 2.5.15 CPU Graphics Voltage [Auto] [Manual Mode] Adaptive Mode CPU Graphics Voltage Override [Auto] Offset Mode Sign [+] CPU Graphics Voltage Offset [Auto] 2-26 Chapter 2: Getting started...
- Page 59 CPU System Agent Voltage Offset [Auto] 2.5.17 CPU Analog I/O Voltage Offset Mode Sign [+] CPU Analog I/O Voltage Offset [Auto] 2.5.18 CPU Digital I/O Voltage Offset Mode Sign [+] CPU Digital I/O Voltage Offset [Auto] 2.5.19 SVID Support [Auto] [Enabled] ASUS H97I-PLUS...
- Page 60 [Enabled] SVID Voltage Override [Auto] 2.5.20 CPU Input Voltage(VCCIN) [Auto] 2.5.21 DRAM Voltage [Auto] 2.5.22 PCH VLX Voltage [Auto] 2.5.23 PCH Core Voltage [Auto] 2.5.24 DRAM CTRL REF Voltage [Auto] 2.5.25 DRAM DATA REF Voltage on CHA/CHB [Auto] Chapter 2: Getting started...
-
Page 61: Advanced Menu
2.5.26 CPU Spread Spectrum [Auto] Advanced menu 2.6.1 CPU Configuration Intel Adaptive Thermal Monitor [Enabled] Hyper-threading [Enabled] ASUS H97I-PLUS 2-29... - Page 62 Active Processor Cores [All] Limit CPUID Maximum [Disabled] [Enabled] Execute Disable Bit [Enabled] Intel Virtualization Technology [Disabled] [Enabled] Hardware Prefetcher(L2 Cache) [Enabled] Adjacent Cache Line Prefetcher [Enabled] Boot Performance Mode [Max on-Turbo Performance] CPU Power Management Configuration Enhanced Intel SpeedStep Technology [Enabled] Turbo Mode [Enabled] Chapter 2: Getting started...
- Page 63 CPU C7 Report [CPU C7s] C7 Latency [Long] Package C State Support [Auto] 2.6.2 PCH Configuration Intel Rapid Start Technology Intel ® Rapid Start Technology [Disabled] ® ® [Enabled] Entry on S3 RTC Wake [Enabled] Entry After [0] ASUS H97I-PLUS...
- Page 64 Active Page Threshold Support [Enabled] for the Intel ® Active Memory Threshold [0] Hybrid Hard Disk Support [Disabled] Intel Smart Connect Technology [Disabled] Intel Smart Connect Technology Support [Disabled] 2.6.3 PCH Storage Configuration SATA Mode Selection [AHCI] [RAID] Pcie Nand Configuration [Auto] Chapter 2: Getting started...
- Page 65 Hot Plug [Disabled] (SATA6G_1 - SATA6G_4) 2.6.4 System Agent Configuration CPU Display Audio [Enabled] DVI Port Audio [Off] Graphics Configuration Primary Display [Auto] CPU Graphics Memory [Auto] Render Standby [Auto] ® CPU Graphics Multi-Monitor [Disabled] DMI Configuration DMI Gen 2 [Enabled] [Enabled] ASUS H97I-PLUS...
- Page 66 NB PCI-E Configuration PCI-Ex16_1 Link Speed [Auto] Memory Configuration Memory Scrambler [Enabled] [Enabled] Memory Remap [Enabled] [Enabled] 2.6.5 USB Configuration USB Devices Legacy USB Support [Enabled] Intel xHCI Mode [Smart Auto] EHCI Hand-off [Disabled] Mass Storage Devices [Auto] Chapter 2: Getting started...
- Page 67 Native ASPM [Disabled] ® PCH - PCI Express options DMI Link ASPM Control [Disabled] ASPM Support [Disabled] SA - PCI Express options DMI Link ASPM Control [Disabled] PEG ASPM Support [Disabled] 2.6.7 Onboard Devices Configuration HD Audio Controller [Enabled] ASUS H97I-PLUS...
- Page 68 item to [Enabled] Front Panel Type [HD] SPDIF Out Type [SPDIF] Depop [Enabled] Intel LAN Controller [Enabled] Intel LAN Controller item to [Enabled Intel LAN PXE Option ROM [Disabled] Charging USB devices in Power State S5 [Disabled] 2.6.8 Deep S4 [Disabled] Restore AC Power Loss [Power Off] Chapter 2: Getting started...
- Page 69 Power On By PS/2 Keyboard [Disabled] Power On By PCIE [Disabled] Power On By RTC [Disabled] 2.6.9 Network Stack Configuration Network Stack [Disabled] Ipv4 / Ipv6 PXE Support [Enabled] ASUS H97I-PLUS...
-
Page 70: Monitor Menu
Monitor menu 2.7.1 Qfan Tuning 2.7.2 CPU/ MB Temperature [xxxºC/xxxºF]/ [Ignore] Select [Ignore] 2.7.3 CPU Fan/ Chassis Fan 1/2 Speed [xxxx RPM]/ [Ignore]/ [N/A] [Ignore] 2.7.4 CPU Input Voltage (VCCIN), CPU Core Voltage, 3.3V Voltage, 5V Voltage, 12V Voltage [Ignore] 2.7.5 CPU Q-Fan Control [Enabled] Chapter 2: Getting started... - Page 71 25º º CPU Fan Max. Duty Cycle(%) [100] CPU Middle Temperature [45] CPU Fan Middle Duty Cycle(%) [60] CPU Lower Temperature [40] CPU Fan Min. Duty Cycle(%) [60] 2.7.6 Chassis Fan 1/2 Q-Fan Control [DC Mode] ASUS H97I-PLUS...
- Page 72 [PWM Mode] or [DC Mode] Chassis Fan 1/2 Q-Fan Source [CPU] Chassis Fan 1/2 Speed Low Limit [600 RPM] Chassis Fan 1/2 Profile [Standard] Chassis Fan 1/2 Profile Chassis Fan 1/2 Upper Temperature [70] ° range from 45° Chassis Fan 1/2 Max. Duty Cycle(%) [100] Chassis Fan 1/2 Middle Temperature [45] Chassis Fan 1/2 Middle Duty Cycle(%) [60] Chassis Fan 1/2 Lower Temperature [40]...
-
Page 73: Boot Menu
Boot menu 2.8.1 Fast Boot [Enabled] SATA Support [All Devices] USB Support [Partial Initialization] ASUS H97I-PLUS 2-41... - Page 74 PS/2 Keyboard and Mouse Support [Auto] Network Stack Driver Support [Disabled] Next Boot after AC Power Loss [Normal Boot] 2.8.2 Boot Logo Display [Auto] ® POST Delay Time [3 sec] Post Report [5 sec] 2.8.3 Bootup NumLock State [Enabled] 2.8.4 Wait for ‘F1’...
- Page 75 CSM (Compatibility Support Module) Launch CSM [Enabled] ® ® Boot Devices Control [UEFI and Legacy OpROM] Boot from Network Devices [Legacy OpROM first] Boot from Storage Devices [Legacy OpROM first] Boot from PCI-E/PCI Expansion Devices [Legacy OpROM first] ASUS H97I-PLUS...
- Page 76 2.8.10 Secure Boot ® OS Type [Windows UEFI mode] ® ® ® ® ® ® Key Management Install Default Secure Boot keys Clear Secure Boot keys Save Secure Boot Keys PK Management Delete PK Load Default PK 2-44 Chapter 2: Getting started...
- Page 77 KEK Management ® Delete KEK Load Default KEK Append Default KEK DB Management Delete the db Load Default db Append Default db dbx Management Delete the dbx Load Default dbx ASUS H97I-PLUS 2-45...
- Page 78 Append Default dbx 2.8.11 Boot Option Priorities ® ® 2.8.12 Boot Override 2-46 Chapter 2: Getting started...
-
Page 79: Tool Menu
Tool menu 2.9.1 ASUS EZ Flash 2 Utility 2.1.2 ASUS EZ Flash 2 2.9.2 Setup Animator [Enabled] 2.9.3 ASUS Overclocking Profile Overclocking Profile Not assigned Load from Profile Profile Name Save to Profile Load/Save Profile from/to USB Drive ASUS H97I-PLUS... -
Page 80: Exit Menu
2.9.4 ASUS SPD Information DIMM Slot number [DIMM_A1] 2.10 Exit menu Load Optimized Defaults Save Changes & Reset Discard Changes & Exit Launch EFI Shell from USB drives Chapter 2: Getting started... -
Page 81: Appendices
Appendices Notices Federal Communications Commission Statement This device complies with Part 15 of the FCC Rules. Operation is subject to the following two conditions: This device may not cause harmful interference. This device must accept any interference received including interference that may cause undesired operation. - Page 82 ASUS Recycling/Takeback Services ASUS recycling and takeback programs come from our commitment to the highest standards for protecting our environment. We believe in providing solutions for you to be able to responsibly recycle our products, batteries, other components as well as the packaging materials.
-
Page 83: Asus Contact Information
+1-510-739-3777 +1-510-608-4555 Web site http://www.asus.com/us/ Technical Support Support fax +1-812-284-0883 General support +1-812-282-2787 Online support http://www.service.asus.com/ ASUS COMPUTER GmbH (Germany and Austria) Address Harkort Str. 21-23, D-40880 Ratingen, Germany +49-2102-959931 Web site http://www.asus.com/de Online contact http://eu-rma.asus.com/sales Technical Support Telephone +49-2102-5789555... - Page 84 Appendices...