Table of Contents
Advertisement
Quick Links
Advertisement
Table of Contents

Related Manuals for Grizzly G0700


Summary of Contents for Grizzly G0700
- Page 1 Copyright © JULy, 2010. By grizzLy indUstriaL, inC. Warning: no portion of this manual may be reproduced in any shape or form Without the Written approval of grizzly industrial, inc. (For MaChines ManUFaCtUred sinCe 8/09) #tr12474 printed in taiWan...
- Page 2 This manual provides critical safety instructions on the proper setup, operation, maintenance and service of this machine/equipment. Failure to read, understand and follow the instructions given in this manual may result in serious personal injury, including amputation, electrocution or death. The owner of this machine/equipment is solely responsible for its safe use.
-
Page 3: Table Of Contents
... 52 outfeed table ... 53 narrow-rip auxiliary Fence & push Block .. 54 section 6: aftermarKet accessories from grizzly ... 56 section 7: maintenance ... 58 schedule ... 58 Cleaning ... 58 Unpainted Cast iron ... 58 Lubrication ... -
Page 4: Introduction
Model g0700. it may or may not be used, depending on if the workpiece is faced with laminate, melamine, or other solid surface material, or if tear-out free cuts are required. -
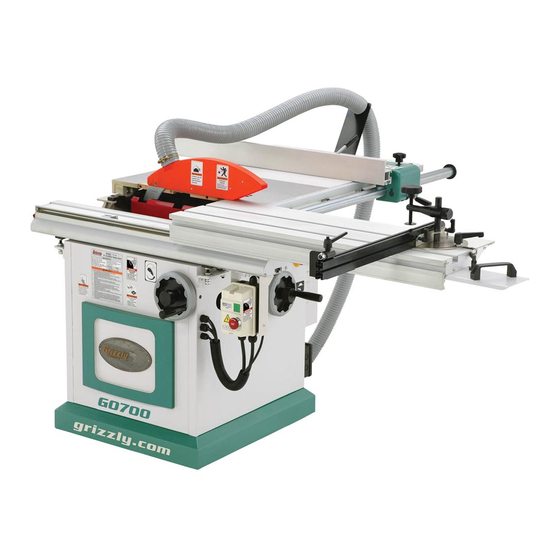
Page 5: Identification
Upper Blade guard riving Knife Blade elevation handwheel riving Knife Main Blade Lower Blade guard scoring Blade Model g0700 (Mfg. since 8/09) identification rip Fence Miter Fence Flip stop Junction Box start/stop switch table insert rip Fence Fine adjust Knob... -
Page 6: Machine Data Sheet
Customer Service #: (570) 546-9663 · To Order Call: (800) 523-4777 · Fax #: (800) 438-5901 MODEL G0700 10" SLIDING TABLESAW WITH SCORING Product Dimensions: Weight... 473 lbs. Length/Width/Height... 47 x 71 x 48 in. Foot Print (Length/Width)... 27-1/2 x 25-1/2 in. - Page 7 The information contained herein is deemed accurate as of 9/16/2010 and represents our most recent product specifications. Model G0700 Due to our ongoing improvement efforts, this information may not accurately describe items previously purchased. Model g0700 (Mfg. since 8/09) PAGE 2 OF 2...
-
Page 8: Sliding Table
Customer Service #: (570) 546-9663 • To Order Call: (800) 523-4777 • Fax #: (800) 438-5901 model g0700 10" SlIdINg TABle SAW 34" Ripping Width ⁄ " ⁄ " Miter Cut +45° w/Miter Fence " Maximum Cutting Length (w/o Scoring Blade) -
Page 9: Section 1: Safety
Be aware of dust hazards associated with each workpiece material, and always wear a NIOSH-approved respirator to reduce your risk. Model g0700 (Mfg. since 8/09) g0700 10" sliding table saw WEARING PROPER APPAREL. Do not wear clothing, apparel, or jewelry that can become entangled in moving parts. - Page 10 Alwaysrepairorreplacedamagedormis-adjust- edpartsbeforeoperatingmachine. EXPERIENCING DIFFICULTIES. If at any time you are experiencing difficulties performing the intended operation, stop using the machine! Contact our Technical Support Department at (570)546-9663. Model g0700 (Mfg. since 8/09)
-
Page 11: Additional Safety For Sliding Table Saws
Model g0700 (Mfg. since 8/09) riving Knife alignment. if the riving knife is not aligned with the saw blade, the workpiece could bind and cause kickback. always make sure the riving knife is in proper alignment with the saw blade. -
Page 12: Preventing Kickback
Model g0700 (Mfg. since 8/09) -
Page 13: Glossary Of Terms
Become familiar with these terms for assembling, adjusting or operating this machine. -
Page 14: Section 2: Power Supply
If this machine will be connected to a shared circuit where mul- tiple machines will be running at the same time, consult a qualified electrician to ensure that the circuit is properly sized for safe operation. Model g0700 (Mfg. since 8/09) -
Page 15: Grounding Instructions
LOCKING PLUG Current Carrying Prongs figure 1. typical L6-30 plug and receptacle. Model g0700 (Mfg. since 8/09) Serious injury could occur if you connect the machine to power before completing the setup process. DO NOT connect to power until instructed later in this manual. -
Page 16: Section 3: Setup
-14- unpacking the Model g0700 was carefully packed when it left our warehouse. if you discover the machine is damaged after you have signed for delivery, please immediately call Customer Service at (570) 546-9663 for advice. -
Page 17: Hardware Recognition Chart
-15- Model g0700 (Mfg. since 8/09) -
Page 18: Inventory
Fence round rail assembly ... 1 g. rip Fence scale ... 1 h. rip Fence ... 1 rip Fence Base ... 1 rip Fence handles ... 2 figure 4. rip fence components. Model g0700 (Mfg. since 8/09) ⁄ " ... 2... - Page 19 Wrench 19/22mm ... 1 s. scoring Blade ... 1 Main Blade ... 1 figure 5. Miscellaneous components. Model g0700 (Mfg. since 8/09) fasteners (grouped by usage) Cap screws M10-1.5 x 25 (ext. table) ... 5 Flat Washers 10mm (ext. table) ... 5 Lock Washers 10mm (ext.
-
Page 20: Cleanup
(Do not use a metal scraper or you may scratch your machine.) Repeat Steps 2–3 as necessary until clean, then coat all unpainted surfaces with a quality metal protectant to prevent rust. Model g0700 (Mfg. since 8/09) inhaled. -
Page 21: Site Considerations
Only install in an access restricted location. 63" Model g0700 (Mfg. since 8/09) Physical Environment The physical environment where your machine is operated is important for safe operation and the longevity of its components. For best results,... -
Page 22: Moving & Placing Table Saw
There are three options for leveling the saw: 1) Place it on a mobile base (Grizzly Model G7315Z) and use the mobile base adjustable feet to level it, 2) shim under the... -
Page 23: Assembly & Setup
Model g0700 (Mfg. since 8/09) figure 11. extension wing mounted and adjusted evenly with the cast iron table. - Page 24 (see figures 15-16). Lock the fence by tightening the fence lock handle. Clamping plate figure 16. installing the rip fence. Model g0700 (Mfg. since 8/09) handles M10-1.5 x 12 Fence Lock handle...
- Page 25 13. thread (2) M5-.8 x 12 cap screws with 5mm lock washers through the switch bracket and into the sliding table base (see figure 19), then tighten the cap screws. Model g0700 (Mfg. since 8/09) remove shipping Brace figure 19. Magnetic switch installed.
- Page 26 24. re-install the large round washer on the end of the fence rail to prevent the fence body from sliding off when moved backward. roller set screw hex Bolt Model g0700 (Mfg. since 8/09)
- Page 27 31. (this step is mandatory.) figure 25. Blade guard installed. 27. install the miter gauge as shown in figure Miter gauge figure 26. Miter gauge installed. Model g0700 (Mfg. since 8/09) 28. install the hose support as shown in figure hose support Blade guard...
- Page 28 29. figure 29. dust hose support in use. tip: the two dust ports can be connected together at the machine with the optional grizzly accessories shown in figure 30. ⁄ " dust hose to h1215 4" Quick Fit sleeve 4"...
-
Page 29: Power Connection
Loosen the strain relief and slide the power cord through it and into the junction box. Model g0700 (Mfg. since 8/09) attach the hot wires to the terminals across from the wires marked "s" and "r" (see figure 32), and attach the ground wire to the terminal across from the green wire tagged with the ground symbol. -
Page 30: Test Run
Call tech support for advice before proceeding any further with the test run or machine operations. if you successfully completed steps 1–4 above, congratulations! the table saw is now ready for cutting operations. Model g0700 (Mfg. since 8/09) -
Page 31: Section 4: Operations
"how to" books before beginning any projects. regardless of the content in this section, grizzly industrial will not be held liable for accidents caused by lack of training. Model g0700 (Mfg. since 8/09) operation overview... -
Page 32: Workpiece Inspection
Figure below. Examples of through cuts are rip cuts, cross cuts, miter cuts, and beveled cuts. The blade guard assembly MUST be used when performing through cuts. figure 36. example of a through cut (blade guard not shown for illustrative clarity). Model g0700 (Mfg. since 8/09) -
Page 33: Blade Guard & Riving Knife
(reaching behind the blade is a major safety risk and should not be done). Model g0700 (Mfg. since 8/09) To ensure that the riving knife works safe- ly, it MUST be aligned with and correctly adjusted to the blade. - Page 34 Knife mounting block on page 66. Riving Knife Minimum 3mm Maximum 8mm Table Top Alignment Riving Knife Table Alignment Zone Straightedge Model g0700 (Mfg. since 8/09)
-
Page 35: Blade Requirements
Model g0700 (Mfg. since 8/09) blade requirements the riving knife included with this machine is 0.090" (2.3mm) thick and is only designed for 10"... - Page 36 The blade angle is adjustable on the hub, and the width of the dado cut is controlled by the angle setting of the blade. figure 48. stacked dado blade. Model g0700 (Mfg. since 8/09)
-
Page 37: Changing Main Blade
Before proceeding with the next step, wear gloves to protect your hands while handling and installing the blade. Model g0700 (Mfg. since 8/09) Use the arbor wrenches to remove the arbor nut and arbor flange, as shown in figure 50, then pull the old blade off the arbor. The arbor nut has left-hand threads and loosens by turning clockwise. -
Page 38: Changing/Adjusting Scoring Blade
Model g0700 has wedge shaped teeth. With this style of scoring blade, the kerf thickness is adjusted by changing the height of the scoring blade. raising the scor- ing blade higher increases the kerf thickness. -
Page 39: Rip Cutting
55. figure 55. traditional rip cutting. Model g0700 (Mfg. since 8/09) rip cutting with sliding table install the miter fence on the sliding table, as shown in figure 56. - Page 40 Lock the sliding table in a stationary position in front of the saw. (the table will only lock in place when it is centered in front of the saw and the sliding table lock is in the locked posi- tion (see figure 57).
-
Page 41: Crosscutting
Model g0700 can crosscut with the fence in the forward or rear position, although it is easier to load large workpieces with the miter fence mounted in the forward position (see figure 60). figure 60. Crosscutting with miter fence in the forward position. -
Page 42: Miter Cutting
Load the workpiece onto the table saw (similar to figure 65) and perform the cutting operation in the same manner as a crosscut. Model g0700 (Mfg. since 8/09) -
Page 43: Dado Cutting
Model g0700 (Mfg. since 8/09) installing dado blade disConneCt saW FroM poWer! Move the sliding table out of the way to expose the lower blade cover. - Page 44 (depth of dado channel desired). set the saw up for the type of cut you need to make, depending on if it is a rip cut (page 37) or crosscut (page 39).
-
Page 45: Rabbet Cutting
Cuts 3+ Workpiece figure 73. successive cuts in the middle to complete the dado. Model g0700 (Mfg. since 8/09) rabbet cutting Commonly used in furniture joinery, a rabbet is an L-shaped groove cut in the edge of the workpiece. rabbets can be cut with either a dado blade or a standard saw blade. - Page 46 Lay the workpiece on its side, as shown in figure 77, adjust the saw blade height to intersect with the first cut, and perform the second cut to complete the rabbet. Workpiece figure 77. second cut to create a rabbet. Fence Blade Fence Model g0700 (Mfg. since 8/09)
-
Page 47: Resawing
⁄ ". Model g0700 (Mfg. since 8/09) making resaw barrier the resaw barrier acts in tandem with the rip fence when resawing to provide tall support for the workpiece to minimize the probability of it binding against the blade and causing kickback. -
Page 48: Resawing Operations
Always replace guard after completing the cut! plug in the table saw, turn it ON, and use a push stick to feed the workpiece through the blade using a slow, steady feed rate. -
Page 49: Section 5: Shop Made Safety Accessories
3 will bend without breaking. Model g0700 (Mfg. since 8/09) Cut a 30º angle at one end of the board. Make a series of end cuts with the grain ⁄... - Page 50 49. ⁄ " hole in the center of the bar, then ⁄ "-20 flat head ⁄ "-20 x flat head screw, flat washer, (Side View) Flat Washer Featherboard Miter Bar Flat Head Screw components. Model g0700 (Mfg. since 8/09)
- Page 51 Mount a second featherboard to the fence with another clamp (see figure 84), then repeat step 5 to ensure it is secure. Model g0700 (Mfg. since 8/09) mounting featherboard in miter slot Lower the saw blade, then adjust the fence to the desired width and secure it.
-
Page 52: Push Sticks
Push Stick Prohibition Zone Store Push Stick Here for Easy Access Blade Push Stick Path Feeding SIZING: Push stick must be at least 15 ⁄ " long. Use ⁄ "– ⁄ " thick material. Model g0700 (Mfg. since 8/09) -
Page 53: Push Blocks
" Grid figure 91. template for a shop-made push block (shown at 50% of full size). Model g0700 (Mfg. since 8/09) the notched end of the push block is then used to push the workpiece the rest of the way through the cut, keeping the operator's hands at a safe distance from the blade. -
Page 54: Zero-Clearance Insert
⁄ " wide. in new insert. ⁄ " drill bit to drill holes completely ⁄ " drill bit and use the included Model g0700 (Mfg. since 8/09) -
Page 55: Outfeed Table
Model g0700 (Mfg. since 8/09) 14. Close the cover over the blade and move the sliding table to the center of the saw. -
Page 56: Narrow-Rip Auxiliary Fence & Push Block
⁄ " Plywood ⁄ " Completed Fence ⁄ " material you used in the previ- " ⁄ Handle " ⁄ " ⁄ " ⁄ " ⁄ " ⁄ construction. Model g0700 (Mfg. since 8/09) ⁄ " " ⁄ ⁄ "... - Page 57 Keep the blade guard installed and in the down position. failure to do this could result in serious personal injury or death. Model g0700 (Mfg. since 8/09) place the workpiece 1" behind the blade and evenly against the table and the auxiliary fence.
-
Page 58: Section 6: Aftermarket Accessories From Grizzly
NOTICE refer to the newest copy of the grizzly catalog for other accessories available for this machine. 10" blades h5190—razor variable tooth carbide 50t h9146—heavy-duty atb carbide tip 60t... - Page 59 108. half-mask respirator with disposable cartridge filters. Model g0700 (Mfg. since 8/09) g1163—1hp dust collector g3591—30 micron replacement bag h4043—3.0 micron upgrade bag excellent point-of-use dust collector that can be used next to the machine with minimal duct- ing.
-
Page 60: Section 7: Maintenance
(free from cracks, fraying and wear) and operate under proper tension. -58- cleaning Cleaning the Model g0700 is relatively easy. Vacuum excess wood chips and sawdust from the table saw and inside the cabinet. Wipe off the before remaining dust with a dry cloth. -
Page 61: Lubrication
90°. From the front of the saw, smear a dab of grease in the front of the trunnion grooves on both sides. -
Page 62: Section 8: Service
3. replace bad belt(s), align pulleys, and re-tension. 4. Correct motor wiring connections. 5. test by rotating shaft; rotational grinding/loose shaft requires bearing replacement. 6. adjust to correct delay; replace module. 7. test/repair/replace. Model g0700 (Mfg. since 8/09) - Page 63 2. Lock knob is tight. to turn. 3. gears caked with dust. Model g0700 (Mfg. since 8/09) possible solution 1. inspect/replace stripped or damaged bolts/ 2. replace warped, bent, or twisted blade; 3. inspect/replace belts (refer to page 62).
-
Page 64: Belt Replacement
115, and push the tensioner against the scoring belt to take up any slack. = Pulley/Roller = Scoring Belt Tensioner Motor Pulley figure 115. scoring belt installation configuration. replace the motor cabinet door. Model g0700 (Mfg. since 8/09) scoring Belt tensioner... -
Page 65: Blade Tilt Calibration
0°, then tightening the cap screws. Model g0700 (Mfg. since 8/09) 45° stop disConneCt saW FroM poWer! adjust the blade angle until you hit the 45°... -
Page 66: Sliding Table Parallel Adjustment
10. tighten the hex nut on the parallel adjust- ment screw to secure it in place, then tighten the table mounting nuts. repeat steps 4–6 as necessary until the sliding table is parallel with the blade. parallel adjustment screw table Mounting nuts controls. Model g0700 (Mfg. since 8/09) -
Page 67: Sliding Table Adjustment
Model g0700 (Mfg. since 8/09) squaring miter fence to blade the accuracy of the miter fence angle is depen- dent on the accuracy of the sliding table paral- lelism adjustment. -
Page 68: Adjusting Riving Knife Mounting Block
32, close the blade cover, and move the sliding table back to the center position. Model g0700 (Mfg. since 8/09) -
Page 69: Section 9: Wiring
You can view these pages in color at www.grizzly.com. Model g0700 (Mfg. since 8/09) WIRE/COMPONENT DAMAGE. Damaged wires or components increase the risk of serious per- sonal injury, fire, or machine damage. If you notice... -
Page 70: Wiring Diagrams
MOTOR 5HP 220V SINGLE-PHASE 220 VAC L6-30 PLUG (AS RECOMMENDED) READ ELECTRICAL SAFETY -68- ON PAGE 67! Wiring diagrams Start Capacitor 400MFD 250VAC Capacitor 30MFD 500VAC Ground EMERGENCY STOP SWITCH BLADE GUARD LIMIT SWITCH POWER CONNECTION Model g0700 (Mfg. since 8/09) -
Page 71: Electrical Components
123. power junction box wiring. figure 125. Magnetic switch wiring. figure 124. emergency stop button wiring. READ ELECTRICAL SAFETY -69- Model g0700 (Mfg. since 8/09) ON PAGE 67! -
Page 72: Section 10: Parts
10: parts cabinet -70- Model g0700 (Mfg. since 8/09) -
Page 73: Cabinet Parts List
PB01M HEX BOLT M10-1.5 X 30 PW04M FLAT WASHER 10MM P0700027 FRONT PANEL P0700028 SWITCH SEAT Model g0700 (Mfg. since 8/09) REF PART # DESCRIPTION PSS74M SET SCREW M8-1.25 X 35 PCAP11M CAP SCREW M8-1.25 X 16 PLW04M LOCK WASHER 8MM P0700036 PLUG M10-1.5... -
Page 74: Handwheels
DESCRIPTION LOCK WASHER 8MM FLAT WASHER 8MM SUPPORT BRACKET ASSY CAP SCREW M8-1.25 X 50 LOCK WASHER 8MM BUSHING CAP SCREW M6-1 X 10 FLAT WASHER 6MM COPPER WASHER 16MM X 0.2T LOCK NUT M16-2 Model g0700 (Mfg. since 8/09) -
Page 75: Main Motor
-73- Model g0700 (Mfg. since 8/09) - Page 76 P0623X0262 BUSHING P0700263 ARBOR NUT 5/8-16 X 12 LH P0623X0264 BUSHING PLW06M LOCK WASHER 10MM P0700269 ATTACHMENT PLATE P0700270 COUPLING NUT M12-1.75 PBHS06M BUTTON HD CAP SCR M5-.8 X 12 PRP61M ROLL PIN 3 X 12 Model g0700 (Mfg. since 8/09)
-
Page 77: Blade Housing
PLN02M LOCK NUT M5-.8 P0700322 KEEPER PLATE P0700324 LOCK WASHER 5MM P0700325 P0623X0701 ARBOR FLANGE P0623X0702 SCORING SAW BLADE CSA 22MM Model g0700 (Mfg. since 8/09) blade housing REF PART # PCAP14M P0623X0704 P0623X0705 P6202-2RS P0623X0707 P0623X0708 PSS02M PSS02M P0623X0711... -
Page 78: Tables
-76- tables Model g0700 (Mfg. since 8/09) - Page 79 SLIDING TABLE END COVER PCAP115M BUTTON HD CAP SCR M6-1 X 16 PW03M FLAT WASHER 6MM P0623X0401 EXTENSION TABLE P0623X0402 CAST IRON TABLE Model g0700 (Mfg. since 8/09) tables parts list REF PART # P0623X0403 PCAP15M P0623X0405 PW02M P0623X0430 PB10M...
-
Page 80: Fence
505-22 505-02 505-21 505-15 505-03 505-16 505-17 505-04 505-23 505-24 505-18 505-14 505-13 505-12 505-11 505-05 505-06 505-10 505-09 505-19 505-25 505-07 505-20 505-08 511-9 511-8 511-10 511-1 511-7 511-6 511-4 511-5 511-3 511-2 -78- Model g0700 (Mfg. since 8/09) -
Page 81: Fence Parts List
505-13 PSS05M SET SCREW M5-.8 X 10 505-14 P0700505-14 CLAMP PLATE 505-15 P0700505-15 ECCENTRIC SHAFT 505-16 P0700505-16 PLASTIC BALL BEARING Model g0700 (Mfg. since 8/09) fence parts list PART # 505-17 PW03M 505-18 P0700505-18 505-19 P0700505-19 505-20 PFH30M 505-21 PLW03M... -
Page 82: Miter Gauge
HEX BOLT M6-1 X 12 FIXED PLATE HEX NUT M6-1 LOCK NUT M10-1.5 FLAT WASHER 10MM FLIP STOP FIXED SHAFT ADJUSTMENT HANDLE M6 X 30 SQUARE NUT M6-1 CLAMP FOOT CLAMP SHAFT ROLL PIN 3 X 20 PLASTIC KNOB Model g0700 (Mfg. since 8/09) -
Page 83: Labels & Miscellaneous
(800) 523-4777 or www.grizzly.com to order new labels. Model g0700 (Mfg. since 8/09) - Page 84 -82- Model g0700 (Mfg. since 8/09)
-
Page 85: Warranty Card
Do you think your machine represents a good value? Would you recommend Grizzly Industrial to a friend? Would you allow us to use your name as a reference for Grizzly customers in your area? Note: We never use names more than 3 times. - Page 86 FOLD ALONG DOTTED LINE FOLD ALONG DOTTED LINE Send a Grizzly Catalog to a friend: Name_______________________________ Street_______________________________ City______________State______Zip______ GRIZZLY INDUSTRIAL, INC. P.O. BOX 2069 BELLINGHAM, WA 98227-2069 TAPE ALONG EDGES--PLEASE DO NOT STAPLE Place Stamp Here...
-
Page 87: Warranty And Returns
WARRANTY AND RETURNS Grizzly Industrial, Inc. warrants every product it sells for a period of 1 year to the original purchaser from the date of purchase. This warranty does not apply to defects due directly or indirectly to misuse, abuse, negligence, accidents, repairs or alterations or lack of maintenance. - Page 88 Buy Direct and Save with Grizzly – Trusted, Proven and a Great Value! ® ~Since 1983~ Visit Our Website Today For Current Specials! ORDER 24 HOURS A DAY! 1-800-523-4777...