Electrolux TE1120 User Manual
Hide thumbs
Also See for TE1120:
- User manual (48 pages) ,
- User manual (32 pages) ,
- User manual (24 pages)
Table of Contents
Advertisement
Quick Links
Advertisement
Table of Contents

Related Manuals for Electrolux TE1120


Summary of Contents for Electrolux TE1120
- Page 1 User manual Tumble dryer TE1120 136936910/EN Original instructions 2021.09.27...
-
Page 3: Table Of Contents
Contents Contents 1 Safety Precautions ..........................5 General safety information......................6 Commercial use only........................6 Copyright ..........................6 Symbols............................6 2 Warranty terms and exclusions......................7 3 Product description..........................8 4 Accessories ............................9 Stacking kit..........................9 Draining kit ..........................9 Pedestal with the drawer ......................9 Coin operated machine ......................10 5 Control panel ............................ -
Page 5: Safety Precautions
User manual 1 Safety Precautions • Servicing shall be carried out only by authorized personnel. • Only authorized spare parts, accessories and consumables shall be used. • The machine is not to be used if industrial chemicals have been used for cleaning. •... -
Page 6: General Safety Information
The machine/machines covered by this manual is/are made for commercial and industrial use only. 1.3 Copyright This manual is intended solely for consultation by the operator and can only be given to third parties with the permis- sion of Electrolux Professional company. 1.4 Symbols Caution... -
Page 7: Warranty Terms And Exclusions
Warranty will be applicable where the customer has used only genuine spare parts and has performed maintenance in accordance with Electrolux Professional user and maintenance documentation made available in paper or elec- tronic format. Electrolux Professional strongly recommends using Electrolux Professional approved cleaning, rinse and descaling agents to obtain optimal results and maintain product efficiency over time. -
Page 8: Product Description
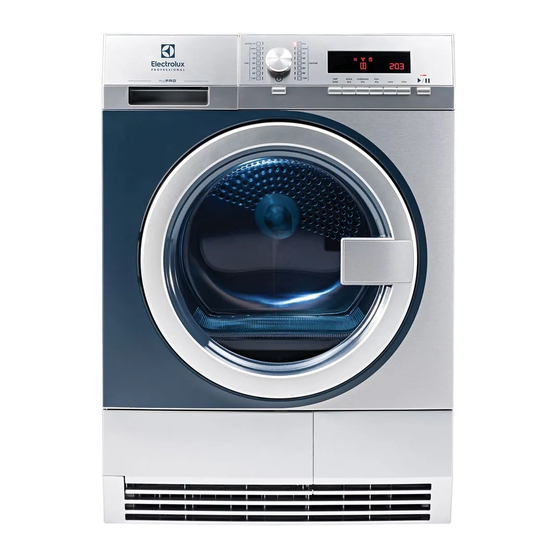
User manual 3 Product description fig.X02193 Water container Control panel Internal light Appliance door Filter Button for condenser door Airflow slots Adjustable feet Condenser door Condenser cover Locks for condenser cover Rating plate For ease of loading laundry or ease of installation the door is reversible. (see separate leaflet). -
Page 9: Accessories
User manual 4 Accessories 4.1 Stacking kit It is available from your authorized vendor. Stacking kit can be used only with the washing machines specified in the leaflet. See the leaflet attached. Read carefully the instructions supplied with the accessory. fig.X02238 4.2 Draining kit It is available from your authorized vendor (can be attached to some types of the tumble dryers). -
Page 10: Coin Operated Machine
User manual 4.4 Coin operated machine If the appliance is set in a public place, it can be connected to a coin operated machine. fig.X02241... -
Page 11: Control Panel
User manual 5 Control panel fig.X02194 Program dial Display Start/Pause button Options buttons Program indicators ON/OFF button with the Auto Off function 5.1 Display fig.X02195 Symbol on the display Symbol description Half load Dryness - extra dry Dryness - cupboard dry Dryness - iron dry Indicator: drain the water container Indicator: clean filter... -
Page 12: Coin Operated Machines
User manual 6 Coin operated machines • Insert correct amount of coins. When inserting coins, the display on the coin meter will count down to “00” and the machine will be ready to start. • Push the Start/Pause button to start the machine. -
Page 13: Programs
User manual 7 Programs There are two types of programs, automatic programs and time programs. • Automatic programs has moisture detection and will stop when selected dryness is achieved. • Time programs has no moisture detection and will stop when the preset or selected time has ended. The following table shows the available programs and a short description of those: Automatic programs Maximum load*... -
Page 14: Time
User manual 8.6 Time This allows the user to increase time of drying in steps of 5 minutes. 9 Before first use Before you use the appliance for the first time do these operations: • Clean the tumble dryer drum with a moist cloth. •... -
Page 15: Daily Use
User manual 10 Daily use 10.1 Preparing the laundry • Close the zippers. • Close the fasteners of the duvet covers. • Do not keep ties or ribbons loose (e.g. apron ribbons). Tie them before you start a program. • Remove all items from the pockets. •... -
Page 16: Setting A Program
User manual 10.5 Setting a program Use the program dial to set the program. The display shows cycle time or price to start. fig.X02213 10.6 Options Together with the program you can set one or more special options. fig.X02214 To activate or deactivate the option push the applicable button. When the option is activated the LED above the button or symbol on the display comes into the view. -
Page 17: Hints And Tips
User manual 11 Hints and tips 11.1 Ecological hints • Spin the laundry well before drying. • Do not exceed the load sizes which are specified in the programs chapter. • Clean the filter after each drying cycle. • Do not use fabric softener to wash and then dry. In the tumble dryer laundry becomes soft automatically. •... -
Page 18: Care And Cleaning
User manual 12 Care and cleaning 12.1 Cleaning the filter At the end of each cycle the symbol Filter appears on the display indicating that you must clean the filter. If the symbol Filter flashes on the display it indicates that the filter is missing. The tumble dryer cannot start. The filter collects the lint during the drying cycle. -
Page 19: Emptying The Water Container
User manual fig.X02227 5. If necessary, clean the filter with a vacuum cleaner. Close the filter. 6. If necessary, remove lint from the filter socket and gasket. You can use a vacuum cleaner. Place the filter back in- side the filter socket. fig.X02229 12.2 Emptying the water container Empty the condensed water container after each drying cycle. -
Page 20: Cleaning The Condenser
User manual 12.3 Cleaning the condenser If the symbol Condenser flashes on the display, the condenser and its compartment must be cleaned. To clean the condenser and its compartment: 1. Open the door. 2. Slide the release button on the bottom of the door to open the condenser door. fig.X02233 3. -
Page 21: Cleaning The Drum
User manual 7. Put the condenser back inside the bottom compartment. 8. Close the condenser cover. 9. Lock the two blockages until they snap. 10. Close the condenser door. 12.4 Cleaning the drum Warning Disconnect the appliance before you clean it. Use a standard neutral soap detergent to clean the inner surface of the drum and drum lifters. -
Page 22: Trouble Shooting
User manual 13 Trouble shooting Problem* Possible cause Remedy The tumble dryer is not connected to mains supply. Connect in at mains socket. Check fuse in fuse box (do- mestic installation). The loading door is opened. Close the loading door. The ON/OFF button was not pushed. -
Page 23: Technical Data
User manual 14 Technical data 14.1 Technical data – 230 V Height x Width x Depth 850 x 600 x 605 mm (maximal 648 mm) Max. depth with the appliance door open 1072 mm Max. width with the appliance door open 950 mm Adjustable height 850 mm (+ 15 mm - feet regulation) -
Page 24: Disposal Information
User manual 15 Disposal information 15.1 Disposal of appliance at end of life Before disposing of the machine, make sure to carefully check its physical condition, and in particular any parts of the structure that can give or break during scrapping. The machine’s parts must be disposed of in a differentiated way, according to their different characteristics (e.g. - Page 28 Electrolux Professional AB 341 80 Ljungby, Sweden www.electroluxprofessional.com...