Table of Contents
Advertisement
Quick Links
Extron USA - West
Extron USA - East
Extron Europe
Headquarters
+800.633.9876
+800.3987.6673
+800.633.9876
Inside USA / Canada Only
Inside Europe Only
Inside USA / Canada Only
+1.919.863.1794
+31.33.453.4040
+1.714.491.1500
+1.919.863.1797 FAX
+31.33.453.4050 FAX
+1.714.491.1517 FAX
© 2008 Extron Electronics. All rights reserved.
Extron Asia
Extron Japan
Extron China
Extron Dubai
+800.7339.8766
+81.3.3511.7655
+400.883.1568
+971.4.2991800
Inside Asia Only
+81.3.3511.7656 FAX
Inside China Only
+971.4.2991880 FAX
+65.6383.4400
+86.21.3760.1568
+65.6383.4664 FAX
+86.21.3760.1566 FAX
User's Manual
Composite Video and S-Video Line Driver
CSVEQ 100 D
with Audio
68-1598-01 Rev. A
08 08
Advertisement
Table of Contents

Related Manuals for Extron electronics CSVEQ 100 D


Summary of Contents for Extron electronics CSVEQ 100 D
- Page 1 +1.714.491.1517 FAX © 2008 Extron Electronics. All rights reserved. User’s Manual Extron China Extron Dubai +400.883.1568 +971.4.2991800 Inside China Only +971.4.2991880 FAX +86.21.3760.1568 +86.21.3760.1566 FAX CSVEQ 100 D Composite Video and S-Video Line Driver with Audio 68-1598-01 Rev. A 08 08...
- Page 2 Precautions Safety Instructions • English Warning Power sources • This equipment should be operated only from the power source This symbol is intended to alert the user of important indicated on the product. This equipment is intended to be used with a main power operating and maintenance (servicing) instructions in system with a grounded (neutral) conductor.
- Page 3 安全须知 • 中文 这个符号提示用户该设备用户手册中 有重要的操作和维护说明。 这个符号警告用户该设备机壳内有暴 露的危险电压,有触电危险。 注意 阅读说明书 • 用 户 使 用 该 设 备 前 必 须 阅 读 并 理 解 所 有 安 全 和 使 用 说 明 。 保存说明书 • 用户应保存安全说明书以备将来使 用。 遵守警告 • 用户应遵守产品和用户指南上的所有安 全和操作说明。...
- Page 5 Quick Start Guide — CSVEQ 100 D Installation and service must be performed by authorized personnel only. These line drivers must be used with UL approved, grounded electrical boxes. To install and set up the line driver, follow these steps and see the appropriate sections of this manual for details.
- Page 6 Quick Start — CSVEQ 100 D, cont’d When using long cables, follow these steps: Supply the color bars test signal to the input. (Recommendation: use an Extron VTG 300 Video Test Generator to generate the test signal.) Adjust the Gain control(s) for the output until the signal level at the far end is the same as the input (or the display shows the correct brightness and contrast).
-
Page 7: Table Of Contents
... 1-1 ... 1-2 ... 2-1 ... 2-2 ... 2-3 ... 3-1 ... 3-8 ...A-2 ...A-5 ...A-5 ... B-2 ... B-3 CSVEQ 100 D • Table of Contents ... 3-2 ... 3-4 ... B-1 68-1598-01 Rev. A 08 08 TOC-i... - Page 8 Table of Contents, cont’d TOC-ii CSVEQ 100 D • Table of Contents...
-
Page 9: Chapter One • Introduction
CSVEQ 100 D Chapter One Introduction About this Manual Features... -
Page 10: About This Manual
S-video plus audio signals up to 1000 feet (300 m) on Extron MHR or RG59 high resolution video cables and STP series audio cables. The CSVEQ 100 D mounts in a Decora style wallplate and is ideal for use in residential and commercial environments where video and audio signals need to be extended over a long distance. -
Page 11: Chapter Two • Installation
CSVEQ 100 D Chapter Two Installation Application Examples Installing the CSVEQ 100 D... -
Page 12: Application Example
Extron MPA 122 Mini Power Ampli er Projector Composite Video CSVEQ 100 D application example CSVEQ 100 D • Installation Installation and service must be performed by authorized personnel only. Balanced Audio S-Video I D E S - V... -
Page 13: Installing The Csveq 100 D
Installing the CSVEQ 100 D The CSVEQ 100 D is a wall-mounted product and can be mounted into an electrical wall box. This section includes site preparation, wall box installation, and the mounting of the line driver in the wall box. -
Page 14: Mounting The Line Driver
If the system is operating correctly, the line driver can be installed in the wall. Adjust the gain and equalization, and set the Audio Out switch to Stereo or Dual Mono before fastening the line driver into the wall box. The controls and cables will be inaccessible after installation. -
Page 15: Installing The Mud Ring Bracket
Installing the mud ring bracket The CSVEQ 100 D can also be installed using the included mud ring bracket. See the illustration below. Once the proper wall location for mounting the line driver has been determined, cut an opening in the wall using the proper mounting template found in the appendix. - Page 16 Installation using a mud ring CSVEQ 100 D • Installation Wall Extron Wall Mounting Bracket...
-
Page 17: Testing And Troubleshooting
If the problem is not resolved by changing the termination, try using a different input cable. Poor quality or damaged cable can cause ghosting and blooming. If the picture still is not displayed correctly, call the Extron S3 Sales and Technical Support Hotline. CSVEQ 100 D • Installation... - Page 18 Installation, cont’d CSVEQ 100 D • Installation...
-
Page 19: Chapter Three • Operation
CSVEQ 100 D Chapter Three Operation Front Panel Features and Operation Rear Panel Features and Operation Replacing the Decora Faceplate... -
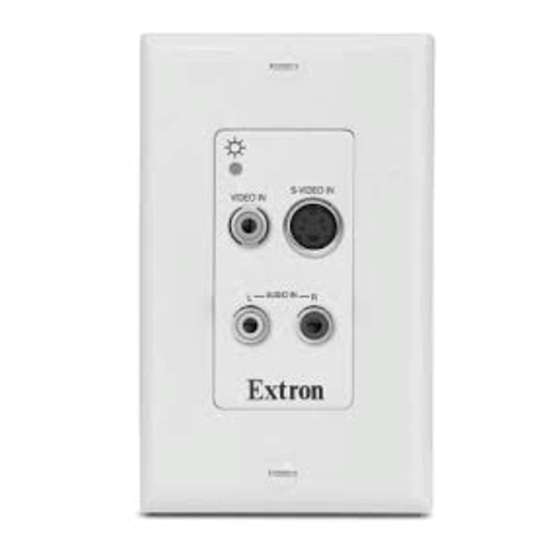
Page 20: Front Panel Features And Operation
Video input connector — Connect a composite video input source to this RCA connector. S-video input connector — Connect an S-video input source to this 4-pin mini DIN connector. See the following pinout table. S-video Pinout Table CSVEQ 100 D • Operation S-VIDEO VIDEO IN AUDIO IN NAME... - Page 21 Audio input connectors — Connect an unbalanced stereo audio source to these left (L) and right (R) RCA connectors. Wire the male connector as shown in the following illustration. Tip (+) Sleeve ( ) CSVEQ 100 D • Operation...
-
Page 22: Rear Panel Features And Operation
Operation, cont’d Rear Panel Features and Operation CSVEQ 100 D Rear Panel Power connector — Connect the external 12 VDC power supply into this 2-pin, 3.5 mm direct insertion connector. The power supply is included with the unit. The "Power supply wiring"... - Page 23 Set Audio Output jumper to Dual Mono. CAUTION Connect the sleeve to ground (Gnd). Connecting the sleeve to a negative (–) terminal will damage the audio output circuits. CSVEQ 100 D • Operation AUDIO OUTPUT CONFIG JUMPER POSITION OFF = DUAL MONO ON = STEREO...
-
Page 24: Power Supply Wiring
Wire the line driver's power connector as shown below. Smooth Power connector wiring To verify the polarity before connection, plug in the power supply with no load and check the output with a voltmeter. CSVEQ 100 D • Operation Ridges SECTION A–A Power Supply Output Cord Power supply voltage polarity is critical. -
Page 25: Gain Adjustment Control
This control produces an equalization adjustment ranging from 0 dB to + 7 dB (video and luma of S-video). The two power cord wires must be kept separate while the power supply is plugged in. Remove the power before wiring. CSVEQ 100 D • Operation... -
Page 26: Replacing The Decora Faceplate
Replacing the Decora Faceplate The front faceplate is replaced by removing the two rear panel mounting screws, replacing the faceplate, then reattaching the two screws, as shown in the CSVEQ 100 D example below. Faceplate (rear) Removing the CSVEQ 100 D faceplate CSVEQ 100 D •... -
Page 27: Appendix A • Specifications, Part Numbers, And Accessories
CSVEQ 100 D A ppendix A Specifications, Part Numbers, and Accessories Specifications Included Parts Optional Accessories... - Page 28 Return loss... -30 dB @ 5 MHz DC offset... ±5 mV with no input signal CSVEQ 100 D • Specifications and Parts -1 dB to +3 dB (x0.9 to x1.4), adjustable C of S-video: 0 dB to +10 dB (x1 to x3),...
-
Page 29: Audio Input
External power supply ... 100 VAC to 240 VAC, 50/60 Hz, external; Power input requirements ... 12 VDC, 0.2 A +6 dB balanced/unbalanced connector, 5 pole 1% THD+N with a 10k ohm load to 12 VDC, 2 A, regulated CSVEQ 100 D • Specifications and Parts... - Page 30 Warranty... 3 years parts and labor All nominal levels are at ±10%. Specifications are subject to change without notice. CSVEQ 100 D • Specifications and Parts 10% to 90%, noncondensing Operating: +32 to +122 °F (0 to +50 °C) /...
- Page 31 Included Parts These items are included in each order of the CSVEQ 100 D. Included parts CSVEQ 100 D (black, white) Faceplate, black (included with 60-951-02 only) Faceplate, white (included with 60-951-03 only) ® Decora wall plate, black included with 60-951-02 only) ®...
- Page 32 Specifications, Part Numbers, Accessories, cont’d Accessory MHR-2 SV mini high resolution S-video cables AV RCA cable STP cable CSVEQ 100 D • Specifications and Parts Part number 26-316-xx IN8906, IN8920 Various...
-
Page 33: Appendix B • Dimensions And Template
CSVEQ 100 D A ppendix B Dimensions and Template CVEQ 100 D Dimensions Cut-out Template... -
Page 34: Csveq 100 D Dimensions
2.83” (7.19 cm) 2.72” (6.91 cm) 1.92” (4.86 cm) 0.92” (2.32 cm) 0.11” (0.28 cm) 0.00” (0.00 cm) CSVEQ 100 D • Dimensions and Template 0.06” (0.15 cm) 0.10” (0.25 cm) Front View 0.00” (0.00 cm) 2.74” (6.96 cm) Side View... -
Page 35: Cut-Out Template
The template is not full size. 2.79" (7.09 cm) 1.75" (4.5 cm) SURFACE CUT-OUT AREA FURNITURE MOUNT CSVEQ 100 D • Dimensions and Template Wall Plate Location of Line Driver To install line driver directly into furniture or wall, cut along this line. - Page 36 Dimensions and Template, cont’d CSVEQ 100 D • Specifications and Parts...
- Page 37 CSVEQ 100 D • Specifications and Parts...
- Page 38 Dimensions and Template, cont’d CSVEQ 100 D • Specifications and Parts...