Advertisement
Quick Links
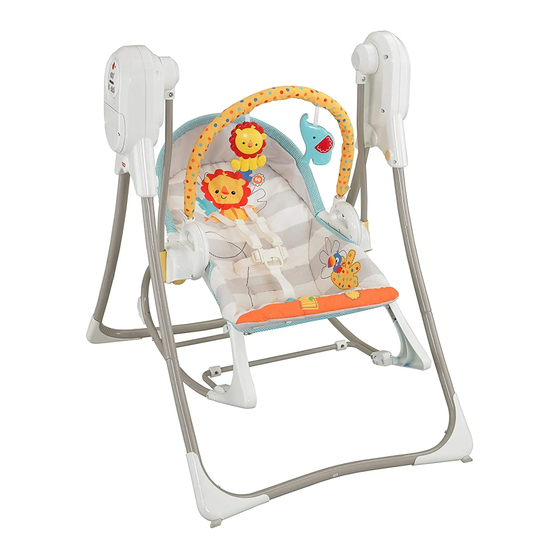
BFH06
IMPORTANT! KEEP FOR FUTURE REFERENCE.
Swing
Infant Seat
Toddler Rocker
Please read these instructions before assembly and use of this product.
Adult assembly is required. Tool needed for assembly: Phillips screwdriver (not included).
Requires four D (LR20) alkaline batteries (not included) for operation.
Product features and decorations may vary from photographs.
fisher-price.co.uk
1
Advertisement

Related Manuals for Fisher-Price BFH06


Summary of Contents for Fisher-Price BFH06
- Page 1 BFH06 IMPORTANT! KEEP FOR FUTURE REFERENCE. Swing Infant Seat Toddler Rocker Please read these instructions before assembly and use of this product. Adult assembly is required. Tool needed for assembly: Phillips screwdriver (not included). Requires four D (LR20) alkaline batteries (not included) for operation.
- Page 2 Great Britain: Vanwall Business Park, New Zealand: 16-18 William Pickering Maidenhead SL6 4UB. Drive, Albany 1331, Auckland. Helpline: 01628 500303. Malaysia: Diimport & Diedarkan Oleh: www.service.mattel.com/uk. Mattel SEA Ptd Ltd. (993532-P) Lot 13.5, Mattel Europa B.V., Gondel 1, 13th Floor, Menara Lien Hoe, Persiaran 1186 MJ Amstelveen, Nederland.
-
Page 3: Consumer Information
Consumer Information WARNING! To prevent serious injury or death from falls or being strangled in the restraint system: • Never leave the child unattended. • This product is not intended for prolonged periods of sleeping. • It is dangerous to use this product on an elevated surface, e.g. a table. •... - Page 4 Parts IMPORTANT! Please remove all parts from the package and identify them before assembly. Some parts may be packed in the pad. Cross Brace 2 Swing Bases 2 Feet 2 Swing Frames 2 Retainers with Lock Nut Pad with Seat Back Tube Hint: Please refer to the care section to remove the seat...
- Page 5 Assembly IMPORTANT! Before each use or assembly, Footrest inspect this product for damaged hardware, loose joints, missing parts or sharp edges. Do not use the product if any components are broken or missing. Do not use access- ories or replacement parts other than those approved by the manufacturer.
- Page 6 Assembly Screws Screws • Insert an M5 x 30 mm screw through the outside of each side rail and into the ends • Insert an M5 x 50 mm screw into each of the cross brace. foot and tighten. IMPORTANT! Please follow the next assembly (step 7) carefully to completely secure the cross brace to the side rails.
- Page 7 Assembly Press Buttons Pad with Seat Back Tube Side Rail Sockets Footrest • While pressing the buttons on the ends of the seat back tube (inside the pad), insert • Fit the lower pocket on the pad around the seat back tube into the sockets in each the footrest.
- Page 8 Assembly Shoulder Belt Swing Frame Lower Slots Hubs Bases Smaller Baby • Insert the ends of the shoulder belts through the lower slots in the seat • Position the swing frames so that the pad back. hubs face each other. •...
-
Page 9: Battery Installation
Battery Installation Hint: We recommend using alkaline Battery Safety Information batteries for longer battery life. In exceptional circumstances, batteries may leak fluids that can cause a chemical burn injury or ruin your product. To avoid battery leakage: 1,5V x 4 •... -
Page 10: Setup And Use
Setup and Use WARNING! To prevent serious injury or death from falls or being strangled in the restraint system: • Never leave the child unattended. • This product is not intended for prolonged periods of sleeping. • It is dangerous to use this product on an elevated surface, e.g. a table. •... - Page 11 Infant Seat Kickstand Adjustable Seat Back Upright Position Kickstand • Lift the seat back and fasten the strap Note: Use the kickstand only when using as buckles. Make sure you hear a “click”. an infant seat. • Rotate the kickstand out. Push down on the seat bottom to be sure the kickstand is in position.
-
Page 12: Securing Child
Securing Child Shoulder Belt TIGHTEN Shoulder Belt Waist Belt Waist Belt LOOSEN Crotch Belt • To tighten the waist belts: Feed the anchored end of the belt up through the buckle to form a loop . Pull the free end of the belt . - Page 13 Toy Bar Swing Setup Swing Hubs • Fit the plugs on each end of the toy bar into the sockets in each side rail. Hint: The toy bar is removable. Press the • Fit the seat onto the swing hubs. ends of the latches and lift the toy bar.
- Page 14 Soothing 6-speed Swing Power Switch Swing Speed Buttons Volume Buttons Music/Sounds Button Swing Music and Sounds • Slide the power switch ON. • Press the music/sounds button • Press the swing speed buttons turn music/sounds ON. Press the button select any of six speed settings. again to turn music/sounds OFF.
- Page 15 Rocker Use Swing Frame Storage PRESS PRESS • Insert the restraint belts back through the slots in the pad. • Lift to remove the seat from the swing frame. • Press the button on each swing frame and push the bases together. Pad Straps •...
- Page 16 Care • The pad is machine washable. Wash the pad Press Buttons separately in cold water on the gentle cycle. Do not use bleach. Tumble dry separately on low heat and remove promptly. • The swing and seat frames, toy bar and toys may be wiped clean using a mild cleaning solution and a damp cloth.