
Related Manuals for VocoPro FIELD-QUAD-H


Summary of Contents for VocoPro FIELD-QUAD-H
- Page 1 FIELD-QUAD CHANNEL A/B CHANNEL C/D 100% FIELD-QUAD-H FIELD-QUAD CHANNEL A/B CHANNEL C/D 100% FIELD-QUAD-B FIELD-QUAD-H/B Portable Four Channel Digital Wireless System OWNER’S MANUAL...
-
Page 2: Legal Disclaimer
VocoPro hereby disclaims any and all liabilities for property, equipment, building, and electrical damages, injuries to any persons, and direct or indirect economic loss associated with the use or reliance of any information contained within this document, and/or as a result of the improper, unsafe, insufficient and negligent assembly, installation, rigging, and operation of this product. -
Page 3: Listening For A Lifetime
Selecting fine audio equipment such as the unit you’ve just purchased is only the start of your musical enjoyment. Now it’s time to consider how you can maximize the fun and excitement your equipment offers. VocoPro and the Electronic Industries Association’s Consumer Electronics Group want you to get the most out of your equipment by playing it at a safe level. -
Page 4: Safety Instructions
Safety Instructions 10. Power Sources - The appliance should be connected to CAUTION a power supply only of the type described in the operating instructions or as marked on the appliance. RISK OF SHOCK 11. Grounding or Polarization - Precautions should be taken so that the grounding or polarization means of an appliance is not defeated. -
Page 5: Fcc Information
If these corrective measures do not produce satisfactory interference is observed. results, please contact your local retailer authorized to distribute Vocopro products. If you can not locate the NOTE: Please check the copyright laws in your country appropriate retailer, please contact Vocopro, before recording from records, compact discs, radio, 1728 Curtiss Court, La Verne, CA 91750. - Page 6 • Operate on license free, super low latency 900 MHz band, far away from TV, radio or Wi-Fi interference. • 300 feet of range, (line of sight) double the range of most digital wireless systems running on 2.4 GHz. FIELD-QUAD CHANNEL A/B CHANNEL C/D 100% FIELD-QUAD-H FIELD-QUAD CHANNEL A/B CHANNEL C/D 100% FIELD-QUAD-B...
-
Page 7: What's In The Box
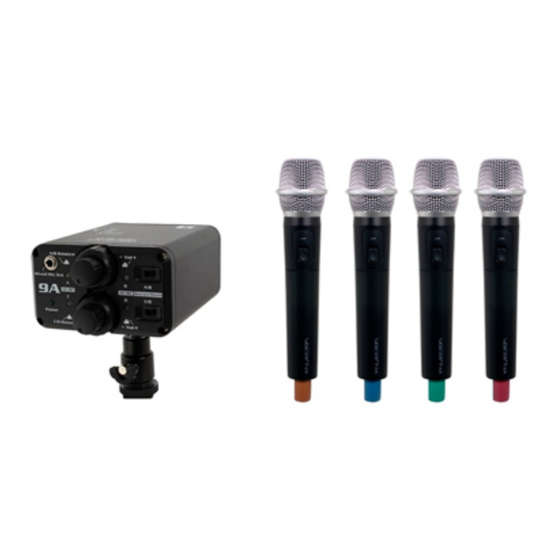
What’s in the Box Field-Quad-Handheld 1. Field-Quad Rechargeable Receiver 2. 4x Handheld Microphones (Field-Quad-H Only) 3. 2x SMA Male Antenna 4. USB Charging Cable 5. ⅛ Inch Audio Cable (TRRS to TRS) 6. ⅛ Inch Audio Cable (TRRS to TRS) 7. - Page 8 Functions and Descriptions Please note, in this manual we will be referring to channels A, B, C, and D for the controls, but your receiver may have channels EFGH, IJKL, or MNOP. Receiver Front Panel 1. Channel A and B volume knob: Turn clockwise to power on the receiver and increase the gain for mic A and mic B. 2.
-
Page 9: Balanced Output
Functions and Descriptions Receiver Panel 1. 5V Power Input: Use a Micro USB cable to charge the internal battery. 2. SMA Female Antenna Jacks: Connect the two antenna here. 3. Mic Out A: Output for mic A audio, if the Stereo/Mono switch is in the Stereo position. If the Mono/Stereo switch is in the Mono position, both Mic A and Mic B audio will output from here. - Page 10 Functions and Descriptions Receiver Top Panel 1. Channel A/B Power LED: This will light up solid green when you turn on channels A and B by turning the volume knob clockwise. If this light is flashing, the internal battery needs to be charged. 2.
- Page 11 Functions and Descriptions Handeheld Microphone - FIELD-QUAD-H Only 1. Mic Head: Picks up vocals. Note: Please hold within 5-6 inches of your mouth for best sound. 2. Mic ON/OFF Switch: Powers microphone ON/OFF. 3. Mic Battery LED: Indicates battery status.
- Page 12 Functions and Descriptions Bodypack Transmitter - FIELD-QUAD-B Only 1. Antenna: Transmits audio to receiver. 2. ON/OFF: Powers bodypack ON/OFF. 3. Power LED: Indicates battery level. a.) Solid Green LED: Battery level is healthy and good to use. b.) Blinking Red LED: Batteries are low and require changing soon. 4.
-
Page 13: Getting Connected
Getting Connected Attaching the Receiver to a Camera with the Cold Shoe Adapter • Screw the cold shoe adapter into the bottom of the receiver and turn until it is secure. • Slide the bottom of the built-in adapter into the camera’s shoe mount, and turn the thumb screw to secure it. - Page 14 Getting Connected ⅛ inch Mixed Mic Out to a Phone Use the ⅛ inch audio cable, TRRS to TRS, connect the angled TRS end into the Mixed Mic Out on the receiver and connect the straight TRRS end into your phone. If your phone does not have a headphone output jack you will need to use an adapter made by your phone’s manufacturer.
- Page 15 Getting Connected Mini-XLR out to a Mixer • Use Mini-XLR female to XLR male cables to connect from the Mic Out A-D on the Back Panel of the Receiver to your mixer. *Mini-XLR to XLR cables not included. Mic Out A Mic Out B ANT A Balanced Output...
-
Page 16: Troubleshooting
Troubleshooting The receiver is not powering on or the battery LED is flickering. • The internal battery is likely out of power and needs to be charged. • It takes about 4 hours to charge the battery from dead to full. What do I do if my mics are cutting out, or sound is not clear? •... - Page 17 Notes / 17...
- Page 18 Notes 18 \...
- Page 19 VocoPro does not, however, warrant it’s products against any and all defects: 1) arising out of material or workmanship not provided or furnished by VocoPro, 2) resulting from abnormal use of the product or caused by use in violation of...
- Page 20 TO VALIDATE YOUR WARRANTY: Fill out the attached warranty card, being sure to include the model and serial number of the unit since this is how warranty cards are tracked. If your VocoPro product was purchased in the U.S., mail the completed card directly to VocoPro within 10 days of the date of purchase. If you purchased the product outside the U.S.
- Page 21 LIMITED DOMESTIC WARRENTY Detatch this portion and mail it to the factory MODEL MANUFACTURE DATE SERIAL NO. ADDRESS OWNER’S NAME STATE CITY The following information is appreciated but not required: Dealer’s name and address: What other products and/or product changes would you like to see Manufactured? Any other comments: / 21...
- Page 22 Please do not return to the retailer if you are having a technical issue operating or connecting the unit. If you need additional help, have questions, or need support with your VocoPro product contact us: Toll Free: 800-678-5348 TEL: 909-593-8893...