Table of Contents
Advertisement
Quick Links
Advertisement
Table of Contents

Related Manuals for VocoPro DigiQuad-Conference V2


Summary of Contents for VocoPro DigiQuad-Conference V2
- Page 1 DigiQuad-Conference V2 ’...
-
Page 2: Legal Disclaimer
WELCOME And thank you for purchasing DigiQuad-Conference V2 from VocoPro. Along with quality products our commitment to customer satisfaction means we have technical support professionals ready to assist you. Be sure to visit our website- www.vocopro.com for the latest information on new products. -
Page 3: Listening For A Lifetime
Selecting fine audio equipment such as the unit you’ve just purchased is only the start of your musical enjoyment. Now it’s time to consider how you can maximize the fun and excitement your equipment offers. VocoPro and the Electronic Industries Association’s Consumer Electronics Group want you to get the most out of your equipment by playing it at a safe level. -
Page 4: Safety Instructions
Safety Instructions 10. Power Sources - The appliance should be connected to CAUTION a power supply only of the type described in the operating instructions or as marked on the appliance. RISK OF SHOCK 11. Grounding or Polarization - Precautions should be taken so that the grounding or polarization means of an appliance is not defeated. -
Page 5: Fcc Information
If these corrective measures do not produce satisfactory interference is observed. results, please contact your local retailer authorized to distribute Vocopro products. If you can not locate the NOTE: Please check the copyright laws in your country appropriate retailer, please contact Vocopro, before recording from records, compact discs, radio, 1728 Curtiss Court, La Verne, CA 91750. -
Page 6: What's In The Box
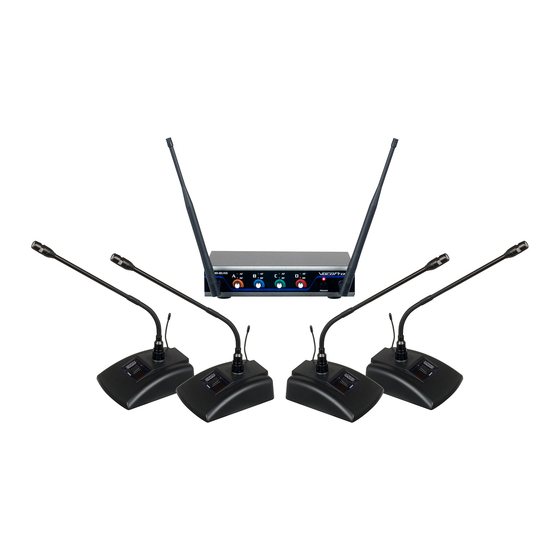
What's in the Box 4-Digital-Quad-Conference-V2 Microphones 1-Digital-Quad Receiver 2-Rack Ears (1 Long & 1 Short) 2-Antenna 1-13.5V Power Adapter 1-1/4-to-1/4 Mic Cable 1-Mounting Plate... - Page 7 Feature Diagram- Microphone 1. GRILL - Protects the microphone cartridge and helps reduce “breathy” and wind noise pick-up. 2. POWER SWITCH – Press once to turn the microphone power ON. While ON, press to mute and unmute the microphone. Hold down for 5 seconds to power off. The microphone will almost instantly pair with the receiver module once powered on.
- Page 8 Feature Diagram- Receiver Receiver - Front Panel 1. ON/OFF Button - Powers the receiver ON/OFF. 2. MIC VOLUME - Adjusts the volume of their respective microphone channels. 3. RF LEDs - Registers Mic status: LED will shine when associated mic is powered on. 4.
- Page 9 Connect to Mixer Unbalanced 1/4" • Connect unbalanced 1/4" cable (included) to the unbalanced output from the Digital-Quad receiver. • Connect the other end of the 1/4" cable to a microphone input channel on a mixer/amplifi er. Rear Panel Digital-Quad Mixer Balanced XLR (Optional) •...
-
Page 10: Microphone Battery Installation
Battery Installation Insert 2 fresh 1.5-volt AA alkaline batteries Microphone Battery Installation 1. Locate Battery compartment underneath receiver. 2. To remove the lid, press down on the tab and lift the lid upwards. 3. Insert 2 AA batteries making sure the batteries sit in the correct direction according to polarity (+/-). 4. -
Page 11: Getting Connected
Getting Connected Attach the Conference microphone to the base transmitter. Match Pins and slotted groove of the Female XLR on the microphone to the pins of the Male XLR on the transmitter base and press down firmly. Tighten sleeve on the Microphone’s XLR connector by turning clockwise. Simply Turn the Microphone on by pressing the power switch. - Page 12 Rack Mounting 1 Receiver The Digital-Quad is packaged with the rack mounts to attach them inside a standard 19” case. The mounts allow for a single Digital-Quad receiver to be installed, or allow up to two to be racked together. Additional Digi-Quad Receivers are sold separately.
- Page 13 Rack Mounting 2 Receivers 1. Identify the two small mounts and one metal plate included with both systems. 2. Fix the metal plate onto the bottom of both receivers, as shown. Make sure three screws are used to mount the plate to the bottom of each receiver.
- Page 14 Adding Microphones The Digital-Quad-Conference-V2 has two Mini XLR inputs so you can connect the Digital-Conference-Extend (not included) for additional wired microphones. The audio from the wired microphone(s) and wireless microphone will be mixed together and all sent on the same wireless channel to the Digital-Quad-Conference receiver. Back of DigitalQuad-Conference-V2 Out to Digital Conference-Extend This Unit is Sold Separately...
-
Page 15: Frequently Asked Questions
Ensure the correct power supply is used with the Digital-Quad. • Inspect power supply cable for frayed wired or loose connections. • Find a suitable replacement for the original power supply; contact VocoPro for factory original parts at: 800-678-5348. / 15... - Page 16 Please do not return to the retailer if you are having a technical issue operating or connecting the unit. If you need additional help, have questions, or need support with your VocoPro product contact us: Toll Free: 800-678-5348 TEL: 909-593-8893...