
Related Manuals for EverFocus eIVP-CML-AI-D0000


Summary of Contents for EverFocus eIVP-CML-AI-D0000
- Page 1 Intel® 10th Gen. AI Box User’s Manual Copyright © EverFocus Electronics Corp. Release Date: September 2021...
- Page 2 All rights reserved. No part of the contents of this manual may be reproduced or transmitted in any form or by any means without written permission of the EverFocus Electronics Corporation. Intel Core is a registered trademark of Intel Corporation HDMI and VGA are trademarks of International Business Machines Corporation.
- Page 3 All cautions and warnings on the device should be noted. All cables and adapters supplied by EverFocus are certified and in accordance with the material safety laws and regulations of the country of sale. Do not use any cables or adapters not supplied by EverFocus to prevent system malfunction or fires.
- Page 4 FCC Statement This device complies with Part 15 FCC Rules. Operation is subject to the following two conditions: (1) this device may not cause harmful interference, and (2) this device must accept any interference received including interference that may cause undesired operation. Caution: There is a danger of explosion if the battery is incorrectly replaced.
-
Page 5: Table Of Contents
TABLE OF CONTENTS Introduction ..........................1 Features .......................... 1 Dimensions ........................2 Packing List ........................2 Front Panel ........................3 Rear Panel ........................3 Connection and Installation ....................4 Removing the Housing Cover ..................4 Memory Modules (SO-DIMM) Installation ..............5 M.2 SSD Module Installation .................. -
Page 6: Introduction
Chapter 1. Introduction The eIVP-CML-AI-D0000 is a small-sized AI Box adopting Intel® 10th Gen Intel® 10th Gen LGA1200 Processors CPU with Intel® H410 chipset. The small footprint makes it suitable to fit on any desk or rear monitors by using the VESA hole patterns. -
Page 7: Dimensions
Note: 1. Equipment configurations and supplied accessories vary by country. Please consult your local EverFocus office or agents for more information. Please also keep the shipping carton for possible future use. 2. Contact the shipper if any items appear to have been damaged in the shipping process. -
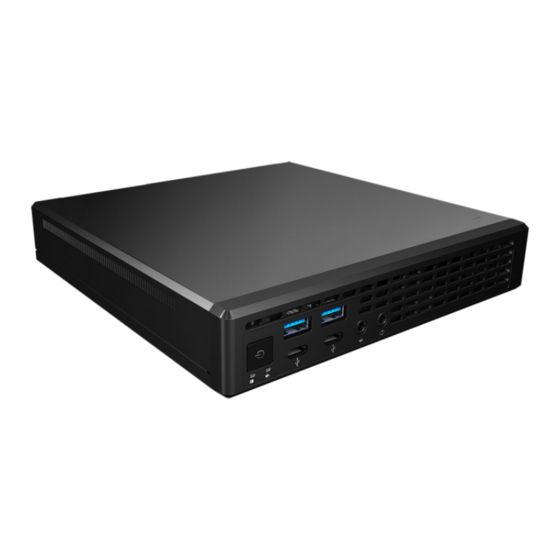
Page 8: Front Panel
AI Box 1.4 Front Panel Description Description Power Button (SW1). Press the button to USB 3.1 Gen1 Type-A Port (USB_2) quickly turn on/off the system. USB 3.1 Gen1 Type-A Port (USB_1) Microphone Input (AUDIO2) USB 3.1 Gen1 Type-C Port (USB31_TC_1) Headphone/Headset Jack USB 3.1 Gen1 Type-C Port (USB31_TC_2) -
Page 9: Connection And Installation
AI Box Chapter 2. Connection and Installation 2.1 Removing the Housing Cover Make sure the system is power-off. Unscrew the two screws on the rear panel, slightly pull the cover backward and then lift up the cover to remove it. -
Page 10: Memory Modules (So-Dimm) Installation
AI Box 2.2 Memory Modules (SO-DIMM) Installation You can install up to two 260-pin DDR4 SO-DIMM slots to the system. Note: It's not allowed to install any DDR rather than DDR4 into the DDR4 slots, such as DDR, DDR2 or DDR3, which may cause damage to the motherboard and SO-DIMM. -
Page 11: Ssd Module Installation
AI Box 2.3 M.2 SSD Module Installation The M.2 SSD socket (M2_1) supports SATA3 6Gb/s module and M.2 PCIe module up to Gen3 x4 (32Gb/s). 1. Prepare a M.2 SSD module and a screw. 2. Gently insert the M.2 SSD module into the M.2 slot. Please be aware that the M.2 SSD module only fits in one orientation. -
Page 12: Wifi/Bt Module Installation
AI Box 2.4 M.2 WiFi/BT Module Installation The M.2 key E socket supports type 2230 wireless (WiFi/BT) module. Note that this M.2 socket does not support SATA M.2 SSD. 1. Prepare a type 2230 wireless module and a screw. -
Page 13: Sata Hdd Installation
AI Box 2.5 2.5" SATA HDD Installation You can install one 2.5” SATA SSD/HDD inside the system. Make sure the system is power-off and remove the housing cover. Use the provided screws to secure the HDD on the HDD holder. -
Page 14: Vesa Mount Installation
AI Box 2.6 VESA Mount Installation You can use the provided VESA mount bracket and screw package to install the system on the rear side of a monitor. Screw the VESA mount plate to the rear side of a monitor. -
Page 15: Jumpers And Connectors On The Motherboard
AI Box Chapter 3. Jumpers and Connectors on the Motherboard 3.1 Motherboard Layout No. Description 2 x 260-pin DDR4 SO-DIMM Slots (DDR4_A1, DDR4_B1) CPU Fan Connector (CPU_FAN1) 2.5W Mono Out Speaker Header (MONO1) SATA3 Connector (SATA0) ROM Recovery Header (ROM_R) -
Page 16: Jumpers Setup
AI Box 3.2 Jumpers Setup The illustration shows how jumpers are setup. When the jumper cap is placed on the pins, the jumper is “Short”. If no jumper cap is placed on the pins, the jumper is “Open”. Clear CMOS Jumper... -
Page 17: Onboard Headers And Connectors
AI Box 3.3 Onboard Headers and Connectors Please note that the onboard headers and connectors are NOT jumpers. Do NOT place jumper caps over these headers and connectors, otherwise, it will cause permanent damage to the motherboard. CPU Fan Connectors (CPU_FAN1) -
Page 18: Smart Switch
3.4 Smart Switch The motherboard has one smart switch: Power Button. Power Button Power Button allows users to (SW1) quickly turn on/off the (see p.3, No. 1) system. - Page 19 FAX: +81 3 5820-1018 sales@everfocus.com www.everfocus.co.jp info@everfocus.co.jp Ihr EverFocus Produkt wurde entwickelt Your EverFocus product is designed and und hergestellt mit qualitativ manufactured with high quality materials hochwertigen Materialien und and components which can be recycled Komponenten, die recycelt und wieder and reused.