Table of Contents
Advertisement
Quick Links
Advertisement
Table of Contents

Related Manuals for AGFA 307


Summary of Contents for AGFA 307
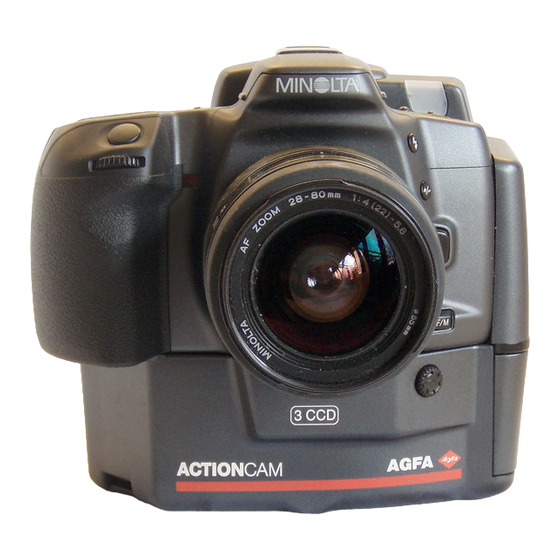
- Page 1 ACTIONCAM Owner’s Guide...
- Page 2 Trademarks ACTIONCAM, FotoTune and FotoFlavor are trademarks of Agfa- Gevaert, NV. Adobe is a trademark of Adobe Systems Inc., registered in the US. Adobe Photoshop and Adobe Acrobat are trademarks of Adobe Systems Inc. Apple and Macintosh are registered trademarks of Apple Computer Inc., registered in the US and other countries.
-
Page 3: Safety Regulations
To reduce the risk of electric shocks, do not disassemble the digital camera and/or accessories. Take them to an authorised Agfa Dealer whenever service or repair is required. Incorrect reassembly can cause electric shocks the next time the unit is used. -
Page 4: Ce Marking (Declaration Of Conformity)
We declare under sole responsibility that the Camera and options to which this declaration relates is in conformity with the below specifications. This declaration is valid for the area European Union (EU) only. Product Type: Digital Camera Product Name: ActionCam Options: Flash 5400HS, Objectiv AF24-85, AC Power... - Page 5 This equipment has been tested and found to comply with the limits for a Class B digital device, pursuant to Part 15 of the FCC rules. These limits are designed to provide reasonable protection against harmful interference in a residential installation. This equipment generates, uses and can radiate radio frequency energy and, if not installed and used in accordance with the instruction, may cause harmful interference to radio communications.
- Page 6 Please take the time to read through this owner's guide, for it contains information that is important for the proper and safe use and care of your camera. Enjoy! The AGFA ACTIONCAM is a compact digital camera with the following features: • The ACTIONCAM digital camera uses three CCD imaging arrays and a unique signal processing technique that allow it to photograph extremely high resolution images, up to 1.75 million pixels per image.
- Page 7 Introduction Welcome...
-
Page 8: For Proper And Safe Use
For proper and Safe use STANDARD SYMBOLS Various symbols are used throughout this owner's guide, and the product itself, for the proper and safe use of this product and to prevent personal injury, injury to others, and property damage. An explanation of the symbols follows. - Page 9 If the camera is dropped or subjected to an impact in which the interior is exposed, immediately remove the batteries and discontinue use. Do not disassemble. Call an AGFA dealer when repairs are required. Electric shock may occur if a high voltage circuit inside the camera is touched.
- Page 10 Read and follow all warnings supplied with the batteries. Batteries may explode due to improper use. Do not install batteries upside down ( Do not use batteries with visible damage. Do not subject batteries to fire or high CAUTION temperatures. Do not attempt to recharge, short, or disassemble.
- Page 11 If water or other liquid gets inside the product, it may cause a short resulting in fire or electric shock. Immediately unplug, discontinue use, and contact an AGFA dealer. Keep plug clean of dust and dirt. Insert plug completely into the electrical outlet.
- Page 12 Never pull the plug if your hands are wet, or if you are standing in water. Do not attempt to disassemble this product; it contains high-voltage circuits. For repairs, contact an AGFA dealer. Disconnect the AC adapter when it is not in use.
-
Page 13: Battery Cautions
SAFETY CAUTIONS FOR THE LITHIUM ION BATTERY 1 Use only the battery charger specified for this unit. 2 Never heat the battery or expose it to fire. Do not disassemble or modify the battery. Do not intentionally or unintentionally short circuit the battery terminals. -
Page 14: Environmental Requirements
To restore camera power, repeat turning the camera on and off. ENVIRONMENTAL REQUIREMENTS • This digital camera is designed for use from 0 to 50 C (-4 to 122 F). • Never leave the digital camera where it may be subjected to extreme temperatures such as the glove compartment of a car. - Page 15 • Do not directly solder the battery. CHARGING • Use only the battery charger specified. • Be sure that the battery terminals are correctly aligned before recharging. • Perform the charging within the temperature range of 0 C to + 45 C (0 F to 113 F).
-
Page 16: Before You Begin
• AC power adapter AC-M515 • DC power cord • Lithium ion battery NP-500H • Lithium battery 2CR5 • AGFA ACTIONCAM DIGITAL FILM Card (PC Card) • Holding Strap HS-700 • SCSI Cable • Digital Camera ACTIONCAM CD • Adobe Photoshop LE 3.0 CD package •... -
Page 17: Quick Operation
Gently insert the lens into the mount and turn the lens clockwise until it clicks into the locked position. 4. Insert AGFA ACTIONCAM Digital Film. Open the slot/SCSI connector cover. Insert the PC card, as shown, until the card stops. - Page 18 7. Focus on subject Align the subject within the focus frame and press the shutter-release button partway down to activate the autofocus. The focus lock indicator will glow when the subject is in focus. 8. Take the picture Check that the standby lamp in the viewfinder is illuminated. Gently press the shutter-release button all the way down to take the picture, the way you want it.
-
Page 19: Names Of Parts -Camera Body
Names of parts -Camera body Built-in Flash Shutter-release button Control dial Lens contacts Mirror Focus mode button Self-timer button White balance window Main switch Mode button Manual fill- flash button Exposure- compensation button Lens-release button Slot/SCSI connector cover PC terminal Inside the slot/SCSI connector cover Access lamp PC card slot... - Page 20 Accessory shoe Finder Battery case Bottom of the camera (after the Battery case has removed out) Power input terminal Clock battery chamber Tripod socket WB/ASM mode switch Flash node button Program reset button Data panel Holding strap eyelet Remote-control terminal Aperture button Battery case release button Battery chamber...
- Page 21 Names of parts -Data panel Shutter speed / SCSI ID number display Terminater power indicator Wireless flash indicator Red-eye reduction indicator Exposure compensation indicator Self timer indicator Aperture display Exposure mode indicators Manual focus indicator Battery condition indicators Frame counter SCSI mode indicator...
- Page 22 Names of parts -Viewfinder Display Focus frame Viewfinder frame Flash signal Focus signal Standby lamp...
-
Page 23: Basic Operation
Chapter 1 Basic operation... -
Page 24: Attaching The Holding Strap
Attaching the Holding Strap You will have a better grip on the ACTIONCAM Digital Camera, if you attach the HS-700 Holding Strap to the camera. Chapter 1 Basic operation Pass one end of the Holding Strap through the lower strap eyelet in the ACTIONCAM and attach as shown. -
Page 25: Inserting Batteries
Inserting Batteries The digital camera uses a 2CR5 lithium battery and an NP-500H rechargeable lithium ion battery. The 6-volt 2CR5 lithium battery powers all camera operations. The NP-500H rechargeable lithium ion battery supplies power for recording and copying digital images. - Page 26 2. Connect the adapter DC cord to the AC power adapter. 3. Plug the other side of adapter cord into the power input 4. Plug the AC power adapter into an AC outlet. Chapter 1 Basic operation case out. terminal in the digital camera as shown. Inserting batteries...
-
Page 27: Battery Condition Indicators
This symbol indicates the condition of the 2CR 5lithium battery. This symbol indicates the condition of the NP-500H lithium ion battery. Full battery symbol - power is sufficient for all digital camera operations. Low battery symbol - power is sufficient for all digital camera operations, but is getting low. - Page 28 If no data appears in the data panel, replace the battery or check that it is inserted correctly. The 2CR5 lithium battery supplies power for camera function (auto- focus, auto-exposure, etc.). The NP-500H rechargeable lithium ion battery supplies the power for recording and playback of digital images taken by ACTIONCAM.
-
Page 29: Attaching And Removing The Lens
Attaching and Removing the Lens Attaching the Lens 1. Remove the camera body cap and rear lens cap as shown. 2. Align the red mounting index on the lens with the one on the camera. 3. Gently insert the lens into the mount and turn it clockwise until it clicks into the locked position. - Page 30 Handling the Camera / Holding the Camera Hold the camera grip firmly with your right hand while supporting the camera or lens with your left hand. Make sure that your fingers are not blocking any of the camera’s features; they should fit securely around the grip.
-
Page 31: Inserting The Pc Card
Inserting the PC Card This camera uses an AGFA PCMCIA card as it’s recording device. The standard accessory card has already been initialized for use in this camera and can be used immediately. On the card you can store 113 images (130 MB) 1. - Page 32 4. Close the slot/SCSI connector cover and slide the main switch to Initial loading starts when the main switch is turned on. The card is scanned and the recording head moves to the first available space on the PC card. While loading, the frame counter will cycle as shown. When loading is complete, the standby display will appear showing the number of frames remaining.
- Page 33 Taking Pictures in Fully-Automatic Mode Fully-Automatic mode is the camera’s standard operating mode, and is suited for virtually any situation. When you press the program- reset button, all the camera’s functions are set to fully automatic operation. 1. Slide the main switch to ON. 2.
- Page 34 5. Align the subject within the focus frame [ ] and press the 6. The standby lamp in the viewfinder will glow when the digital 7. Press the shutter release button all the way down to take the picture. Chapter 1 Basic operation shutter release button partway down to activate autofocus and autoexposure systems.
-
Page 35: Removing The Pc Card
Removing the PC Card When the card is full, “0” will be displayed in the data panel and the shutter will lock. Remove the full PC card and replace with a new PC card. 1. Slide the main switch to lock. PERFORM THIS OPERATION BEFORE REMOVING THE PC CARD, OR DATA MAY BE LOST Wait until the data display disappears. - Page 36 If the computer is not nearby, and a new card is not available, the last image can be overwritten. CAUTION Overriding will delete the last image. Then the image can not be recovered. 1. Press and hold the mode button and the self timer button. "0"...
-
Page 37: Focus Details
Chapter 2 Focus Details... -
Page 38: Focus Signals
Focus Signals The focus signals appear at the base of the viewfinder when the shutter is pressed partway down. The color of the focus signal indicates the focus situation. Focus Signal Glows Green: Glows Orange: Glows Red: Chapter 2 Focus Details Focus is confirmed and locked. -
Page 39: Special Focusing Situations
Special Focusing Situations In special focusing situations, it may be difficult or impossible for the camera to focus accurately — you may have to use focus lock or manual focus. If two subjects at different distances overlap in the focus frame. If a subject composed of alternating light and dark lines completely fills the focus frame. -
Page 40: Focus Lock
Focus Lock Focus lock should be used when you want to take a picture with your subject outside the focus frame [ ] or in situations where autofocus is difficult to confirm. 1. Center your subject in the focus frame [ ] and press the shutter 2. -
Page 41: Manual Focus
Manual Focus In situations where the autofocus system is not suitable and focus lock is not possible, you may focus the lens manually. The autofocus system will continue to monitor focus and will indicate when the subject within the focus frame [ ] is in focus. 1. -
Page 42: Autofocus Illuminator
Autofocus Illuminator If the flash is raised and the camera detects that the scene is too dark to focus accurately, the flash will automatically fire a few short bursts before and after the lens focuses (AF Illuminator). This provides the light necessary for the camera to detect and focus on your subject. -
Page 43: Advanced Operation
Chapter 3 Advanced Operation... -
Page 44: Setting The White Balance
Setting the White Balance This digital camera has automatic white balance. Beautiful images can be taken under any light source. However, manual white balance is necessary when the light source illuminating the white balance window is different than the light source illuminating the subject. - Page 45 To set the white balance manually : 1. Turn the WB/ASM mode switch to white balance (WB). 2. While pressing the mode button, turn the control dial until the desired indicator blinks in the data panel. The blinking WB mode is selected when you release the mode button (the other WB indicators will disappear).
-
Page 46: Selecting The Exposure Mode
Exposure Mode This camera has four different exposure modes: Aperture-priority, Shutter-priority, Manual, and Program. The exposure modes allow you to tailor the degree of camera control needed to capture the desired image. For information on P mode, refer to “Taking Pictures in Program Mode”. -
Page 47: A Mode: Aperture Priority
A MODE: APERTURE PRIORITY In A mode, you select the aperture and the camera automatically sets the shutter speed required for proper exposure. 1. Set the command switch to ASM. 2. While pressing the mode button, turn the control dial until 'A ' blinks in the data panel. -
Page 48: S Mode: Shutter Priority
S MODE: Shutter Priority In S mode, you select the shutter speed and the camera automatically sets the aperture required for proper exposure. 1. Set the command switch to ASM. 2. While pressing the mode button, turn the control dial until 'S' blinks in the data panel. - Page 49 M MODE: Manual Exposure In M mode, you have full control of the exposure. You select both the shutter speed and the aperture. The data panel will tell you if the exposure you have selected is over, under, or the same as the metered exposure.
-
Page 50: Exposure Compensation
Exposure Compensation This feature lets you compensate the exposure 3 stops, in 1/2 stop increments. Exposure compensation is used when the camera’s metering system cannot correctly determine the precise exposure. 1. While pressing the exposure-compensation button, turn the control dial until the compensation value you want appears in the data panel. - Page 51 Self-Timer The self-timer will delay release of the shutter for approximately ten seconds after you press the shutter release button, giving you time to get into the picture. 1. Press the self timer button. Self-timer indicator will appear on the data panel. Pressing the self-timer button again will cancel the self timer.
-
Page 52: Remote Release Terminal
Remote Release Terminal To avoid blurry pictures, use of the optional Remote Cord RC-1000S (or L) is recommended. Using Remote Cord 1. Remove the remote control terminal cover. 2. Insert the remote cord’s plug into the terminal. To Attach the Remote Terminal Cover after use 1. - Page 53 Chapter 4 Flash Details...
-
Page 54: Using The Built-In Flash
Using the Built-in Flash The built-in flash provides coverage for lens focal lengths as short as 28mm. The flash output is controlled automatically by the camera’s TTL (through the lens) flash metering system. Grip both sides of the built-in flash and gently lift. After you have finished using the flash, push it back down. - Page 55 BUILT-IN Flash Precautions FLASH RANGE The range of the built-in flash depends on the aperture selected. Make sure your subject is within the working range of the flash, specified in the table below. Aperture Flash Range F 6.7 1.0 - 5.0 m (3.3 - 16.5 ft.) 1.0 - 4.2 m (3.3 - 13.8 ft.) F 9.5 1.0 - 3.5 m (3.3 - 11.5 ft.)
- Page 56 Using Flash in P, A, S and M Mode When the built-in flash is up, or an attached accessory flash is on, it will automatically fire in low-light or back-lit situations. The camera will select the most appropriate shutter speed and aperture. TO FIRE THE FLASH MANUALLY In P mode, you can manually fire the built-in or accessory flash.
-
Page 57: Red-Eye Reduction
Red-Eye Reduction When photographing people or animals at night or in low light situations, the effect called ‘Red-Eye’ may occur due to the flash reflecting off the inside of the subject’s eyes. To reduce this effect and to produce more natural looking pictures, use the red-eye reduction mode with the built-in flash. -
Page 58: Wireless/Remote Off Camera Flash
NORMAL FLASH WIRELESS /REMOTE FLASH WIRELESS /REMOTE RATIO FLASH Chapter 4 Flash Details Wireless/Remote Off Camera Flash Wireless / Remote Off-Camera Flash Control is available with the Minolta accessory flashes: 5400HS, 5400xi, or the 3500xi. Wireless / Remote flash allows you to experiment with creative lighting techniques using off-camera accessory flashes without a tangle of accessory cords and connectors. - Page 59 Taking Picture in Wireless/Remote Flash Mode 1. Position your camera and 3500xi flash unit using the information on this page. If you are using a flash unit other than the 3500xi off camera, refer to the instruction manual for that flash. Camera Range (See table below) Maximum Operating Range...
- Page 60 WIRELESS / REMOTE RATIO CONTROL In wireless / remote mode, when ratio control is selected, the output of the off camera flash and the built-in flash combine to provide a 2:1 light ratio. To use ratio control, press and hold the manual fill flash button, then press the shutter-release button all the way down to take the picture.
- Page 61 AGFA Dealer for advice. Positive Polarity Negative Polarity • The trigger voltage of some flash units may be too high for the digital camera to fire the flash. If this is true of your flash, contact an authorized AGFA Dealer.
- Page 62 PCMCIA is the abbreviation for Personal Computer Memory Card International Association, and is categorized into three types. The three types are Type I, Type II, and Type III. The AGFA ACTIONCAM Digital Film is a Type III card. It has been included as a standard accessory.
- Page 63 About the Lithium Ion Battery This digital camera uses a lithium ion battery as the power source for the digital back. Lithium Ion batteries have the following advantages: • Compact-Lightweight-High Energy Density Lithium ion batteries have approximately 30% less volume, and are 35% lighter in weight than standard nickel cadmium batteries with the same discharge capacity.
-
Page 64: Accessory Information
• Manual focus lenses (MD or MC) cannot be attached to this camera. • See page 41 for lens shadowing when using the built-in flash. • Some AF lenses are not suitable for use with this digital camera Contact an authorized AGFA dealer for details. -
Page 65: Exposure Warnings
Exposure Warnings Mode Appendix Exposure Warnings Display Cause Light level is beyond the range of the available shutter speeds and apertures Required shutter speed is beyond the range of the camera Required aperture is beyond the range of the lens Action In bright light, attach a neutral density (ND) filter or reduce the... -
Page 66: Troubleshooting
Use focus lock, or manual focus. • PC card has not been inserted yet. Insert the AGFA ACTIONCAM Digital Film into the card slot according to the instructions on page 10. • Camera is attached to a microscope or telescope Contact an AGFA dealer for information. - Page 67 Set the main switch to lock, remove the card and reinsert. If this display appears again, the card is defective or is not compatible. Contact your AGFA dealer. Camera operation interferes with the television or radio • Camera is too close to the television or radio...
- Page 68 Clock Battery Replacement The clock inside the digital camera uses a 3V lithium battery (CR2025) to maintain memory while the digital camera battery 2CR5 is being changed. If this battery is exhausted, the clock settings in this digital camera will be lost when the camera battery is removed.
-
Page 69: Care And Storage
BEFORE IMPORTANT EVENTS Always check camera operation carefully, or take test photographs. QUESTIONS AND SERVICE If you have questions about your camera, contact your local camera dealer or write to the AGFA distributor in your area. - Page 70 Sensing System 3 CCD (G1, G2, R/B), Dual-Green System Recording Format DOS Format, 8 bit Digital recording Recording Media PC Card (AGFA ACTIONCAM Digital Film) Number of Frames 113 Frames Autofocus Minolta’s through-the-lens (TTL) phase- detection system with CCD line sensor...
- Page 71 Technical Details (AC-M515) Input voltage AC100-240V 50/60 Hz Output voltage DC 6.5V 2A (using for AC adapter) DC 8.4V 1.4A (using for lithium ion battery charger) Dimensions 71.5(W) x 95.1(D) x 44.5(H) mm or 2.81(W) x 3.74 (D) x 1.75 inch(H) Weight 300g...
- Page 72 Appendix 2 The AVA™1502P SCSI HOST ADAPTER The ActionCam PC version bundles the AVA™1502P SCSI host Adapter from ADAPTEC. The AVA™1502 P is a 16 bit Plug and Play ISA to SCSI host adapter for DOS and Windows systems. This board is choosen because of his easy installation capabilities (plug-and-play) and his external DB25 connection.
- Page 73 For Windows 3.xx you have to install the Adaptec EZ-SCSI Lite software which is available on the ActionCam CD. Agfa recommends the installation and use of the Adaptec AVA 1502P boards even if another SCSI card is already installed. This to avoid SCSI conflicts and system crashes due to connecting and disconnecting the ActionCam camera.
Need help?
Do you have a question about the 307 and is the answer not in the manual?
Questions and answers