Table of Contents
Advertisement
Quick Links
Advertisement
Table of Contents

Related Manuals for KDF 007-Plus


Summary of Contents for KDF 007-Plus
- Page 1 Thank you for purchasing KDF’s Sintering Furnace, 007Plus. Before using the unit, please read the manual thoroughly and understand the capabilities and proper usage for this machine. Please keep this manual in an easily accessible location for future reference. W1017400-1...
-
Page 2: Table Of Contents
■Safety Precautions·························································································1 ■Before you start using your furnace·······························································4 ■Descriptions of Component Parts··································································5 Furnace Front····················································································5 Furnace Rear ····················································································6 Operation Panel ················································································7 ■Installation ······································································································8 Power Requirement ··········································································8 Location & Environment····································································8 Accessory··························································································8 Optional Item Installation···································································8 Air Pump Connection ········································································8 ■Power On ·······································································································8 ■Two-Stages Program Operation ····································································9 How to program for two-stages·························································9 How to program for preset ································································10 Two-Stages Program Operation························································10... -
Page 3: Safety Precautions
We recommend you to follow these instructions for proper use of the unit. The safety precautions contained herein and the accompanying icons provided for the safe use of this machine and to prevent injuries and loss on material resources. Please read them carefully prior to your actual machine operation. Failure to follow or ignorance of the directions may cause severe injury or death. - Page 4 Do not remove the panels or parts uninstructed or modify them in any manner. This may cause electric shock or fire. Contact the dealer for repairs. Do Not Dismantle Do not place heavy items or place machine on the power cord and make sure that the cord is not damaged.
- Page 5 Do not let the unit door stay opened. This may cause fire or injury. Prohibited Before using the unit, make sure that the temperature inside muffle is below 40℃ and clean the dusts inside the unit. The dusts inside the unit may cause the heater damage and electric shock.
-
Page 6: Before You Start Using Your Furnace
The noise from the unit may occur noise into radio etc. Caution When you unpack the unit, we recommend you to make sure that the following standard accessories are included. In addition, check the unit for any damage or dent on the unit surface. Contact the dealer if there is any damage on the unit. -
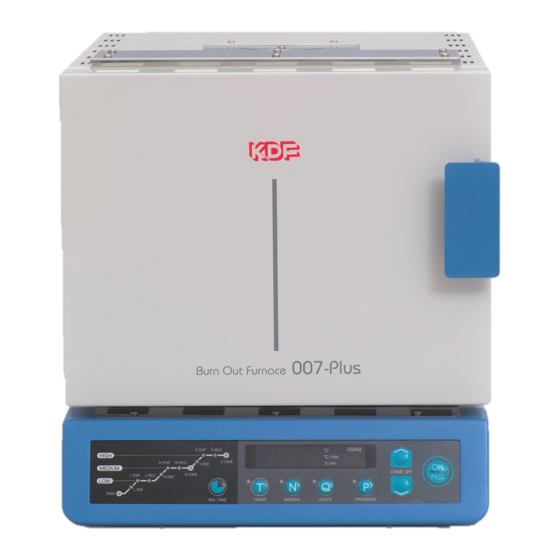
Page 7: Descriptions Of Component Parts
Furnace Front ① ② ③ ④ ① Gas Vent Place the ceramic gas outlet provided for catalyst cleaner or exhaust fume ventilator. ② Door Knob Pull the knob to open the door and push to close. ③ Operation Panel Program operation, furnace temperature and program process are displayed. ④... -
Page 8: Furnace Rear
Furnace Rear ① ② ③ ④ ① Air inlet Connect a piping tube for airflow. ② Outlet for Cleaner Outlet for catalyst cleaner or exhaust fume ventilator. (Max. capacity 300VA) ③ Sub Fuse Fuse for catalyst cleaner or exhaust fume ventilator. (Φ5.2 x 20mm, 125V, 5A, normal fusing) ④... -
Page 9: Operation Panel
Operation Panel ① ② ③ ⑨ ④ ⑤ ⑥ ⑦ ⑧ ⑩ ⑪ ① Process Graph Program items are displayed when you store program and the process finished and current process are displayed during program operation. ② Display Temperature, heat rise speed and hour/minute are displayed. Lamp of unit measure is switched to the indication under process. -
Page 10: Installation
Power Requirement ・We recommend you to use the proper power voltage described in the main specifications of the unit. Location & Environment ・Set up the unit on a flat stable table. ・Keep the unit away from walls and other equipment. Note) Leave a minimum of 20cm of space around the unit as well as 1.5m of space above the unit. -
Page 11: Two-Stages Program Operation
Two-Stages Program Operation How to program for two-stages Program Example:In general, ring molds are heat treated under two-stage firing program. Suppose you store a firing program on program course 5 as follows. Course TIMER 8 hours 30 minutes L RISE 6℃/min L TEMP 300℃... -
Page 12: How To Program For Preset
How to program for preset When you program Preset time, firing program starts operating when the set time is past. In the program example shown above, the program starts after 8 hours 30 minutes. Press the TIMER button in the Stand-by mode and press the button to program .... -
Page 13: Three-Stages Program Operation
H Rise lamp is illuminated 3. Press the button to set the H Rise temp and press the OK/PASS button. H Temp. lamp is illuminated 4. Press the button to set H temp. and press the OK/PASS button. H Hold lamp is illuminated 5. -
Page 14: Other Operations In Firing Process
Other Operations In Firing Process Skip Operation While a program is in process, press the button to skip the program in process and proceed to next OK/PASS program item. Balance Time While you press the BAL.TIME button, the remaining time until the end of the Hold time of the final process appears on the display. -
Page 15: Initial Set Mode
Initial Set Mode Turn on the unit white you press the PROGRAM button to set the following programs. ・Safety Hold Time ・Key Entry Sound Volume ・Temperature Calibration Safety Hold Time This function is to cease supply of current to muffle heater to prevent negligence of power switch off when a certain amount of time passed after program finish. -
Page 16: Error Messages And Troubles
When you have the errors and troubles as mentioned below, we recommend you to follow the instructions shown on each item. Contact dealers for repairs. Items Possible Causes of Troubles Recommendable Measures Power fails to switch on Main power is not supplied to the furnace. Make sure that power cord is plugged or main fuse is blown or not. -
Page 17: Optional Items
(Platinum Catalyst). Plug the power cord of cleaner to the dedicated power outlet on the back of main unit to operate together with the unit. Platinum Catalyst, KDF-ES71 and KDF-ES72, large types than compact sized KDF-ES7, are provided for increased capacity of gas disposal and good for quick firing programs. -
Page 18: Main Specifications
1 pc Electrical Outlet 1 pc Instruction Manual 1 booklet The specifications are changed without prior notice, in case the furnace is in need of quality improvement. 130 Ishigohri-cho, Ohyake, Yamashinaku, Kyoto 607-8187, Japan TEL 81-75-571-1000 FAX 81-75-572-9000 e-mail:denken@kdf.co.jp -16-... -
Page 19: Table Of Program
Table of Program Investment Process L RISE(℃/min.) L TEMP.(℃) L HOLD(hour/min.) M RISE(℃/min.) M TEMP.(℃) M HOLD(hour/min.) M CHIME H RISE(℃/min.) H TEMP.(℃) H HOLD(hour/min.) H CHIME Investment Process L RISE(℃/min.) L TEMP.(℃) L HOLD(hour/min.)...