Makita DUM604 Instruction Manual
Cordless grass shear / cordless hedge trimmer
Hide thumbs
Also See for DUM604:
- Instruction manual (133 pages) ,
- Instruction manual (109 pages) ,
- Instruction manual (84 pages)

Related Manuals for Makita DUM604


Summary of Contents for Makita DUM604
- Page 1 INSTRUCTION MANUAL Cordless Grass Shear / Cordless Hedge Trimmer DUM604 / DUH202 Read before use.
-
Page 2: Specifications
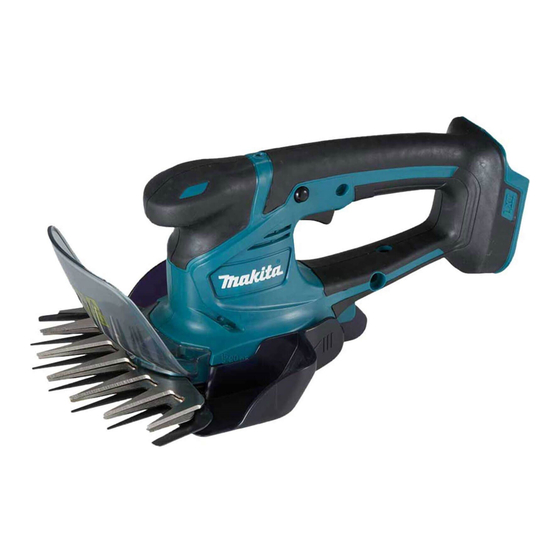
SPECIFICATIONS DUM604 with shear blade for grass shear installed Model: DUM604 Cutting width 160 mm Strokes per minute 2,500 min Dimensions 353 mm x 177 mm x 131 mm (L x W x H) Rated voltage D.C. 18 V Net weight 1.5 - 1.8 kg... -
Page 3: Safety Warnings
DUM604/DUH202 with shear blade for grass shear installed The tool is intended for cutting lawn edges or sprouts. WARNING:... - Page 4 Keep children and bystanders away while If devices are provided for the connection of operating a power tool. Distractions can cause dust extraction and collection facilities, ensure these are connected and properly used. Use of you to lose control. dust collection can reduce dust-related hazards. Electrical safety Do not let familiarity gained from frequent use Power tool plugs must match the outlet.
- Page 5 Use the power tool, accessories and tool bits etc. Never allow children, persons with reduced in accordance with these instructions, taking into physical, sensory or mental capabilities or account the working conditions and the work to be lack of experience and knowledge or people performed. Use of the power tool for operations different unfamiliar with these instructions to use the from those intended could result in a hazardous situation.
- Page 6 Take care against injury to feet and hands from WARNING: DO NOT let comfort or familiarity the cutting tool. with product (gained from repeated use) replace Never stand on a ladder and run the strict adherence to safety rules for the subject equipment.
- Page 7 13. Use the hedge trimmer only if you are in good 30. Do not open or mutilate the battery(ies). physical condition. If you are tired, your attention Released electrolyte is corrosive and may cause damage to the eyes or skin. It may be will be reduced. Be especially careful at the end of toxic if swallowed. a working day. Perform all work calmly and care- fully. The user is responsible for all damages to 31.
-
Page 8: Functional Description
18. Keep the battery away from children. SAVE THESE INSTRUCTIONS. CAUTION: Only use genuine Makita batteries. Use of non-genuine Makita batteries, or batteries that have been altered, may result in the battery bursting causing fires, personal injury and damage. It will also void the Makita warranty for the Makita tool and charger. Tips for maintaining maximum battery life Charge the battery cartridge before completely ► 1 . -
Page 9: Overheat Protection
Never use the light up for a few seconds. tool if it starts when you pull the switch trigger without pressing the lock-off button. Ask your local Indicator lamps Remaining Makita Service Center for repairs. capacity WARNING: Never disable the lock function or Lighted Blinking tape down the lock-off button. -
Page 10: Indicator Lamp
Change the fixed position of the grass receiver by Indicator lamp moving it in the direction of the arrow. The indicator lamp blinks or lights up when the remain- ing battery capacity is low or empty. The indicator lamp also lights up when the tool becomes overloaded. NOTE: The shearing height value is a guideline. The actual shearing height may vary depending on the ► 1 . - Page 11 NOTICE: on the tool while sliding the grass receiver toward the front of the tool. If the parts other than the shear blades such as the crank are worn out, ask Makita Authorized Service Centers for parts replacement or repairs.
- Page 12 Removing the shear blades Installing the shear blades Remove the grass receiver and place the tool Prepare the crank, undercover, and new shear upside down. blades. ► 1 . Crank 2. Undercover 3. Shear blades While pressing the lock lever, turn the undercover counterclockwise until on the undercover is aligned Remove the blade cover from the old shear...
- Page 13 Apply a small amount of grease to the periphery Place the undercover so that on the under- of the crank. Attach the crank to the pins with the small cover is aligned with on the lock lever. and large rounds facing up. While pressing the undercover, turn the under- cover clockwise until on the undercover is aligned ► 1 .
- Page 14 Attach the blade cover before removing or installing the shear blades. NOTICE: If the parts other than the shear blades such as the crank are worn out, ask Makita Authorized Service Centers for parts replacement or repairs. Removing the shear blades Place the tool upside down.
- Page 15 Installing shear blades Apply a small amount of grease to the periphery of the crank. Attach the crank to the pins with its small and Prepare the crank, undercover, and new shear large rounds facing down. blades. ► 1 . Crank ► 1 . Crank 2. Undercover 3. Shear blades Slide the shear blades so that the hole on the Attach the blade cover to the shear blades.
- Page 16 Tighten the two screws firmly with a screwdriver. 10. Make sure that the lock lever fits in the groove on the undercover. ► 1 . Screws ► 1 . Lock lever Place the undercover so that on the under- cover is aligned with on the lock lever. CAUTION: Never use the tool without install- ing the undercover. Remove the blade cover, and then turn on the tool to check if the tool works properly.
-
Page 17: Operation
To remove the chip receiver, press the levers on both Shearing (for grass shear) sides to release the hooks. Turn the tool on after adjusting the shearing height and hold it so that the bottom of the tool rests on the ground. Gently move the tool forward. ► 1 . Levers NOTICE: Never try to remove the chip receiver by an excessive force with its hooks locked in the When trimming around curbs, fences or trees, move the holes of the blades. - Page 18 NOTICE: NOTICE: Do not trim the wet grass or foliage of Do not cut down dead trees or similar small trees. hard objects. Doing so may damage the tool. NOTICE: Do not trim the grass or weeds while Cutting long lawn using the shear blades. The blades may become tangled in the grass or weeds. Do not try to cut long grass all at once. Instead, cut the lawn in steps. Leave a day or two between cuts until the Hold the tool with one hand, pull the switch trigger while...
-
Page 19: Blade Maintenance
Always be sure that the tool is switched off and the battery cartridge is removed before attempting to perform inspection or maintenance. To maintain product SAFETY and RELIABILITY, repairs, any other maintenance or adjustment should be performed by Makita Authorized or Factory Service Centers, always using Makita replacement parts. Cleaning the tool Clean the tool by wiping off dust with a dry cloth or one dipped in soapy water and wrung out. NOTICE: Never use gasoline, benzine, thinner, alcohol or the like. -
Page 20: Optional Accessories
Dirt and corrosion cause excessive blade friction and shorten the operating time per battery charge. CAUTION: These accessories or attachments are recommended for use with your Makita tool Storage specified in this manual. The use of any other accessories or attachments might present a risk of injury to persons. Only use accessory or attachment The hook hole in the tool bottom is convenient for hang- for its stated purpose. - Page 24 Makita Europe N.V. Jan-Baptist Vinkstraat 2, 3070 Kortenberg, Belgium Makita Corporation 3-11-8, Sumiyoshi-cho, Anjo, Aichi 446-8502 Japan 885551C228 www.makita.com 20210303...