
Related Manuals for Plustek OpticFilm 135i


Summary of Contents for Plustek OpticFilm 135i
- Page 1 Please contact us directly if you have any questions Tel: (714) 670-7713, Mon-Fri 9:00AM~5:30PM, PST eMail: infoUSA@plustekus.com Or fill out a technical support form at https://plustek.com/usa/support/technical-support-form.html...
- Page 2 Installation Usage & Maintenance Troubleshooting...
- Page 3 Trademarks © 2019 Plustek Inc. All rights are reserved. No portion of this document may be reproduced without permission. All trademarks and brand names mentioned in this publication are property of their respective owners. Liability While all efforts have been made to ensure the accuracy of all contents in this ...
-
Page 4: Table Of Contents
Table of Contents INTRODUCTION............................1 A N ...........................1 OTE ABOUT CONS SAFETY PRECAUTIONS ..........................2 .............................3 AINTENANCE PRODUCT OVERVIEW ..........................4 ............................4 OX ONTENTS .............................5 CANNER VERVIEW BEFORE INSTALLING THE SCANNER ......................6 ....................6 ONNECTING THE CANNER TO OUR OMPUTER LED I ............................7 NDICATOR ...............................7 OWER INSTALLING THE SCANNER ..........................8 ..........................8 INDOWS NSTALLATION OS X I ..........................10 AC NSTALLATION FILM HOLDERS ............................11 ......................11 SING ... -
Page 5: Introduction
Introduction Welcome to the world of Plustek scanners – the ultimate in computer imaging. Your new scanner will improve the professionalism of your day‐to‐day computing tasks by allowing you to input images into your computer system. Like all of our products, your new scanner is thoroughly tested and backed by our reputation for unsurpassed dependability and customer satisfaction. Thank you for choosing us as your scanner supplier. We hope you will continue to turn to us for additional quality products as your computing needs and interests grow. A Note about Icons This guide uses the following icons to point out information that deserves special ... -
Page 6: Safety Precautions
Safety Precautions Before using this device, please read the following important information to eliminate or reduce any possibility of causing damage and personal injury. 1. Usage, the product is for indoor use in dry locations. Moisture condensation may occur inside this device and cause malfunction at these conditions: • when this device is moved directly from a cold to a warm location; • after a cold room is heated; • when this device is placed in a damp room. To avoid the moisture condensation, you are recommended to follow the procedure: i. Seal this device in a plastic bag for it to adapt to room conditions. ii. Wait for 1‐2 hours before removing this device from the bag. 2. Do use the power adapter and USB cable provided with the scanner. Use of other power adapter and cables may lead to malfunction. 3. Keep the space around the AC adapter clear in case you need to quickly unplug the AC adapter during emergencies. 4. Damaged wire could cause fire or electrical shock. Keep the power cord straight and without being twisted, bended, or scraped. 5. Unplug this device if you don’t need to use for a certain period of time, such as, during night or long weekend, to avoid any risks of causing fire. 6. Do not attempt to disassemble the scanner. There is danger of an electrical shock and opening your scanner will void your warranty. ... -
Page 7: Maintenance
Maintenance To keep your scanner working smoothly, take a moment to review the following maintenance tips. Information Avoid using the scanner in a dusty environment. When it is not in use, keep the scanner covered. Dust particles and other foreign objects may damage the unit. Do not attempt to disassemble the scanner. There is danger of an electrical shock and opening your scanner will void your warranty. Do not subject the scanner to excessive vibration. It may damage the internal components. ° ° °... -
Page 8: Product Overview
Product Overview Box Contents 1. Scanner 2. Mounted Film Holder and Filmstrip Holder A. For scanning 35mm mounted films (max. 4) B. For scanning 35mm filmstrip (max. 6 frames) 3. USB Cable 4. Power Adapter 5. Quick Guide Save the box and packing materials in case you need to transport this scanner in the future. Box contents may change at any time without prior notice. 4 ... -
Page 9: Scanner Overview
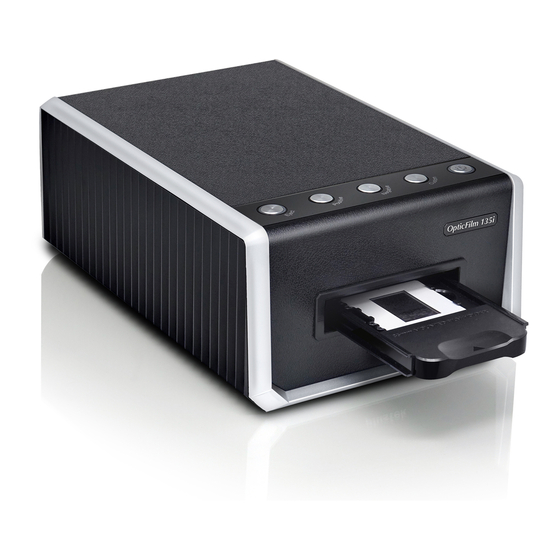
Scanner Overview 1. Eject Button (with indicator light) Press this button to eject the currently inserted film holder. 2. Positive Button Press this button to scan positive source material with the currently defined settings. 3. Negative Button Press this button to scan negative source material with the currently defined settings. 4. Custom Button Press this button to perform a custom scan with the currently defined settings. 5. Power Saving Button (with indicator light) Press the button to wake the scanner up from sleep mode. Press and hold the button for 2 seconds to put the scanner into sleep mode. 6. Front Film Holder Slot Insert the film holder into the scanner through the dust cover. 7. Kensington Security Slot Used for attaching lock‐and‐cable apparatuses to prevent device theft. ... -
Page 10: Before Installing The Scanner
Before Installing the Scanner Connecting the Scanner to Your Computer 1. Plug the power adapter into the scanner’s power receptor. 2. Plug the other end of the power adapter into a standard AC power outlet. 3. Plug the square end of the included USB cable to the USB port at the rear of the scanner. 4. Plug the rectangular end of the USB cable to the USB port on the back of your computer. 5. Switch the scanner power on. 6 ... -
Page 11: Led Indicator
LED Indicator The Power Saving button LED and Eject button LED indicate different scanner status. Eject button Power Saving Status LED button LED The scanner is turned on and operating normally, Off Blue no film holder has been inserted. The film holder has been inserted and the scanner Blue Blue is ready to scan. Blue Blinking Blue The film holder is being scanned. The film holder has been ejected and can be Orange Blue removed, or the film holder cannot be inserted because there is no USB connection. ... -
Page 12: Installing The Scanner
Installing the Scanner Please follow the step‐by‐step procedures described below to install the USB scanner. Please visit www.plustek.com/OpticFilm135i/QuickStart to download the software and driver and quick installation guide for your newly purchased Plustek OpticFilm135i film scanner. Windows Installation 1. Follow the on‐screen instructions to install all software that your new USB scanner requires. 2. After the software is installed, ... - Page 13 For Windows 8 / 10, please follow the on‐screen installation instructions after connecting the scanner. Attention For Windows OS: If you are facing difficulty in installing the scanner driver, please try manually installing the software. 1. Please open [Start] > [Control Panel] > [System] > [Hardware] > [Device Manager]. In the [Device Manager] window, right‐click on this scanner under [Other devices] and select [Update Driver Software] from the pop‐up menu. Information ...
-
Page 14: Mac Os X Installation
Mac OS X Installation 1. Double‐click on the setup file [Plustek Film Scanner] , and the Scanner Installer will start to guide you through the installation. Follow the on‐screen guide in the installer window. 2. You will be prompted to enter your Mac administrator password in the way. Enter the password to continue the installation. Note: ... -
Page 15: Film Holders
Film Holders 2 film holders are included in the package. They guarantee correct scanning results. The scanner automatically detects the type of film holder you have inserted and will automatically define the crop areas according to the film holder. These 2 film holders can be used for both positive and Information negative source material, you just have to select the responding button to scan. Using 35mm Mounted Film Holder Insert mounted film into slots with emulsion (non‐glossy) side down. There are arrows and illustrations on the frame of each slot. Please follow the illustrations to insert the mounted film. ... -
Page 16: Insert The Film Holder
Insert the Film Holder Insert the film holder into the scanner through the Front Film Holder Slot until it is automatically pulled in by the scanner. The scanner will not pull in the film holder if the USB cable is disconnected. Please allow about 35 cm in front of the scanner to insert and remove the film holder. The film holder should be able to be inserted into the scanner smoothly. Do not push the film holder hard. On the top side of the film holder you can see ’35 mm Mounted Film Holder’ or ’35 mm Strip Film Holder’. Always keep this side up for correct scan results. ... -
Page 17: Scan With Quickscan Plus Application
Scan with QuickScan Plus Application Launch QuickScan Plus using the QuickScan Plus shortcut on your Desktop. Adjust the scan settings. Please refer to the QuickScan Plus on‐line help for more information about available scan settings. Preference Settings Click on button and select Preference to open the Preference settings dialog. 13 ... - Page 18 Save image files after hardware scan: Activate this checkbox if you do not want the QuickScan Plus program to launch after scanning images. Export to 3 party image editing software: Activate this checkbox to export the scanned images to 3 party image editing software for further editing. The scanned images will be opened directly on 3 party image editing software. Note: The negative film scanned images will be exported to 3 party image editing software without any image processing. If you activate this checkbox, the main window will appear as following: ...
-
Page 19: The Scan Screen
Auto Update: Activate this checkbox and select a value from the drop‐down list to set how often this program should automatically check for updates. Click the Check for Updates button to check if there is any update. Power Saving: Activate this checkbox and select a value from the drop‐down list to set when the scanner will enter power saving mode. Simply press on any of the scanner 's physical buttons to wake it. ICC Profile: Activate this checkbox and select a profile from the drop‐down list to set device output color standard. Remove Scratch/ Dust: Activate this checkbox and select a desired mode from the drop‐down list to remove scratch/dust. This function is only for the infrared built‐in model. The Scan Screen The Scan screen is where you set your scanning parameters. These scanning parameters will also be used when you initiate a scan using the physical buttons on your scanner. ... - Page 20 3600 dpi Approx. 4500 x 3100 dots 2400 dpi Approx. 3000 x 2000 dots 1800 dpi Approx. 2250 x 1500 dots 1200 dpi Approx. 1500 x 1000 dots 600 dpi Approx. 750 x 500 dots * 7200 dpi is only available for Windows 64‐bit operating system. Color: Select a desired color mode from the drop‐down list. File name: Enter the desired file name into the field. The default uses your computer's date and time. Save path: Click on the Browse button and use the dialog to select the folder where you wish to store your scanned images. For example, the default saving path in Windows 7 is Users > Public > Public Pictures > Plustek Photo. Format: Select the desired bit rate and file format you wish to use from the drop‐down lists. The higher the bit rate, the more detailed the scan and the larger the resulting file will be. Available format options are: JPEG, TIFF, PNG, Windows Bitmap. Scan: Insert your film tray and click on the Scan button when you are ready to scan. After the scan is completed, the View screen will be shown. Click on the Save button, your images are already saved and can be found in the folder you set under Save path on the Scan screen. 16 ...
-
Page 21: The Edit Screen
The Edit Screen You may select one or multiple images to delete, rotate or share at the same time. Selected images will be highlighted with a gray rectangle around the images. Simply click an image to remove a picture from your selection. Click on the Edit button above the frames to switch to the Edit screen to apply various filter effects and make more detailed adjustments to your images. Eject the Film Holder Press the Eject button to eject the currently inserted film holder. 17 ... -
Page 22: Appendix A: Troubleshooting
Appendix A: Troubleshooting Scanner Connection The first step to take when troubleshooting connection problems with your scanner is to check all physical connections. Scanning Problems Most problems are easily solved, and some of the most common questions and their recommended solutions are listed below. Symptom Cause & Solution 1. The scanner cannot be The USB cables are not connected properly found Make sure that the cables are connected tightly and to the proper port. The USB cable might be too long Please use the USB cable that comes with your scanner. The scanner’s power cord is not connected properly Make sure that the AC adapter is connected to an outlet. If the scanner is connected to a Surge Protector, make sure that the Surge Protector is turned on. Windows didn’t detect the scanner 1) Please open [Start] > [Control Panel] > [System] > [Hardware] > [Device Manager]. 2) Please check if your scanner is properly listed under [Imaging Devices]. If it is not listed there or the device icon has an exclamation mark, please refer to “Manually Installing the Software” to install the device drivers. 2. The scanned film The scanner or the surface it is placed on was appears abnormal bumped into during the scanning process Please press the Eject button on your scanner to eject the film holder, then reinsert the film holder. Please scan the film again and make sure the scanner or the surface it is placed on is not bumped ... - Page 23 3. The film holder is stuck The scanner’s power or USB cable got inside the scanner disconnected during the scan or some other error cause the scan to fail while the scanner was scanning Disconnect and reconnect the power and USB cables to the scanner. The scanner will attempt to eject any inserted film holder automatically when turned on. If the film holder is not ejected automatically, please eject the film holder by manually pulling it out from the front. 4. The film holder is You pressed a button to bring the scanner out of automatically ejected sleep mode or you just connected the USB cable after accidently disconnecting it The scanner will eject any inserted film holder when coming out of sleep mode or when connection with a computer has been established. This behavior is normal. 5. The film holder is not The scanner and computer are not connected via pulled into the scanner, USB cable and the Eject button Please make sure the scanner and your computer LED is Orange are connected via USB cable. The scanner will not pull in the film holder if the USB cable is disconnected. The scanner installation is not complete Please complete the scanner installation. 6. The scanner scans very You are running other applications in the slowly background ...
- Page 24 7. There is a grinding or The scanner engages the gears and it initializes rattling noise at the itself before scanning beginning of each scan This noise is normal to the operation of the scanner. 20 ...
-
Page 25: Faq
FAQ 1. How to open the scan images in 3 party image editing software? Please activate Export to 3 party image editing software option in Preference dialog. And configure the Application settings in the main window. 2. How to select non consecutive images on View screen? Selected images will be highlighted with a gray rectangle around the images. You may click on one image, hold down the Command (Mac) or Ctrl (Windows) key and click one or more other images to deselect. 21 ... - Page 26 3. How to reset the modified images to the original status? Just click on the Reset button to reset the selected images to their original state. 4. Why the scanner buttons are not functioned? Please make sure the scanner is not in power saving mode, and the QuickScan Plus program is executed. 5. How to adjust the cropping areas? You may select Custom scan mode to adjust the cropping areas if necessary. 22 ...
-
Page 27: Appendix B: Specifications
Appendix B: Specifications OpticFilm 135i OpticFilm 135 Image Sensor CCD Light Source LED Hardware Resolution 7200 dpi 3600 dpi Scan Modes Color: 48‐bit input, 24/48‐bit output Grayscale: 16‐bit input, 8/16‐bit output Dynamic Range 3.4 Infrared Built‐in N/A Action Button Eject button, Scan buttons x 3 (Positive, Negative, Custom) Scanning Speed Approx. 52 seconds for Approx. 40 seconds for maximum scanning area color maximun scanning area color at 600 dpi (IR enabled) at 600 dpi Approx. 360 seconds for Approx. 205 seconds for maximum scanning area color maximun scanning area color at 3600 dpi (IR enabled) at 3600 dpi Remark: Approx. 25 minutes for maximum scanning area at maximum resolution: 7200dpi (IR enabled) Net Weight ... -
Page 28: Appendix C: Customer Service And Warranty
Appendix C: Customer Service and Warranty If you encounter problems with your scanner, please review the installation instructions and troubleshooting suggestions contained in this guide. Visit our website www.plustek.com for more customer service information. For further assistance call our customer support phone number listed on the website. One of our representatives will be happy to assist you from Monday through Friday in office working hours as shown below: Europe 9:00 a.m. – 5:30 p.m. (CET) Other Countries or Areas 9:00 a.m. – 6:00 p.m. Taiwan Time To avoid delays, please have the following information available before calling: Scanner name and model number Scanner serial number A detailed description of the problem Your computer manufacturer and its model number The speed of your CPU (Pentium 133, etc.) ... -
Page 29: Service & Support Information (For Eu Country Only )
Service & Support Information (For EU country only) Where appropriate, the period of availability of spare parts and the possibilities of upgrading products information. Please ask local distributors and suppliers for spare parts information and product upgrade information. Information requested by relevant Implementing Measure. Please ask local distributors and suppliers for the related information of Implementing Measure test report. ... -
Page 30: Fcc Radio Frequency Statement
If this product is an optional feature, this Limited Warranty applies only when the feature is used in a machine for which it was designed. If you have any questions about your Limited Warranty, contact the approved retailer from whom you bought the product or the manufacturer. THIS LIMITED WARRANTY REPLACES ALL OTHER WARRANTIES, EXPRESS OR IMPLIED, INCLUDING, BUT NOT LIMITED TO, THE IMPLIED WARRANTIES OF MERCHANTABLITY AND FITNESS FOR A PARTICULAR PURPOSE. HOWEVER, SOME LAWS DO NOT ALLOW THE EXCLUSION OF IMPLIED WARRANTIES. IF THESE LAWS APPLY, THEN ALL EXPRESS AND IMPLIED WARRANTIES ARE LIMITED IN DURATION TO THE WARRANTY PERIOD. NO OTHER WARRANTIES APPLY AFTER THAT PERIOD. ... - Page 31 Increase the separation between the equipment and receiver. Connect the equipment to an outlet on a circuit different from that which the receiver is connected. Shielded interconnect cables and shielded power cord which are supplied with this equipment must be employed with this equipment to ensure compliance with the pertinent RF emission limits governing this device. Consult the dealer or an experienced radio/TV technician for help if the conditions persist. Changes or modifications not expressly approved by the manufacturer or authorized service center could void the user’s authority to operate this equipment. 27 ...
- Page 32 The Scan Screen The Crop Screen The View Screen The Edit Screen Scan Images...
- Page 33 Contents QuickScan Plus: Table of Contents Part I Introduction Part II User Interface Overview 1 Preference Settings ........................... 4 2 The Scan Screen ........................... 7 3 The Crop Screen ........................... 8 4 The View Screen ........................... 9 5 The Edit Screen ...........................
-
Page 34: Part I Introduction
QuickScan Plus Help Introduction This program is a specialized image scanning program that allows you to conveniently scan and edit positive and negative films, and automatically save their electronic files in the designated folder. This program, seamlessly integrating the operation of your scanner with your computer, provides a quick and convenient way to perform various functions. - Page 35 2. Double-click the icon on the desktop. For Mac OS: 1. Double-click the icon in Finder > Applications > Plustek > Your scanner model name. 2. Click the icon in the Dock. To close the program, please click the Close button in the upper right corner of the program window.
-
Page 36: Preference Settings
QuickScan Plus Help Preference Settings Click on button and select Preference to open the Preference settings dialog. · Save image files after hardware scan: Activate this checkbox if you do not want the QuickScan Plus program to launch after scanning images. ·... - Page 37 User Interface Overview Note: The negative film scanned images will be exported to 3rd party image editing software without any image processing. All rights are reserved.
- Page 38 QuickScan Plus Help If you activate this checkbox, the main window will appear as following: Click the Modify button to add desired applications, for example: Photoshop, GIMP. You may add up to 5 applications. · App Name: Enter the application name. ·...
-
Page 39: The Scan Screen
User Interface Overview · Auto Update: Activate this checkbox and select a value from the drop-down list to set how often this program should automatically check for updates. Click the Check for Updates button to check if there is any update. ·... -
Page 40: The Crop Screen
For example, the default saving path in Windows 7 is Users > Public > Public Pictures > Plustek Photo. Format: Select the desired bit rate and file format you wish to use from the drop- ·... -
Page 41: The View Screen
User Interface Overview The Crop screen is where you can adjust the crop areas using click and drag, or add or delete areas by clicking on the respective buttons. You can also zoom in on the frames using your mouse wheel or by using the zoom buttons above the frames. The Crop screen will be shown if you selected the Custom scan mode or when automatic framing and cropping failed. - Page 42 QuickScan Plus Help The View screen is where you select one or multiple images to edit, share or delete. Selected images will be highlighted with a gray rectangle around the images. Simply click an image to remove a picture from your selection. ·...
-
Page 43: The Edit Screen
User Interface Overview in a dialog within QuickScan Plus. Share to Twitter: Click this button to launch the Twitter website in a dialog · within QuickScan Plus. · Help & Tools: Click on this button to open a context menu with the following items: o Help: Select this item to launch the on-line help file. -
Page 44: Effect
QuickScan Plus Help Reset: Click on this button to reset the selected images to their original state. · · Undo: Click on this button to undo the last effect or adjustment. · Redo: Click on this button to redo the last effect or adjustment. Share to Facebook: Click this button to launch the Facebook website in a ·... -
Page 45: Adjust
User Interface Overview Click on the Effect tab to view all available effect filters you can apply to your images. Click on any category title to expand that category's list. Use your mouse wheel to scroll through the list of available effects, then select a desired effect with a mouse click. The selected effect will be laid over your images to better visualize the effect for you. -
Page 46: Part Iii Working With This Program
QuickScan Plus Help Click on the Adjust tab to view all available adjustments you can apply to your images. Click on any adjustment to apply it to the currently selected image. If the adjustment has sub-items you can select, it will be expanded when you click on it. Select the desired adjustments and click on the Apply button to apply the adjustment or click on the Cancel button to close the adjustment sub-items. - Page 47 Working with this program Double-click the icon on the desktop. · For Mac OS: Double-click the icon in Finder > Applications > Plustek > Your scanner · model name. · Click the icon in the Dock. 2. You will be greeted by the Scan screen. Select your desired scan mode by clicking on one of the buttons on the left.