Table of Contents
Advertisement
Quick Links
EN
Dear Customer,
Gigaset Communications GmbH is the legal successor to
Siemens Home and Office Communication Devices GmbH &
Co. KG (SHC), which in turn continued the Gigaset business
of Siemens AG. Any statements made by Siemens AG or
SHC that are found in the user guides should therefore be
understood as statements of Gigaset Communications
GmbH.
We hope you enjoy your Gigaset.
DE
Sehr geehrte Kundin, sehr geehrter Kunde,
die Gigaset Communications GmbH ist Rechtsnachfolgerin
der Siemens Home and Office Communication Devices
GmbH & Co. KG (SHC), die ihrerseits das Gigaset-Geschäft
der Siemens AG fortführte. Etwaige Erklärungen der
Siemens AG oder der SHC in den Bedienungsanleitungen
sind daher als Erklärungen der Gigaset Communications
GmbH zu verstehen.
Wir wünschen Ihnen viel Freude mit Ihrem Gigaset.
FR
Chère Cliente, Cher Client,
la société Gigaset Communications GmbH succède en droit
à Siemens Home and Office Communication Devices GmbH
& Co. KG (SHC) qui poursuivait elle-même les activités Giga-
set de Siemens AG. Donc les éventuelles explications de Sie-
mens AG ou de SHC figurant dans les modes d'emploi
doivent être comprises comme des explications de Gigaset
Communications GmbH.
Nous vous souhaitons beaucoup d'agrément avec votre
Gigaset.
IT
Gentile cliente,
la Gigaset Communications GmbH è successore della Sie-
mens Home and Office Communication Devices GmbH &
Co. KG (SHC) che a sua volta ha proseguito l'attività della
Siemens AG. Eventuali dichiarazioni della Siemens AG o
della SHC nei manuali d'istruzione, vanno pertanto intese
come dichiarazioni della Gigaset Communications GmbH.
Le auguriamo tanta soddisfazione con il vostro Gigaset.
NL
Geachte klant,
Gigaset Communications GmbH is de rechtsopvolger van
Siemens Home and Office Communication Devices GmbH &
Co. KG (SHC), de onderneming die de Gigaset-activiteiten
van Siemens AG heeft overgenomen. Eventuele uitspraken
of mededelingen van Siemens AG of SHC in de gebruiksaan-
wijzingen dienen daarom als mededelingen van Gigaset
Communications GmbH te worden gezien.
Wij wensen u veel plezier met uw Gigaset
ES
Estimado cliente,
la Gigaset Communications GmbH es derechohabiente de la
Siemens Home and Office Communication Devices GmbH &
Co. KG (SHC) que por su parte continuó el negocio Gigaset
de la Siemens AG. Las posibles declaraciones de la
Siemens AG o de la SHC en las instrucciones de uso se
deben entender por lo tanto como declaraciones de la Giga-
set Communications GmbH.
Le deseamos que disfrute con su Gigaset.
PT
SCaros clientes,
Gigaset Communications GmbH é a sucessora legal da Sie-
mens Home and Office Communication Devices GmbH &
Co. KG (SHC), que, por sua vez, deu continuidade ao sector
de negócios Gigaset, da Siemens AG. Quaisquer declara-
ções por parte da Siemens AG ou da SHC encontradas nos
manuais de utilização deverão, portanto, ser consideradas
como declarações da Gigaset Communications GmbH.
Desejamos que tenham bons momentos com o seu Gigaset.
Issued by
Gigaset Communications GmbH
Schlavenhorst 66, D-46395 Bocholt
Gigaset Communications GmbH is a trademark
licensee of Siemens AG
DA
FI
SV
NO
EL
HR
.
SL
Kære Kunde,
Gigaset Communications GmbH er retlig efterfølger til Sie-
mens Home and Office Communication Devices GmbH &
Co. KG (SHC), som fra deres side videreførte Siemens AGs
Gigaset-forretninger. Siemens AGs eller SHCs eventuelle
forklaringer i betjeningsvejledningerne skal derfor forstås
som Gigaset Communications GmbHs forklaringer.
Vi håber, du får meget glæde af din Gigaset.
Arvoisa asiakkaamme,
Gigaset Communications GmbH on Siemens Home and
Office Communication Devices GmbH & Co. KG (SHC)-yri-
tyksen oikeudenomistaja, joka jatkoi puolestaan Siemens
AG:n Gigaset-liiketoimintaa. Käyttöoppaissa mahdollisesti
esiintyvät Siemens AG:n tai SHC:n selosteet on tämän
vuoksi ymmärrettävä Gigaset Communications GmbH:n
selosteina.
Toivotamme Teille paljon iloa Gigaset-laitteestanne.
Kära kund,
Gigaset Communications GmbH övertar rättigheterna från
Siemens Home and Office Communication Devices GmbH &
Co. KG (SHC), som bedrev Gigaset-verksamheten efter Sie-
mens AG. Alla förklaringar från Siemens AG eller SHC i
användarhandboken gäller därför som förklaringar från
Gigaset Communications GmbH.
Vi önskar dig mycket nöje med din Gigaset.
Kjære kunde,
Gigaset Communications GmbH er rettslig etterfølger etter
Siemens Home and Office Communication Devices GmbH &
Co. KG (SHC), som i sin tur videreførte Gigaset-geskjeften i
Siemens AG. Eventuelle meddelelser fra Siemens AG eller
SHC i bruksanvisningene er derfor å forstå som meddelelser
fra Gigaset Communications GmbH.
Vi håper du får stor glede av din Gigaset-enhet.
Αγαπητή πελάτισσα, αγαπητέ πελάτη,
η Gigaset Communications GmbH είναι η νομική διάδοχος της
Siemens Home and Office Communication Devices GmbH &
Co. KG (SHC), η οποία έχει αναλάβει την εμπορική
δραστηριότητα Gigaset της Siemens AG. Οι δηλώσεις της
Siemens AG ή της SHC στις οδηγίες χρήσης αποτελούν
επομένως δηλώσεις της Gigaset Communications GmbH.
Σας ευχόμαστε καλή διασκέδαση με τη συσκευή σας Gigaset.
Poštovani korisnici,
Gigaset Communications GmbH pravni je sljednik tvrtke
Siemens Home and Office Communication Devices GmbH &
Co. KG (SHC), koji je nastavio Gigaset poslovanje tvrtke
Siemens AG. Zato sve izjave tvrtke Siemens AG ili SHC koje
se nalaze u uputama za upotrebu treba tumačiti kao izjave
tvrtke Gigaset Communications GmbH.
Nadamo se da sa zadovoljstvom koristite svoj Gigaset
uređaj.
Spoštovani kupec!
Podjetje Gigaset Communications GmbH je pravni naslednik
podjetja Siemens Home and Office Communication Devices
GmbH & Co. KG (SHC), ki nadaljuje dejavnost znamke
Gigaset podjetja Siemens AG. Vse izjave podjetja Siemens
AG ali SHC v priročnikih za uporabnike torej veljajo kot izjave
podjetja Gigaset Communications GmbH.
Želimo vam veliko užitkov ob uporabi naprave Gigaset.
© Gigaset Communications GmbH 2008
All rights reserved.
Subject to availability. Rights of modifications
reserved.
www.gigaset.com
Advertisement
Table of Contents

Related Manuals for Siemens Gigaset sl550


Summary of Contents for Siemens Gigaset sl550
- Page 1 Nadamo se da sa zadovoljstvom koristite svoj Gigaset de la Siemens AG. Las posibles declaraciones de la uređaj. Siemens AG o de la SHC en las instrucciones de uso se deben entender por lo tanto como declaraciones de la Giga- Spoštovani kupec! set Communications GmbH.
- Page 2 Devices GmbH & Co. KG (SHC), kroz koju je nastavljeno poslovanje kompanije Gigaset kao dela Siemens AG. Stoga sve izjave od strane Siemens AG ili SHC koje se mogu naći u korisničkim uputstvima treba tumačiti kao izjave kompanije Gigaset Communications GmbH.
- Page 3 Issued by Siemens Home and Office Communication Devices GmbH & Co. KG Schlavenhorst 66 D-46395 Bocholt Gigaset SL550 © Siemens Home and Office Communication Devices GmbH & Co. KG 2005 All rights reserved. Subject to availability. Rights of modification reserved. www.siemens.com/gigaset...
-
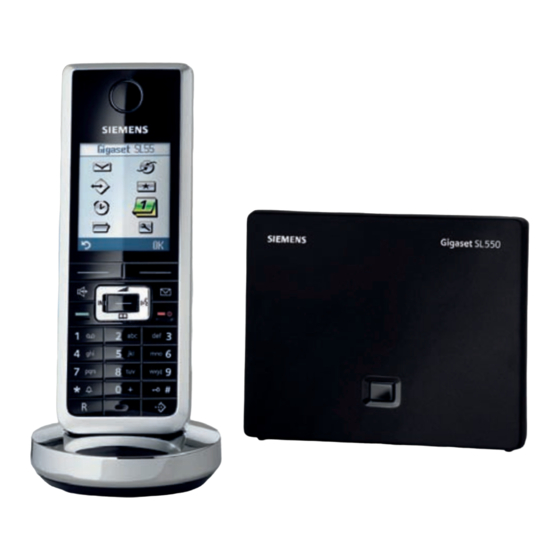
Page 4: Handset At A Glance
Handset at a glance Handset at a glance 1 Display in idle status 2 Battery pack charge status = e V U (flat to full) flashes: battery pack almost flat e V U flashes: battery pack charging 3 Display keys (page 13) 4 Message key Access to calls and message lists;... -
Page 5: Base Station At A Glance
Base station at a glance Base station at a glance Registration/ Paging key (page 33) -
Page 6: Table Of Contents
Using the network mailbox ..32 Configuring the network mailbox Gigaset SL550 – for fast access ....32 more than just a telephone ..6 Viewing the network mailbox First Steps . - Page 7 Contents Repeater support ....43 Restoring default settings to base station ....44 Connecting the base station to the PABX .
-
Page 8: Safety Precautions
Safety precautions Safety precautions Caution: Read the safety precautions and the user guide before use. Explain their contents to your children, and the potential hazards associated with using the tele- phone. Only use the mains adapter supplied, as indicated on the underside of the base station or the back of the charging cradle. -
Page 9: Gigaset Sl550 - More Than Just A Telephone
Gigaset SL550 – more than just a telephone Gigaset SL550 – one belt clip, one user guide. more than just a telephone Installing the base station Your telephone has a clearly laid out and charging cradle colour display (65K colours) and not only... -
Page 10: Setting Up The Handset For Use
Fitting the battery pack and place the cables in the cable recesses. Caution: Use only the rechargeable Siemens Original battery pack (page 49). Never use a conven- tional (non-rechargeable) battery pack, as this may cause significant damage to health and property. - Page 11 First Steps ¤ Placing the handset in the charging Then close the cover so that it clicks into place. cradle ¤ Plug the charging cradle mains adapter into a mains power socket. ¤ Place the handset in the charger with the display facing forward.
- Page 12 First Steps back again until the battery pack is fully Once the phone is registered and the time discharged. set, the idle display looks as shown here (example): Note: Ð After the initial charge and discharge you may replace your handset in the charging cradle INT 1 after every call.
-
Page 13: Menu Tree
Menu tree Menu tree Instead of scrolling to locate a menu function, you can select a menu function faster by opening the menu and keying in the digit combination ("shortcut"). Example: w N 2 11 for "Set ringtone for external calls". With the telephone in idle status, press w (open main menu): î... - Page 14 Menu tree Ï Resource Dir. Screensavers (page 37) Caller Pictures (page 40) Sounds (page 40) Capacity (page 40) Ð Settings Date/Time (page 9) Audio Settings 8-2-1 Ringer Settings (page 38) 8-2-2 Advisory Tones (page 40) 8-2-3 Silent Alert (page 39) Display 8-3-1 Screen Saver...
-
Page 15: Making Calls
Making calls Making calls If the ringtone is intrusive, press the dis- play key . You can take the call as §Silence§ long as it is displayed on the screen. Making an external call Calling Line Identification External calls are calls using the public tel- When you receive a call, the caller's ephone network. -
Page 16: Handsfree Operation
Operating the handset Operating the handset Handsfree operation In handsfree mode, instead of holding the handset to your ear you can put it down Activating/deactivating the handset e.g. on the table in front of you to allow Press and hold the end call others to participate in the call. -
Page 17: Display Keys
Operating the handset Initiate voice dialling, press Delete key: deletes one char- and hold (page 20); acter at a time from right to Main menu, press briefly. left. Î Go back one menu level or In the main menu and in input fields cancel operation. -
Page 18: Correcting Incorrect Entries
Operating the handset Submenus The functions in the submenus are dis- played as lists. To access a function: ¤ Scroll to the function with the control key q and press §OK§ ¤ Enter the corresponding digit combina- tion (page 10). Pressing briefly on the end call key a returns you to the previous menu level / cancels the operation. -
Page 19: Network Services
Network services Network services Network services are functions that your network provider makes available to you. You have to request these services from your network provider. ¤ If you require assistance, please con- tact your network provider. Setting functions for the next call ¢... -
Page 20: Using The Directory And Lists
Using the directory and lists Using the directory and lists Call-by-Call list In the Call-by-Call list you can store prefi- The options are: xes for network providers ("call-by-call numbers"). Directory, ¤ Open the call-by-call list in idle status Call-by-Call list, by pressing the C key. - Page 21 Using the directory and lists Selecting entries in the directory and Delete Entry Delete selected entry. call-by-call list VIP Entry (directory only) s / C Open directory or call-by-call Mark a directory entry as VIP (Very list. Important Person) and assign it a speci- You have the following options: fic ringtone.
- Page 22 Using the directory and lists ¢ s / C s (select entry) Storing anniversaries in the directory ¢ ¢ (open menu) Copy §Options§ ¢ You can store an anniversary for every Entry Copy List to Internal number in the directory and specify a time Enter the internal number of when you will receive a reminder call on the receiver handset.
- Page 23 Using the directory and lists Viewing missed anniversaries Record Pattern Select. When an anniversary has elapsed without Press the display key to start being acknowledged, you will be remin- §OK§ the recording. ded once by the display icon when Appoint. the handset is in idle status.
-
Page 24: Last Number Redial List
Using the directory and lists Last number redial list Opening lists with the message key The last number redial list contains the ten numbers last dialled with the handset You can use the message key f to (max. 32 numbers). If one of the numbers open the following list options: is in the directory, then the corresponding SMS list... -
Page 25: Making Cost-Effective Calls
Making cost-effective calls If entries are only available from one list, You can add the number of the caller to the other list options are not needed and the directory (page 19). only the relevant list will be shown. Date and time of call (if set, page 9) Type of entry: SMS incoming message list ‰... -
Page 26: Automatic Network Provider Code (Preselection)
Making cost-effective calls Automatic network provider Saving/editing entries in the preselection lists code (preselection) Each of the two lists can contain You can specify a call-by-call number 20 entries, each with 6 digits. (preselection number), which is automat- Numbers may be prefixed according to the ically placed in front of numbers accord- country in the "with preselection"... -
Page 27: Sms (Text Messages)
SMS (text messages) SMS (text messages) Please remember: Each incoming SMS is signalled by a single ring (ringtone as for external Your unit is supplied ready for you to send calls). If you accept such an SMS "call" text messages immediately. on the first ring, the SMS will be lost. - Page 28 SMS (text messages) Select and press Reading/deleting a status report §OK§ ¤ s / C Open the incoming message list (page 26) and then: Select number with area code (even if you are in that area) Select SMS with the status from the directory or call-by- State OK State not...
-
Page 29: Receiving An Sms
SMS (text messages) Requirement: Your service provider sup- Edit Edit the text of the saved SMS and then ports this feature. ¤ send (page 24). You are writing an SMS (page 24). Character Set Press the display key. §Options§ Text is shown in the selected character Select and press Send §OK§... - Page 30 SMS (text messages) The incoming message list is displayed as Edit follows (example): Edit the text in the SMS and then send it (page 24). Attachments SMS: (e.g. pictures, melodies) are not sent. Forwarding an SMS 1 bold: number of new entries ¤...
-
Page 31: Notification By Sms
SMS (text messages) ¤ SMS mailboxes Save the number with the area code (dialling code) in the directory. The General Mailbox is the default set- Changing the character set ting. Anyone can access this mailbox and ¤ Read the SMS (page 27): it cannot be protected by a PIN. -
Page 32: Setting Sms Centre
SMS (text messages) ‰ Setting SMS centre Active mailboxes are marked with the mailbox list. They are shown in the SMS list and can, if necessary, be displayed by pressing the message key f. Entering/changing SMS centres ¤ You should find out about the services Deactivating a mailbox ¤... -
Page 33: Sms To A Pabx
SMS (text messages) SMS to a PABX SMS troubleshooting You can only receive an SMS when the Errors when sending Calling Line Identification is for- E0 Calling Line Identification permanently warded to the extension of the PABX withheld (CLIR) or Calling Line (CLIP). - Page 34 SMS (text messages) The message is played back. 1. The "display call number" service is not acti- vated. ¥ Have your service provider enable this service (there is a charge for this). 2. Mobile phone operator and network SMS service provider have not agreed on a cooperation.
-
Page 35: Using The Network Mailbox
Using the network mailbox Using the network mailbox Calling the network mailbox Press and hold. You are connected straight to The network mailbox is your network pro- the network mailbox. vider's answering machine within the net- Press handsfree key d if work. -
Page 36: Using Several Handsets
Using several handsets Using several handsets De-registering handsets You can de-register any registered handset from any registered Gigaset SL55 handset. Registering handsets Open list of internal users. The handset you are currently You can register up to a total of six hand- using is indicated by <... -
Page 37: Making Internal Calls
Using several handsets Making internal calls Then, if the internal participant does not answer or is busy, the call will automati- cally return to you (the display will show Internal calls to other handsets registered Recall). on the same base station are free. Calling a specific handset Internal consultation calls Initiate internal call. -
Page 38: Listening To An External Call
Using several handsets Listening to an external call Changing the name of a handset Note: Important: The function must Listening In Change the automatically assigned name of be activated. the handset, before changing the display lan- You are conducting an external call. An guage, e.g. -
Page 39: Handset Settings
Handset settings You will hear the error tone (descending Calendar tone sequence) if you assign an internal Open the calendar/enter new appoint- number twice. ments. ¤ Repeat the process with an unused Alarm Clock number. Assign key with the menu for setting and activating the alarm clock (page 41): ì... -
Page 40: Setting Emergency Numbers
Handset settings Setting emergency numbers Press and hold (idle status). When the auto key lock is activated, only Setting the screensaver emergency numbers can be called. You can set emergency numbers. In idle status you can select a picture from ¢... -
Page 41: Setting Display Illumination
Handset settings Setting display illumination Press the control key. Select volume. Depending on whether the handset is in Press display key if necessary §Save§ the charging cradle or not, you can acti- to save the setting perma- vate or deactivate the display illumination. nently. -
Page 42: Activating/Deactivating First Ring Muting
Handset settings Activate or deactivate Press the display key. A call is §Beep§§ Announce. Requirement: Cal- now signalled by one brief ling Line Identification alert tone. You will now see º in the display. (page 16). In idle status, you can also open the menu Vibration alarm by pressing t briefly. -
Page 43: Activating/Deactivating
Handset settings You can download sounds in .mid format Rename and pictures from a PC (page 51). Rename (max. 16 characters) and press . The entry is stored with the new §OK§ In My stuff you can listen to the existing name. -
Page 44: Setting The Alarm Clock
Handset settings ¢ ¢ Ð twice at five minute intervals and then Audio Settings ¢ switched off. Advisory Tones ¤ Change multiple line input: During a call, the wake-up call is signalled by a short tone. Key Tones: Select or Off. Deactivating the wake-up call/ Confirm.: repeating after a pause (slumber... -
Page 45: Displaying Missed Appointments, Anniversaries
Handset settings Date: Activate / Deactivate Enter the day/month in 4-digit format. Activate/deactivate selected appoint- ment. Time: Enter hours/minutes in 4-digit format. Delete List Delete all appointments. Notes: Enter the text (max. 16 characters) . Switching off or answering an The text appears as the appointment appointment reminder name in the list and will be displayed... -
Page 46: Restoring The Handset Default
Base station settings ment is marked with ¼, a Changing the system PIN missed anniversary with ‚. You can change the 4-digit system PIN set Delete appointment Delete on the base station (default setting: 0000) Write an SMS. to a 4-digit PIN known only to yourself. Press and hold (idle status). -
Page 47: Restoring Default Settings To Base Station
Base station settings Restoring default settings to base station When resetting, the handsets remain reg- istered. The following settings are not reset: System PIN Setting "First ringtone suppressed" ¢ ¢ ¢ Ð Base Base Reset Enter the system PIN and press §OK§... -
Page 48: Connecting The Base Station
Connecting the base station to the PABX Connecting the base station If an access code is stored: The access code is prefixed automati- to the PABX cally when you select from the follo- wing lists: numbers of the SMScentres, calls list, answering machine list. The following settings are only needed You must enter the access code when when your PABX requires them. -
Page 49: Switching Temporarily To Tone Dialling (Dtmf)
Connecting the base station to the PABX Changing a dialling pause (pause after access code) Requirement: You have saved an access code (page 45). Open menu. N 5 O 1 1 Press keys. Enter a digit for the length of the pause (1 = 1 sec.;... -
Page 50: Appendix
If you have any queries about the use of The incoming call number is not displayed your telephone, you can contact us at any although CLIP is set. time at www.siemens.com/gigasetcus- Phone number identification is not enabled. ¥ tomercare . The table below contains a list... -
Page 51: Service (Customer Care)
You can get assistance easily when you have technical questions or questions about how to use your device by using our online support service on the Internet at: www.siemens.com/gigasetcustomercare or by referring to the section entitled Questions and answers in this manual (page 47). -
Page 52: Specifications
Appendix Specifications General specifications DECT standard is supported Recommended battery pack GAP standard is supported (Valid at the time of going to press) No. of channels 60 duplex channels Lithium-Ion (Li-Ion): 700 mAh Radio frequency V30145-K1310-X250 range 1880–1900 MHz The handset is supplied with the recom- Duplex method Time multiplex, 10 ms frame length... -
Page 53: Notes On The Operating Instructions
Notes on the operating instructions Notes on the ¢ ¢ Ð Display operating instructions ¤ When the handset is in idle status press the control key in the middle This section explains the meaning of cer- (w) to open the main menu. ¤... -
Page 54: Example: Multiple Line Input
Notes on the operating instructions Example: multiple line input PC Interface There are many situations in which you You can connect your handset to your can change the settings of a display or computer using the supplied data cable enter data in several lines. (page 54). - Page 55 Notes on the operating instructions (upper case: 1st letter upper case, all oth- Deactivating/activating predictive text ers lower case). Press the hash key # Requirement: You are writing an SMS. before entering the letter. Press the display key. §Options§ You can see in the display whether upper Predictive Text case, lower case or digits are selected.
-
Page 56: Accessories
Picture CLIP SMS (CLIP must be enabled) Voice dialling PC interface, e.g. for managing directory entries, ringtones and screen savers Headset socket www.siemens.com/gigasetsl55 Gigaset Handset S45 Illuminated colour display (4096 colours) Illuminated keypad Handsfree operation Polyphonic ringer melodies Directory for around 150 entries... - Page 57 Polyphonic ringer melodies Directory for around 150 entries SMS (CLIP must be enabled) Headset socket Room monitor www.siemens.com/gigasete45 Gigaset repeater The Gigaset repeater can be used to increase the reception range of your Gigaset handset to the base station. www.siemens.com/gigasetrepeater...
- Page 58 Send and receive texts from messenger services (IMS) Operate your PC remotely via the handset (e.g. operating the Windows Media Player) www.siemens.com/gigasetm34usb All accessories and batteries are available from your mobile phone retailer. Only use original accessories. This will avoid possible health risks and damage,...
-
Page 59: Index
Index Index range ..... . . restoring to factory settings ..setting ..... . system PIN . - Page 60 Index Character set table, see in idle status ....Special characters internet call ....Charge status display .
- Page 61 Index changing name ....Internet call ....changing number .
- Page 62 Index Memory ..... . My stuff ..... PABX Menu connecting base station...
- Page 63 Index Sound deleting ..... Saving (access code) ... . . renaming .
-
Page 64: Mounting The Base On The Wall
Mounting the base on the wall approx. 9 mm...