Advertisement
Quick Links
Advertisement

Related Manuals for Spirit XRW600


Summary of Contents for Spirit XRW600
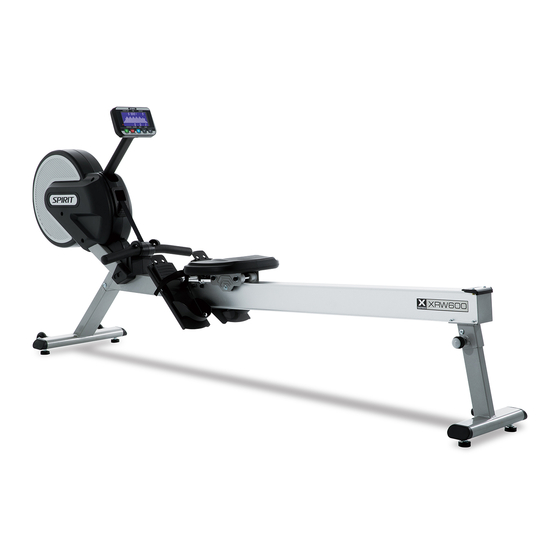
- Page 1 XRW600 Rower OWNER’S MANUAL...
-
Page 3: Table Of Contents
TABLE OF CONTENTS IMPORTANT SAFETY INSTRUCTIONS IMPORTANT ELECTRICAL INSTRUCTIONS IMPORTANT OPERATION INSTRUCTIONS PRODUCT REGISTRATION XRW600 ASSEMBLY INSTRUCTIONS CONSOLE OPERATION PROGRAMMABLE FEATURES USING HEART RATE TRANSMITTER GENERAL MAINTENANCE MANUFACTURER’S LIMITED WARRANTY Thank you for purchasing our product, please save these instructions. Please do not perform or attempt any... - Page 4 Through your dealer, Spirit Fitness will do all we can to make your ownership experience as pleasant as possible for many years to come.
-
Page 5: Important Safety Instructions
Important Safety Instructions Sparks from the motor may ignite a highly gaseous environment. WARNING • Never drop or insert any object into any openings. When using an electrical appliance, basic precautions should • Do not use outdoors. always be followed, including the following: •... -
Page 6: Important Electrical Instructions
Important Electrical Instructions outlet that is properly installed and grounded in accordance with all local codes and ordinances. WARNING DANGER - Improper connection of the equipment- grounding conductor can result in a risk of electric shock. NEVER remove any cover without first disconnecting AC power. Check with a qualified electrician or serviceman if you are If voltage varies by ten percent (10%) or more, the performance of your Rower may be affected. -
Page 7: Important Operation Instructions
Please record the serial number of this fitness product in the space provided below. Serial Number: Register Y our Purchase The self-addressed product registration card must be completed in full and returned to Spirit Fitness. You can also go to https://www.spiritfitness.com/residentialwarrantyregistration.html under the Support tab to register online. - Page 8 XRW600 PRE ASSEMBLY UNPACKING TOOLS INCLUDED: 1. Cut the straps, then lift the box over the unit and unpack. ‰ 13/14mm Wrench ‰ Combination Wrench 2. Carefully remove all parts from the carton and inspect for any damage or missing parts.
- Page 9 CONSOLE FRONT STABILIZER MAIN FRAME LEVELERS SEAT FOOT PEDALS ALUMINUM RAIL REAR STABILIZER LEVELERS...
- Page 10 XRW600 STEP ONE HARDWARE FOR STEP 1 PART TYPE DESCRIPTION 3/8”X19X1.5T FLAT WASHER 3/8”X3/4” BOLT 1. Gather HARDWARE FOR STEP 1. 2. Use the WRENCH (130) to tighten 3 BUTTON HEAD SOCKET BOLTS (120) together with 3 FLAT WASHERS (109) to secure the MAIN FRAME (1) and FRONT STABILIZER (2) together.
- Page 11 XRW600 STEP TWO HARDWARE FOR STEP 2 PART TYPE DESCRIPTION BOLT M6X10mm 1. Gather HARDWARE FOR STEP 2. 2. Use ALLEN WRENCH (126) to tighten 4 BUTTON HEAD SOCKET BOLTS (101) through the ALUMINUM TRACK (51) then secure the ALUMINUM TRACK (51) and the...
- Page 12 XRW600 STEP THREE HARDWARE FOR STEP 3 PART TYPE DESCRIPTION 8X1.5T SPLIT WASHER M8X15mm BOLT 1. Gather HARDWARE FOR STEP 3. 2. Attach the other end of the ALUMINUM TRACK (51) to FOLDING END ASSEM- BLY (6) of the Main Frame (1) and use ALLEN...
- Page 13 XRW600 STEP FOUR HARDWARE FOR STEP 4 PART TYPE DESCRIPTION 5/16” x Ø18 x 1.5T Flat Washer M6 x 15L Phillips Head Screw Spring Washer Ø1/4” Button Head Socket Bolt M8 x 12L 1. Gather HARDWARE FOR STEP 4. 2. Use Combination M5 ALLEN WRENCH &...
- Page 14 TION XRW600 CONSOLE OPERA Large Blue-LED T en innovative Matrix Window programs offer a variety of work-outs Built-in Heart Rate Receiver Easy-T ouch Control Buttons...
- Page 15 Power When Pressing any key button wakes up the console which has been turned off, the console LCD will turn on with full display and beeps for 2 seconds then enters idle mode. When there is speed signal input with the speed sensor detected, it directly enters Manual workout mode. Power off: In any mode during turning on, if there is not any button activated or no rowing activity lasts for 1 minute, it turns off automatically.
- Page 16 Heart Rate • The heart rate range is 40~220 bpm • When the heart rate signal is detected, the small dot at lower right corner of the heart rate window will be blinking to- gether with heart rate value showing. •...
- Page 17 500M/Time • Only workout modes of Manual, Distance, Time and Calorie are with this display function. • For Manual workout mode as an example: When the console starts, Matrix in the middle of LCD will show the wave pat- tern then switch to 500M/TIME 00:00 across center display after 5 seconds then switch again back to the wave pattern after another 5 seconds and continue to repeat the cycle.
- Page 18 • The value increases one increment when UP key is pressed once. Down Key • Under the setting mode of the target workout, the parameter is will be counted down. The value decreases one increment when DOWN key is pressed once. •...
- Page 19 Operating Instruction The screen is with full display and the buzzer beeps for two seconds after turning on. Pressing Start button goes directly to Manual workout mode or pressing MODE button to switch and select a workout mode with the workout sequence shown as below: MANUAL »...
- Page 20 Manual Mode To choose MANUAL mode (Fig. 1-1) Pressing Start/Stop button begins the workout mode or pulling the handlebar under the idle mode enters directly into Manual workout mode. The image at the center of LCD will scan every 5 seconds to show the stroke speed with wave pattern (Fig.
- Page 21 The image at the center of LCD will scan every 5 seconds to show the stroke speed with wave pattern (Fig. 2-2) and 500M/TIME (Fig. 2-3) or pressing MODE button to cancel scanning with wave pattern only. Pressing MODE again switches the image to show 500M/TIME. Distance window counts down from target distance setting value and shows the remaining distance of the workout.
- Page 22 The image at the center of LCD will scan every 5 seconds to show the stroke speed with wave pattern (Fig. 3-2) and 500M/TIME (Fig. 3-3) or pressing MODE button to cancel scanning with wave pattern only. Pressing MODE again switches the image to show 500M/TIME. Under the workout mode, pressing UP or DOWN key button adjusts the resistance level.
- Page 23 The image at the center of LCD will scan every 5 seconds to show the stroke speed with wave pattern (Fig. 4-2) and 500M/TIME (Fig. 4-3) or pressing MODE button to cancel scanning with wave pattern only. Pressing MODE again switches the image to show 500M/TIME. Calorie window counts down from the setting target calorie value and shows the remaining calorie of the workout.
- Page 24 20/10 Interval To choose 20/10 INTERVAL workout mode (Fig. 5-1) The image at the center of LCD: 20 seconds (Exercise)/10 seconds (Rest) Pressing Start/Stop button starts the workout mode. The image at the center of LCD shows time count-down of current workout and wave (Fig. 5-2) or rest time count-down and mark (Fig.
- Page 25 10/20 Interval To choose 10/20 INTERVAL workout mode (Fig. 6-1) The image at the center of LCD: 10 seconds (Exercise)/20 seconds (Rest) Pressing Start/Stop button starts the workout mode. The image at the center of LCD shows time count-down of current workout and wave (Fig. 6-2) or rest time count-down and mark (Fig.
- Page 26 Custom Interval To choose CUSTOM INTERVAL workout mode (Fig. 7-1) User-define time (Exercise)/time (Rest): the default is 10 seconds (Exercise)/10 seconds (Rest) The value at left side of the matrix window flashes for setting the exercise time. Use UP/DOWN buttons to adjust and set the workout time. The default time is 10 seconds with 1-second increment of up or down.
- Page 27 Under the workout mode, pressing UP or DOWN key button adjusts the resistance level. There are 10 Exercise/Rest cycles for each workout time. When workout completes, the buzzer sounds with a long beep. If rowing continues, the time count- down repeats. Fat Burn To choose Fat Burn workout mode (Fig.
- Page 28 Under the workout mode, pressing UP or DOWN key button adjusts the resistance level. Time window starts count-down from the setting time and shows the remaining workout time. When time is counted down to 0:00, the workout completes and the buzzer sounds with a long beep. If rowing continues, the time count-down repeats.
- Page 29 Under the workout mode, pressing UP or DOWN key button adjusts the resistance level. Time window starts count-down from the setting time and shows the remaining workout time. When time is counted down to 0:00, the workout completes and the buzzer sounds with a long beep. If rowing continues, the time count-down repeats.
- Page 30 Game Workout To choose GAME workout mode (Fig. 11-1) Pressing Start/Stop button and begins the GAME workout mode (11-2). The goal of the Game Workout Mode is the manuveur your user dots through an obstacle field by rowing faster or slower to raise/lower the use dot sprite. Three dots at left side represents the user position and the image shift one profile left per second and continue to scroll.
- Page 31 Folding/Unfolding Procedures Hold the Handlebar (37) to lift the rower slightly and Lift and fold the Aluminum Track until it locks into place. press the Release Lever (12). Moving Procedures To fold Rear Fold the aluminum rail assembly up. Stabilizer, turn Lift the rear and roll Knob (47) away.
- Page 32 Heart Rate Monitoring (chest strap not included) The old motto, “no pain, no gain”, is a myth that has been overpowered by the benefits of exercising comfortably. A great deal of this success has been promoted by the use of heart rate monitors. With the proper use of a heart rate monitor, many people find that their usual choice of exercise intensity was either too high or too low and exercise is much more enjoyable by maintaining their heart rate in the desired benefit range.
- Page 33 The two most popular reasons for, or goals, of exercise are cardiovascular fitness (training for the heart and lungs) and weight control. The black columns on the chart above represent the MHR for a person whose age is listed at the bottom of each column. The training heart rate, for either cardiovascular fitness or weight loss, is represented by two different lines that cut diagonally through the chart.
- Page 34 Rate of Perceived Exertion Heart rate is important but listening to your body also has a lot of advantages. There are more variables involved in how hard you should workout than just heart rate. Your stress level, physical health, emotional health, temperature, humidity, the time of day, the last time you ate and what you ate, all contribute to the intensity at which you should workout.
- Page 35 Wearing The Chest Strap *Not Included Attach the transmitter to the elastic strap using the interlocking key. Adjust the strap as tightly as possible as long as the strap is not too tight to remain comfortable. Position the transmitter with the logo centered in the middle of your torso facing away from your chest (some people must position the transmitter slightly left of center).
- Page 36 Some people have problems with the transmitter picking up a signal from their skin. If you have problems try wearing the transmitter upside down. Normally the transmitter will be oriented so the Spirit Fitness logo is right side up. The antenna that picks up your heart rate is very sensitive. If there is an outside noise source, turning the whole machine 90 degrees may de-tune the interference.
-
Page 37: General Maintenance
GENERAL MAINTENANCE Wipe down all areas in the sweat path with a damp cloth after each workout. If a squeak, thump, clicking or rough feeling develops the main cause is most likely one of three reasons: The hardware was not sufficiently tightened during assembly. All bolts that were installed during assembly need to be tightened as much as possible. -
Page 38: Manufacturer's Limited Warranty
Rower Warranty - Effective August 22, 2018 Spirit Fitness, Inc. (Spirit Fitness) warrants all its Rower parts for a period of time listed below from the date of retail sale, as determined by sale receipt, or in the absence of a sales receipt eighteen (18) months from the original factory shipping date. Spirit Fitness’ responsibilities include providing new or remanufactured parts, at Spirit Fitness’... - Page 39 Spirit Fitness’ obligation under this warranty is limited to repairing or replacing, at Spirit Fitness’ option, the product through one of our authorized service centers. All repairs must be preauthorized by Spirit Fitness. If the product is shipped to a service center freight charges to and from the service center will be the customer’s responsibility.
- Page 40 800.258.4555 Spirit Fitness spiritservice@spiritfitness.com 3000 Nestle Road www.spiritfitness.com Jonesboro, AR 72401 XRW600 Owners Manual © 2018 All Rights Reserved Revision 5: 08.22.2018...