Table of Contents
Advertisement
Use & Care Guide
Kenmore
Upright Freezer or
Freezer / Refrigerator
# = color number, número de color
Models: 111.2215# - White - 15 cu.ft.
111.2218# - White - 18 cu.ft.
111.2121# - White - 21 cu.ft.
111.2221# - White - 21 cu.ft.
# = color number
Transform SR Brands Management LLC,
Hoffman Estates, IL 60179 U.S.A.
www.kenmore.com
Advertisement
Table of Contents

Related Manuals for Kenmore 111.2215 Series


Summary of Contents for Kenmore 111.2215 Series
- Page 1 Use & Care Guide Kenmore Upright Freezer or Freezer / Refrigerator # = color number, número de color Models: 111.2215# - White - 15 cu.ft. 111.2218# - White - 18 cu.ft. 111.2121# - White - 21 cu.ft. 111.2221# - White - 21 cu.ft.
-
Page 2: Table Of Contents
Record Model/ Important Safety Instructions Serial Numbers Safety Precautions Please read and save Do not attempt to install or operate these instructions your unit until you have read the safety This Use & Care Guide provides specific precautionsin this Use & Care Guide. operating instructions for your model. - Page 3 Important Safety Instructions with other appliances or furniture. DANGER Child Safety Destroy or recycle the carton, plastic bags, DANGER Risk of fire or explosion. and any exterior wrapping material Flammable refrigerant used. Do not use immediately after the unit is unpacked. mechanical devices to defrost refrigerator.
- Page 4 Important Safety Instructions • Performance may be affected if the IMPORTANT voltage varies by 10% or more. Operating the unit with insufficient Your old unit may have a cooling system power can damage the motor. Such that used CFCs or HCFCs (chlorofluoro- damage is not covered under the carbons or hydrochlorofluorocarbons).
-
Page 5: Appliance Setup
Appliance Setup Cleaning • Wash any removable parts, the This Use & Care Guide provides specific appliance interior, and exterior with mild operating instructions for your model. Use detergent and warm water. Wipe dry. the unit only as instructed in this Use & Care Do not use harsh cleaners on these Guide. -
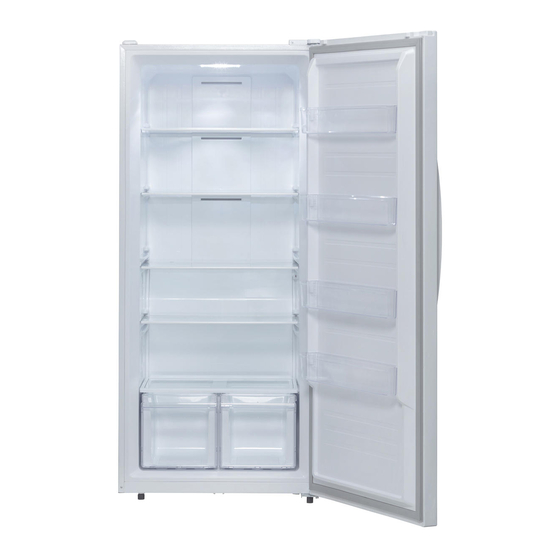
Page 6: Appliance Features
Appliance Features - 111.2215# (15cf) 1 Freezer Compartment Shelves - For storage of frozen food, meat, fish, ice cream 2 Freezer Compartment Door Bins - For storage of frozen food. 3 Freezer Compartment Drawer Bins - For storage of frozen food. 4 LED Light - For lighting the freezer interior 5 Temperature Control Panel... - Page 7 - 111.2218# (18cf) 1 Freezer Compartment Shelves - For storage of frozen food, meat, fish, ice cream 2 Freezer Compartment Door Bins - For storage of frozen food. 3 Freezer Compartment Drawer Bins - For storage of frozen food. 4 LED Light - For lighting the freezer interior 5 Front Control Panel (located on freezer door exterior) - For adjusting the temperature without opening the door...
- Page 8 Appliance Features - 111.2121# (21cf) 1 Freezer Compartment Shelves - For storage of frozen food, meat, fish, ice cream 2 Freezer Compartment Door Bins - For storage of frozen food. 3 Freezer Compartment Drawer Bins - For storage of frozen food. 4 LED Light - For lighting the freezer interior 5 Temperature Control Panel...
- Page 9 - 111.2221# (21cf) 1 Freezer Compartment Glass shelves - For storage of frozen food, meat, fish, ice cream 2 Freezer Compartment Door Bins - For storage of frozen food. 3 Freezer Compartment Drawer Bins - For storage of frozen food. 4 LED Light - For lighting the freezer interior 5 Front Control Panel (located on freezer door exterior)
-
Page 10: Temperature Control
Temperature Control (111.2215#, 111.2121#) Lock function The control panel must be unlocked in order to change the temperature setting. Unlock: Press and hold the Mode button for 3 seconds. After the Lock icon blinks 3 times and then goes off the panel is unlocked. - Page 11 Temperature Control (111.2218#, 111.2221#) Lock function Except for switching the temperature scale (°F ↔ °C), the control panel must be unlocked before it can be used. Unlock: Press and hold the Lock button for 3 seconds. After the Lock icon blinks 3 times and then goes off the panel is unlocked.
- Page 12 Temperature Control (111.2218#, 111.2221#) Refrigerator temperature of 50 hours. During this process, the set temperature on the control will When fridge mode is turned on press show normal temperature target the “-” or “ +” button to switch the set internal target will return to once the temperatures as below.
- Page 13 High Temp Alert Indicator 1) Freezer Mode The Freezer LED indicator will light up and a chime will sound if the interior temperature exceeds 18°F (-8°C) for 24 hours. The LED indicator will remain lit until the interior temperature drops below 10°F (-12°C).
-
Page 14: Door Handle Installation (111.2218#, 111.2221#)
Door Handle Installation (111.2218#, 111.2221#) Included Parts : Included Parts : Using the supplied hex wrench, tighten Two Handle Attachment Bolts (A), Hex Wrench (B) the set screw in the handle lower end to securely attach the handle to the door. Insert and tighten the handle attachment bolts into the upper and lower holes in the door. -
Page 15: Door Swing Reversal (Optional)
Door Swing Reversal (Optional) The refrigerator is shipped with the doors opening from left to right. To reverse the door swing to open from right to left, perform the steps in the following procedure. Open door being careful not to let it fall Tools Required (Not Included) : down. - Page 16 Door Swing Reversal (Optional) Locate the cabinet left corner top hinge To attach switch: cover in the accessories bag shipped 1. Secure tab on non-plunger side of with the appliance. Detach the door light switch beneath its hinge cover wall switch from the previously removed right hook.
- Page 17 Remove the screw securing cap to top of Locate the cabinet left corner top hinge door. Remove cap. Use screw to attach in the accessories bag shipped with the cap to other side of door. appliance. Insert the hinge pin into the hinge pin hole in the top of the door.
-
Page 18: Door Handle Reversal
Door Handle Reversal Use the supplied hex wrench to loosen Unscrew and remove the handle the set screw at the handle lower end. attachment bolts from the door. Remove the bolt hole plugs on the other side of the door. Insert and tighten the bolts into the holes. -
Page 19: Care & Cleaning
abrasive cleaners, or alkaline solutions on Automatic Defrost any interior surface. Do not wash The appliance is equipped with removable parts in a dishwasher. automatic defrost capability so that you do not have to manually defrost. The Cleaning Door Bins cooling element of the unit is regularly To remove the door bins for cleaning, use heated to melt the frost that forms on it. -
Page 20: Power Or Appliance Failure
• Remove foods and clean the appliance interior. • Secure all loose items such as bins and shelves by taping them securely in place to prevent damage. • In a moving vehicle, secure appliance in an upright position to prevent movement. Also protect outside of appliance with a blanket, or similar item. -
Page 21: Before You Call
Before You Call TROUBLESHOOTING Before calling for service, review this list. It may save you time and GUIDE expense. This list includes common occurrences that are not the result of defective workmanship or materials in this appliance. CONCERN POTENTIAL CAUSE COMMON SOLUTION Appliance does not 1. - Page 22 Before You Call CONCERN POTENTIAL CAUSE COMMON SOLUTION Louder sound Modern cooling This is normal. When the surrounding noise levels whenever appliances have level is low, you might hear the compressor appliance is on. increased storage running while it cools the interior. capacity and more stable temperatures.
-
Page 23: Warranty
KENMORE LIMITED WARRANTY WITH PROOF OF SALE the following warranty coverage applies when this appliance is correctly installed, operated and maintained according to all supplied instructions. One Year on Appliance FOR ONE YEAR from the date of sale this appliance is warranted against defects in material or workmanship. - Page 24 Kenmore ® Customer Care Hotline To schedule in-home repair service or order replacement parts Para pedir servicio de reparación a domicilio, y ordenar piezas 1-844-553-6667 www. kenmore. com ®...