Lincoln Electric PRECISION TIG 375 Service Manual
Hide thumbs
Also See for PRECISION TIG 375:
- Operator's manual (68 pages) ,
- Specification sheet (168 pages) ,
- Operator's manual (45 pages)
Table of Contents
Advertisement
Quick Links
RETURN TO MAIN MENU
SVM163-B
PRECISION TIG 375
April, 2008
10809; 10810; 10894; 11161; 11162
For use with machines having Code Numbers:
Safety Depends on You
Lincoln arc welding and cutting
equipment is designed and built
with safety in mind.
However,
your
overall
safety
can
be
increased by proper installation
. . . and thoughtful operation on
DO NOT INSTALL,
your part.
OPERATE OR REPAIR THIS
EQUIPMENT WITHOUT READ-
ING THIS MANUAL AND THE
SAFETY PRECAUTIONS CON-
TAINED THROUGHOUT.
And,
most importantly, think before
you act and be careful.
SERVICE MANUAL
opyright © Lincoln Global Inc.
• World's Leader in Welding and Cutting Products •
• Sales and Service through Subsidiaries and Distributors Worldwide •
Cleveland, Ohio 44117-1199 U.S.A. TEL: 888-935-3877 FAX: 216.486.1751 WEB SITE: www.lincolnelectric.com
Advertisement
Chapters
Table of Contents
Troubleshooting

Related Manuals for Lincoln Electric PRECISION TIG 375


Summary of Contents for Lincoln Electric PRECISION TIG 375
- Page 1 RETURN TO MAIN MENU SVM163-B PRECISION TIG 375 April, 2008 10809; 10810; 10894; 11161; 11162 For use with machines having Code Numbers: Safety Depends on You Lincoln arc welding and cutting equipment is designed and built with safety in mind.
-
Page 2: Safety
Miami, Florida 33135 or CSA Standard W117.2-1974. A Free copy of “Arc Welding Safety” booklet E205 is available from the Lincoln Electric Company, 22801 St. Clair Avenue, Cleveland, Ohio 44117-1199. BE SURE THAT ALL INSTALLATION, OPERATION, MAINTENANCE AND REPAIR PROCEDURES ARE PERFORMED ONLY BY QUALIFIED INDIVIDUALS. - Page 3 i i i i SAFETY i i i i ELECTRIC SHOCK can kill. ARC RAYS can burn. 3.a. The electrode and work (or ground) circuits 4.a. Use a shield with the proper filter and cover are electrically “hot” when the welder is on. plates to protect your eyes from sparks and Do not touch these “hot”...
- Page 4 i i i i i i S S A A F F E E T T Y Y i i i i i i WELDING and CUTTING CYLINDER may explode SPARKS can if damaged. cause fire or explosion. 7.a. Use only compressed cylinders...
- Page 5 i i v v S S A A F F E E T T Y Y i i v v 6. Eloigner les matériaux inflammables ou les recouvrir afin de PRÉCAUTIONS DE SÛRETÉ prévenir tout risque d’incendie dû aux étincelles. Pour votre propre protection lire et observer toutes les instructions 7.
-
Page 6: Table Of Contents
Theory of Operation ......................Section E Troubleshooting and Repair ....................Section F How to Use Troubleshooting Guide.....................F-2 PC Board Troubleshooting......................F-3 Troubleshooting Guide.........................F-4 Test Procedures ........................F-19 Replacement Procedures ......................F-45 Retest After Repair........................F-65 Electrical Diagrams ......................Section G Parts Manual ......................P404 & P558 Series PRECISION TIG 375... - Page 7 Stacking ............................A-4 Lifting and Moving........................A-4 Tilting ............................A-4 High Frequency Interference Protection ..................A-4 Input Electrical Connections .......................A-5 Ground Connection.......................A-5 Output Cables, Connections & Limitations .................A-6 TIG Torch Connection .........................A-7 Auxiliary Power Connections ......................A-8 Remote Control...........................A-8 Robotic Interface Connection......................A-9 PRECISION TIG 375...
-
Page 8: Installation
INSTALLATION TECHNICAL SPECIFICATIONS-PRECISION TIG 375 (Domestic, Canadian & Export) RATED INPUT - SINGLE PHASE ONLY Duty Cycle-Applications Voltage + 10% Max. Amps With Out Power Factor Capacitor Number K1833-1 AC/DC Stick / Balance TIG 112/102/51 K1903-1 Unbalance (70% Penetration ) AC TIG... -
Page 9: Rated Output
TRANSFORMER INSULATION CLASS 180°C (H) ALSO CALLED ‘INVERSE TIME" OR "THERMAL/MAGNETIC " CIRCUIT BREAKERS; CIRCUIT BREAKERS WHICH HAVE A DELAY IN TRIPPING ACTION THAT DECREASES AS THE MAGNITUDE OF CURRENT INCREASES. 50/60H IEC Max. range exceeds 310A. PRECISION TIG 375... -
Page 10: Safety Precautions
_____________________________________________________________ be reduced or eliminate re-radiated interference. SELECT SUITABLE LOCATION The Precision TIG 375 has been field tested under rec- Place the welder where clean cool air can freely circu- ommended installation conditions and has been found late in through the rear louvers and out through the bot- to comply with F.C.C. - Page 11 3. On multiple input line voltage welders, be sure the reconnect panel is connected for the voltage being supplied to the welder. WARNING Failure to follow these instructions can cause immediate failure of components within the welder. PRECISION TIG 375...
-
Page 12: Output Cables, Connections & Limitations
ELECTRICALLY "HOT" TO WORK WHEN TIG WELD- source. ING. ----------------------------------------------------------------------- ------------------------------------------------------------------------ Refer to Figure A.2 for the location of the WORK and STICK terminals, as well as the TIG Torch connection panel. PRECISION TIG 375... -
Page 13: Tig Torch Connection
1/2” Stud dling and using compressed gas containers. Connector (S20403-3) with with a 7/8-14 LH male fitting. Contact your supplier for specifics. Magnum PTW-18/-20 (or LW-) water-cooled Torches require no adapter for Precision TIG connection. PRECISION TIG 375... -
Page 14: Auxiliary Power Connections
The Precision TIG Export models also provide a grounded 220 VAC Euro type Schuko receptacle and a PRECISION TIG 375... -
Page 15: Robotic Interface Connection
MINIMUM OUTPUT panel controls limit the inter- face control setting over the rated output range of the machine. The diagram in Figure A.4 below shows the remote receptacle plug connections and signals for robotic interface: FIGURE A.4 PRECISION TIG 375... - Page 16 A-10 A-10 NOTES PRECISION TIG 375...
- Page 17 Internal Set Up Controls......................B-9 2 Step Trigger Modes ........................B-10 4 Step Trigger Modes ........................B-11 TIG Weld Cycle Chart .......................B-12 Set Up for TIG Amptrol Welding....................B-13 Making a TIG Weld with an Amptrol..................B-14 Recommended Electrode Amperage Ranges ................B-14 PRECISION TIG 375...
-
Page 18: Operation
SAFETY PRECAUTIONS PRODUCT DESCRIPTION Read and understand this entire section before operat- The Precision TIG 375 is part of a new family of indus- ing the machine. trial arc welding power sources providing constant cur- rent, single range square wave AC/DC TIG (GTAW) - Page 19 EQUIPMENT LIMITATIONS RECOMMENDED PROCESSES The Precision TIG machines are protected from over- The Precision TIG 375 is recommended for the TIG loads beyond the electrical ratings and duty cycles, per (GTAW) and Stick (SMAW) welding processes within the Specifications Section A-2, A-3, with Thermostat...
-
Page 20: Controls And Settings
STICK mode the Electrode circuits of both the Stick and TIG torch cables * Arc voltage and current are sensed to determine if are electrically HOT to Work. the arc is established or out. ------------------------------------------------------------------------ PRECISION TIG 375... - Page 21 • With the Current Control switch to LOCAL position, this knob sets the welding output level. * Arc voltage and current are sensed to determine if the arc is established or out. PRECISION TIG 375...
- Page 22 • All settings may be reset to the Factory Default Settings (above) by holding the (Menu) button pressed while turning on the machine’s Power switch. The display will show “rES” to indicate the defaults are reset. PRECISION TIG 375...
- Page 23 Advanced Control Panel (K1829-1- standard on the • At any time in the Stick mode, pressing the Display Precision TIG 375): Refer to Figure B.3 Tig Weld switch to left, causes the digital meter to display the Cycle Chart for graphic illustration of these TIG welding minimum amps rating of the machine (See Item 7).
- Page 24 • SPOT ON position provides the peak current level set by the Maximum Output Control for a time determined by the SPOT TIME control. A red panel light is ON to indicate SPOT mode. PRECISION TIG 375...
-
Page 25: Internal Set Up Controls
Prevents "stubbing" of the electrode by providing extra output current if the arc voltage drops below Precision TIG 375 Advanced Panel has the following the level required to sustain the welding arc. High additional control features which are set up using the... -
Page 26: Step Trigger Modes
2 Step - Restart Enabled (With DIP Switch #2 ON. As Shipped) Torch Button Output Current Pre-Flow Post Flow Actuate the trigger a second time, during down-slope, to activate up-slope and restart. 2 Step.eps 12-17-07 PRECISION TIG 375... - Page 27 Hold the third trigger crater current before normal down-slope. and stop. pull to maintain crater current. stopping. The following two options are available during the normal 4 Step.eps down-slope period. 12-17-07 PRECISION TIG 375...
-
Page 28: Tig Weld Cycle Chart
SEE ITEM 9 SEE ITEM 7 SEE ITEM 9 START TIME SEE ITEM 17 CRATER-FILL TIME Manual Manual in 2/4-Step in 4-Step w/ Restart Disabled SEE ITEM 12 & TIG Welding Features SEE ITEM 12 CODES ABOVE 11000 (K2621-1) PRECISION TIG 375... -
Page 29: Setup For Tig Amptrol Welding
Precision TIG over the range between the level preset TIG welding with an Amptrol by the Minimum Output control when the Amptrol is at its inactivated state, and the level preset by the Maximum Output control when the Amptrol is at fully- activated state. PRECISION TIG 375... -
Page 30: Making A Tig Weld With An Amptrol
60 - 100 90 - 140 Mild steel procedures are based on recommended procedures listed in C2.10 8/94 and the maximum rating of the PRECISION TIG 375 Excaliber 7018 procedures are based on Jet-LH 78 MR Blue Max procedures are based on C6.1 6/95... -
Page 31: Accessories
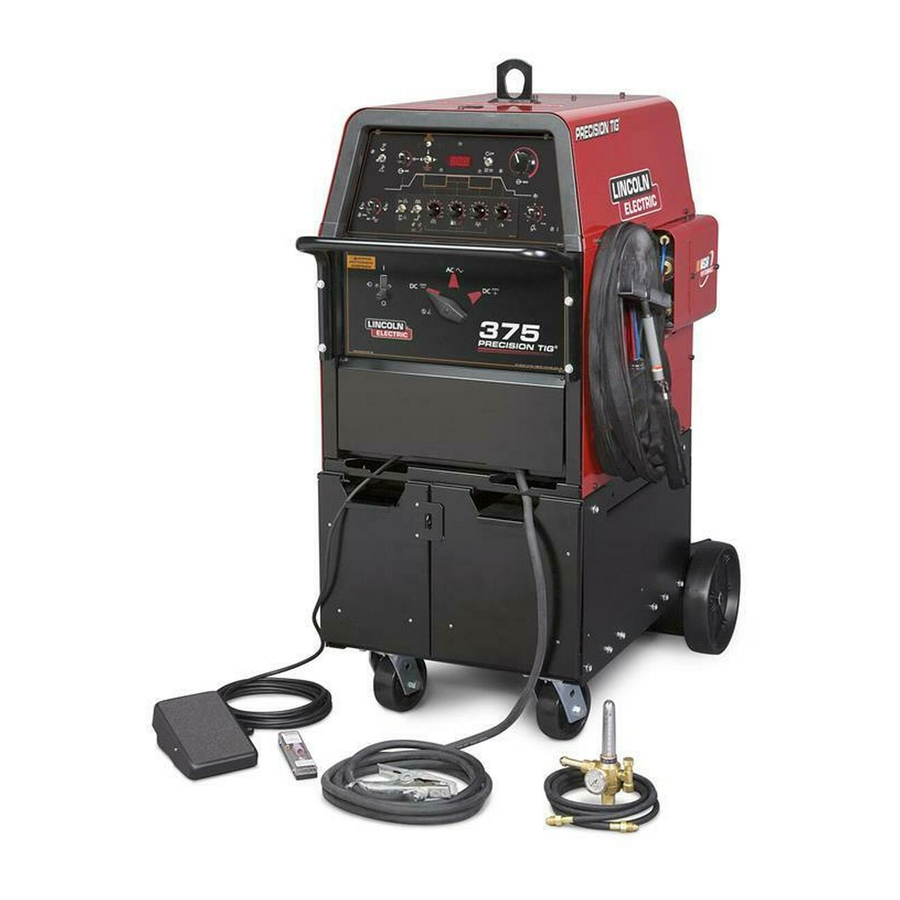
TABLE OF CONTENTS - ACCESSORIES - Accessories...........................Section C Optional Equipment for Codes Above 11000 ................C-2 Optional Equipment for Codes Below 11000................C-3 PRECISION TIG 375... - Page 32 • K870 Foot Amptrol All Air Cooled or Water-Cooled Magnum® TIG • K1784-4 25’ PTW-20 water-cooled TIG Torch Torches may be used with the Precision TIG 375. • K918-2 Zippered Torch Cover Connection adapters are only required for Air-Cooled • KPi510...
- Page 33 • Magnum® PTA and PTW Series Torches All Air Cooled or Water-Cooled Magnum® TIG Accessories that are factory installed with the Torches may be used with the Precision TIG 375. Domestic model (K1833-1) to make up the Domestic Connection adapters are only required for Air-Cooled...
- Page 34 NOTES PRECISION TIG 375...
- Page 35 TABLE OF CONTENTS -MAINTENANCE- Maintenance ..........................Section D Safety Precautions ........................D-2 Routine and Periodic Maintenance .....................D-2 Overload Protection ........................D-2 Service Procedures........................D-3 Component Location and Access ....................D-3 Spark Gap Adjustment........................D-3 Under Cooler Service .........................D-3 Major Component Location......................D-4 PRECISION TIG 375...
-
Page 36: Safety Precautions
SAFETY PRECAUTIONS OVERLOAD PROTECTION FAN-AS-NEEDED (F.A.N.) WARNING The Precision TIG 375 has the F.A.N. circuit feature, which means the cooling fan will operate only while ELECTRIC SHOCK can kill. welding; then for about 8 minutes after welding has • Only qualified personnel should stopped to assure proper machine cooling. -
Page 37: Maintenance
Turn the input power off using the dis- connect switch or fuse box before working inside the machine. This is particularly important when working on the secondary circuit of the high volt- age transformer (T3) because the output voltage is dangerously high. ------------------------------------------------------------------------ PRECISION TIG 375... -
Page 38: Major Component Location
MAINTENANCE MAJOR COMPONENT LOCATIONS 1. Case Front Assembly 2. Arc Starter and Bypass Assembly 3. Case Back Assembly 4. Center Assembly 5. Case Cover Assembly PRECISION TIG 375... - Page 39 DC Welding Output ........................E-5 AC Welding Output........................E-6 SCR Operation..........................E-7 Protective Circuits ........................E-8 Fan As Needed (F.A.N.)......................E-8 Thermal Protection .......................E-8 Overload Protection ......................E-8 FIGURE E.1 – PRECISION TIG 375 BLOCK LOGIC DIAGRAM Precision Tig 375 BACKGROUND CIRCUIT FROM CONTROL BOARD REAR GANG...
-
Page 40: Theory Of Operation
When the input power switch is GENERAL DESCRIPTION turned “on,” the input voltage is applied directly to the The Precision TIG 375 is part of a new family of indus- primary winding of the main transformer. trial arc welding power sources able to provide con-... -
Page 41: Output Rectification, Control Board And Feedback
THEORY OF OPERATION FIGURE E.3 – OUTPUT RECTIFICATION, CONTROL BOARD AND FEEDBACK Precision Tig 375 BACKGROUND CIRCUIT FROM CONTROL BOARD REAR GANG STICK OCV BOOST WORK CIRCUIT POLARITY SWITCH OPTIONAL POWER FACTOR BYPASS BOARD FROM CONTROL BOARD CORRECTION FRONT CAPACITORS... -
Page 42: High Voltage/High Frequency Circuit
RECEPTACLE HIGH VOLTAGE/HIGH FREQUENCY CIRCUIT The Precision TIG 375 has a high frequency adjust- The control board passes the 115 VAC voltage to the ment that allows the operator to control the intensity of primary of the high voltage transformer. The secondary the high frequency circuit. -
Page 43: Dc Welding Output
THEORY OF OPERATION FIGURE E.5 – DC WELDING OUTPUT Precision Tig 375 BACKGROUND CIRCUIT FROM CONTROL BOARD REAR GANG STICK OCV BOOST WORK CIRCUIT POLARITY SWITCH OPTIONAL POWER FACTOR BYPASS BOARD FROM CONTROL BOARD CORRECTION FRONT CAPACITORS ELECTRODE HIGH FREQUENCY... -
Page 44: Ac Welding Output
THEORY OF OPERATION FIGURE E.7 – AC WELDING OUTPUT Precision Tig 375 BACKGROUND CIRCUIT FROM CONTROL BOARD REAR GANG STICK OCV BOOST WORK CIRCUIT POLARITY SWITCH OPTIONAL POWER FACTOR BYPASS BOARD FROM CONTROL BOARD CORRECTION FRONT CAPACITORS ELECTRODE HIGH FREQUENCY... -
Page 45: Scr Operation
AC cycle time in the on state and the remainder of the time in the off state. The amount of time spent in the ON state is con- trolled by the gate. PRECISION TIG 375... -
Page 46: Protective Circuits
Both thermal protection and current over- load are included. FAN-AS-NEEDED (F.A.N.) The Precision Tig 375 has the F.A.N. (fan as needed) circuit feature, which means that the cooling fan will operate only while welding; then for about eight min- utes after welding has stopped to assure proper machine cooling. - Page 47 High Voltage Transformer Removal & Replacement .............F-45 Control Board Removal and Replacement..............F-49 SCR Bridge Assembly Removal and Replacement ............F-53 Mounting of Stud Type Diodes to Aluminum Heatsink ..........F-55 SCR Removal and Replacement ..................F-57 Polarity Switch Removal and Replacement..............F-63 Retest after Repair ......................F-65 PRECISION TIG 375...
-
Page 48: Troubleshooting And Repair
HOW TO USE TROUBLESHOOTING GUIDE WARNING Service and repair should be performed by only Lincoln Electric Factory Trained Personnel. Unauthorized repairs performed on this equipment may result in danger to the technician and machine operator and will invalidate your factory warranty. For your safety and to avoid Electrical Shock, please observe all safety notes and precautions detailed throughout this manual. -
Page 49: Pc Board Troubleshooting
Do not touch electrically hot parts. don’t remove them until installation is complete. • If you return a PC Board to The Lincoln Electric Company for credit, it must be in the static-shielding Sometimes machine failures appear to be due to PC bag. -
Page 50: Troubleshooting Guide
Reset if necessary. CAUTION If for any reason you do not understand the test procedures or are unable to perform the test/repairs safely, con- tact the Lincoln Electric Service Department for electrical troubleshooting assistance before you proceed. Call 1-888-935-3877. PRECISION TIG 375... - Page 51 8. The control board may be faulty. CAUTION If for any reason you do not understand the test procedures or are unable to perform the test/repairs safely, con- tact the Lincoln Electric Service Department for electrical troubleshooting assistance before you proceed. Call 1-888-935-3877. PRECISION TIG 375...
- Page 52 CAUTION If for any reason you do not understand the test procedures or are unable to perform the test/repairs safely, con- tact the Lincoln Electric Service Department for electrical troubleshooting assistance before you proceed. Call 1-888-935-3877. PRECISION TIG 375...
- Page 53 CAUTION If for any reason you do not understand the test procedures or are unable to perform the test/repairs safely, con- tact the Lincoln Electric Service Department for electrical troubleshooting assistance before you proceed. Call 1-888-935-3877. PRECISION TIG 375...
- Page 54 R12 or its connection. CAUTION If for any reason you do not understand the test procedures or are unable to perform the test/repairs safely, con- tact the Lincoln Electric Service Department for electrical troubleshooting assistance before you proceed. Call 1-888-935-3877. PRECISION TIG 375...
- Page 55 3. Perform the SCR Bridge Tests. CAUTION If for any reason you do not understand the test procedures or are unable to perform the test/repairs safely, con- tact the Lincoln Electric Service Department for electrical troubleshooting assistance before you proceed. Call 1-888-935-3877. PRECISION TIG 375...
- Page 56 4. The filters may be blocked. CAUTION If for any reason you do not understand the test procedures or are unable to perform the test/repairs safely, con- tact the Lincoln Electric Service Department for electrical troubleshooting assistance before you proceed. Call 1-888-935-3877. PRECISION TIG 375...
- Page 57 3. The control board may be faulty. CAUTION If for any reason you do not understand the test procedures or are unable to perform the test/repairs safely, con- tact the Lincoln Electric Service Department for electrical troubleshooting assistance before you proceed. Call 1-888-935-3877. PRECISION TIG 375...
- Page 58 CAUTION If for any reason you do not understand the test procedures or are unable to perform the test/repairs safely, con- tact the Lincoln Electric Service Department for electrical troubleshooting assistance before you proceed. Call 1-888-935-3877. PRECISION TIG 375...
- Page 59 See the Wiring Diagram. CAUTION If for any reason you do not understand the test procedures or are unable to perform the test/repairs safely, con- tact the Lincoln Electric Service Department for electrical troubleshooting assistance before you proceed. Call 1-888-935-3877. PRECISION TIG 375...
- Page 60 CAUTION If for any reason you do not understand the test procedures or are unable to perform the test/repairs safely, con- tact the Lincoln Electric Service Department for electrical troubleshooting assistance before you proceed. Call 1-888-935-3877. PRECISION TIG 375...
- Page 61 CAUTION If for any reason you do not understand the test procedures or are unable to perform the test/repairs safely, con- tact the Lincoln Electric Service Department for electrical troubleshooting assistance before you proceed. Call 1-888-935-3877. PRECISION TIG 375...
- Page 62 3. The control board may be faulty. CAUTION If for any reason you do not understand the test procedures or are unable to perform the test/repairs safely, con- tact the Lincoln Electric Service Department for electrical troubleshooting assistance before you proceed. Call 1-888-935-3877. PRECISION TIG 375...
- Page 63 Installation Manual. CAUTION If for any reason you do not understand the test procedures or are unable to perform the test/repairs safely, con- tact the Lincoln Electric Service Department for electrical troubleshooting assistance before you proceed. Call 1-888-935-3877. PRECISION TIG 375...
- Page 64 F-18 F-18 NOTES PRECISION TIG 375...
-
Page 65: Meter Calibration Adjustments
METER CALIBRATION ADJUSTMENTS WARNING Service and repair should be performed by only Lincoln Electric factory trained personnel. Unauthorized repairs performed on this equipment may result in danger to the technician or machine operator and will invalidate your factory warranty. For your safety and to avoid electrical shock, please observe all safety notes and precautions detailed throughout this manual. - Page 66 #306) at the right side meter plug ( nearest the trim- mer). 3. This voltage should match the 200A panel meter reading (as 0.200v, or 200mv) within 1%. If not, adjust the trimmer so that the panel meter accuracy is corrected. (See Figure F.1). PRECISION TIG 375...
- Page 67 NOTE: If switch is held closed longer than about 15 seconds, the machine will shut down to protect internal holding resistor from overheating. PRECISION TIG 375...
- Page 68 NOTES F-22 F-22 PRECISION TIG 375...
-
Page 69: High Frequency Circuit Disable Procedure
HIGH FREQUENCY CIRCUIT DISABLE PROCEDURE WARNING Service and repair should be performed by only Lincoln Electric factory trained personnel. Unauthorized repairs performed on this equipment may result in danger to the technician or machine operator and will invalidate your factory warranty. For your safety and to avoid electrical shock, please observe all safety notes and precautions detailed throughout this manual. - Page 70 3. Locate the Spark Gap Assembly at the lower rear right side of the machine. See Figure F.3. 4. Carefully remove the three leads from the Spark Gap Assembly. See Figure F.3. 5. Insulate the leads from each other and from the case. PRECISION TIG 375...
-
Page 71: Protection Board Test
PROTECTION BOARD TEST WARNING Service and repair should be performed by only Lincoln Electric factory trained personnel. Unauthorized repairs performed on this equipment may result in danger to the technician or machine operator and will invalidate your factory warranty. For your safety and to avoid electrical shock, please observe all safety notes and precautions detailed throughout this manual. - Page 72 Pins 1 & 2 amptrol from min. to max. Decreasing from 10K to 0 when working on remote Pins 1 & 4 amptrol from min. to max. FIGURE F.4 – Plug J5 (viewed from pin end) Jumper PRECISION TIG 375...
-
Page 73: T1 Main Transformer Test
T1 MAIN TRANSFORMER TEST WARNING Service and repair should be performed by only Lincoln Electric factory trained personnel. Unauthorized repairs performed on this equipment may result in danger to the technician or machine operator and will invalidate your factory warranty. For your safety and to avoid electrical shock, please observe all safety notes and precautions detailed throughout this manual. -
Page 74: Test Procedures
T1 transformer may panel is correct for the input voltage applied. Turn be faulty. Also check the leads for broken or the Precision TIG 375 ON. loose connections between plug J11 and the T1 transformer. 4. Using the voltmeter, carefully test for the correct transformer secondary voltages per Table F.3. - Page 75 208 VAC H1 TO H3 230 VAC H1 TO H4 460 VAC NOTE: If the input voltages vary, the secondary voltages will vary accordingly. Based on 208/230/460 models. For other voltage models refer to appropriate Wiring Diagram. PRECISION TIG 375...
- Page 76 F-30 F-30 NOTES PRECISION TIG 375...
-
Page 77: Gas (Water) Solenoid Test
GAS (WATER) SOLENOID TEST WARNING Service and repair should be performed by only Lincoln Electric factory trained personnel. Unauthorized repairs performed on this equipment may result in danger to the technician or machine operator and will invalidate your factory warranty. For your safety and to avoid electrical shock, please observe all safety notes and precautions detailed throughout this manual. - Page 78 GAS (WATER) SOLENOID TEST (continued) TEST PROCEDURE 7. Activate the torch trigger and check for 1. Remove input power to the Precision TIG 375 approximately 115 VAC at the solenoid leads machine. (#231A and # 235). If the correct voltage is 2.
-
Page 79: Static Scr Test
STATIC SCR TEST WARNING Service and repair should be performed by only Lincoln Electric factory trained personnel. Unauthorized repairs performed on this equipment may result in danger to the technician or machine operator and will invalidate your factory warranty. For your safety and to avoid electrical shock, please observe all safety notes and precautions detailed throughout this manual. - Page 80 The “Finned” heat sinks are the anode test points for SCR 1 and 2. The “Non-Finned” heat sink is the cathode test point for SCR 1 and 2. See Wiring Diagram. PRECISION TIG 375...
-
Page 81: Active Scr Test
ACTIVE SCR TEST WARNING Service and repair should be performed by only Lincoln Electric factory trained personnel. Unauthorized repairs performed on this equipment may result in danger to the technician or machine operator and will invalidate your factory warranty. For your safety and to avoid electrical shock, please observe all safety notes and precautions detailed throughout this manual. - Page 82 4.5 volts. See Figure F.8. Figure F.9 - Active SCR Test Set-Up 6 volt lantern battery under R1 = 4 ohms / 10 watts test R2 = 3 ohms / 10 watts Resistor valves are +/- 10% PRECISION TIG 375...
- Page 83 7. Close switch SW-1 (Switch SW-2 should be 11. Replace plug J4 on the control board. open). The voltmeter should read zero. If 12. Replace the case sides and top. the voltmeter reads higher than zero, the SCR is shorted. PRECISION TIG 375...
- Page 84 F-38 F-38 NOTES PRECISION TIG 375...
-
Page 85: Typical Output Voltage Waveform (Dc Tig Mode
20 volts and that each horizontal division represents 5 milliseconds in time. NOTE: Scope probes connected at machine output terminals: (+) probe to electrode, (-) probe to work. SCOPE SETTINGS Volts/Div......20V/Div. Horizontal Sweep..5 ms/Div. Coupling......DC Trigger......Internal PRECISION TIG 375... - Page 86 5 milliseconds in time. The machine was loaded with a resistance grid bank. NOTE: Scope probes connected at machine output terminals: (+) probe to electrode, (-) probe to work. SCOPE SETTINGS Volts/Div......20V/Div. Horizontal Sweep..5 ms/Div. Coupling......DC Trigger......Internal PRECISION TIG 375...
- Page 87 20 volts and that each horizontal division represents 5 milliseconds in time. NOTE: Scope probes connected at machine output terminals: (+) probe to electrode, (-) probe to work. SCOPE SETTINGS Volts/Div......20V/Div. Horizontal Sweep..5 ms/Div. Coupling......DC Trigger......Internal PRECISION TIG 375...
- Page 88 20 volts and that each horizontal division represents 5 milliseconds in time. NOTE: Scope probes connected at machine output terminals: (+) probe to electrode, (-) probe to work. SCOPE SETTINGS Volts/Div......20V/Div. Horizontal Sweep..5 ms/Div. Coupling......DC Trigger......Internal PRECISION TIG 375...
- Page 89 5 milliseconds in time. NOTE: Scope probes connected at machine output terminals: (+) probe to electrode, (-) probe to work. NOTE: AC balance control set at “Balanced” position. SCOPE SETTINGS Volts/Div......20V/Div. Horizontal Sweep..5 ms/Div. Coupling......DC Trigger......Internal PRECISION TIG 375...
- Page 90 F-44 F-44 NOTES PRECISION TIG 375...
-
Page 91: High Voltage Transformer Removal & Replacement
HIGH VOLTAGE TRANSFORMER REMOVAL AND REPLACEMENT WARNING Service and repair should be performed by only Lincoln Electric factory trained personnel. Unauthorized repairs performed on this equipment may result in danger to the technician or machine operator and will invalidate your factory warranty. For your safety and to avoid electrical shock, please observe all safety notes and precautions detailed throughout this manual. - Page 92 7. Replace any necessary cable ties. Figure F.12. This will allow access to the 8. Secure the case back using the 3/8” mount- high voltage transformer mounting screws. ing bolts previously removed. 9. Replace the case sides and top. PRECISION TIG 375...
- Page 93 F-47 TROUBLESHOOTING & REPAIR F-47 HIGH VOLTAGE TRANSFORMER REMOVAL AND REPLACEMENT (continued) Figure F.12 - 3/8” Screw & Leads S and F Locations PRECISION TIG 375...
- Page 94 F-48 F-48 NOTES PRECISION TIG 375...
-
Page 95: Control Board Removal And Replacement
CONTROL BOARD REMOVAL AND REPLACEMENT WARNING Service and repair should be performed by only Lincoln Electric factory trained personnel. Unauthorized repairs performed on this equipment may result in danger to the technician or machine operator and will invalidate your factory warranty. For your safety and to avoid electrical shock, please observe all safety notes and precautions detailed throughout this manual. - Page 96 F.14. 5. Cut any necessary cable ties. 6. Using a phillips head screwdriver, remove the eight PC Board mounting screws. See Figure F.14. 7. Carefully maneuver the control board out of the front of the machine. PRECISION TIG 375...
- Page 97 F-51 TROUBLESHOOTING & REPAIR F-51 CONTROL BOARD REMOVAL AND REPLACEMENT (continued) Figure F.14 - Control Board Plug Locations PRECISION TIG 375...
- Page 98 NOTES F-52 F-52 PRECISION TIG 375...
-
Page 99: Scr Bridge Assembly Removal And Replacement
SCR BRIDGE ASSEMBLY REMOVAL AND REPLACEMENT WARNING Service and repair should be performed by only Lincoln Electric factory trained personnel. Unauthorized repairs performed on this equipment may result in danger to the technician or machine operator and will invalidate your factory warranty. For your safety and to avoid electrical shock, please observe all safety notes and precautions detailed throughout this manual. - Page 100 Note placement of Insulators for reassembly. Note placement of insulators for reassembly. 7. See SCR Replacement Procedures. 7. See SCR Replacement Procedures. 8. Replace all leads, baffles and insulators pre- 8. Replace all leads, baffles and insulators pre- viously removed. viously removed. PRECISION TIG 375...
-
Page 101: Mounting Of Stud Type Diodes To Aluminum Heatsink
MOUNTING OF STUD TYPE DIODES TO ALUMINUM HEAT SINKS WARNING Service and repair should be performed by only Lincoln Electric factory trained personnel. Unauthorized repairs performed on this equipment may result in danger to the technician or machine operator and will invalidate your factory warranty. For your safety and to avoid electrical shock, please observe all safety notes and precautions detailed throughout this manual. - Page 102 The nuts for diodes with copper studs are to run on all the way by hand then torqued as per the following table. c. Turn a minimum of 1/2 turn more while torquing per the table. PRECISION TIG 375...
-
Page 103: Scr Removal And Replacement
SCR REMOVAL AND REPLACEMENT WARNING Service and repair should be performed by only Lincoln Electric factory trained personnel. Unauthorized repairs performed on this equipment may result in danger to the technician or machine operator and will invalidate your factory warranty. For your safety and to avoid elec- trical shock, please observe all safety notes and precautions detailed throughout this manual. - Page 104 SPRING AND HOUSING BE USED FOR REASSEMBLY. 2. Remove the old SCR. 3. Clean the area on the heat sink around the SCR mounting surface. Using a putty knife, or similar tool. DO NOT SCRATCH THE SCR MOUNTING SURFACE. PRECISION TIG 375...
- Page 105 HEX NUT and turn it over. Check for "rocking" motion. See Figure F.16. PLAIN WASHER Fig. F.17 - Clamp Assembly. 5. Re-inspect the SCR for proper seating. Fig. F.16 - 1/2" Wide Leaf Spring SPRING CURVATURE 1/2" EXAGGERATED PRECISION TIG 375...
- Page 106 Do not over tighten cap screws. The leaf spring will apply the required clamping force to the SCR. 1. Do not turn the nuts. While holding the nuts stationary, turn the cap screws only with the following proce- dure. PRECISION TIG 375...
- Page 107 Be sure that the leaf spring is not cocked in the housing. Figure F.19. Heat sinks may not be exactly as pictured. 6. Re-inspect the SCR for proper seat- ing. PRECISION TIG 375...
- Page 108 F-62 F-62 NOTES PRECISION TIG 375...
-
Page 109: Polarity Switch Removal And Replacement
POLARITY SWITCH REMOVAL AND REPLACEMENT WARNING Service and repair should be performed by only Lincoln Electric factory trained personnel. Unauthorized repairs performed on this equipment may result in danger to the technician or machine operator and will invalidate your factory warranty. For your safety and to avoid electrical shock, please observe all safety notes and precautions detailed throughout this manual. - Page 110 7. Reconnect all previously removed leads to mounting nuts. their proper terminals. See Wiring Diagram. NOTE: Do not remove the sticker completely. 8. Replace case sides and top. PRECISION TIG 375...
-
Page 111: Retest After Repair
RECOMMENDED METERS FOR MACHINE OUTPUT TESTS VOLTMETER: AC and DC True RMS Meter - Fluke 8922A or equivalent AMMETER: Columbia Type AX AC or DC Tong Ammeter IMPORTANT: IF OTHER TYPE METERS ARE USED, RESULTS MAY NOT BE ACCURATE. PRECISION TIG 375... - Page 112 F-66 NOTES F-66 PRECISION TIG 375...
- Page 113 TIG Option P.C. Board Schematic Codes above 11000 (G4760 Page 1) .........G-28 TIG Option P.C. Board Schematic Codes above 11000 (G4760 Page 2) .........G-29 TIG Option P.C. Board Schematic Codes above 11000 (G4760 Page 3) .........G-30 TIG Option P.C. Board Assembly Codes above 11000 (G4761-1) ..........G-31 PRECISION TIG 375...
- Page 114 ELECTRICAL DIAGRAMS WIRING DIAGRAM - ENTIRE MACHINE - CODE 10809 (G4047) CONTROL PANEL (VIEWED FROM REAR) PRECISION TIG 375 WIRING DIAGRAM L1 (U) 460 VOLT CONNECTION CONNECT STRAP TO L2 (V) HIGH (H4) (AS SHOWN) 230 VOLT CONNECTION 304B POWER SWITCH...
- Page 115 ELECTRICAL DIAGRAMS WIRING DIAGRAM - ENTIRE MACHINE - CODE 10810 (G4047-1) CONTROL PANEL (VIEWED FROM REAR) PRECISION TIG 375 WIRING DIAGRAM L1 (U) 575 VOLT CONNECTION CONNECT STRAP TO L2 (V) HIGH (H4) (AS SHOWN) 304B 460 VOLT CONNECTION POWER SWITCH...
- Page 116 WIRING DIAGRAM - ENTIRE MACHINE - CODE 10894 (G4047-2) 415 VOLT CONNECTION CONNECT STRAP TO CONTROL PANEL (VIEWED FROM REAR) HIGH (H4) (AS SHOWN) PRECISION TIG 375 WIRING DIAGRAM 380-400 VOLT CONNECTION L1 (U) CONNECT STRAP TO MID (H3) L2 (V)
- Page 117 L1 (U) CONNECT STRAP TO HIGH (H4) (AS SHOWN) N.C. DISPLAY TOGGLE SHOWN IN MIN AMP POSITION. PRECISION TIG 375 WIRING DIAGRAM HIGH VOLTAGE CAPACITOR, .0015/12kV PANNEAU DE COMMANDE (VIEWED FROM REAR) CONNECTER LA BRIDE SUR HAUT (H4) (COMME ILLUSTRÉ) N.D.
- Page 118 575 V N.B. ROBOTIC INTERFACE CONNECTION. C4,C5 BY-PASS CAPACITORS, .0047 PRECISION TIG 375 WIRING DIAGRAM CONNECT STRAP TO HIGH (H4) (AS SHOWN) N.C. DISPLAY TOGGLE SHOWN IN MIN AMP POSITION. HIGH VOLTAGE CAPACITOR, .0015/12kV CONNECTER LA BRIDE SUR HAUT (H4) (COMME ILLUSTRÉ) L1 (U) N.D.
- Page 119 MIN OUTPUT (0 - 1.5V) 10J9 OUTPUT BALANCE (0 - 10V) INDUCTOR 12J9 STICK OCV BOOST CIRCUIT, BYPASS PCB RECONNECT +15V PRESENT ONLY ON PRECISION TIG 375 PANEL OUTPUT SCHE. S24206-X REMOTE (+15V) POSTFLOW (0 - 15V) 313B DISPLAY MIN A (+15V) 11J9 TOROID...
- Page 120 OUTPUT 10J9 INDUCTOR BALANCE (0 - 10V) 12J9 AC & DC STICK OCV BOOST CIRCUIT, RECONNECT BYPASS PCB +15V PRESENT ONLY ON PRECISION TIG 375 OUTPUT PANEL SCHE. S24206-X middle section 75vac REMOTE (+15V) (375 only) POSTFLOW (0 - 15V)
- Page 121 ELECTRICAL DIAGRAMS SCHEMATIC - CONTROL PC BOARD - BELOW CODE 11000 (G3908 PAGE 1) NOTE: This diagram is for reference only. It may not be accurate for all machines covered by this manual. PRECISION TIG 375...
- Page 122 G-10 G-10 ELECTRICAL DIAGRAMS SCHEMATIC - CONTROL PC BOARD - BELOW CODE 11000 (G3908 PAGE 2) NOTE: This diagram is for reference only. It may not be accurate for all machines covered by this manual. PRECISION TIG 375...
- Page 123 G-11 G-11 ELECTRICAL DIAGRAMS SCHEMATIC - CONTROL PC BOARD - BELOW CODE 11000 (G3908 PAGE 3) NOTE: This diagram is for reference only. It may not be accurate for all machines covered by this manual. PRECISION TIG 375...
- Page 124 Lincoln Electric discourages board level troubleshooting and repair since it may compromise the quality of the design and may result in danger to the Machine Operator or Technician.
- Page 125 G-13 G-13 ELECTRICAL DIAGRAMS SCHEMATIC - CONTROL PC BOARD - ABOVE CODE 11000 (G4762 PAGE 1) NOTE: This diagram is for reference only. It may not be accurate for all machines covered by this manual. PRECISION TIG 375...
- Page 126 G-14 G-14 ELECTRICAL DIAGRAMS SCHEMATIC - CONTROL PC BOARD - ABOVE CODE 11000 (G4762 PAGE 2) NOTE: This diagram is for reference only. It may not be accurate for all machines covered by this manual. PRECISION TIG 375...
- Page 127 G-15 G-15 ELECTRICAL DIAGRAMS SCHEMATIC - CONTROL PC BOARD - ABOVE CODE 11000 (G4762 PAGE 3) NOTE: This diagram is for reference only. It may not be accurate for all machines covered by this manual. PRECISION TIG 375...
- Page 128 G-16 G-16 ELECTRICAL DIAGRAMS SCHEMATIC - CONTROL PC BOARD - ABOVE CODE 11000 (G4762 PAGE 4) NOTE: This diagram is for reference only. It may not be accurate for all machines covered by this manual. PRECISION TIG 375...
- Page 129 G-17 G-17 ELECTRICAL DIAGRAMS SCHEMATIC - CONTROL PC BOARD - ABOVE CODE 11000 (G4762 PAGE 5) NOTE: This diagram is for reference only. It may not be accurate for all machines covered by this manual. PRECISION TIG 375...
- Page 130 Lincoln Electric discourages board level troubleshooting and repair since it may compromise the quality of the design and may result in danger to the Machine Operator or Technician.
- Page 131 Lincoln Electric discourages board level troubleshooting and repair since it may compromise the quality of the design and may result in danger to the Machine Operator or Technician.
- Page 132 Lincoln Electric discourages board level troubleshooting and repair since it may compromise the quality of the design and may result in danger to the Machine Operator or Technician.
- Page 133 OR CIRCUITRY OF CONTROLS HAVING A COMMON CODE NUMBER. DIODES = 1A, 400V (UNLESS OTHERWISE SPECIFIED) COMMON CONNECTION NOTE: This diagram is for reference only. It may not be accurate for all machines covered by this manual. PRECISION TIG 375...
- Page 134 Lincoln Electric discourages board level troubleshooting and repair since it may compromise the quality of the design and may result in danger to the Machine Operator or Technician.
- Page 135 .0047 440V 440V FRAME GROUND FILE NAME: S24206_1AA THE LINCOLN ELECTRIC CO. THE LINCOLN ELECTRIC CO. THIS SHEET CONTAINS PROPRIETARY INFORMATION OWNED BY AND IS NOT TO BE REPRODUCED, DISCLOSED OR USED WITHOUT THE EXPRESS PERMISSION O F NOTES :...
- Page 136 Lincoln Electric discourages board level troubleshooting and repair since it may compromise the quality of the design and may result in danger to the Machine Operator or Technician.
- Page 137 G-25 G-25 ELECTRICAL DIAGRAMS SCHEMATIC - TIG OPTION PC BOARD - BELOW CODE 11000 (G4039 PAGE 1) NOTE: This diagram is for reference only. It may not be accurate for all machines covered by this manual. PRECISION TIG 375...
- Page 138 G-26 G-26 ELECTRICAL DIAGRAMS SCHEMATIC - TIG OPTION PC BOARD - BELOW CODE 11000 (G4039 PAGE 2) NOTE: This diagram is for reference only. It may not be accurate for all machines covered by this manual. PRECISION TIG 375...
- Page 139 Lincoln Electric discourages board level troubleshooting and repair since it may compromise the quality of the design and may result in danger to the Machine Operator or Technician.
- Page 140 G-28 G-28 ELECTRICAL DIAGRAMS SCHEMATIC - TIG OPTION PC BOARD - ABOVE CODE 11000 (G4760 PAGE 1) NOTE: This diagram is for reference only. It may not be accurate for all machines covered by this manual. PRECISION TIG 375...
- Page 141 G-29 G-29 ELECTRICAL DIAGRAMS SCHEMATIC - TIG OPTION PC BOARD - ABOVE CODE 11000 (G4760 PAGE 2) NOTE: This diagram is for reference only. It may not be accurate for all machines covered by this manual. PRECISION TIG 375...
- Page 142 G-30 G-30 ELECTRICAL DIAGRAMS SCHEMATIC - TIG OPTION PC BOARD - ABOVE CODE 11000 (G4760 PAGE 3) NOTE: This diagram is for reference only. It may not be accurate for all machines covered by this manual. PRECISION TIG 375...
- Page 143 Lincoln Electric discourages board level troubleshooting and repair since it may compromise the quality of the design and may result in danger to the Machine Operator or Technician.