Panasonic VL-MWD275 Operating Instructions Manual
Wireless video intercom system, main monitor station
Hide thumbs
Also See for VL-MWD275:
- Instruction manual (16 pages) ,
- Important information and quick manual (16 pages)
Table of Contents
Advertisement
Model Name
Wireless Video Intercom System
Main Monitor Station
Thank you for purchasing a Panasonic product.
Please read this document before using the product and save it for future reference.
Carefully read the information found in the section titled "For your safety" in particular.
This system is not designed to provide complete protection from property loss. To the maximum extent permitted by
applicable law, Panasonic will not be held responsible for any damage incurred as a result of property loss.
Installation Guide is supplied separately.
Operating Instructions
Model No.
VL-SWD275
VL-MWD275
Advertisement
Table of Contents

Related Manuals for Panasonic VL-MWD275


Summary of Contents for Panasonic VL-MWD275
- Page 1 This system is not designed to provide complete protection from property loss. To the maximum extent permitted by applicable law, Panasonic will not be held responsible for any damage incurred as a result of property loss. Installation Guide is supplied separately.
-
Page 2: Table Of Contents
Playing recorded images (sub monitor) ............20 6. Using electric locks and PBXs Using electric locks and PBXs Using electric locks ........21 Doorbells .............21 Panasonic PBX integration ......21 7. Incoming call operations Incoming call operations When another incoming call is received ............22... -
Page 3: Introduction
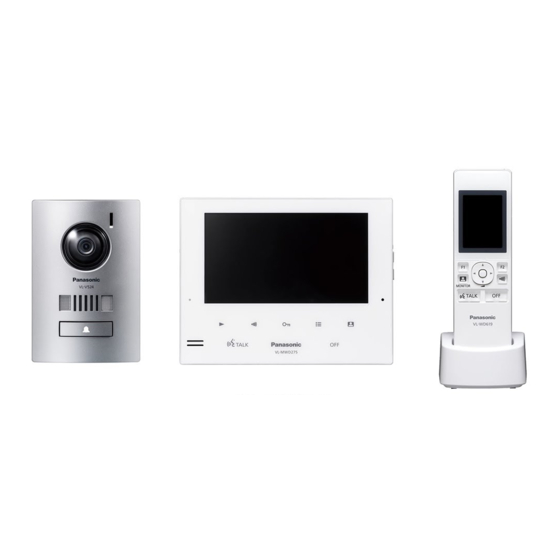
Door Station Main Monitor Station 1. . Introduction (Sub monitor (Doorphone (Main monitor Model composition VL-SWD275 VL-MWD275 VL-WD619 VL-V524 VL-MWD275 VL-MWD275 *1 Can be configured to be used as an extension monitor. *2 Product names used in this document. Note: R Before attempting to connect or operate this product, please read the nameplate on the bottom or rear of the product. -
Page 4: Additional/Replacement Accessories
– VL-V591: Doorphone backlight compensation settings (page 23) – VL-V524/VL-V522L/VL-V591: Wide/zoom settings and zoom position settings (page 14) 1.3.1 Compatible Panasonic PBXs This unit can be used with Panasonic PBXs (page 21). Consult your dealer for more information. Compatible Panasonic PBXs – KX-TDA30/TDA100/TDA100D/TDA200/TDA600 series –... -
Page 5: General Information
This device is classified as a HiNA device (networked equipment with high network availability), according to Ecodesign requirements. Note: R For more information about the energy efficiency of the product, please visit our website, www.panasonic.com, and enter the model number in the search box. Graphical symbols for use on equipment and their descriptions 1. -
Page 6: Symbols, Expressions, And Styles
1. Introduction 1.5 Symbols, expressions, and styles The following symbols, expressions, and styles are used in this document. Item How it is expressed Example Text displayed on the Text is displayed in a special font, “Initial settings” product’s display usually enclosed in quotation marks Icons displayed on the Black-and-white illustration of... -
Page 7: Important Information
2. Important information or electric shock. Confirm that smoke has stopped 2.1 For your safety emitting and contact an authorised service centre. R Hold the main body (not the metal parts) of the AC To prevent severe injury or loss of life or property, and to adaptor, AC cable plug, and power plug when 2. -
Page 8: Important Safety Instructions
Move away from the electrical The main monitor, sub monitor, and other compatible appliances. Panasonic units use radio waves to communicate with R In areas surrounded by a high electrical field, each other. (The product operates in the frequency range disturbances may occur in the unit's image or sound. - Page 9 – The power is turned off during use. R Disclaimer R Panasonic may not be liable for damages due to Recorded data may be altered or deleted as a result external factors such as power failures. of incorrect operations, exposure to static electricity, R If you stop using the main monitor/extension monitor accidents, malfunction, repairs or other operations.
-
Page 10: Preparation
3. Preparation 3.1.2 Main monitor/extension monitor 3.1 Controls 3. . Preparation 3.1.1 Doorphone Lens cover Display (page 12) Camera lens Play lamp (blue) LED lights Lights when there is an unplayed image. The Used to illuminate the visitor’s face or the area in front indicator turns off when the unplayed image is of the doorphone so that the visitor's face can be seen displayed. - Page 11 3. Preparation Soft keys 3.1.3 Sub monitor Soft key icons Indicate the item that will be selected when you press the soft key directly under each icon. The icons that are displayed vary depending on current screen and operation. Soft keys Select the items displayed on the screen directly above each soft key.
-
Page 12: Using The Display
3. Preparation 3.2.2 Sub monitor - monitor display 3.2 Using the display Information screen 3.2.1 Main monitor - display information Image viewing screen Status icons (page 12) Status icons (page 12) The information screen is displayed when the sub monitor is taken off the charger, or M N, M , or Soft key icons (page 11) -
Page 13: Battery Installation
3.4 Charging the sub monitor and prevent the batteries from discharging. – Recharge the batteries before using the sub Only connect the charger with the supplied Panasonic monitor again. AC adaptor (page 3). AC adaptor connections 3.5 Wall mounting... -
Page 14: Setting The Language, Date And Time
3. Preparation Wide mode 3.6 Setting the language, date and Zoom mode (default setting) time When you use the main monitor for the first time, you will be prompted to set the display language, date, and time settings. R The play lamp lights if these settings are not configured. - Page 15 3. Preparation Note: R If you do not perform any operations for 90 seconds while changing this setting, the setting is cancelled and the screen turns off.
-
Page 16: Talking And Monitoring
4. Talking and monitoring is displayed in white. 4.1 Answering doorphone calls Note: When you receive a call from a doorphone, the main R Press-to-talk mode is cancelled when the call ends. 4. . Talking and monitoring monitor, extension monitor, and sub monitor ring, and display an image from the doorphone. -
Page 17: Talking With Other Devices
4. Talking and monitoring Note: R The sound from your end will not be heard at the doorphone. R You can monitor for up to about 3 minutes. Features available while monitoring – Recording doorphone images (page 18) – Adjusting wide/zoom and pan/tilt settings (page 23) –... -
Page 18: Recording And Playing
5. Recording and playing 5.1 Recording doorphone images 5.2 Playing recorded images (main monitor and extension The main monitor and extension monitor can record 5. . Recording and playing doorphone images (still images). They can save images monitor) from up to 50 doorphone calls or monitoring sessions. Each time new images are recorded, they are saved in When there are new (i.e., unplayed) images recorded, an image set of up to 4 images. - Page 19 5. Recording and playing Recording date and time 5.2.2 Options available when playing images Indicates that the image has not been played. While playing images, you can press to display the options menu and change the following settings. Status icons To turn off the operation guide Indicates the number of the doorphone that ®...
-
Page 20: Playing Recorded Images (Sub Monitor)
5. Recording and playing Status icons 5.3 Playing recorded images (sub Indicates the number of the doorphone that monitor) recorded the image. Indicates that the image is protected (i.e., You can view recorded images stored in the main cannot be deleted) monitor using the sub monitor. -
Page 21: Using Electric Locks And Pbxs
Select the doorphone (“Doorphone 1” or PBX extensions to answer doorphone calls. “Doorphone 2”) that you want to assign the electric Please use only a Panasonic PBX (page 4). lock to ® R For detailed information about connections, see the operating instructions included with the PBX and the Select the type of the electric lock ®... -
Page 22: Incoming Call Operations
7. Incoming call operations 7.1 When another incoming call is received When another incoming call is received while talking, monitoring, or receiving an incoming call, the ringtone sounds 7. . Incoming call operations and notifications are received in the following manner for the main monitor, extension monitor, and sub monitor. Main monitor example: Main monitor example: When there is an incoming call from doorphone 2 while... -
Page 23: Additional Functions
8. Additional functions R Sub monitor: 8.1 Zooming in and out (wide/ ® “Voice changer” ® zoom, pan/tilt; main monitor and To turn off the operation guide (main monitor and 8. . Additional functions extension monitor only) extension monitor only) ®... -
Page 24: Ringtone Settings
8. Additional functions 8.3 Ringtone settings Main monitor/extension monitor: You can change the ringtone type and volume that is heard during an incoming call. R For information about how to configure settings, see page 25. Sub monitor: See page 28 for information about changing the ringtone type. Perform the following procedure to adjust the ringtone volume. - Page 25 8. Additional functions Sub-menu Settings Power supply – – <50 Hz>, 60 Hz – To prevent mottled or uneven colour from frequency being displayed, choose the appropriate power supply frequency for your area. Adjust image Colour – Adjusts the colouring of images from the Doorphone 1 (red) doorphone or lobby station.
- Page 26 8. Additional functions Sub-menu Settings Electric Doorphone 1 Electric Connect to <Unlock for 1 second> - lock the electric door lock/ Unlock for 7 seconds Electric lock 1/ vehicle Connect to gate lock the electric lock 2/ Connect to doorphone/ <No connection>...
- Page 27 8. Additional functions Sub-menu Settings Cancel – – – Sub monitor Extension monitor, Repeater *1 These functions are not available for the extension monitor. Item name: “Other” Sub-menu Settings Touch sound – <On>, Off Play lamp – <Enable>, Disable Delete all images Delete all images/Delete Yes, No Non-protected images...
-
Page 28: Sub Monitor - Function Settings List
8. Additional functions 8.5 Sub monitor - function settings list You can change the settings to match how the sub monitor is used. From the information screen press Select the desired item ® R Repeat this step as necessary to navigate to the desired setting. Select the desired setting ®... -
Page 29: Expanding The System
9. Expanding the system Select the registration number of the extension 9.1 Registering sub monitors and monitor to be registered ® extension monitors R Make sure to select the same registration number 9. . Expanding the system that was selected on the main monitor. Extension monitors and additional sub monitors can be R Registration is complete when the extension registered to the main monitor. -
Page 30: Cancelling Devices (Main Monitor/Extension Monitor)
9. Expanding the system When repeaters are used: When registering a repeater for the second time: Select the connection method according to how you want to use the repeater (page 29) ® R Complete the following operations within about 2 minutes. - Page 31 9. Expanding the system monitor, first use the extension monitor to cancel itself, and then re-register it again as an extension monitor. (Extension monitors become main monitors again when they are cancelled.)
-
Page 32: General Information
Output: 24 V DC, 0.6 A Dimensions Approx. 104´100´54 10.2 Specifications (mm) (height ´ (excluding protruding sections) width ´ depth) Main monitor (VL-MWD275) Mass (weight) Approx. 215 g Power source R VL-MWD275BX/CX/ML: Operating Ambient temperature: approx. 220-240 V AC, 50/60 Hz environment 0 °C to +40 °C... - Page 33 10. General information IP rating Operating Ambient temperature: approx. IP44 environment 0 °C to +40 °C *1 Water resistance is only assured if the doorphone is Relative humidity installed correctly according to the instructions in the (non-condensing): up to 90 % Installation Guide, and appropriate water protection measures are taken.
-
Page 34: Troubleshooting
11. Troubleshooting 11.1 Troubleshooting Monitor display (doorphone images) 11. . Troubleshooting Problem Cause & Solution Page Images appear distorted. R Images may appear distorted because of the characteristics of the – camera lens. This is not a malfunction. The image of the subject R At night or when there is poor light in the area around the doorphone, is displayed in black and the image of the subject may be displayed in black and white (or... - Page 35 11. Troubleshooting Problem Cause & Solution Page Images displayed on the R The top part of the sub monitor (where the antenna is located) is being sub monitor distort or are covered with your hand. displayed slowly. (It takes → Do not cover it. 5 seconds or more to be R The sub monitor is too far from the main monitor, or there is an object displayed.)
- Page 36 11. Troubleshooting Sub monitor (charging) Problem Cause & Solution Page R The battery level is very low. flashes and 2 short → Charge the batteries immediately. beeps sound. Even if you place the sub R The AC adaptor is disconnected from the power outlet. monitor on the charger, →...
-
Page 37: Error Messages - Main Monitor
11. Troubleshooting 11.2 Error messages - main monitor N ® select “Information display” ® “Status The following error messages can be viewed by pressing M of connected devices”. Display Cause & Solution Page “Cannot be used.” R The wiring between the main monitor and extension monitor is not connected. -
Page 38: Vl-V901 Basic Operations
12. VL-V901 basic operations This section explains the basic operations of the VL-V901 lobby station (Video Intercom System for Apartment Complexes) when used with the VL-MWD275 main monitor. For further information about features and operations, visit our Web site and find the document: https://panasonic.net/cns/pcc/support/intercom/v900... -
Page 39: Main Monitor Operations With The Lobby Station
12. VL-V901 basic operations 12.2.2 Calling a receptionist Press M N. Press M N or M N to search for the receptionist. Press M N to call. 12.2.3 Opening the door by entering an unlock code Press M#N. Enter the 4-digit unlock code. Press M 12.3 Main monitor operations with the lobby station 12.3.1 Image viewing screen of the main monitor... -
Page 40: System Conditions And Limitations
12. VL-V901 basic operations 12.3.4 Calling extension telephones Press M Select the desired extension telephone. R Up to 4 extension telephones may be displayed. ® Press When finished, press M 12.3.5 Door bells A door bell may be connected to your main monitor. In this case, the main monitor will ring when the door bell button is pressed. - Page 41 1006, Oaza Kadoma, Kadoma-shi, Osaka 571-8501, Japan http://www.panasonic.com © Panasonic Corporation 2020 PNQP1550ZA C0320MM0...