ATEN NRGence PE5108 User Manual
8-outlet 1u metered eco pdu
Hide thumbs
Also See for NRGence PE5108:
- User manual (88 pages) ,
- Quick start manual (2 pages) ,
- User manual (88 pages)
Table of Contents
Advertisement
Quick Links
Advertisement
Table of Contents

Related Manuals for ATEN NRGence PE5108


Summary of Contents for ATEN NRGence PE5108
- Page 1 ATEN NRGence™ PE5-8108 / PE5-8208 8-Outlet 1U Metered eco PDU User Manual...
- Page 2 eco PDU PE Series User Manual Compliance Statements FEDERAL COMMUNICATIONS COMMISSION INTERFERENCE STATEMENT This equipment has been tested and found to comply with the limits for a Class A digital device, pursuant to Part 15 of the FCC Rules. These limits are designed to provide reasonable protection against harmful interference when the equipment is operated in a commercial environment.
-
Page 3: Consignes De Sècuritè Relatives À L'unitè Pe
eco PDU PE Series User Manual PE Device Safety Notice Set the maximum permissible breaker protection in the building circuitry to the current rating specified on the rating plate. Observe all national regulations and safety codes as well as deviations for breakers. ... -
Page 4: About This Manual
eco PDU PE Series User Manual About This Manual This user manual is provided to help you get the most out of your eco PDU. It covers all aspects of the power distribution unit, including installation, configuration, and operation. The eco PDU models covered in this manual include: Model PE5108 15A/10A 8-Outlet 1U Metered eco PDU... -
Page 5: Conventions
eco PDU PE Series User Manual Conventions This manual uses the following conventions: Monospaced Indicates text that you should key in. Indicates keys you should press. For example, [Enter] means to press the Enter key. If keys need to be chorded, they appear together in the same bracket with a plus sign between them: [Ctrl+Alt]. -
Page 6: Package Contents
eco PDU PE Series User Manual Package Contents The eco PDU standard package consists of: 1 PE5108 / PE5208 / PE6108 / PE6208 / PE7108 / PE7208 / PE8108 / PE8208 Power Distribution Unit 1 power cord 1 mounting kit ... -
Page 7: Product Information
For information about all ATEN products and how they can help you connect without limits, visit ATEN on the Web or contact an ATEN Authorized Reseller. Visit ATEN on the Web for a list of locations and telephone numbers: International http://www.aten.com... -
Page 8: User Notice
ATEN is not liable for any loss or damage. -
Page 9: Table Of Contents
eco PDU PE Series User Manual Contents Compliance Statements ........ii Consignes de sècuritè... - Page 10 eco PDU PE Series User Manual PE6108B / PE6108G / PE6208B / PE6208G / PE8108B / PE8108G / PE8208B / PE8208G Readout Section ..... . . 15 Hardware Setup Chapter 2.
- Page 11 eco PDU PE Series User Manual Safety Instructions......... . . 57 General .
- Page 12 eco PDU PE Series User Manual This Page Intentionally Left Blank...
-
Page 13: Chapter 1 Introduction
Graphical User Interface that allows you to configure a PDU device and monitor power status of the equipment connected. This series of ATEN eco PDUs have a circuit breaker alert that can sound an alarm and send SNMP trap or e-mail alerts when a trip occurs. This feature... - Page 14 eco PDU PE Series User Manual provides a faster response time to recover servers and other devices during power loss due to circuit overload. With its advanced security features and ease of operation, the eco PDU is the most convenient, reliable, and cost-effective way to remotely manage power access for multiple computer installations and allocate power resources efficiently.
-
Page 15: Pe Series Eco Pdu Comparison Chart
Chapter 1. Introduction PE Series eco PDU Comparison Chart Amps Power Cord Monitoring Model Outlets (IEC C19 to) Level Per Port Total PE5108A NEMA 5-15P NEMA 5-15R PE5108B NEMA 6-15P IEC C13 PE5108G IEC C14 IEC C13 PE5208A NEMA 5-20P NEMA 5-20R PE5208B NEMA 6-20P... -
Page 16: Features
eco PDU PE Series User Manual Features Power Distribution Space saving 1U rack mount design with rear mounting IEC or NEMA outlet models 3 digit 7-segment front panel LED display showing the current, IP address of PDU, and outlets ... -
Page 17: Management
Chapter 1. Introduction Management Power status measurement at the PDU/outlet level LED indicators for current and IP address at the PDU device and / or outlet levels. Real-time current, voltage, and kWH displayed in a browsed-based UI for monitoring at the PDU level (PE5108 / PE5208 / PE6108 / PE6208) and at the outlet level (PE7108 / PE7208 / PE8108 / PE8208) ... -
Page 18: Requirements
eco PDU PE Series User Manual Requirements Browsers accessing the eco PDU unit must support TLS 1.2. For cold booting of attached computers, the computer's BIOS must support Wake on LAN or System after AC Back. For Safe Shutdown: ... -
Page 19: Optional Accessories
Plug cable holders to secure the connecting cables of your attached devices in place on the eco PDU. Use only the ATEN Lok-U-Plug cable holders that have been specifically designed to work with eco PDU. Using any other types of cable securing device could be highly dangerous. -
Page 20: Components
eco PDU PE Series User Manual Components PE5108A / PE7108A Front View PE5208A / PE7208A Front View PE5108A / PE5208A / PE7108A / PE7208A Rear View... -
Page 21: Pe5108A / Pe5208A / Pe7108A / Pe7208A Readout Section
Press the button to pushbutton recover normal operation. power sockets 8 x NEMA 5-15R or 8 x NEMA 5-20R Note: Holes for ATEN Lok-U-Plug cable holders are located around the sockets. See Securing the Cables, page 19, for further information. readout section The selection (PDU Current / Outlet Current / IP Address) appears in the first (1-digit) display window. -
Page 22: Pe5108B / Pe5108G / Pe7108B / Pe7108G Front View
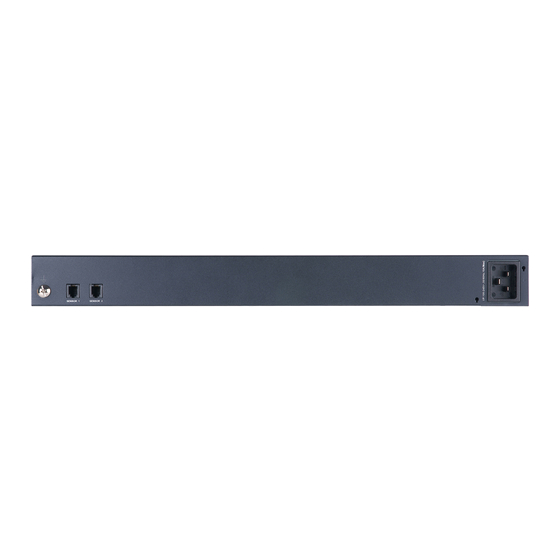
eco PDU PE Series User Manual PE5108B / PE5108G / PE7108B / PE7108G Front View PE5208B / PE5208G / PE7208B / PE7208G Front View PE5108B / PE5108G / PE5208B / PE5208G / PE7108B / PE7108G / PE7208B / PE7208G Rear View... -
Page 23: Pe5108B / Pe5108G / Pe5208B / Pe5208G / Pe7108B / Pe7108G / Pe7208B / Pe7208G Readout Section
8 x IEC60320 C13 or 7 x IEC60320 C13 + 1 x C19 Note: Holes for ATEN Lok-U-Plug cable holders are located around the sockets. See Securing the Cables, page 19, for further information. ... -
Page 24: Pe6108A / Pe8108A Front View
eco PDU PE Series User Manual PE6108A / PE8108A Front View PE6208A / PE8208A Front View PE6108A / PE6208A / PE8108A / PE8208A Rear View... -
Page 25: Pe6108A / Pe6208A / Pe8108A / Pe8208A Readout Section
Press the button to pushbutton recover normal operation. power sockets 8 x NEMA 5-15R or 8 x NEMA 5-20R Note: Holes for ATEN Lok-U-Plug cable holders are located around the sockets. See Securing the Cables, page 19, for further information. readout section The selection (PDU Current / Outlet Current / IP Address) appears in the first (1-digit) display window. -
Page 26: Pe6108B / Pe6108G / Pe8108B / Pe8108G Front View
eco PDU PE Series User Manual PE6108B / PE6108G / PE8108B / PE8108G Front View PE6208B / PE6208G / PE8208B / PE8208G Front View PE6108B / PE6108G / PE6208B / PE6208G / PE8108B / PE8108G / PE8208B / PE8208G Rear View... -
Page 27: Pe6108B / Pe6108G / Pe6208B / Pe6208G / Pe8108B / Pe8108G / Pe8208B / Pe8208G Readout Section
8 x IEC320 C13 or 7 x IEC320 C13 + 1 x C19 Note: Holes for ATEN Lok-U-Plug cable holders are located around the sockets. See Securing the Cables, page 19, for further information. ... - Page 28 eco PDU PE Series User Manual This Page Intentionally Left Blank...
-
Page 29: Chapter 2. Hardware Setup
Chapter 2 Hardware Setup Before You Begin 1. Important safety information regarding the placement of this device is provided on page 57. Please review it before proceeding. 2. Make sure that power to all the devices you will be connecting have been turned off. -
Page 30: Installation
eco PDU PE Series User Manual Installation To set up your eco PDU installation, refer to the installation diagram on the next page (the numbers in the diagram correspond to the numbered steps), and do the following: 1. Use a grounding wire to ground the eco PDU by connecting one end of the wire to its grounding terminal, and the other end of the wire to a suitable grounded object. -
Page 31: Securing The Cables
Chapter 2. Hardware Setup Securing the Cables For added safety, use ATEN Lok-U-Plug cable holders to secure the cables from your attached devices in place on the eco PDU unit. Secure the cable holders using the specially designed holes around the individual power outlets, as shown below: Note: 1. -
Page 32: Securing The Sensors
eco PDU PE Series User Manual Securing the Sensors Connect the sensors to the eco PDU’s front panel sensor ports and secure them using sensor mounts, tie wraps, and adhesive cable tie holders. If you use a tie wrap to secure the sensor, tighten the tie wrap over the recessed channel on the sensor, as shown in the following diagram: Note: 1. -
Page 33: Chapter 3. Basic Operation And First Time Setup
PDU device and monitor power status of the equipment connected to it. NRGence eco DC can be downloaded from the ATEN website, along with a separate eco DC User Manual. SNMP The eco PDU supports any 3rd party V3 SNMP Manager Software. SNMP Management Information Database (MIB) files for the eco PDU device can be found on the software CD provided with the eco PDU package. -
Page 34: First Time Setup
eco PDU PE Series User Manual First Time Setup Once the eco PDU installation has been cabled up, the next task the Administrator needs to perform involve configuring the network parameters, changing the default Super Administrator login settings, and adding users. The way to accomplish this is to log in over the Net with a browser. -
Page 35: Network Configuration
Chapter 3. Basic Operation and First Time Setup Network Configuration To set up the network, do the following: 1. Click the Setup tab. 2. The interface displays the Device Configuration page. A screen similar to the one below appears: 3. Fill in the fields according to the information provided under Device Configuration, page 38. -
Page 36: Changing The Administrator Login
eco PDU PE Series User Manual Changing the Administrator Login To change the default Administrator username and password, do the following: 1. Click the User tab. The Accounts page has a detailed list of users – with more information about them – in the large central panel: 2. -
Page 37: Chapter 4. Browser Operation
Chapter 4 Browser Operation Logging In The eco PDU can be accessed via a supported Internet browser from any platform. Note: Browsers must support TLS 1.2. To access the eco PDU do the following: 1. Open your browser and specify the IP address of the eco PDU you want to access in the browser's URL location bar. -
Page 38: The Eco Pdu Main Page
eco PDU PE Series User Manual The eco PDU Main Page After you have successfully logged in, the eco PDU Main Page comes up with the Energy Connections page displayed: Note: The screen depicts an Administrator’s page. Depending on a user’s type and permissions, not all of these elements appear. -
Page 39: Page Components
The Sidebar provides a tree view listing of outlets that relate to the various tab bar and menu bar selections. Help Connects to on-line help at the ATEN website for the device’s configuration and operation. Logout Click this button to log out of your eco PDU session. -
Page 40: Energy
eco PDU PE Series User Manual Energy Connections When you log in to the eco PDU, the interface opens with its default selection of the Energy tab; and the Connections menu. The contents of the PDU Status and Outlet Status sections are displayed in the main panel. Note: Only enabled eco PDU models will display the Outlet Status submenu section. - Page 41 Chapter 4. Browser Operation PDU Status All eco PDU models support PDU device level monitoring. The PDU Status section allows you to set up a power management configuration for the PDU device as a whole: PDU Threshold Settings These fields are used to set the maximum, minimum, and fluctuation threshold settings for Aggregate Current, Voltage, Power, and Aggregate Power Dissipation.
- Page 42 eco PDU PE Series User Manual Outlet Status If your eco PDU models supports outlet level monitoring, the main panel Outlet Status section allows you to set up a power management configuration for each outlet at an individual level. Outlet Threshold Settings These fields are used to set the maximum, minimum, and fluctuation threshold settings for Current, Voltage, Power, and Power Dissipation.
-
Page 43: Configuration
Chapter 4. Browser Operation Configuration The Configuration page is used to configure the settings of the eco PDU at the individual power outlet level: POP Settings This section allows you to configure the settings for the Proactive Overload Protection (POP) feature. Effective on all non-critical outlets, this added safety feature automatically powers off outlets in the user- defined sequence when a current overload occurs in protecting the powered devices. - Page 44 eco PDU PE Series User Manual (Continues on next page.) Power On Time Schedule Settings Check the Enable Power On Time Schedule box to use the Power ON Delay setting to set the amount of time the eco PDU waits before powering on an outlet.
- Page 45 Chapter 4. Browser Operation Heading Meaning Remote Turn ON Use the drop-down menu to select one of the choices, below: Method Wake on LAN: This is a Safe Shutdown and Restart option. If this is selected, when an Outlet is turned Off, the eco PDU first sends a message to the computer telling it to prepare for a shutdown;...
-
Page 46: User
eco PDU PE Series User Manual User When you select the User tab the screen comes up with Administrator Information and User Information displayed in the main panel. The eco PDU supports one Administrator account and up to eight User accounts. Note: 1. -
Page 47: User Information
Chapter 4. Browser Operation User Information To add a user, do the following: 1. Select the user type in the Management drop-down menu. 2. Key in a name and password in the Name and Password fields. 3. Set the outlet-by-outlet permissions of the user in the Outlet field. 4. -
Page 48: Log
eco PDU PE Series User Manual The Log tab keeps a record of transactions that take place on its installation, and stores up to 128 events at one time. The System Log page provides a powerful array of filters and functions that allow you to view and export the log file data, as well as be informed by email of specified events as they occur. -
Page 49: Notification Settings
Chapter 4. Browser Operation Notification Settings The Notification Settings page is used to specify which of the eco PDU’s components will receive notification of a log event. When you click the Notification Settings menu item, a page similar to the one below appears: ... -
Page 50: Setup
eco PDU PE Series User Manual Setup The Setup tab provides Device Configuration and Security settings. The Device Configuration page allows super administrators, administrators, and users with device management permission to configure eco PDU system settings. The Security page controls access to the PDU. Device Configuration This page presents information about the selected device, as described in the following sections:... - Page 51 Chapter 4. Browser Operation Service Ports As a security measure, if a firewall is being used, the Administrator can specify the port numbers that the firewall will allow. If a port other than the default is used, users must specify the port number as part of the IP address when they log in.
- Page 52 eco PDU PE Series User Manual IPv4 Configuration The PDU’s IPv4 IP and DNS addresses (the traditional method of specifying IP addresses) can either be assigned dynamically (DHCP), or a fixed IP address can be specified. For dynamic IP address assignment, select the Obtain IP address automatically radio button.
- Page 53 Chapter 4. Browser Operation Event Notification The Event Notification section is divided into three sections: SMTP Settings; SNMP Trap Receivers; and Syslog Server. Each section is described below. SMTP Settings To have the eco PDU device email reports from the SMTP server to you, do the following: 1.
- Page 54 eco PDU PE Series User Manual SNMP Trap Receivers Up to four SNMP management stations can be specified. If you want to use SNMP trap notifications, do the following: 1. Check Enable SNMP Trap. 2. Select which version of SNMP you want to use. 3.
- Page 55 Chapter 4. Browser Operation Syslog Server To record all the events that take place on eco PDU devices and write them to the eco PDU Syslog server, do the following: 1. Check Enable Syslog Server. 2. Key in the IP address and the port number of the Syslog server. The valid port range is 1-65535.
-
Page 56: Date/Time
eco PDU PE Series User Manual Date/Time The Date/Time dialog page sets the eco PDU time parameters: Time Zone To establish the time zone that the eco PDU is located in, drop down the Time Zone list and choose the city that most closely corresponds to where it is at. - Page 57 Chapter 4. Browser Operation Manual Input Use this section to specify the eco PDU’s date and time manually. Click the calendar icon and click the calendar entry for the date. Key the time into the Time field, using the HH:MM:SS (hours, minutes, seconds) format.
-
Page 58: Security
eco PDU PE Series User Manual Security The Security page controls access to the eco PDU device. Login Failures Allowed sets the number of consecutive failed login attempts that are permitted from a remote user. Timeout sets the amount of time a remote user must wait before attempting to login again after exceeding the number of allowed failures. -
Page 59: Account Policy
Chapter 4. Browser Operation Account Policy The Account Policy section governs policies in regard to usernames and passwords. Check a policy and enter the required information in the appropriate fields. Item Description Minimum Username Length Sets the minimum number of characters required for a username. -
Page 60: Login String / Ip Filter / Mac Filter
eco PDU PE Series User Manual Login String / IP Filter / Mac Filter Login String The Login String entry field is used to specify a login string (in addition to the IP address) that users must include when accessing the eco PDU device with a browser. - Page 61 Chapter 4. Browser Operation IP Filter / MAC Filter If any filters have been configured, they appear in the IP Filter and/or MAC Filter list boxes. IP and MAC Filters control access to the eco PDU based on the IP and/or MAC addresses of the client computers attempting to connect.
- Page 62 eco PDU PE Series User Manual To add a MAC filter, do the following: 1. Click Add. A dialog box similar to the one below appears: 2. Specify the MAC address in the dialog box (for example, 001074670000), then click OK. Repeat these steps for any additional MAC addresses you want to filter.
-
Page 63: Authentication & Authorization
Chapter 4. Browser Operation Authentication & Authorization The Authentication & Authorization page is used to set up login authentication and authorization management from external sources. RADIUS Settings To allow authentication and authorization for the eco PDU device through a RADIUS server, do the following: 1. -
Page 64: Private Certificate
For enhanced security, the Private Certificate section allows you to use your own private encryption key and signed certificate, rather than the default ATEN certificate. There are two methods for establishing your private certificate: generating a self-signed certificate;... - Page 65 3. Click Upload to complete the procedure. Note: 1. Clicking Restore Default returns the device to using the default ATEN certificate. 2. Both the private encryption key and the signed certificate must be imported at the same time.
-
Page 66: Pdu
eco PDU PE Series User Manual The PDU tab is used to upgrade the eco PDU’s firmware, and to backup and restore the device’s configuration settings. Firmware File When you click the Maintenance tab, the display opens with the Firmware Upgrade menu page, which looks similar to the one below: A description of the items shown in this panel are given in the table, below: Item... - Page 67 Chapter 4. Browser Operation Upgrading the Firmware To upgrade the firmware refer to the screenshot on the preceding page, and do the following: 1. Go to our website and download the new firmware file to a convenient location on your computer. 2.
-
Page 68: Backup/Restore
eco PDU PE Series User Manual Backup/Restore Selecting Backup/Restore on the menu bar gives you the ability to back up the switch’s configuration and user profile information: Backup To backup the device’s settings do the following: 1. In the Password field, key in a password for the file. Note: Entering a password is optional. -
Page 69: Safety Instructions
Appendix Safety Instructions General This product is for indoor use only. Read all of these instructions. Save them for future reference. Follow all warnings and instructions marked on the device. Do not place the device on any unstable surface (cart, stand, table, etc.). If the device falls, serious damage will result. - Page 70 eco PDU PE Series User Manual If an extension cord is used with this device make sure that the total of the ampere ratings of all products used on this cord does not exceed the extension cord ampere rating. Make sure that the total of all products plugged into the wall outlet does not exceed 15 amperes.
- Page 71 Appendix Only adjust those controls that are covered in the operating instructions. Improper adjustment of other controls may result in damage that will require extensive work by a qualified technician to repair. Do not connect the RJ-11 connector marked “Sensor” to a public telecommunication network.
-
Page 72: Consignes De Sécurité
eco PDU PE Series User Manual Consignes de sécurité Général Ce produit est destiné exclusivement à une utilisation à l’intérieur. Veuillez lire la totalité de ces instructions. Conservez-les afin de pouvoir vous y référer ultérieurement. Respectez l’ensemble des avertissements et instructions inscrits sur l’appareil. - Page 73 Appendix L’équipement doit être installé à proximité de la prise murale et le dispositif de déconnexion (prise de courant femelle) doit être facile d’accès. Veillez à ce que rien ne repose sur le cordon d’alimentation ou les câbles. Acheminez le cordon d’alimentation et les câbles de sorte que personne ne puisse marcher ou trébucher dessus.
- Page 74 eco PDU PE Series User Manual N’utilisez que les commandes qui sont abordées dans le mode d’emploi. Le réglage incorrect d’autres commandes peut être à l’origine de dommages qui nécessiteront beaucoup de travail pour qu’un technicien qualifié puisse réparer l’unité. ...
-
Page 75: Rack Mounting
To secure the cables in the eco PDU’s power outlets, use only the ATEN Lok-U-Plug cable holders that have been specifically designed to work with the eco PDU. Using any other kind of cable securing device could be highly dangerous. Please contact your ATEN dealer for information about ATEN Lok-U-Plugs. -
Page 76: Montage Sur Bâti
Fixation des câbles d’alimentation Pour fixer les câbles aux sorties d’alimentation de l’unité d’alimentation éco, utilisez uniquement les supports de câble Lok-U- Plug d’ATEN qui ont été conçus spécialement pour être utilisés avec l’unité... - Page 77 Appendix d’alimentation éco. L’utilisation de tout autre type système de fixation de câble pourrait s’avérer très dangereuse. Veuillez contacter votre revendeur ATEN pour plus d’informations sur le support de câble ATEN Lok-U-Plug.
-
Page 78: Technical Support
PDU PE Series User Manual Technical Support International For online technical support – including troubleshooting, documentation, and software updates: http://eservice.aten.com For telephone support, see Telephone Support, page vii North America Email Support support@aten-usa.com Online Troubleshooting http://www.aten-usa.com/support Technical... -
Page 79: Ip Address Determination
Appendix IP Address Determination If you are an administrator logging in for the first time, you need to access the eco PDU in order to give it an IP address that users can connect to. There are two methods to choose from. In each case, your client computer must be on the same network segment as the eco PDU. - Page 80 NRGence eco DC allows you to determine/assign an IP address in order to configure a PDU device and monitor power status of the equipment connected to it. NRGence eco DC can be obtained from the Download area of the ATEN website.
-
Page 81: Specifications
Appendix Specifications PE5108A / PE5208A / PE7108A / PE7208A Function PE5108A / PE7108A PE5208A / PE7208A Power Outlets Direct Connectors Power Inlet 1 x IEC 320 C20 Power NEMA 8 x NEMA 5-15R 8 x NEMA 5-20R Outlets Sensor 2 x RJ-11 1 x RJ-45 (F) LEDs Outlet Status... -
Page 82: Pe5108B / Pe5208B / Pe7108B / Pe7208B
eco PDU PE Series User Manual PE5108B / PE5208B / PE7108B / PE7208B Function PE5108B / PE7108B PE5208B / PE7208B Power Outlets Direct Connectors Power Inlet 1 x IEC 320 C20 Power NEMA Outlets 8 x IEC 320 C13 7 x IEC 320 C13 (Ports 2–8); 1 x C19 (Port 1) Sensor 2 x RJ-11... -
Page 83: Pe5108G / Pe5208G / Pe7108G / Pe7208G
Appendix PE5108G / PE5208G / PE7108G / PE7208G Function PE5108G / PE7108G PE5208G / PE7208G Power Outlets Direct Connectors Power Inlet 1 x IEC 320 C20 Power NEMA Outlets 8 x IEC 320 C13 7 x IEC 320 C13 (Ports 2–8); 1 x C19 (Port 1) Sensor 2 x RJ-11... -
Page 84: Pe6108A / Pe6208A / Pe8108A / Pe8208A
eco PDU PE Series User Manual PE6108A / PE6208A / PE8108A / PE8208A Function PE6108A / PE8108A PE6208A / PE8208A Power Outlets Direct Connectors Power Inlet 1 x IEC 320 C20 Power NEMA 8 x NEMA 5-15R 8 x NEMA 5-20R Outlets Sensor 2 x RJ-11... -
Page 85: Pe6108B / Pe6208B / Pe8108B / Pe8208B
Appendix PE6108B / PE6208B / PE8108B / PE8208B Function PE6108B / PE8108B PE6208B/ PE8208B Power Outlets Direct Connectors Power Inlet 1 x IEC 320 C20 Power NEMA Outlets 8 x IEC 320 C13 7 x IEC 320 C13 (Ports 2–8); 1 x C19 (Port 1) Sensor 2 x RJ-11... -
Page 86: Pe6108G / Pe6208G / Pe8108G / Pe8208G
eco PDU PE Series User Manual PE6108G / PE6208G / PE8108G / PE8208G Function PE6108G / PE8108G PE6208G/ PE8208G Power Outlets Direct Connectors Power Inlet 1 x IEC 320 C20 Power NEMA Outlets 8 x IEC 320 C13 7 x IEC 320 C13 (Ports 2–8); 1 x C19 (Port 1) Sensor 2 x RJ-11... -
Page 87: Administrator Login Failure
Appendix Administrator Login Failure If you are unable to perform an Administrator login (because the Username and Password information has become corrupted, or you have forgotten it, for example), you can clear the login information with the following procedure: 1. Power off the eco PDU and remove its housing. 2. -
Page 88: Limited Warranty
Copyright © 2021 ATEN® International Co., Ltd. Released: 2021-08-11 ATEN and the ATEN logo are registered trademarks of ATEN International Co., Ltd. All rights reserved. All other brand names and trademarks are the registered property of their respective owners.