ATEN PE4104G User Manual
Ip control box
Hide thumbs
Also See for PE4104G:
- User manual (104 pages) ,
- User manual (92 pages) ,
- User manual (98 pages)
Table of Contents
Advertisement
Quick Links
Advertisement
Table of Contents

Related Manuals for ATEN PE4104G


Summary of Contents for ATEN PE4104G
- Page 1 IP Control Box PE4104G User Manual www.aten.com...
-
Page 2: Emc Information
© Copyright 2020 ATEN® International Co., Ltd. Manual Date: 2020-12-23 ATEN and the ATEN logo are registered trademarks of ATEN International Co., Ltd. All rights reserved. All other brand names and trademarks are the registered property of their respective owners. -
Page 3: User Information
ATEN is not liable for any loss or damage. -
Page 4: Package Contents
PE4104G User Manual Package Contents 1 PE4104G IP Control Box 1 Standard Rack Mount Kit 1 Power Cord 4 Footpads 1 User Instructions* Check to make sure that all of the components are present and in good order. -
Page 5: Table Of Contents
PE4104G Front View........ - Page 6 PE4104G User Manual Connections ..........19 PDU Status .
- Page 7 PE4104G.........
-
Page 8: About This Manual
PE4104G User Manual About This Manual This User Manual is provided to help you get the most from the PE4104G unit/ system. It covers all aspects of installation, configuration and operation. An overview of the information in the manual is provided below. -
Page 9: Conventions
For information about all ATEN products and how they can help you connect without limits, visit ATEN on the Web or contact an ATEN Authorized Reseller. Visit ATEN on the Web for a list of locations and telephone numbers: International http://www.aten.com... - Page 10 PE4104G User Manual This Page Intentionally Left Blank...
-
Page 11: Chapter 1 Introduction
The PE4104G boasts a slim, compact form factor and supports desk mount as well as rack mount, ensuring easy installation in confined spaces. It is a smart... -
Page 12: Features
PE4104G User Manual Features Power Distribution Space saving slim form factor IEC power outlet Separates power for the unit’s own power and its power outlets – user interface is still accessible even when an overload condition trips the device’s circuit breaker... -
Page 13: Requirements
Chapter 1. Introduction Requirements Browsers accessing the PE4104G unit must support 2048 and 4096 bit encryption. For cold booting of attached computers, the computer’s BIOS must support wake on LAN or System after AC Back. For Safe Shutdown: ... -
Page 14: Optional Accessories
Sensors are optional accessories. You can use the PE4104G unit without sensors. However, if you want to have complete energy management of an instrumented data center with the use of the PE4104G, you would need to use eco DC software and install sensor to generate a complete energy-efficient data and chart. -
Page 15: Components
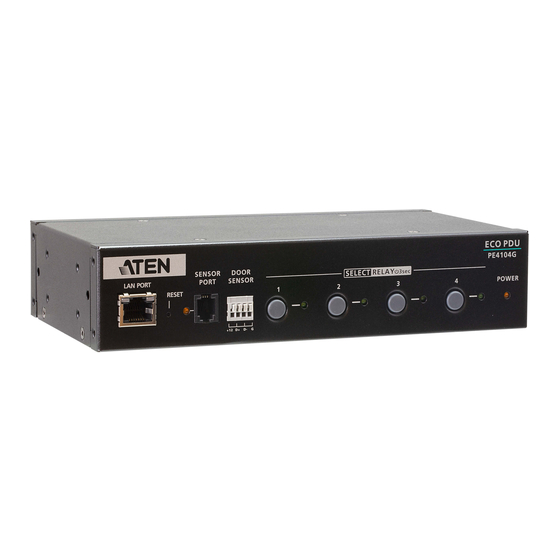
Chapter 1. Introduction Components PE4104G Front View Component Description LAN Port The Cat 5e cable that connects the unit to the Internet plugs in here. Reset Button Press and release to reboot the unit. This Reset Button (recessed) is recessed and must be pushed with a thin object, such as the end of a paper clip, or a ballpoint pen. -
Page 16: Pe4104G Rear View
PE4104G User Manual PE4104G Rear View Component Description Grounding Terminal Connects to a suitable grounding object. Power Outlet Sockets Electrical appliances plug in here. Circuit Breaker Protects the PDU from damage caused by excess current from an overload or short circuit. -
Page 17: Chapter 2. Hardware Setup
Important safety information regarding the placement of this device is provided on page 63. Please review it before proceeding. Rack Mounting The PE4104G can be mounted vertically on the outside of the rack and a few options are available. Desktop Mount... - Page 18 PE4104G User Manual 2. Align and stabilize the mounting ear using M3 Phillips Hex Screws. 3. Align the unit and the mounting ear to the rack and stabilize the unit using rack screws. Let the buttons stabilize in the button holes and the mounting...
-
Page 19: Installation
(the numbers in the diagram correspond to the numbered steps), and do the following: 1. Ground the PE4104G by connecting one end of a grounding wire to the Grounding Terminal and the other end to a suitable grounded object. -
Page 20: Securing The Cable
PE4104G User Manual Securing the Cable For added safety, use ATEN Lok-U-Plug cable holders to secure the cables from your attached devices in place on the unit. Secure the cable holders using the specially designed holes around the individual power outlets, as shown... -
Page 21: Chapter 3. Basic Operation And First Time Setup
Basic Operation and First Time Setup Operation Methods The PE4104G provide three methods to access and manage your installation: Browser, eco DC Energy Management Software and SNMP. Note: The following sections of this chapter contain information concerning Browser operation. For eco DC operation, please refer to the separate eco DC User Manual. -
Page 22: First Time Setup
PE4104G User Manual First Time Setup Once the eco PDU installation has been cabled up, the next task the Administrator needs to perform involve configuring the network parameters, changing the default Super Administrator login settings, and adding users. The way to accomplish this is to log in via web browser. -
Page 23: Network Configuration
Chapter 3. Basic Operation and First Time Setup Network Configuration To configure the network settings, do the following: 1. Click the Setup tab. 2. The interface displays the Device Configuration page. A screen similar to the one below appears: 3. Fill in the fields according to the information provided under Device Configuration, page 31. -
Page 24: Moving On
PE4104G User Manual Moving On After setting up the network and changing the default Administrator username and password, you can proceed to other administration activities – including adding users. This is covered in the next chapter. -
Page 25: Chapter 4. Browser Operation
Note: Browsers must support SSL 2048 and 4096 bit encryption. To access the PE4104G do the following: 1. Open your browser and specify the IP address of the PE4104G you want to access in the browser's URL location bar. Note: You can get the IP address from the PE4104G administrator, or see IP Address Determination, page 67, for information about setting it up yourself. - Page 26 PE4104G User Manual 3. Provide a valid Username and Password (set by the administrator), and select your language. (Options are: English [default]; Traditional Chinese; Simplified Chinese; Japanese; German; Italian; Spanish; French; Russian; Korean; Portuguese). 4. Then Click Login to bring up the browser Main Page.
-
Page 27: The Eco Pdu Main Page
Chapter 4. Browser Operation The eco PDU Main Page After you have successfully logged in, the PE4104G Main Page comes up with the Energy Connections page displayed: Note: The screen depicts an Administrator’s page. Depending on a user’s type and permissions, not all of these elements appear. - Page 28 PE4104G User Manual Item Description Interactive Display Panel This is your main work area. The screens that appear reflect your menu choices and Sidebar node selection.
-
Page 29: Energy
Energy Connections When you log in to the PE4104G, the interface opens with its default selection of the Energy tab; and the Connections menu. The contents of the PDU Status, Sensor Status, and Outlet Status sections are displayed in the main panel. -
Page 30: Sensor Status
Note: Sensors are optional accessories. Check with your dealer for information about eco DC software. Outlet Status The PE4104G supports on, off and reboot control from the outlet status column for each outlet. On / Off / Reboot You can manually turn the outlet On and Off from this page by clicking the radio buttons. -
Page 31: Configuration
Chapter 4. Browser Operation Configuration The Configuration page is used to configure the settings of the PE4104G at the individual power outlet level. Power On Time Schedule Settings Check the Enable Power On Time Schedule box to use the Power ON Delay setting to set the amount of time the eco PDU waits before powering on an outlet. - Page 32 PE4104G User Manual Heading Meaning Outlet Shows the port number of the listed outlet. Outlet Name Each outlet can be given a distinctive name. The maximum number of characters is 48. Confirmation If this option is enabled (there is a check in the checkbox), a dialog...
- Page 33 Chapter 4. Browser Operation Heading Meaning Remote Turn ON Use the drop-down menu to select one of the choices, below: Method Wake on LAN: This is a Safe Shutdown and Restart option. If this is selected, when an Outlet is turned Off, the eco PDU first sends a message to the computer telling it to prepare for a shutdown;...
- Page 34 PE4104G User Manual Heading Meaning Autoping Autoping Monitoring pings a device at specified intervals and if Monitoring there is no response (Request timed out) the PDU automatically powers cycles the outlet (off and then on). To enable Autoping Monitoring, check the Enable checkbox, or check the Disable checkbox to disable.
-
Page 35: User
User When you select the User tab the screen comes up with Administrator Information and User Information displayed in the main panel. The PE4104G supports one Administrator account and up to eight User accounts. Note: 1. Each account can support 2 login sessions. -
Page 36: Snmpv1/V2C Community
PE4104G User Manual SNMPv1/v2c Community Enter values Read community and Write community for SNMPv1/V2c authentication, if required. Telnet Use the Name and Password fields to change the account used to login via Telnet sessions. Enter values in the required fields to change the account used to login via SSH. - Page 37 Chapter 4. Browser Operation Field Description Name From 1 to 16 characters are allowed depending on the Account Policy settings. See Account Policy, page 40. Password From 1 to 16 characters are allowed depending on the Account Policy settings. See Account Policy, page 40. Outlet This field allows you to set the outlet-by-outlet permissions of the user.
-
Page 38: Log
PE4104G User Manual The Log tab keeps a record of transactions that take place on its installation, and stores up to 1024 events at one time. The System Log page provides a powerful array of filters and functions that allow you to view and export the log file data, as well as be informed by email of specified events as they occur. -
Page 39: Notification Settings
Chapter 4. Browser Operation Notification Settings The Notification Settings page is used to specify which of the PE4104G’s components will receive notification of a log event. When you click the Notification Settings menu item, a page similar to the one below appears: ... - Page 40 PE4104G User Manual If you only want to set notification for some of the sub-category events, don’t put a check in the main category row. Instead, drop down the sub-category list, and only check the sub-category events you want.
-
Page 41: Setup
Chapter 4. Browser Operation Setup The Setup tab provides Device Configuration and Security settings. The Device Configuration page allows administrators to configure the PE4104G’s system settings. The Security page controls access to the PDU. Device Configuration This page presents information about the selected device, as described in the... -
Page 42: Service Ports
If a port other than the default is used, users must specify the port number as part of the IP address when they log in. If an invalid port number (or no port number) is specified, the PE4104G will not be found. -
Page 43: Ipv4 Configuration
Chapter 4. Browser Operation IPv4 Configuration The PDU’s IPv4 IP and DNS addresses (the traditional method of specifying IP addresses) can either be assigned dynamically (DHCP), or a fixed IP address can be specified. For dynamic IP address assignment, select the Obtain IP address automatically radio button. -
Page 44: Event Notification
SNMP Trap Receivers; and Syslog Server. Each section is described below. SMTP Server To have the PE4104G email reports from the SMTP server to you, do the following: 1. Enable the Enable report from the following SMTP Server, and key in the IP address and Port number of your SMTP server. - Page 45 Chapter 4. Browser Operation Note: If you are sending the report to more than one email address, separate the addresses with a semicolon. The total cannot exceed 256 characters. SNMP Trap Receivers Up to four SNMP management stations can be specified. If you want to use SNMP trap notifications, do the following: 1.
- Page 46 Syslog Server To record all the events that take place on eco PDU devices and write them to the PE4104G’s Syslog server, do the following: 1. Check Enable Syslog Server. 2. Key in the IP address and the port number of the Syslog server. The valid...
-
Page 47: Date/Time
The Date/Time dialog page sets the PE4104G time parameters: Time Zone To establish the time zone that the PE4104G is located in, drop down the Time Zone list and choose the city that most closely corresponds to where it is at. -
Page 48: Finishing Up
PE4104G User Manual As an alternative to specifying the date and time by entering them into the date and time fields, you can click to put a check in the Sync with PC checkbox, in which case the eco PDU will take its date and time settings from the locally connected PC. -
Page 49: Security
Chapter 4. Browser Operation Security The Security page controls access to the PE4104G device. -
Page 50: Working Mode
TLS1.0 or TLS1.1 data encryptioin. IPInstaller Setting If Disable is checked, the IP address of the PE4104G cannot be found by the IP Installer software. If Readonly is checked, the IP address of the PE4104G can be found but not configurable by the IP Installer software. -
Page 51: Ip Filter / Mac Filter
Chapter 4. Browser Operation Check a policy and enter the required information in the appropriate fields. Item Description Minimum Username Length Sets the minimum number of characters required for a username. Acceptable values are from 1–16. Minimum Password Length Sets the minimum number of characters required for a password. - Page 52 PE4104G User Manual If the exclude button is checked, all the addresses within the filter range are denied access; all other addresses are allowed access. Adding Filters To add an IP filter, do the following: 1. Click Add. A dialog box similar to the one below appears:...
- Page 53 Chapter 4. Browser Operation 2. Specify the start filter address in the dialog box (for example, 192.168.0.200), then click OK. 3. To filter a single IP address, key in the same address as the start IP. To filter a continuous range of addresses, key in the end number of the range (for example, 192.168.0.225).
-
Page 54: Authentication & Authorization
PE4104G User Manual Authentication & Authorization The Authentication & Authorization page is used to set up login authentication and authorization management from external sources. RADIUS Settings To allow authentication and authorization for the eco PDU device through a RADIUS server, do the following: 1. -
Page 55: Private Certificate
For enhanced security, the Private Certificate section allows you to use your own private encryption key and signed certificate, rather than the default ATEN certificate. There are two methods for establishing your private certificate: generating a self-signed certificate;... -
Page 56: Ecotcp
When you have finished making your settings on this page, click Save. EcoTCP The EcoTCP page enables the communication between ecoDC software and the PE4104G. To enable the EcoTCP, check the Enable service checkbox and specify the EcoDC IP and the EcoDC Port number. -
Page 57: Pdu
Chapter 4. Browser Operation The PDU tab is used to upgrade the PE4104G’s firmware, and to backup and restore the device’s configuration settings. Upgrade Main Firmware The Upgrade Main Firmware page is used to upgrade the firmware of the PE4104G. - Page 58 PE4104G User Manual 2. Click the Browse button; navigate to where the firmware file is located and select it. 3. Click Upgrade to start the upgrade procedure. If you enabled Check Main Firmware Version the current firmware level is compared with that of the upgrade file. If the current version is equal to or higher than the upgrade version, a popup message appears, to inform you of the situation and stops the upgrade procedure.
-
Page 59: Backup/Restore
Selecting Backup/Restore on the menu bar gives you the ability to back up the switch’s configuration and user profile information: Station List Station List lists the PE4104G only. Backup To backup the device’s settings do the following: 1. In the Password field, key in a password for the file. -
Page 60: Restore
PE4104G User Manual Restore To restore a previous backup, do the following: 1. Click Browse; navigate to the file and select it. Note: If you renamed the file, you can leave the new name. There is no need to return it to its original name. -
Page 61: Chapter 5. Telnet Commands
PE4104G via Telnet from any computer connected to the same network. Setup Log in to the PE4104G’s web GUI, go to the Setup tab and click Security from the menu bar. Under Working Mode, check Enable Telnet Server and then click Save at the bottom of the page. -
Page 62: Session Timeout
4. At the login prompt, enter Username: teladmin; and Password: telpwd. Note: The Telnet username and password can be configured on the User tab of the PE4104G's web GUI. 5. When the Telnet session is established, Logged in successfully appears... -
Page 63: Commands
Chapter 5. Telnet Commands Commands Use the Telnet commands to view and configure the PE4104G as described in each section. The text-based command line provides some of the same functions found under the Energy tab of the PE4104G’s web-based GUI. -
Page 64: Read Power Outlet Status
Outlet Status Power The Read Power Outlet Status command allows you to view the power status of an outlet on the PE4104G. The formula for Read Outlet Status commands is as follows: Command + Outlet + Number + Option + [Enter] 1. -
Page 65: Switch Outlet Status
Switch Outlet Status The Switch Outlet Status command allows you to change the power status of an outlet on the PE4104G. The formula for Switch Outlet Status commands is as follows: Command + Outlet + Number + Option + Control + [Enter] 1. - Page 66 PE4104G User Manual The following table lists the available Switch Outlet Status commands: Command Outlet Option Control Enter Description imme [Enter] Switch outlet XX on with option imme or delay. XX: delay Outlet number (01 ~ 04) imme [Enter] Switch outlet XX off with option imme or delay.
-
Page 67: Read Power Value
Read Power Value The Read Power Value command allows you to view the power measurement values of the PE4104G, Bank or Outlet. The formula for Read Power Value commands is as follows: Command + Target + Outlet + Number + Measurement + Option + [Enter] 1. - Page 68 PE4104G User Manual Measurement Description Read power dissipation measurement Read power factor measurement freq Read voltage frequency measurement Option Description simple Return simple string of the selected measurement and the selected power outlet format Return format string of the selected measurement and the...
-
Page 69: Read Environmental Value
Chapter 5. Telnet Commands Read Environmental Value The Read Environmental Value command allows you to view measurements from the PE4104G’s environmental sensors. The formula for Read Environmental Value commands is as follows: Command + Outlet + Number + Option + [Enter] 1. -
Page 70: Close Telnet Session
[Enter] The following table shows the value for the Close Telnet Session command: Command Description quit Close telnet session command The following table lists the Close Telnet Session command: Command Enter Description quit [Enter] Disconnects telnet session with PE4104G. -
Page 71: Reboot Pdu Device
The Reboot PDU Device command allows you to reboot the PE4104G. The formula for Reboot PDU Device commands is as follows: Command + [Enter] 1. For example, if you want to reboot the PE4104G, type the following: reboot [Enter] The following tables show the possible values for the Read Environmental... - Page 72 PE4104G User Manual This Page Intentionally Left Blank...
-
Page 73: Appendix
Appendix Safety Instructions General This product is for indoor use only. Read all of these instructions. Save them for future reference. Follow all warnings and instructions marked on the device. Do not place the device on any unstable surface (cart, stand, table, etc.). If the device falls, serious damage will result. - Page 74 PE4104G User Manual If an extension cord is used with this device make sure that the total of the ampere ratings of all products used on this cord does not exceed the extension cord ampere rating. Make sure that the total of all products plugged into the wall outlet does not exceed 15 amperes.
-
Page 75: Rack Mounting
Appendix Rack Mounting Before working on the rack, make sure that the stabilizers are secured to the rack, extended to the floor, and that the full weight of the rack rests on the floor. Install front and side stabilizers on a single rack or front stabilizers for joined multiple racks before working on the rack. -
Page 76: Technical Support
PE4104G User Manual Technical Support International For online technical support – including troubleshooting, documentation, and software updates: http://support.aten.com For telephone support, see Telephone Support, page iii North America Email Support support@aten-usa.com Online Troubleshooting http://www.aten-usa.com/support Technical Documentation Support Software Updates... -
Page 77: Ip Address Determination
Appendix IP Address Determination If you are an administrator logging in for the first time, you need to access the eco PDU in order to give it an IP address that users can connect to. There are two methods to choose from. In each case, your client computer must be on the same network segment as the eco PDU. -
Page 78: Method 2
DC allows you to determine/assign an IP address in order to configure a PDU device and monitor power status of the equipment connected to it. eco DC can be obtained from the Download area of the ATEN web site. -
Page 79: Specifications
Appendix Specifications PE4104G Models PE4104G Outlet 4 x IEC C13 Inlet IEC C14 LAN Port 1 x RJ-45 Female with LEDs (Silver / LED: Orange / Green) 10/100M Outlet 4 x Green Power 1 x Orange Sensor 1 x Orange... - Page 80 PE4104G User Manual Housing Metal Dimensions (W x Dx H) 4.40 X 11.50 X 20.00 cm (1.73 x 4.53 x 7.87 in.) Weight 0.90 kg (1.98 lb) Power Cord Length Environmental Temperature (Operating / Storage) 0–50ºC / –20–60ºC Humidity (Operating / Storage) 0–80ºC RH, Non-Condensing...
-
Page 81: Administrator Login Failure
Password information has become corrupted, or you have forgotten it, for example), you can clear the login information with the following procedure: 1. Power off the PE4104G and remove its housing. 2. Short the jumper labeled J4 (PIN1 and PIN2). -
Page 82: Limited Warranty
What is covered by the Limited Hardware Warranty ATEN will provide a repair service, without charge, during the Warranty Period. If a product is detective, ATEN will, at its discretion, have the option to (1) repair said product with new or repaired components, or (2) replace the entire product with an identical product or with a similar product which fulfills the same function as the defective product.