
Related Manuals for Walgreens DELUXE WRIST WGNBPW-210


Summary of Contents for Walgreens DELUXE WRIST WGNBPW-210
- Page 1 DELUXE WRIST Blood Pressure Monitor • 5-Year Limited Warranty El manual en español empieza en la página 40 WGNBPW-210 WIC 900371...
-
Page 2: Table Of Contents
TABLE OF CONTENTS INTRODUCTORY INFORMATION: Important Product Notices and Safety Instructions .......... 3 About Blood Pressure ........5 Blood Pressure Standard ........ 6 How This Blood Pressure Monitor Works ..........7 USAGE INFORMATION: Name/Function of Each Part ......8 Display Explanations ........9 Installing Batteries ........ - Page 3 Measurement Procedure ....... 19 Risk Category Index ........21 Irregular Heartbeat Detector ......22 Excessive Body Motion Detector ....23 Recalling Values from Memory ..... 23 Clearing Values from Memory ...... 25 Important Notes Regarding Your Blood Pressure Measurement ...... 26 Care, Maintenance, &...
-
Page 4: Important Product Notices And Safety Instructions
IMPORTANT PRODUCT NOTICES AND SAFETY INSTRUCTIONS When using your blood pressure monitor, basic precautions should always be followed. Please read and follow all instructions and warnings before using this product. Save these instructions for future reference. • This device uses the oscillometric method to measure systolic and diastolic blood pressure, as well as heart rate. - Page 5 hemorrhage, or temporary numbness to your wrist. In general, these symptoms should not last long. However, if symptoms persist, please seek advice from a medical professional. • When used along with other medical electronic equipment on the same arm, pressurization of the cuff may cause the other devices to temporarily malfunction.
-
Page 6: About Blood Pressure
ABOUT BLOOD PRESSURE What is Blood Pressure? Blood pressure is the pressure exerted on the artery walls while blood flows through the arteries. The pressure measured when the heart contracts and sends blood out of the heart is systolic (highest) blood pressure. -
Page 7: Blood Pressure Standard
BLOOD PRESSURE STANDARD This table contains defined levels for hypertension that are publicly available from the American Heart Association (AHA 2017). Users ® can compare their own blood pressure readings against these defined levels to determine if they may potentially be at an increased risk. This table is applicable to most adults aged 18 and older. -
Page 8: How This Blood Pressure Monitor Works
Please note that cues provided by this monitor are only intended to assist you in using the table on the previous page. The table and cues are only provided for convenience to help you understand your noninvasive blood pressure reading as it relates to the American Heart Association information. -
Page 9: Name/Function Of Each Part
NAME/FUNCTION OF EACH PART Wrist Cuff LCD Display Battery Cover (located on side of unit) START/STOP Memory Recall/ User-Select Date & Time Select Date & Time Set Accessories for unit: 2 “AAA” 1.5V alkaline batteries and a carrying case are included with the unit. -
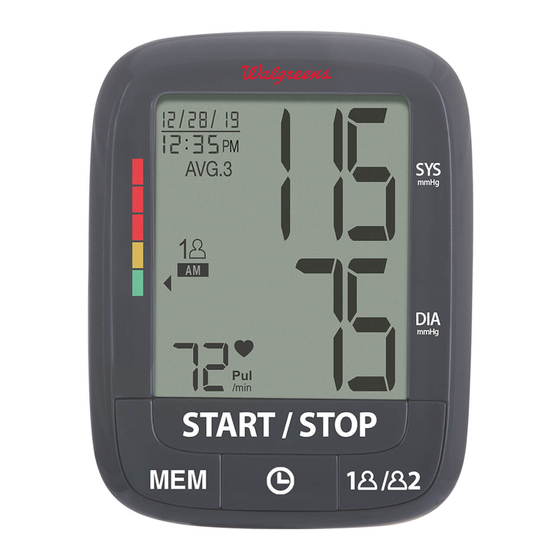
Page 10: Display Explanations
DISPLAY EXPLANATIONS Date/Time Indicator Systolic Pressure Diastolic Wrist Pressure Positioning Guide Heart Rate Irregular Heartbeat Detector... - Page 11 Display Symbols: User 1: Appears when the monitor is operated by User 1. User 2: Appears when the monitor is operated by User 2. Low Battery Symbol: Appears when batteries should be replaced, or +/- polarities have been positioned incorrectly. Pulse Symbol: Shows heart rate in beats per minute.
- Page 12 If any of the following letters and numbers appear in the area that systolic pressure should be displayed or the wrist icon appears, an error has occurred with your reading. See Troubleshooting section of this manual for more information. Incorrect cuff placement: Correct and measure again. Error Determining Measurement Data: Relax, do not move, and measure again.
-
Page 13: Installing Batteries
INSTALLING BATTERIES 1. Slide off the battery cover to open the battery compartment. 2. Install or replace the 2 “AAA” alkaline batteries according to the indications inside the battery compartment. NOTE: When removing batteries, pull black ribbon forward. 3. Replace the battery cover. Replace the batteries if: •... - Page 14 • Remove batteries when unit is not in use for extended periods of time. • When the batteries are removed, the measurement values stored in memory are retained. However, the date and time must be reset. • Clean contacts on battery and in battery compartment with a soft dry cloth each time you install batteries.
-
Page 15: Date & Time Set Procedure
DATE & TIME SET PROCEDURE mmHg It is important to set the Date & Time before using your blood pressure monitor, so that a time stamp can be assigned to each mmHg record that is stored in the memory. 1. To set the date and time, press the “Date &... -
Page 16: Applying The Cuff
APPLYING THE CUFF 1. Remove all watches, wrist jewelry, etc. Fig. A prior to attaching the wrist monitor. Clothing sleeves should be rolled up and the cuff should be wrapped around bare skin for correct measurements. 2. Apply cuff to left wrist with palm facing up as shown in Fig. -
Page 17: Correct Measurement Posture
CORRECT MEASUREMENT POSTURE 1. Place your elbow on a table so that the cuff is at the same level as your heart as shown Fig. A in Fig. A. Relax your entire body, especially between your elbow and fingers. NOTE: Your heart is located slightly below your armpit. -
Page 18: Wrist Positioning Guide
WRIST POSITIONING GUIDE • When using wrist blood pressure monitors, it is important to take the measurement while relaxing your wrist at heart level. This will help ensure an accurate reading will be taken. Because it is difficult to find the ideal location for a wrist measurement, we have included an optional Wrist Positioning Sensor that will assist in directing your wrist to the ideal location for a blood pressure measurement. -
Page 19: Wrist Positioning Guide Settings
NOTE: • Due to differences in individual sizes and physique, this feature may not be helpful in all cases and you may wish to turn this feature OFF. If you feel the suggested wrist position does not match your heart level, please turn this feature OFF and follow your judgment. -
Page 20: Measurement Procedure
MEASUREMENT PROCEDURE IMPORTANT NOTES: • Blood pressure changes with every heartbeat and is in constant fluctuation throughout the day. • Blood pressure measurement can be affected by the position of the user, his or her physiologic condition, and other factors. Before Measurement: To help ensure an accurate reading, follow these instructions before taking a measurement:... - Page 21 WGNBPW-210 LCD (Option A) 1. Press the “ ” button and select User 1 or User 2. 2. With the cuff wrapped around your wrist, press the “START/STOP” button. Do not inflate the cuff unless it is wrapped around your wrist. All digits will light up, checking the display functions.
-
Page 22: Risk Category Index
RISK CATEGORY INDEX This monitor comes equipped with a Risk Category Indicator that automatically compares each reading to defined levels established by the American Heart Association (AHA 2017) as described earlier ® in this manual, and provides a helpful cue if your reading falls into one of the stages that could potentially indicate increased risk. -
Page 23: Irregular Heartbeat Detector
IRREGULAR HEARTBEAT DETECTOR The appearance of the icon indicates that a pulse irregularity consistent with an irregular heartbeat was detected during measurement. Usually this is not a cause for concern. However, if the symbol appears often, we recommend you seek medical advice. -
Page 24: Excessive Body Motion Detector
EXCESSIVE BODY MOTION DETECTOR icon is displayed if body Excessive movement is detected during Body Motion measurement, especially the Detector movement of the wrist the blood pressure monitor is worn on. NOTE: The measured blood pressure reading may not be accurate if the icon is displayed. - Page 25 3. The monitor will first display the calculated average applied to the last 3 memories. NOTE: • If the records are less than 3, it will display the latest record. • The average will not include readings where excessive body motion occurred, or readings where the wrist is not in the ideal position...
-
Page 26: Clearing Values From Memory
CLEARING VALUES FROM MEMORY 1. Press the “ ” button to select User 1 or User 2. 2. Press the “MEM” button to enter into memory recall mode. 3. Press and hold the “MEM” and the “Date & Time Set” buttons at the same time and the data for the selected user will be erased automatically. -
Page 27: Important Notes Regarding Your Blood Pressure Measurement
IMPORTANT NOTES REGARDING YOUR BLOOD PRESSURE MEASUREMENT • It is suggested that you take your measurements at the same time each day and use the same wrist for consistency. • Users should wait a minimum of 5 minutes before taking additional measurements. -
Page 28: Care, Maintenance, & Cleaning
CARE, MAINTENANCE, & CLEANING • Clean the blood pressure monitor body and cuff carefully with a slightly damp, soft cloth. Do not press. Do not wash cuff or use chemical cleaner on it. Never use thinner, alcohol, or petrol (gasoline) as cleaner. •... - Page 29 • DO NOT inflate the cuff unless wrapped around wrist. • DO NOT wrap the cuff around body parts other than your wrist. • DO NOT drop or insert any object into any opening. • This monitor may not meet its performance specifications if stored or used outside of these temperature and humidity ranges: Storage/Transportation Operating...
-
Page 30: Potential For Electromagnetic Interference
POTENTIAL FOR ELECTROMAGNETIC INTERFERENCE To avoid inaccurate results caused by electromagnetic interference between electrical and electronic equipment, do not use the device near a cell phone or microwave oven. For most wireless communication devices, it is recommended to maintain a distance of 10.8 feet (3.3m) in order to avoid electromagnetic interference. -
Page 31: Electromagnetic Compatibility (Emc)
ELECTROMAGNETIC COMPATIBILITY (EMC) • Guidance and manufacturer’s declaration – electromagnetic emissions The device is intended for use in the electromagnetic environments listed below, and should only be used in such environments: Emissions test Compliance Electromagnetic environment – guidance RF emissions CISPR 11 Group 1 RF energy is used only to maintain device’s operation. - Page 32 • Guidance and manufacturer’s declaration – electromagnetic immunity The device is intended for use in the electromagnetic environments listed below, and should only be used in such environments: Immunity test IEC 60601 Compliance Electromagnetic environment – guidance test level level Conducted RF 150 kHz to 150 kHz to...
- Page 33 • Recommended separation distances between portable and mobile RF communication equipment and the device. The device is intended for use in an electromagnetic environment in which radiated RF disturbances are controlled. The customer or the user of the device can help electromagnetic interference by maintaining a minimum distance between portable and mobile RF communications equipment (transmitters) and the device as recommended below, according to the maximum output power of the communications equipment.
- Page 34 • Guidance and manufacturer’s declaration – electromagnetic immunity The device is intended for use in the electromagnetic environments listed below. The customer or the user of the device should only be used in such environments: Immunity test Test Band a) Service a) Modulation b) Modulation b) (W)
-
Page 35: Troubleshooting
TROUBLESHOOTING If any abnormality arises during use, please check the following points: SYMPTOMS POSSIBLE CAUSES CORRECTION Unit does not turn on Batteries have run down. Replace them with 2 new “AAA” when the “START/ alkaline batteries. STOP” button is pushed. Battery polarities have been Re-insert the batteries in the positioned incorrectly. - Page 36 Excessive body movement, Measure again. Keep arm steady especially of the wrist the during measurement. Excessive body motion cuff is worn, occurred during detector symbol shown the measurement. Ex: on display. talking, moving, or shaking of the arm with the cuff on while measurement.
-
Page 37: Specifications
SPECIFICATIONS Power Source: Two 1.5V DC “AAA” Alkaline batteries Measurement Method: Oscillometric Rated cuff pressure: 0 mmHg~299 mmHg (0kPa~39.9 kPa) Measurement pressure: Measurement Range: SYS: 60 mmHg~230 mmHg (8.0 kPa~30.7 kPa) DIA: 40 mmHg~130 mmHg (5.3 kPa~17.3 KPa) Pulse value: 40~199 beats/minute Pressure: ±3 mmHg Accuracy: Pulse: ±5% of reading... - Page 38 Wrist Circumference: 5.3"–8.4" (13.5cm–21.5cm) (2) “AAA” alkaline batteries, instruction manual, carrying Accessories: case. 2.75"(L) x 3.58"(W) x .93"(H) Dimensions: 70mm(L) x 91mm(W) x 23.5mm(H) Degree of Protection Type BF applied part Device Classification Internally Powered ME Equipment IP22: The first number 2: Protected against solid foreign objects of 12.5mm ∅...
-
Page 39: 5-Year Limited Warranty
Made exclusively for LIMITED 5-YEAR WARRANTY HoMedics sells its products with the intent that they are free of defects in manufacture and workmanship for a period of 5 years from the date of original purchase, except as noted below. HoMedics warrants that its products will be free of defects in material and workmanship under normal use and service. - Page 41 Monitor de Presión Arterial DE LUJO PARA LA MUÑECA • Garantía Limitada de 5 Años WGNBPW-210 WIC 900371...
- Page 42 ÍNDICE INFORMACIÓN INTRODUCTORIA Notificaciones Importantes Sobre el Producto e Instrucciones de Seguridad ..43 Sobre la Presión Arterial ....... 45 Estándar de Presión Arterial ......46 Funcionamiento de este monitor de presión arterial ......47 INFORMACIÓN DE USO Nombre/Función de Cada Parte ....48 Explicaciones de la Pantalla ......
- Page 43 Procedimiento de Medición ......59 Indicador de Categoría de Riesgo ....61 Detector de Latidos Irregulares ....62 Detector de Movimiento Corporal Excesivo .......... 63 Recuperar Valores de la Memoria ....63 Limpiando Valores de la Memoria ....65 Notas Importantes Respecto a Su Medición de la Presión Arterial ....
-
Page 44: Notificaciones Importantes Sobre El Producto E Instrucciones De Seguridad
NOTIFICACIONES IMPORTANTES SOBRE EL PRODUCTO E INSTRUCCIONES DE SEGURIDAD Al usar su monitor de presión arterial, siempre debe tener precauciones básicas. Lea y siga todas las instrucciones y advertencias antes de usar este producto. Guarde estas instrucciones para referencia futura. •... - Page 45 temporal de la muñeca. En general, estos síntomas no deben permanecer mucho tiempo. Sin embargo, si persisten los síntomas, busque la opinión de un profesional médico. • Cuando se usa junto con otros equipos médicos electrónicos en el mismo brazo, la presurización del manguito puede ocasionar que los otros dispositivos no funcionen bien de manera temporal.
-
Page 46: Sobre La Presión Arterial
SOBRE LA PRESIÓN ARTERIAL ¿Qué es la Presión Arterial? La presión arterial es la presión ejercida en las paredes arteriales mientras la sangre fluye a través de las arterias. La presión medida cuando el corazón se contrae y expulsa la sangre del corazón es la presión arterial sistólica (la más alta). -
Page 47: Estándar De Presión Arterial
ESTÁNDAR DE PRESIÓN ARTERIAL Esta tabla contiene los niveles definidos para hipertensión que están disponibles al público de parte de la Asociación Estadounidense del Corazón (American Heart Association o AHA 2017, por sus siglas en ® inglés). Los usuarios pueden comparar sus propias lecturas de presión arterial contra estos niveles definidos para identificar la posibilidad de que estén expuestos a un riesgo mayor. -
Page 48: Funcionamiento De Este Monitor De Presión Arterial
Tome en cuenta que las indicaciones proporcionadas por este monitor tienen únicamente la intención de ayudarle a usar la tabla de la página anterior. La tabla y las indicaciones se proporcionan solo por comodidad para ayudarle a entender la medición no invasiva de su presión arterial y cómo se interpreta de acuerdo con la información de la American Heart Association No son ®... -
Page 49: Nombre/Función De Cada Parte
NOMBRE/FUNCIÓN DE CADA PARTE Brazalete Para Muñeca Pantalla LCD Cubierta de Baterías (ubicada en la parte lateral de la unidad) INICIO/PARO (START/STOP) Recuperar de Selección la Memoria/ del Usuario Selección de Fecha y Hora Ajuste de Fecha y Hora Accesorios de la unidad: 2 baterías alcalinas “AAA”... -
Page 50: Explicaciones De La Pantalla
EXPLICACIONES DE LA PANTALLA Indicador de Presión Fecha/Hora Sistólica Hipertensión Presión Presión Guía de Diastólica Posición de Presión la Muñeca Frecuencia Cardíaca Detector de Latidos Irregulares... - Page 51 Símbolos de Pantalla: Usuario 1: Aparece cuando el usuario 1 opera el monitor. Usuario 2: Aparece cuando el usuario 2 opera el monitor. Símbolo de batería baja: Aparece cuando las baterías deben reemplazarse o cuando las polaridades +/- se han posicionado incorrectamente.
- Page 52 Si cualquiera de las siguientes letras y números en el área donde debería aparece la presión sistólica o si aparece el icono de la muñeca, ocurrió un error en la medición. Vea la sección de solución de problemas de este manual para saber más detalles.
-
Page 53: Colocación De Baterías
COLOCACIÓN DE BATERÍAS 1. Deslice la cubierta de las baterías para abrir el compartimiento de las mismas. 2. Instale o reemplace las 2 baterías alcalinas “AAA” de acuerdo con las indicaciones dentro del compartimiento de las baterías. NOTA: Cuando quite las baterías, jale hacia delante el listón negro. 3. - Page 54 • Al instalar las baterías, observe que la polaridad +/- sea correcta. Una instalación incorrecta de las baterías puede causar daños a la unidad. • Retire las baterías cuando la unidad no se use durante largos periodos. • Los valores de medición almacenados en la memoria se conservan cuando se retiran las baterías.
-
Page 55: Procedimiento Para Ajuste De Fecha Y Hora
PROCEDIMIENTO PARA AJUSTE mmHg DE FECHA Y HORA mmHg Es importante programar la fecha y la hora antes de usar su monitor de la presión arterial, de modo que se pueda asignar un sello de tiempo a cada registro que se almacene en la memoria. 1. -
Page 56: Cómo Colocar El Brazalete
CÓMO COLOCAR EL BRAZALETE 1. Retire todos los relojes, joyería para muñeca, Fig. A etc. antes de colocarse el monitor para muñeca. Las mangas de la ropa deben enrollarse hacia arriba y el manguito debe quedar alrededor de la muñeca, directo sobre la piel, para la toma correcta de las mediciones. -
Page 57: Postura Correcta Para La Medición
POSTURA CORRECTA PARA LA MEDICIÓN 1. Coloque su codo sobre una mesa, de modo que el brazalete esté a la altura del corazón, Fig. A como se muestra en la Fig. A. Relaje todo su cuerpo, especialmente entre su codo y sus dedos. -
Page 58: Guía De Posición De La Muñeca
GUÍA DE POSICIÓN DE LA MUÑECA • Al usar un monitor de presión arterial de muñeca es importante tomar la medición con una postura relajada y con su muñeca elevada a la altura del corazón. Esto ayuda a conseguir que el resultado de la medición sea preciso. -
Page 59: Ajustes De La Guía De Posición De La Muñeca
NOTA: • Debido a diferencias en las tallas y la constitución física de las personas, esta característica podría no ser útil en todos los casos y podría querer APAGARLA. Si siente que la posición sugerida de la muñeca no corresponde a la altura de su corazón, APAGUE por favor esta característica y siga su propio criterio. -
Page 60: Procedimiento De Medición
PROCEDIMIENTO DE MEDICIÓN NOTAS IMPORTANTES: • La presión arterial cambia con cada latido y está en una fluctuación constante a lo largo del día. • La medición de la presión arterial puede ser afectada por la posición del usuario, su condición fisiológica y otros factores. Antes de la medición: Para ayudar a asegurar una medición precisa, siga estas instrucciones antes de realizar la medición:... - Page 61 1. Presione el botón “ ” y seleccione el Usuario 1 o el Usuario 2. WGNBPW-210 LCD (Option A) 2. Ya con el brazalete colocado alrededor de su muñeca, presione el botón “INICIO/PARO (START/STOP)”. No infle el brazalete a menos que lo tenga colocado alrededor de su muñeca. Todos los dígitos se iluminarán para revisar las funciones de la pantalla.
-
Page 62: Indicador De Categoría De Riesgo
INDICADOR DE CATEGORÍA DE RIESGO Este monitor viene equipado con un indicador de categoría de riesgo que compara automáticamente cada medición contra los niveles definidos por la American Heart Association (AHA 2017) como se describió ® anteriormente en este manual, y proporciona una indicación útil si su lectura cae en una de las etapas que podría potencialmente indicar un riesgo elevado. -
Page 63: Detector De Latidos Irregulares
DETECTOR DE LATIDOS IRREGULARES La aparición del ícono indica que se detectó una irregularidad de pulso consistente con una frecuencia cardíaca irregular durante la medición. Usualmente, esta no es una causa de preocupación. Sin embargo, si el símbolo aparece con frecuencia, recomendamos que busque asesoría médica. -
Page 64: Detector De Movimiento Corporal Excesivo
DETECTOR DE MOVIMIENTO CORPORAL EXCESIVO El icono se mostrará si se Detector de detecta movimiento del cuerpo movimiento durante la medición, especialmente el corporal movimiento de la muñeca que está excesivo usando el monitor de presión arterial. NOTA: La lectura de la presión arterial medida podría no ser precisa si se muestra el icono. - Page 65 3. El monitor mostrará primero el promedio calculado aplicado a las últimas muestras. NOTA: • Si los registros son menos de 3, se mostrará el registro más reciente. • El promedio no incluirá las mediciones de cuando haya ocurrido un movimiento excesivo del cuerpo , o lecturas de cuando la muñeca no haya estado en la posición ideal 4.
-
Page 66: Limpiando Valores De La Memoria
LIMPIANDO VALORES DE LA MEMORIA 1. Presione el botón “ ” para seleccionar el Usuario 1 o el Usuario 2. 2. Presione el botón “MEM” para ingresar el modo de recuperación de memoria. 3. Presione y mantenga presionados los botones “MEM” y de “Ajuste de fecha y hora “Date &... -
Page 67: Notas Importantes Respecto A Su Medición De La Presión Arterial
NOTAS IMPORTANTES RESPECTO A SU MEDICIÓN DE LA PRESIÓN ARTERIAL • Se sugiere que tome sus mediciones a la misma hora todos los días y use la misma muñeca por consistencia. • Los usuarios deberán esperar un mínimo de 5 minutos antes de tomar mediciones adicionales. -
Page 68: Cuidados, Mantenimiento Y Limpieza
CUIDADOS, MANTENIMIENTO Y LIMPIEZA • Limpie el monitor de presión arterial y el brazalete con cuidado con una tela ligeramente húmeda y suave. No presione. No lave el brazalete o use algún limpiador químico en él. Jamás utilice solvente, alcohol o gasolina para limpiar. •... - Page 69 • NO infle el brazalete a menos que esté colocado alrededor de su muñeca. • NO envuelva con el brazalete ninguna parte de su cuerpo que no sea su muñeca. • NO deje caer ni inserte ningún objeto en ninguna abertura. •...
-
Page 70: Potencial De Interferencia Electromagnética
POTENCIAL DE INTERFERENCIA ELECTROMAGNÉTICA Para evitar resultados poco precisos provocados por interferencia electromagnética entre equipo eléctrico y electrónico, no utilice el dispositivo cerca de un teléfono celular o un horno de microondas. Para la mayoría de los dispositivos de comunicación inalámbrica, se recomienda mantener una distancia de 3.3 m (10.8 ft) para evitar interferencia electromagnética. -
Page 71: Compatibilidad Electromagnética (Emc)
COMPATIBILIDAD ELECTROMAGNÉTICA (EMC) • Orientación y declaración del fabricante - emisiones electromagnéticas El dispositivo está diseñado para su uso en los ambientes electromagnéticos que se enumeran a continuación, y deberá usarse únicamente en dichos ambientes: Prueba de emisión Cumplimiento Ambiente electromagnético - orientación Emisiones de RF CISPR 11 Grupo 1 La energía de RF se usa únicamente para mantener la operación del... - Page 72 • Orientación y declaración del fabricante - inmunidad electromagnética El dispositivo está diseñado para su uso en los ambientes electromagnéticos que se enumeran a continuación, y deberá usarse únicamente en dichos ambientes: Prueba de Nivel de prueba Nivel de Ambiente electromagnético - orientación inmunidad IEC 60601 cumplimien-...
- Page 73 • Distancias de separación recomendadas entre equipo de comunicación portátil y móvil y el dispositivo. El dispositivo está diseñado para su uso en un ambiente electromagnético en donde las perturbaciones de RF radiada están bajo control. El cliente o el usuario del dispositivo pueden ayudar con la interferencia electromagnética al mantener una distancia mínima entre el equipo portátil o móvil de comunicaciones por RF (transmisores) y el dispositivo como se recomienda a continuación, de acuerdo con la potencia máxima de salida del equipo de comunicaciones.
- Page 74 • Orientación y declaración del fabricante - inmunidad electromagnética El dispositivo está diseñado para usarse en los ambientes electromagnéticos que se muestran a continuación. El cliente o el usuario del dispositivo solo deberán usarlo en dichos ambientes: Prueba de Frecuencia Banda a) Servicio a) Modulación b)
-
Page 75: Solución De Problemas
SOLUCIÓN DE PROBLEMAS Si surge cualquier anormalidad durante el uso, revise los siguientes puntos: SÍNTOMAS POSIBLES CAUSAS CORRECCIÓN La unidas no se Las baterías se acabaron. Reemplácelas con 2 baterías enciende cuando se alcalinas “AAA” nuevas. presiona el botón de INICIO/PARO. - Page 76 Movimiento corporal Mida nuevamente. Mantenga excesivo ocurrido durante el brazo en su lugar durante la Aparece en la pantalla la medición, especialmente medición. el símbolo de detector de la muñeca que está de movimiento corporal usando el brazalete. Por excesivo. ejemplo: hablar, moverse o sacudir el brazo con el brazalete colocado durante...
-
Page 77: Especificaciones
ESPECIFICACIONES Fuente de Alimentación: Dos baterías alcalinas “AAA” de 1.5 V CD Método de Medición: Oscilométrica Presión clasificada del brazalete: 0 mmHg~299 mmHg (0kPa~39.9 kPa) Presión en la medición: Rango de Medición: SYS: 60 mmHg~230 mmHg (8.0 kPa~30.7 kPa) DIA: 40 mmHg~130 mmHg (5.3 kPa~17.3 KPa) Valor de pulso: 40~199 latidos/minuto Presión: ±3 mmHg Precisión:... - Page 78 Circunferencia de 13.5cm–21.5cm (5.3"–8.4") la muñeca: Accesorios: 2 baterías alcalinas “AAA,” instructivo y estuche para llevar. 2.75"(Largo) x 3.58"(Ancho) x .93"(Alto) Dimensiones: 70mm (Largo) x 91mm (Ancho) x 23.5mm (Alto) Grado de Protección Parte aplicada tipo BF Clasificación Equipo EM alimentado de manera interna del Dispositivo IP22: El primer número 2: Protegido contra objetos extraños sólidos de12.5 mm ∅...
-
Page 79: Garantía Limitada De 5 Años
GARANTÍA LIMITADA DE 5 AÑOS Fabricado en exclusiva para HoMedics vende sus productos con la intención de que estén libres de defectos de fabricación y mano de obra por un período de 5 años a partir de la fecha de compra original, con excepción de lo que se indica a continuación.