Table of Contents
Advertisement
Available languages
Available languages
Advertisement
Chapters
Table of Contents

Related Manuals for Walgreens WGNBPW-710


Summary of Contents for Walgreens WGNBPW-710
- Page 1 AUTOMATIC WRIST Blood Pressure Monitor Warranty W-710...
-
Page 2: Table Of Contents
TABLE OF CONTENTS INTRODUCTORY INFORMATION: Important Product Notices and Safety Instructions .......... 3 About Blood Pressure ........5 Blood Pressure Standard........ 5 How This Blood Pressure Monitor Works ..........7 USAGE INFORMATION: Name/Function of Each Part ......8 Display Explanations ........9 Installing Batteries ........ - Page 3 Risk Category Index ........19 Irregular Heartbeat Detector (IHB) ....20 Recalling Values from Memory..... 21 Clearing Values from Memory ...... 21 Important Notes Regarding Your Blood Pressure Measurement ...... 22 Care, Maintenance & Cleaning ..... 23 Potential for Electromagnetic Interference............
-
Page 4: Important Product Notices And Safety Instructions
IMPORTANT PRODUCT NOTICES AND SAFETY INSTRUCTIONS When using your blood pressure monitor, basic precautions should always be followed. Please read and follow all instructions and warnings before using this product. Save these instructions for future reference. and it is not intended to serve as a substitute for the advice of a physician or medical professional. - Page 5 pressure at the wrist if you have any of the following conditions: Severe hypertension, severe diabetes, severe arteriosclerosis, severe kidney disease or vascular disease that may compromise circulation. of heart pacemakers. sensitive electronic components. Avoid strong electrical or electromagnetic fields in the direct vicinity of the device (e.g. mobile telephones, microwave ovens).
-
Page 6: About Blood Pressure
ABOUT BLOOD PRESSURE What is Blood Pressure? walls while blood flows through the arteries. The pressure measured when the heart contracts and sends blood out of the heart is systolic (highest) blood pressure. The pressure measured when the heart dilates with blood flowing back into the heart is called diastolic (lowest) blood pressure. - Page 7 Blood pressure tends to go up and down, even in people who normally don’t have high readings. If your numbers stay above risk and should consult your physician. Category Systolic (mmHg) Diastolic (mmHg) Normal Prehypertension High Blood Pressure Although one can easily find where their own blood pressure reading to the defined levels and provides a helpful cue if your reading falls into one of the stages that could potentially this feature.
-
Page 8: How This Blood Pressure Monitor Works
HOW THIS BLOOD PRESSURE MONITOR WORKS This monitor uses innovative technology to detect your blood pressure. This technology enables the monitor to automatically inflate and deflate at the appropriate level for each individual. With one touch of a button, the cuff will automatically inflate to block the blood flow Please note that any muscle movement during inflation or deflation will cause measurement error. -
Page 9: Name/Function Of Each Part
NAME/FUNCTION OF EACH PART DATE/TIME SET Buttons Display MEMORY RECALL Button Wrist Cuff Battery Cover START/STOP Button Accessories for unit : batteries included with the unit. -
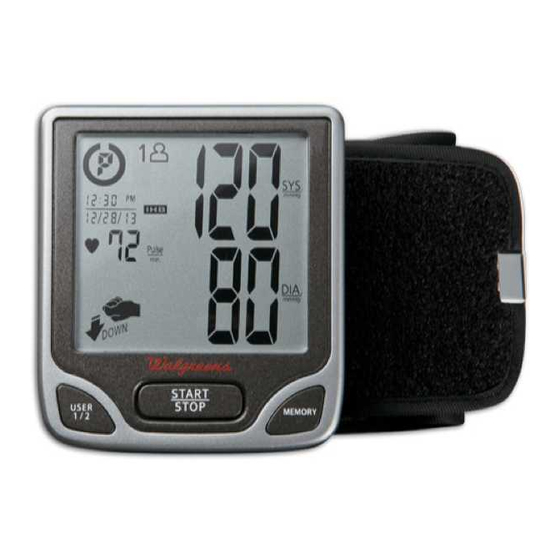
Page 10: Display Explanations
DISPLAY EXPLANATIONS Systolic Pressure Diastolic Pressure Heart Rate Date/Time Indicator... -
Page 11: Display Symbols
Display Symbols: Weak Battery Symbol: Appears when batteries should be replaced. Pulse Symbol: Shows the heart rate per minute. Irregular Heartbeat Detector: more information. Risk Category Index: information. and any of the following letters and numbers appear in the area that systolic pressure should be displayed, an error has occurred with your reading. -
Page 12: Installing Batteries
INSTALLING BATTERIES side of the monitor. Remove battery cover by pressing down and pulling away from the monitor. polarity indications inside the Battery Type: 2 Alkaline LR03 “AAA” size to the polarity indications inside the back into place. - Page 13 Replace the batteries if: switched on. As the supplied batteries are for test only, they may be discharged earlier than batteries you buy in stores. Replace all batteries at one time (as simultaneous set). time. Date and time will need to be reset if batteries are removed or replaced.
-
Page 14: Date & Time Set Procedure
DATE & TIME SET PROCEDURE DATE/TIME SET button located on the top of the monitor. HOUR. Change the HOUR by pressing the button. Each press will increase the number by one in a cycling manner. Press the DATE/TIME SET button again to confirm the entry, and the screen will show a blinking number representing the MINUTE. -
Page 15: Applying The Cuff
APPLYING THE CUFF the wrist monitor. Clothing sleeves Fig. A should be rolled up and the cuff should be wrapped around bare skin for correct measurements. up as shown in Fig. A. Fig. B shown in Fig. B. measurements, fasten the hook and loop strap securely around your wrist so and the wrist. -
Page 16: Correct Measurement Posture
CORRECT MEASUREMENT POSTURE Fig. A so that the cuff is at the same level as your heart as shown in especially between your elbow and fingers. Note: Your heart is located slightly below your armpit. Fig. B level as your heart or if you cannot keep your arm completely still throughout the reading, use a... -
Page 17: Measurement Procedure
MEASUREMENT PROCEDURE Important Notes: during measurement to ensure accurate readings. constant fluctuation throughout the day. position of the user, his or her physiologic condition with alcohol or caffeine, or smoking to measure blood pressure. measurement. arm or hand muscles. blood pressure measurement. If you are using this blood pressure monitor for the first time, please remove the protective film from the screen. - Page 18 START/STOP button. Do not inflate the cuff unless it is wrapped around your wrist. All digits will light up, checking the display functions. The checking The monitor is “Ready to Measure” and will automatically inflate the cuff to begin measurement. The cuff will then begin deflating as measurement continues.
- Page 19 will deflate entirely and systolic pressure, diastolic pressure and pulse will be shown simultaneously on the LCD screen. The measurement is then automatically stored into memory. Note: minute after last operation. You may also press the START/STOP button to turn the unit off. the START/STOP button (recommended), the MEMORY button or DATE/TIME SET ( buttons.
-
Page 20: Risk Category Index
RISK CATEGORY INDEX to defined levels established by the U.S. National Institutes of Health’s (NIH) National Heart Lung and Blood Institute as described earlier in this manual, and provides a helpful cue if your reading falls into one of the stages that could potentially indicate increased risk. -
Page 21: Irregular Heartbeat Detector (Ihb)
IRREGULAR HEARTBEAT DETECTOR (IHB) The appearance of the icon indicates that a pulse Irregular Heartbeat irregularity consistent with Detector an irregular heartbeat was detected during measurement. Usually this is not a cause for concern. However, if the symbol appears often, we recommend you seek medical advice. -
Page 22: Recalling Values From Memory
MEMORY button to access the memory. MEMORY button will recall a previous reading. The latest reading will be recalled first. and + buttons at the same Press and hold the time while in memory recall mode and the data will be erased automatically. -
Page 23: Important Notes Regarding Your Blood Pressure Measurement
IMPORTANT NOTES REGARDING YOUR BLOOD PRESSURE MEASUREMENT measurements can be affected by hot or cold temperatures. Take your blood pressure at normal body temperature. Do not move or talk during measurement as this can elevate readings. Do not move or cross legs during measurement. Keep feet flat on floor. -
Page 24: Care, Maintenance & Cleaning
CARE, MAINTENANCE & CLEANING carefully with a slightly damp, soft cloth. Do not press. Do not wash cuff or use chemical cleaner on it. Never use thinner, alcohol or petrol (gasoline) as a cleaner. batteries when the unit will not be used for a long time. - Page 25 Do not fold the cuff tightly. Do not disassemble the monitor or cuff. If in need of repair, refer to the warranty section of this manual. Do not drop on floor). Do not inflate the cuff unless wrapped around wrist. Do not wrap the cuff around body parts other than your wrist.
-
Page 26: Potential For Electromagnetic Interference
POTENTIAL FOR ELECTROMAGNETIC INTERFERENCE To avoid inaccurate results caused by electromagnetic interference a cell phone or microwave oven. For most wireless communication devices, it is recommended to avoid electromagnetic interference. received, including interference that may cause undesired operation. NOTE: NOTE: These limits are designed to provide reasonable protection against harmful accordance with the instructions, may cause harmful interference to radio communications. -
Page 27: Electromagnetic Compatibility (Emc)
ELECTROMAGNETIC COMPATIBILITY (EMC) The device is intended for use in the electromagnetic environments listed below, and should only be used in such environments: Emissions test Compliance RF energy is used only to maintain device’s operation. Therefore, its RF emissions are so low that it’s not Class B likely to cause any interference in nearby electronic Harmonic emissions IEC... - Page 28 manufacturer. The device is intended for use in the electromagnetic environments listed below, and should only be used in such environments: Immunity IEC 60601 Compliance test test level level Conducted Not Ap- plicable used no closer to any part of the device, including cables, than the recommended separation distance calculated from the Recommended separation distance Radiated...
-
Page 29: Troubleshooting
TROUBLESHOOTING If any abnormality arises during use, please check the following points: POSSIBLE SYMPTOMS CORRECTION CAUSES Unit does not Batteries have Replace them turn on when the run down. START/STOP alkaline batteries. Battery polarities Re-insert the button is pushed. have been positioned batteries in the incorrectly. -
Page 30: Specifications
SPECIFICATIONS Power Source: Measurement Oscillometric Method: Measurement (mmHg) Range: Accuracy: Pressure Sensor: Semi-conductor Inflation: Pump driven Deflation: Automatic Pressure release valve Memory Capacity: Auto-shut-off: Operation Environment: Storage/ Transportation Environment:... - Page 31 Weight: Wrist Circumference: Accessories: manual Dimensions: ingress of water. Not suitable for use in presence of operation with short-time loading. Follow instructions for use. Note:...
-
Page 32: Year Limited Warranty
Made exclusively for LIMITED FIVE YEAR WARRANTY HoMedics sells its products with the intent that they are free of defects in manufacture and workmanship for a period of five years from the date of For service or repair, original purchase, except as noted below. HoMedics warrants that its products do not return this unit will be free of defects in material and workmanship under normal use and to the retailer. - Page 33 THE WARRANTY PROVIDED HEREIN SHALL BE THE SOLE AND EXCLUSIVE WARRANTY. THERE SHALL BE NO OTHER WARRANTIES EXPRESS OR IMPLIED INCLUDING ANY IMPLIED WARRANTY OF MERCHANTABILITY OR FITNESS OR ANY OTHER OBLIGATION ON THE PART OF THE COMPANY WITH RESPECT TO PRODUCTS COVERED BY THIS WARRANTY. HOMEDICS SHALL HAVE NO LIABILITY FOR ANY INCIDENTAL, CONSEQUENTIAL OR SPECIAL DAMAGES.
- Page 35 MONITOR AUTOMÁTICO De presión arterial para el brazo W-710...
- Page 36 ÍNDICE INFORMACIÓN INICIAL: Avisos importantes del producto e instrucciones de seguridad ......37 Acerca de la presión arterial ......39 Valores estándar de la presión arterial ..39 Cómo funciona este monitor de presión arterial ............41 INFORMACIÓN DE USO: Nombre/función de cada pieza.....
- Page 37 Postura correcta para la medición....49 Procedimiento de medición......50 Índice de categoría de riesgo....... 53 Detector de latidos cardíacos irregulares (IHB)..............54 Cómo recuperar valores de la memoria ..55 Cómo borrar valores de la memoria .... 55 Notas importantes con respecto a la medición de presión arterial......
-
Page 38: Instrucciones De Seguridad
INSTRUCCIONES DE SEGURIDAD Cuando utilice el monitor de presión arterial, debe respetar siempre las precauciones básicas. Lea y siga todas las Guarde estas instrucciones para referencia futura. es solamente para uso doméstico y por lo tanto no está profesional médico. la presión arterial sistólica y diastólica, y la frecuencia cardíaca. - Page 39 incómodas, como hemorragia parcial subcutánea o adormecimiento temporal del muñeca. En general, estos síntomas no deben durar demasiado. Sin embargo, si no se frecuencia de marcapasos. componentes electrónicos sensibles. Evite los campos eléctricos o electromagnéticos fuertes cercanos al dispositivo precisión. interferencia de radiofrecuencia, etc.).
-
Page 40: Acerca De La Presión Arterial
ACERCA DE LA PRESIÓN ARTERIAL ¿Qué es la presión arterial? las arterias cuando la sangre fluye por las arterias. La presión ¿Por qué se debe medir la presión arterial? Entre los distintos problemas de salud de la actualidad, son arterial alta). La hipertensión se relaciona peligrosamente con enfermedades cardiovasculares. - Page 41 a su médico. Presión sistólica Presión diastólica Categoría (mmHg) (mmHg) Normal Prehipertensión Hipertensión Si bien en esta tabla es posible encontrar fácilmente la categoría compara automáticamente cada lectura con estos niveles definidos y brinda una guía útil si su lectura está dentro de una función.
-
Page 42: Cómo Funciona Este Monitor De Presión Arterial
CÓMO FUNCIONA ESTE MONITOR DE PRESIÓN ARTERIAL se infle y desinfle automáticamente en el nivel apropiado de desinflado. durante el proceso de inflado o desinflado causará un el monitor mostrará lecturas de presión sistólica y diastólica, y de pulso. se encuentran sus resultados de medición en la tabla del de los NIH, y brinda una guía si su lectura entra en una de función. -
Page 43: Nombre/Función De Cada Pieza
NOMBRE/FUNCIÓN DE CADA PIEZA Botones de CONFIGURACIÓN DE FECHCA/HORA Pantalla LCD Botón para recuperar MEMORIA Tapa del la muñeca compartimiento Botón START/STOP de las baterías (COMENZAR/DETENER) Accesorios para la unidad: unidad. -
Page 44: Explicaciones De La Pantalla
EXPLICACIONES DE LA PANTALLA Presión sistólica Presión diastólica Frecuencia cardíaca Indicador de fecha y hora... - Page 45 Símbolos de la pantalla: Símbolo de batería baja: aparece cuando se deben cambiar las baterías. Símbolo de pulso: muestra la frecuencia cardíaca por minuto. Detector de latidos cardíacos irregulares: información. Índice de categoría de riesgo: consulte la página Si aparecen y alguno de los siguientes números o letras en el área donde se debe mostrar la presión sistólica, ha ocurrido un error en la lectura.
-
Page 46: Instalación De Las Baterías
INSTALACIÓN DE LAS BATERÍAS baterías está ubicada sobre la parte lateral del monitor. Retire la tapa del compartimiento de las baterías opuesta al monitor. se encuentran en el interior del compartimiento (según se muestra Tipo de batería: 2 baterías alcalinas LR03 tamaño “AAA”. - Page 47 Reemplace las baterías si: dispositivo. las baterías cuando la unidad no esté en uso durante baterías, será necesario restablecer la fecha y hora. Limpie los contactos de las baterías y del compartimiento de las baterías. Nota: Las baterías son desechos peligrosos. No las deseche...
-
Page 48: Procedimiento De Configuración De Fecha Y Hora
PROCEDIMIENTO DE CONFIGURACIÓN DE FECHA Y HORA botón de encuentra en la parte superior del monitor. indica la HORA. Cambie la HORA presionando el botón + el número de manera cíclica. Presione el botón de nuevamente para confirmar los datos ingresados. En la pantalla MINUTOS. -
Page 49: Aplicación Del Brazalete
APLICACIÓN DEL BRAZALETE de colocar el monitor para la muñeca. Deberá remangarse si tiene mangas largas Fig. A piel desnuda para obtener una medición correcta. arriba, como se muestra en la Figura A. Fig. B se muestra en la Figura B. para asegurarlo alrededor de la muñeca está... -
Page 50: Postura Correcta Para La Medición
POSTURA CORRECTA PARA LA MEDICIÓN Fig. A todo su cuerpo, especialmente la Nota: Fig. B puede mantener el muñeca lectura, utilice un como una toalla doblada, para en la Figura B. arriba. Fig. C Evite recostarse hacia atrás durante la medición como se muestra en la Figura C. -
Page 51: Procedimiento De Medición
PROCEDIMIENTO DE MEDICIÓN Notas importantes: durante la medición para asegurar lecturas precisas. está en constante fluctuación durante todo el día. por la posición del usuario, sus condiciones fisiológicas y otros factores. Para obtener la mayor precisión en la con alcohol o cafeína, o fumar. mayor precisión. - Page 52 el botón START/STOP (COMENZAR/DETENER). en la muñeca. Todos los dígitos se encenderán para verificar las funciones de la pantalla. El procedimiento de verificación se completará después Listo para medir automáticamente Nota: Este monitor se volverá a inflar automáticamente si el para la medición.
- Page 53 desinflará por completo y se mostrarán las lecturas de presión sistólica, presión diastólica y pulso simultáneamente en la pantalla LCD. La medición se almacenará automáticamente en la memoria. Nota: 1 minuto después de la última medición. También puede presionar el botón START/ STOP (COMENZAR/DETENER) para apagar la unidad.
-
Page 54: Índice De Categoría De Riesgo
ÍNDICE DE CATEGORÍA DE RIESGO cada lectura con los niveles definidos establecidos y la Sangre de los Institutos Nacionales de la Salud (NIH) de los Estados Unidos, como se describió anteriormente en este manual, y brinda una guía útil únicamente a ayudarlo con el uso de esta tabla. La tabla y las guías se proporcionan únicamente para su comodidad y ayudarlo a entender su lectura no invasiva de presión arterial según se relaciona con la... -
Page 55: Detector De Latidos Cardíacos Irregulares (Ihb)
DETECTOR DE LATIDOS CARDÍACOS IRREGULARES (IHB) Si durante la medición se detectó una irregularidad de Detector de latidos cardíacos irregulares, aparece cardíacos irregulares un ícono Generalmente, esto no es causa de preocupación. Sin embargo, si el símbolo aparece con en una etapa temprana. Si se mueve, tiembla o habla durante la medición, pueden no se mueva ni hable durante la medición. -
Page 56: Cómo Recuperar Valores De La Memoria
LA MEMORIA botón MEMORY (MEMORIA) para acceder a la memoria. botón MEMORY (MEMORIA) se recuperará una lectura previa. La última lectura será la primera en recuperarse. y + al Presione y mantenga presionados los botones mismo tiempo en el modo para recuperar memoria; los datos se borrarán automáticamente. -
Page 57: Notas Importantes Con Respecto A La
NOTAS IMPORTANTES CON RESPECTO A LA MEDICIÓN DE LA PRESIÓN ARTERIAL pueden verse afectadas por las temperaturas cálidas o frías. Tome su presión arterial a una temperatura corporal normal. elevar las lecturas. No mueva ni cruce las piernas durante la medición. Mantenga los pies bien apoyados sobre el piso. -
Page 58: Cuidado, Mantenimiento Y Limpieza
CUIDADO, MANTENIMIENTO Y LIMPIEZA húmedo. No presione demasiado fuerte. No lave el utilice diluyentes, alcohol ni petróleo (gasolina) para limpiarlo. prolongado. dispositivo y de los componentes del dispositivo, incluidas las baterías. se adapte a la temperatura ambiente antes de usarla. de presión arterial. - Page 59 componentes necesita reparación, consulte la sección de la garantía de este manual. al suelo). muñeca. muñeca. abertura. siguientes rangos de temperatura y humedad: transportar la unidad funcionamiento Temperatura: Temperatura: Humedad: Humedad:...
-
Page 60: Potencial De Interferencia
POTENCIAL DE INTERFERENCIA un teléfono móvil o un horno microondas. Se recomienda mantener la mayoría de los dispositivos de comunicación perturbaciones por interferencia electromagnética. pueda causar un funcionamiento no deseado. con los límites para un dispositivo digital de Clase B, conforme a la corregir la interferencia mediante una o más de las siguientes medidas: esté... -
Page 61: Compatibilidad Electromagnética (Emc)
continuación, y únicamente en tales entornos: Prueba de emisiones Cumplimiento Emisiones de RF mantener el funcionamiento del dispositivo. Por lo tanto, sus emisiones de RF son tan Emisiones de RF Clase B electrónicos cercanos. Emisiones armónicas No se aplica El dispositivo puede usarse en todas las instalaciones, incluso en instalaciones No se aplica directamente a la red pública de energía... - Page 62 móviles y el dispositivo. Potencia máxima de Distancia de separación de acuerdo con la frecuencia del transmisor salida nominal del transmisor No se aplica de separación recomendada en metros (m) recomendada se puede calcular empleando la ecuación frecuencia más alto.
- Page 63 continuación, y únicamente en tales entornos: Prueba de Nivel de Nivel de inmunidad prueba según cumplimiento la norma IEC 60601 RF propa- No se aplica gada por conducción dispositivo, incluidos los cables, a una distancia inferior a la distancia de separación recomendada calculada a partir de la ecuación aplicable a la RF radiada frecuencia del transmisor.
-
Page 64: Diagnóstico Y Resolución De Problemas
DIAGNÓSTICO Y RESOLUCIÓN DE PROBLEMAS SÍNTOMAS CAUSAS POSIBLES La unidad no se Se han agotado las Cámbielas por dos baterías enciende cuando baterías. se presiona el botón START/STOP Los polos de las baterías no se en la posición correcta. han colocado correctamente. -
Page 65: Especificaciones
ESPECIFICACIONES Método de medición: Oscilométrico Presión: Rango de medición: Precisión: Sensor de presión: Semiconductor Inflado: Por bombeo Desinflado: Capacidad de memoria: Apagado automático: Ambiente de funcionamiento:... - Page 66 Ambiente para guardar/transportar la unidad: Peso: Circunferencia de la muñeca: Accesorios: instrucciones Dimensiones: entrada de agua. tiempo de carga reducido. Siga las instrucciones de uso. Nota:...
-
Page 67: Garantía Limitada Por 5 Años
Fabricado exclusivamente para GARANTÍA LIMITADA POR CINCO AÑOS HoMedics vende sus productos con la intención de que no tengan defectos Por servicio o reparación, de fabricación ni de mano de obra por un plazo de cinco años a partir de la fecha de compra original, con las siguientes excepciones. - Page 68 LA GARANTÍA AQUÍ ESTABLECIDA SERÁ LA ÚNICA Y EXCLUSIVA GARANTÍA. NO HABRÁ NINGUNA OTRA GARANTÍA EXPRESA NI IMPLÍCITA, INCLUYENDO NINGUNA GARANTÍA DE COMERCIALIZACIÓN O APTITUD NI NINGUNA OTRA OBLIGACIÓN POR PARTE DE LA COMPAÑÍA CON RESPECTO A PRODUCTOS CUBIERTOS POR ESTA GARANTÍA. HOMEDICS NO TENDRÁ...