Table of Contents
Advertisement
Available languages
Available languages
Quick Links
OWNERS MANUAL
MANUEL D'UTILISATEUR
MANUAL DEL USUARIO
Model No.
Modèle N°
Modelo No.
45-04733
Want more information or assembly tips?
Video
Instruction
Guide
y o u t u b e . c o m / c / a g r i f a b
CAUTION:
Read Rules for
Safe Operation
and Instructions
Carefully
PRINTED IN USA
SMartliNk PlatforM
PlatE-forME SMartliNk
PlataforMa SMartliNk
• Safety
• assembly
• operating
• Maintenance
• repair Parts
• Sécurité
• assemblage
• Utilisation
• Entretien
• Pièces de réparation
Call 1-800-448-9282 for missing parts or assembly help.
the fastest way to purchase parts www.speedepart.com
• Seguridad
• armado
• operación
• Mantenimiento
• Piezas de repuesto
FORM NO. 28093 (05/01/18)
Advertisement
Table of Contents

Related Manuals for Agri-Fab 45-04733


Summary of Contents for Agri-Fab 45-04733
- Page 1 OWNERS MANUAL MANUEL D’UTILISATEUR MANUAL DEL USUARIO Model No. Modèle N° Modelo No. 45-04733 SMartliNk PlatforM PlatE-forME SMartliNk Want more information or assembly tips? Video PlataforMa SMartliNk Instruction Guide • Safety y o u t u b e . c o m / c / a g r i f a b • assembly...
-
Page 2: Safety Rules
SafEtY rUlES Remember, any power equipment can cause injury if operated improperly or if the user does not understand how to operate the equipment. Exercise caution at all times when using power equipment. CaUtioN: VEHiClE BrakiNG look for tHiS SYMBol to PoiNt oUt StaBilitY MaY BE affECtED WitH iMPortaNt SafEtY... - Page 3 (x2) (x2) (x2) (x2) (x4) (x3) 48115 44044 (x2) 43063 (x1) 43019 43085 (x2) (x13) 47810 44292 (x1) (x4) (x4) 43343 47134 R19171616 43182 28157 23353 HarDWarE PaCkaGE SaC DE PiÈCES PaQUEtE DE torNillErÍa...
-
Page 4: Tools Required For Assembly
aSSEMBlY iNStrUCtioNS Secure the ends of the hitch tubes together using two 5/16 x 2-1/2" hex bolts (8) and 5/16" nylock nuts (14). Do not tighten yet. See figure 3. toolS rEQUirED for aSSEMBlY (2) 3/4" Wrenches (2) 1/2" Wrenches aSSEMBlY of SMartliNk PlatforM Rotate the end plates attached to the tray assembly down to a vertical position as shown in figure 1. - Page 5 11. Attach the lift tube assembly (2) and the hitch tube 14. Attach the wheels (1) to the lift tube assembly using (5) to the rear hole on the left side of the tray using a a 1/2 x 4-1/8" hex bolt (7), two 1/2" washers (30), a 5/16 x 1-1/2"...
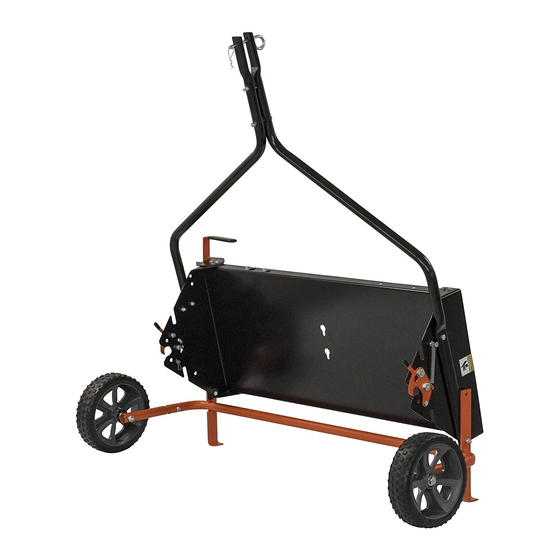
- Page 6 kNoW YoUr SMartliNk PlatforM FOOT STANDS LIFT HANDLE CATCH CENTER BRACE HITCH TUBES LIFT HANDLE RETAINER SLOT AXLE RETAINERS Hitch tubes Connects the Smartlink Platform to the axle retainers Lock tool in place with help from clevis towing vehicle. pins. Center Brace retainer Slot Reinforces tools that need further...
- Page 7 USiNG tHE SMartliNk PlatforM attaCHiNG toolS - loaDiNG toolS Different tools should be attached in the ways outlined attaCHiNG toolS - CENtEr BraCE below to lower risk of injury. Always exercise caution when loading a tool into the platform. Depending on which tool is used, the center brace may need to be moved to either the center or top of the SPikEr/PlUGGEr Smartlink Platform.
-
Page 8: Operation
oPEratioN DEtHatCHEr With the platform standing on footstands, slide the shoulder bolts on the dethatcher down into the Operation of the Smartlink Platform will change depending on retainer slots. See figure 13. what tool has been attached. Refer to the operation section for 2. -
Page 9: Maintenance
MaiNtENaNCE PlUG aErator Mow lawn and remove loose clippings prior to use. 2. Start tractor engine with controls in neutral and place Before each use, check all nuts and bolts for throttle at slow engine speed. tightness. 3. Engage shift lever at lowest possible forward speed 2. -
Page 11: Consignes De Sécurité
CoNSiGNES DE SÉCUritÉ Tout appareil mécanique risque de provoquer des blessures s’il est employé incorrectement ou si l’utilisateur ne sait pas s’en servir. Faites preuve de prudence à tout moment lorsque vous utilisez un appareil mécanique. attENtioN : lE frEiNaGE Et la StaBilitÉ CE SYMBolE iNDiQUE DES CoNSiGNES DU VÉHiCUlE riSQUENt D’ÊtrE affECtÉS DE SÉCUritÉ... - Page 12 iNStrUCtioNS PoUr l’ a SSEMBlaGE Fixez l’ensemble du tube de levage (2), la poignée de levage (3) et le tube d’attelage (5) au trou arrière du côté droit du plateau, en utilisant un boulon à six pans de 5/16 x 1-1/2 po NÉCESSairES À...
- Page 13 CE QU’il faUt SaVoir SUr VotrE PlatE-forME SMartliNk BÉQUILLES CLIQUET DE LA POIGNÉE DE LEVAGE APPUI CENTRAL TUBES D’ATTELAGE POIGNÉE DE LEVAGE CRAN DE RÉGLAGE DE LA PLAQUE DE FIXATION DE L’ESSIEU PLAQUES DE FIXATION DE L’ESSIEU tubes d’attelage Plaques de fixation Permet de raccorder la plate- Maintient l’outil solidement en place avec de l’essieu...
- Page 14 foNCtioNNEMENt UtiliSatioN DE la PlatE-forME SMartliNk Le fonctionnement de la plate-forme Smartlink change selon l’outil qui y a été attaché. Consultez la section Fonctionnement pour chaque fiXatioN DES oUtilS – aPPUi CENtral outil avant de vous en servir. Selon l’outil qui est utilisé, il vous faudra déplacer l’appui central au centre ou en haut de la plate-forme Smartlink.
-
Page 15: Entretien
ENtrEtiEN aÉratEUr À CUillÈrE Tondez le gazon et enlevez l’herbe coupée avant utilisation. Démarrez le moteur du tractor avec les commandes au Avant chaque utilisation, vérifiez tous les écrous et les point mort, puis ouvrez la commande des gaz à un régime boulons pour vous assurer qu”ils sont bien serrés. -
Page 16: Reglas De Seguridad
rEGlaS DE SEGUriDaD Cualquier equipo puede causar lesiones si se opera inapropiadamente o si el usuario no entiende cómo operarlo. Tenga la debida precaución en todo momento cuando use este equipo eléctrico. PrECaUCiÓN: CaPaCiDaD BUSQUE EStE SÍMBolo QUE iNDiCa VEHÍCUlo Para frENar Y SU EStaBiliDaD PrECaUCioNES DE SEGUriDaD PUEDEN QUEDar afECtaDoS al aDiCioNar iMPortaNtES. - Page 17 iNStrUCCioNES DE ENSaMBlaJE Acople el ensamblaje del tubo de elevación (2) al mango de elevación (3) y el tubo de enganche al agujero posterior del lado derecho de la bandeja utilizando un perno HErraMiENtaS rEQUEriDaS Para El hexagonal de 5/16 x 1-1/2 pulg. y la tuerca de cierre de ENSaMBlaJE nylon de 5/16 pulg.
- Page 18 CoNoZCa la PlataforMa SMartliNk PARADOR DE PIE SUJETADOR DEL ASA LEVANTADORA RIOSTRA DEL MEDIO TUBOS DE ENGANCHE ASA LEVANTADORA RANURA DEL RETÉN RETENES DEL EJE tubos de enganche Conectan la plataforma Smartlink al retenes del eje Asegura las herramientas en su lugar con vehículo de remolqu.
-
Page 19: Operación
oPEraCiÓN CÓMo UtiliZar la PlataforMa SMartliNk La operación de la plataforma Smartlink cambiará dependiendo HErraMiENtaS DE aCoPlaMiENto – rioStra de qué herramientas se hayan acoplado. Consulte la sección de operación correspondiente a cada herramienta antes de usarla. DE MEDio Dependiendo de la herramienta que se use, la riostra de medio NUNCa DEJE HErraMiENta... -
Page 20: Mantenimiento
MaNtENiMiENto airEaDor DE taCoS Corte el césped y retire las ramas sueltas antes de usar el aireador. Antes de cada uso, revise las tuercas y pernos para Arranque el motor del tractor con los controles en neutro asegurarse de que estén debidamente ajustados. y coloque el acelerador para que el motor funcione a baja Lubrique las ruedas y puntos de giro según sea necesario. - Page 22 PartS for 45-04733 SMartliNk PlatforM...
- Page 23 PartS for 45-04733 SMartliNk PlatforM Part No DESCriPtioN Part No DESCriPtioN 41863 Wheel 43343 Hair Cotter Pin, 3/32 x 2-5/16" 67204 Lift Tube Assembly 23353 Hitch Pin, 3/8 x 3" 26360 Lift Handle 28164ORG Outside Lift Tube 26345 Center Brace...
-
Page 24: Repair Parts
Agri-Fab, Inc. Unauthorized uses and/or reproductions of this manual will subject such unauthorized user to civil and criminal penalties as provided by the United States Copyright Laws.