Table of Contents
Advertisement
Advertisement
Table of Contents

Related Manuals for DK Digital AS-200


Summary of Contents for DK Digital AS-200
- Page 2 . . . for choosing one of our Home Theatre Systems. For your own safety and in order to learn all about the functions available, please read this manual and keep it for future reference. And if you once sell the unit please include the manual. www.dk-digital.com © 2006 Copyright, manufacturer: DK digital GmbH...
-
Page 3: Important Safety Instructions, Please Read Carefully
Important Safety Instructions, please Read Carefully! • This unit is meant to reproduce audio signals and to receive radio transmissions. Using it in any other way warranty invalidates the warranty and you risk electric shock. • Never attempt to open the housings of your surround speaker set or to service the product beyond that described in this manual. -
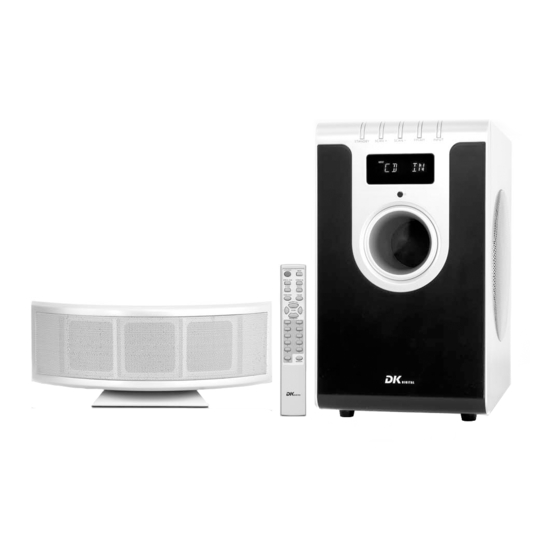
Page 4: Scope Of Delivery
Scope of delivery 1. Remote control handset incl. Batteries 2. Subwoofer/main unit 3. Satellite speaker 4. Connection cable for satellite speaker 5. Adaptor cable 6x RCA to 9pin plug 6. Frame antenna for AM reception 7. Pig tail antenna for FM reception 8. -
Page 5: Operating Elements On The Subwoofer
Operating elements on the subwoofer on the front . . . 1. STANDBY 2. SCAN + 3. Display 4. SCAN — 5. FM/AM 6. INPUT 7. LED 8. IR - to switch the unit on and off - starts station scanning up - here the unit shows operational information - starts station scanning down - toggles the radio band... - Page 6 . . . and on the rear panel 1) AM — Input for MW loop antenna Please connect the lead wires of the supplied MW loop antenna here. 2) FM — Input for FM dipole antenna Please connect the supplied FM dipole antenna here. 3) CD STEREO IN —...
- Page 7 7) SPEAKER OUT — OUTPUT TO CENTRE SPEAKER For connecting the centre speaker, please only use the supplied special cable. Do not use other cables! 8) MAIN POWER ON/OFF Using this power switch you connect the unit to the mains and activate it. 9) FUSE - CAUTION! This cab holds the primary fuse.
- Page 8 Connecting Audio Sources 1. Connect the 5.1 input (5.1 CHANNEL INPUT EXTEND) at the subwoofer’s back panel to devices providing audio signals via separated outputs for front, surround, centre, and subwoofer, e. g. DVD players. Only use the supplied adaptor cable 6x RCA to 9-pole-plug.
-
Page 9: The Remote Control
The Remote Control Take out the remote control handset from the package. Open the battery compartment on its rear side. Insert two batteries (1,5 V, size AAA). Please make sure the polarity matches the marks inside the compartment. Otherwise the r/c will not work and may be damaged. - Page 10 10 RADIO: Use this button to activate the built-in tuner. 11 STEREO IN: Press this key to activate the 3 stereo inputs one after the other. 12 MUTE: Press this button to silence the sound. Press it again to reactivate the sound. Operating the Home Cinema Set Connect the plug of the power cord to a properly connected AC230V power socket.
- Page 11 2. Use the SCAN “+” / “—“ keys to select the channels. Press the SCAN “+” key repeatedly for a short period of time to search for radio channels, which broadcast on a higher frequency than the one currently displayed. Press the SCAN “—” key repeatedly for a short period of time to search for radio channels, which broadcast on a lower frequency than the one currently displayed.
-
Page 12: Disposal Advice
/ peak music output power 60 watts / 300 watts 10 watts / 50 watts per channel 10 watts / 50 watts AC230V~ / 50 Hz alternating current © 2006 Copyright DK digital GmbH 40878 Ratingen Germany www.dk-digital.com...