
Related Manuals for Directed Electronics 5301


Summary of Contents for Directed Electronics 5301
- Page 1 Remote Start Keyless Entry Model 5301 Owner’s Guide © 2009 Directed Electronics, Vista, CA G4202V 2009-08...
-
Page 3: Table Of Contents
Advanced commands: function level 4 ...............11 Rear defogger ..................11 Aux 4 ....................11 Out of range notification ..................12 System maintenance ..................12 Low battery indicator ................13 Configuring your remote ..................14 Programming ..................16 Multi-car control capability ...............17 © 2009 Directed Electronics. All rights reserved. - Page 4 Unlocking ....................31 Remote start ...................31 Owner recognition ..................32 Rapid resume logic ..................32 Power saver mode...................32 Programming options ..................33 Convenience expansions ..................34 Glossary of terms ....................35 Quick reference guide ..................37 Limited lifetime consumer warranty ..............40 © 2009 Directed Electronics. All rights reserved.
-
Page 5: Government Regulations
RF exposure compliance. This device is designed to be used in a person’s hands and its operating configurations do not support normal transmissions while it is carried in pockets or holsters next to a persons’ body. © 2009 Directed Electronics. All rights reserved. - Page 6 Warning: Changes or modifications not expressly approved by the party responsible for compliance could void the user’s authority to operate this device. © 2009 Directed Electronics. All rights reserved.
-
Page 7: Warning! Safety First
Failure to do so can result in personal injury or prop- erty damage. We recommend the owner have the parking/emergency brake system inspected and adjusted by a qualified automotive shop biannually. © 2009 Directed Electronics. All rights reserved. - Page 8 This product should not be installed in any convertible vehicles, soft, or hard top with a manual transmission. Installation in such vehicles may pose certain risk. © 2009 Directed Electronics. All rights reserved.
-
Page 9: What's Included
➢ Replacement remote controls Your system comes with one Responder LE remote control (P/N 7251V) and one remote control (P/N 7152V). If additional remotes are desired, please see your authorized dealer or visit www.directedstore.com to order. © 2009 Directed Electronics. All rights reserved. -
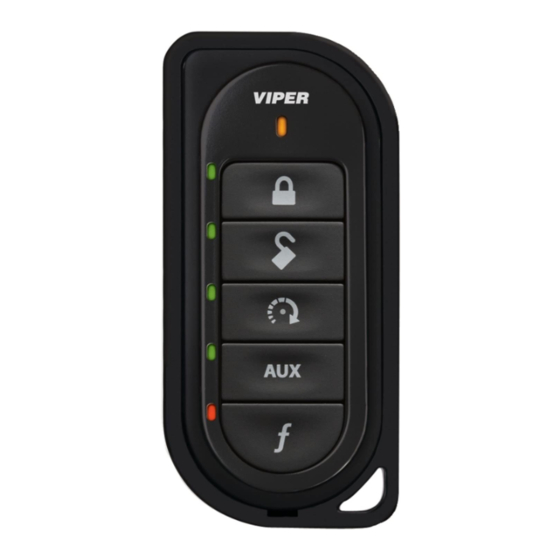
Page 10: Responder Le 2- Way Remote
Battery Door Remove to access batteries when necessary. For more detail, see Page13. Transmit indicator LED indicators Flashes to indicate function confirmation Note: If Keypad Lock is On, press and then press to unlock. © 2009 Directed Electronics. All rights reserved. -
Page 11: 1-Way Companion Remote
1-way companion remote Note: See call-out table for 2- way remote. © 2009 Directed Electronics. All rights reserved. -
Page 12: Transmitter Configuration
(2- way only) (2- way (2- way only) only) *Used to access function levels for Advanced Commands with multiplier in third row implies button presses) ** Must be pressed and held to access state © 2009 Directed Electronics. All rights reserved. -
Page 13: Control Center
• The Status LED, as a visual indicator of the system’s status. • The Control button, for placing the system into Valet Mode and to per- form the Emergency Override operation. Control Button © 2009 Directed Electronics. All rights reserved. -
Page 14: Basic Commands
Press and hold for 1.5 seconds to activate the Trunk Release. A U X Feedback The AUX LED turns on and AUX activation tone sounds. Notes This is an optional feature. See your authorized Di- rected dealer for details. © 2009 Directed Electronics. All rights reserved. -
Page 15: Function Shift
*Horn honk is an optional feature. The panic and horn honk feature is avail- able when this option is installed. Pressing more than one button simultaneously generates an error tone and the Function LED turns on, and all other LEDs flash. © 2009 Directed Electronics. All rights reserved. -
Page 16: Advanced Commands: Function Level 1
Hold for 1.5 seconds . Feedback: Cabin temperature is displayed on the remote. Notes LED lights turn on to indicate a range. (See page 28) *Horn honk is an optional feature. © 2009 Directed Electronics. All rights reserved. -
Page 17: Advanced Commands: Function Level 2
Lock status Command: Press two-times and then hold for 1.5 seconds. Feedback Lock or Unlock LED on 2- way remote lights up to display if the system is in locked or unlocked mode. © 2009 Directed Electronics. All rights reserved. -
Page 18: Advanced Commands: Function Level 3
Hold for 1.5 seconds. Feedback: Remote start On tones sound. Notes Runtime remaining is displayed via LEDs. (See Page 23) If re- mote start is not active the 2- way responds with an error tone. © 2009 Directed Electronics. All rights reserved. -
Page 19: Advanced Commands: Function Level 4
A U X Command : Press four times and then press Feedback: The AUX LED turns on, Aux activation tone sounds Notes This is an optional feature. See your authorized Directed dealer for details. © 2009 Directed Electronics. All rights reserved. -
Page 20: Out Of Range Notification
The system requires no specific maintenance. The 2- way remote uses two CR2016 cell batteries and the1- way remote uses one CR2032 cell battery. When the battery begins to weaken, the operating range is reduced. © 2009 Directed Electronics. All rights reserved. -
Page 21: Low Battery Indicator
Insert a new battery into the holder and under the clip with the posi- tive (+) side up. Replace the battery cover. The remote control is now ready for use. Side View Rear View Latch Battery Tray © 2009 Directed Electronics. All rights reserved. -
Page 22: Configuring Your Remote
* This option is not available with the 1- way companion remote. When Paging is On the remote wakes up every few seconds to detect pages from the system. When Off the remote does not wake up to receive pages from the system. © 2009 Directed Electronics. All rights reserved. - Page 23 Power Save 2 is for maximum battery life and will monitor the system only when remote start has been activated. Important: When Power Save 2 is on, the optional Factory Alarm trigger mes- sages are not received when remote start is off. (See Convenience Expansions) © 2009 Directed Electronics. All rights reserved.
-
Page 24: Programming
Note: Remotes are pre-programmed from the factory. How to Remote Pair Make sure the remote control is set for the desired Car 1 or Car 2 operation for the system it is to be paired with. © 2009 Directed Electronics. All rights reserved. -
Page 25: Multi-Car Control Capability
While holding a command button and transmitting, the amber LED at the top of the remote control flashes in groups to indicate which car is being controlled. • Car 1: 1 flash • Car 2: 2 flashes © 2009 Directed Electronics. All rights reserved. - Page 26 The LEDs will change to indicate the car that can be operated. After you select the car number, press any command button to oper- ate the features. The selected car remains selected until the setting is changed. © 2009 Directed Electronics. All rights reserved.
-
Page 27: Using Your System
The 2- way remote beeps two-times and the LED indica- tor flashes. If locked the doors unlock and the optional Failsafe Starter Kill deactivates. If no unlock confirmation is received, the 2- way remote emits the out-of-range signal. © 2009 Directed Electronics. All rights reserved. -
Page 28: Valet Mode
Valet Mode. Repeat the process to take the system out of Valet Mode. The Control Center LED turns on solid when in Valet Mode and turns off when exiting Valet Mode. © 2009 Directed Electronics. All rights reserved. -
Page 29: Panic Mode
Note: The override feature allows you to select a specific number of presses needed to disable the system. If the override button has been programmed to a new number of presses by your authorized dealer, that number should be indicated below. Override button presses ________ © 2009 Directed Electronics. All rights reserved. -
Page 30: Using The Remote Start
The remote start shuts down: • When the brake pedal is pressed • The hood is opened • When the remote start command is sent again from a remote control • When runtime expires © 2009 Directed Electronics. All rights reserved. - Page 31 100% runtime remaining 75% runtime remaining 50% runtime remaining 25% runtime remaining A U X When the remote start and Function LEDs are blinking, there is less than three minutes of runtime left. © 2009 Directed Electronics. All rights reserved.
-
Page 32: Manual Transmission Vehicles
Get in without stepping on the brake. Insert the ignition key and turn it to the On position. Now, step on the brake. The remote start turns off. The vehicle is ready to drive. © 2009 Directed Electronics. All rights reserved. -
Page 33: Timer Mode
4 times when exiting timer mode. To exit timer mode with the transmitter: • Press the button twice and then press . The parking lights flash A U X slow four times to confirm timer mode is exited. © 2009 Directed Electronics. All rights reserved. -
Page 34: Turbo Timer Mode
Transmit the timer mode feature by pressing two-times, and then press A U X Or press the optional dash mounted activation button one time. The lights turn on and the remote start activates the ignition. © 2009 Directed Electronics. All rights reserved. -
Page 35: Smart Start Activation
Press the button on the remote 3 times and then press the button. A U X The parking lights flash 5 times fast to confirm the remote is in Smart Start mode. © 2009 Directed Electronics. All rights reserved. -
Page 36: Low Runtime Alert
The LEDs light up indicating the temperature range of the vehicle. 95˚F and above 76˚F to 95˚F 56˚F to 75˚F 32˚F to 55˚F A U X 32˚F and below © 2009 Directed Electronics. All rights reserved. -
Page 37: Turning On The Rear Defogger
Pit Stop mode. After you exit the vehicle you can lock the system with the remote and the car remains running. If the vehicle shuts down when locking, then the unit did not enter the Pit Stop mode. © 2009 Directed Electronics. All rights reserved. -
Page 38: Safety Features
Remote start safe-lock makes sure the doors are locked when Remote Start is activated and after it is deactivated, even if they are unlocked when remote start is activated. Door locks may require additional parts and labor. © 2009 Directed Electronics. All rights reserved. -
Page 39: Diagnostics
8 flashes: neutral safety wire has no ground or the remote start defeat toggle switch is off. Keep a record of the number of flashes, to assist your authorized Directed dealer when taking the vehicle in for service. © 2009 Directed Electronics. All rights reserved. -
Page 40: Owner Recognition
Valet Mode, the status LED shuts Off. If the system remains in Valet Mode, the LED comes back on the next time the ignition is turned On, and then Off. © 2009 Directed Electronics. All rights reserved. -
Page 41: Programming Options
After the next unlock all operations return to normal. Turn the ignition On for one to three seconds and then Off. The horn honks once to confirm one-time bypass is enabled. © 2009 Directed Electronics. All rights reserved. -
Page 42: Convenience Expansions
• Trunk Release • Windows open/close • Left Sliding door open/close • Right Sliding door open/close • Rear Hatch open/close • Sunroof open/close • Audio System on/off • Headlights on/off © 2009 Directed Electronics. All rights reserved. -
Page 43: Glossary Of Terms
Control Button: A small push button switch located on your systems Control Center. It is used to override the starter interrupt when a remote is lost or dam- aged, or to enter or exit Valet Mode. © 2009 Directed Electronics. All rights reserved. -
Page 45: Quick Reference Guide
Control Center flashes and the parking lights flash once to confirm lock- ing. • Silent UnLock Press one-time and then press for one-second. The doors unlock the parking lights flash twice to confirm unlocking. © 2009 Directed Electronics. All rights reserved. - Page 46 Turn the ignition key to the Off position. Exit the vehicle and lock the doors with the remote. The engine will remain running until the programmed time elapses or a shut-down input is received. © 2009 Directed Electronics. All rights reserved.
-
Page 48: Limited Lifetime Consumer Warranty
Limited lifetime consumer warranty Directed Electronics. (“Directed”) promises to the original purchaser to repair or replace (at Directed’s election) with a comparable reconditioned model any Directed unit (hereafter the “unit”), excluding without limitation the siren, the remote transmitters, the associated... - Page 49 Authorized dealer’s company name and address Type of alarm installed Year, make, model and color of the automobile Automobile license number Vehicle identification number All security options installed on automobile Installation receipts 920-0003 06-06 © 2009 Directed Electronics. All rights reserved.
- Page 52 The company behind this system is Directed Electronics Since its inception, Directed Electronics has had one purpose, to provide consumers with the finest vehicle security and car stereo products and accessories available. The recipient of nearly 100 patents and Innovations Awards in the field of advanced electronic technology.