Table of Contents
Advertisement
Quick Links
Advertisement
Table of Contents

Related Manuals for Pulse Impstar 40

Summary of Contents for Pulse Impstar 40
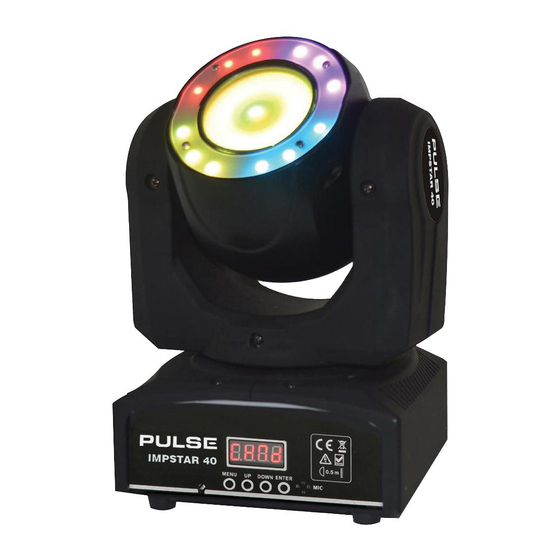
- Page 1 LED Moving Wash/Beam Light with Halo Model: Impstar 40...
-
Page 2: Important Safety Information
Please read these instructions carefully before use and retain for future reference. IMPORTANT SAFETY INFORMATION • When using electrical appliances basic safety precautions should always be followed. • Check the product before use for any damage. Should you notice any damage on the cable or casing, do not use. -
Page 3: Product Overview
PRODUCT OVERVIEW MENU ENTER DOWN IEC Power Connector with DMX Out Fuse Holder (rear) DMX In SETUP Fuse Replacement: • With a flat head screwdriver, prise the fuse holder out of its housing. • Remove the defective fuse from its holder and replace with the same fuse specification. -
Page 4: Cable Connections
SETUP DMX Data Cable: • Use a Belden 9841 or equivalent cable that meets the specifications for EIA RS- 485 applications. The cable will have the following characteristics: - 2-conductor trwitsed pair plus a shield - Maximum capacitance between conductors - 30pF/ft - Maximum capacitance between conductor and shield - 55pF/ft - Maximum resistance of 20Ω... -
Page 5: Setting Up A Dmx Serial Data Link
SETTING UP A DMX SERIAL DATA LINK • Connect the (male) 3-pin connector side of the DMX cable to the output (female) 3-pin connector of the controller. • Connect the end of the cable coming from the controller, which will have a (female) 3-pin connector, to the input connecotr of the next fixture consisting of (male) 3-pin connector. -
Page 6: Photometric Diagram
OPERATING INSTRUCTIONS Navigating the Control Panel: • Access the control panel functions using the four panel buttons located directly beneath the LCD. Used to access the menu or to go to MENU a previous menu option. Scrolls through the menu options in ascending order Scrolls through the menu options in DOWN... - Page 7 AuTo SoUn SeNs 0-100 DiSp Tilt Performs mode test Test sequence Displays hours usage Hour Displays software version Resets to default rSEt...
-
Page 8: Operation Mode
OPERATION MODE • Press the MENU button and the display shows each option in sequence, then press ENTER and the LCD will show modes for you to choose. • Use the UP/DOWN buttons to set the desired inversion, then press ENTER to confirm. -
Page 9: Dmx Mode
To display the hours the lamp has been operating: • Press the MENU button until “hour” is displayed • Press ENTER and the total hours usage to date will be shown. To display the software revision version: • Press MENU until “Ver” is diaplayed. •... - Page 10 240-255 Sound Active 150-184 5050 SMD section 2 Red mix Blue 185-219 5050 SMD section 2 Green mix Blue 220-255 5050 SMD section 2 RGB 000-010 No Function 011-044 5050 SMD section 3 Red 045-079 5050 SMD section 3 Green 080-114 5050 SMD section 3 Blue 115-149...
- Page 11 000-255 Blue LED Dimmer0%~ 100% 000-255 White LED Dimmer0%~ 100% 000-255 5050 SMD Dimmer0%~ 100% 000-008 No function 009-255 5050 SMD Strobe slow to fast 000-255 5050 SMD RED Dimmer0%~ 100% 000-255 5050 SMD Green Dimmer0%~ 100% 000-255 5050 SMD Blue Dimmer0%~ 100% 000-010 No Function 011-044...
-
Page 12: Specification
115-149 5050 SMD section 4 Red mix Green 150-184 5050 SMD section 4 Red mix Blue 185-219 5050 SMD section 4 Green mix Blue 220-255 5050 SMD section 4 RGB 000-199 No function 200-209 Reset 210-239 No function 240-255 Sound Active SPECIFICATION Voltage AC 100-240V 50-60Hz...