Advertisement
Quick Links
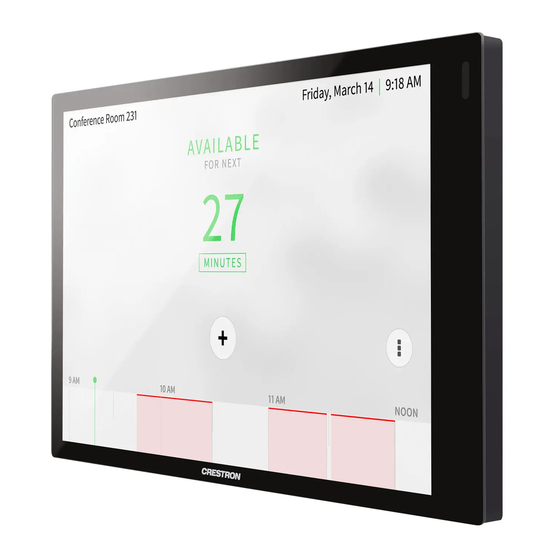
TSS-770 and TSS-1070
7 in. and 10.1 in. Room Scheduling Touch Screens
The Crestron®
TSS-770
and
TSS-1070
designed specifically for room scheduling applications. The touch screens
install near the entrance of a meeting room or huddle space to provide a
clear indication of the room availability and schedule, and they integrate
seamlessly with a variety of popular scheduling services.
NOTE: The TSS-770 and TSS-1070 are functionally similar. For
simplicity within this guide, the term "touch screen" is used except
where otherwise noted. The TSS-770-T-LB and TSS-1070-T-LB kits
provide a version of the touch screen designed to run the Microsoft
Teams® Panels scheduling application exclusively.
In the Box
1
TSS-770 or TSS-1070*, Room Scheduling Touch Screens
Additional Items
1
Bracket, Mounting (2055453)
4
Screw, 6-32 x 3/4 in., Undercut Head, Phillips (2033247)
4
Screw, M3 x 16 mm, Flat Head, Phillips (2013788)
2
Screw, M3.5 x 25 mm, Flat Head, Phillips (2023756)
4
Anchor, #6-8, Self-Drilling (2035879)
4
Screw, 6-AB x 1 in., Flat Head, Phillips (2056874)
1
Bracket, Security (2055451)
2
Screw, M2 x 4 mm, Security (2055454)
1
Key, Security Bracket Release (2055452)
* Refer to the TSS-770-B-S and TSS-1070-B-S product pages at
complete list of color variations.
are wall mount touch screens
www.crestron.com
for a
Install the Mounting Bracket
The TSS-770 and TSS-1070 install over a standard 2-gang or 3-gang
U.S. electrical box, a 2-gang European electrical box, or a 2-gang U.K.
electrical box. The touch screen also installs into drywall.
NOTES:
Additional mounting options are possible using the following
l
mounting accessories. For more information, refer to the product
pages at www.crestron.com.
TSW-UMB-70 universal mounting bracket
o
TSW-UMB-70-PMK preconstruction mounting kit
o
TSW-UMB-70-BBI wall mount back box
o
TSW-770/1070-MSMK series multisurface mounting kits
o
TSW-770/1070-MUMK mullion mounting kit
o
TSW-770/1070-RMB series retrofit mounting brackets
o
TSW-770/1070-RMK series rack mount kits
o
Installing the mounting bracket to an electrical box is required only
l
if one of the mounting solutions above is not used. Refer to the
documentation for your chosen mounting solution at
www.crestron.com/manuals.
Electrical Box Mounting
To mount the touch screen into an electrical box, use the appropriate
screws (four 6-32 x 3/4 in. screws, four M3 x 16 mm screws, or two
M3.5 x 25 mm screws) to attach the mounting bracket to the electrical
box as shown in the following illustrations:
NOTE: For U.S. installations, use a #2 Phillips screwdriver. For
European or U.K. installations, use a #1 Phillips screwdriver.
Quick Start
1
Advertisement

Related Manuals for Crestron TSS-770


Summary of Contents for Crestron TSS-770
- Page 1 The TSS-770 and TSS-1070 install over a standard 2-gang or 3-gang seamlessly with a variety of popular scheduling services.
- Page 2 Quick Start TSS-770 and TSS-1070 7 in. and 10.1 in. Room Scheduling Touch Screens Drywall Mounting For U.S. installations, use the four 6-32 x 3/4 in. screws. Mounting hardware is provided with the touch screen for drywall installations without an electrical box. Using this hardware will ensure that the bracket is completely flush with the touch screen to provide maximum magnetic force.
- Page 3 Quick Start TSS-770 and TSS-1070 7 in. and 10.1 in. Room Scheduling Touch Screens To remove the touch screen after installation, use the included release Install the Security Bracket key to push down on the security bracket release tabs as shown in the...
- Page 4 NOTE: The TSS-770 may use either PoE or PoE+ to supply power to compatible LED accessories over USB; the TSS-1070 requires at NOTE: To clean or disinfect a touch screen display, use a soft, clean, minimum PoE+ to supply power to LED accessories over USB.
-
Page 5: Configure The Touch Screen
To access the built-in setup screens, place five fingers on the display and Configure the Touch Screen hold for 15 seconds. The main Setup screen is displayed (TSS-770 shown). When power is applied for the first time, the touch screen boots with the Crestron room scheduling application selected by default. -
Page 6: Set The Time Zone
1. Ensure that the touch screen is connected to the network. different protocol (such as Wi-Fi® communications), use the 2. Use the Device Discovery tool in Crestron Toolbox™ software to MAC address for that protocol instead. discover the touch screen and its IP address on the network. -
Page 7: Select An Application
A similar message application may be selected from the web configuration interface. is displayed when connecting to the device in Crestron Toolbox software The touch screen included in the TSS-770-T-LB or TSS-1070-T-LB kits if an admin account has not already been created. - Page 8 2. Tap Next. The Time Zone Selection screen is displayed. Configure Microsoft Teams Panels The touch screen included in the TSS-770-T-LB or TSS-1070-T-LB kits ships with the Microsoft Teams Panels scheduling application running out of the box, with the Language Selection screen displayed upon initial boot.
- Page 9 Quick Start TSS-770 and TSS-1070 7 in. and 10.1 in. Room Scheduling Touch Screens 4. Tap Next. A Microsoft Teams sign in screen is displayed. Visit the Product Pages Scan the QR code to visit the product page. TSS-770 www.crestron.com/model/6511329 TSS-1070 www.crestron.com/model/6511331 5.
- Page 10 Crestron disclaims any proprietary interest in the marks and names of others. Crestron is not responsible for errors in typography or photography.