Table of Contents
Advertisement
Advertisement
Table of Contents

Related Manuals for Singer 8060


Summary of Contents for Singer 8060
- Page 1 INSTRUCTION MANUAL NOTICE D’UTILISATION MANUAL DE INSTRUCCIONES 8060...
-
Page 2: Important Safety Instructions
SAVE THESE INSTRUCTIONS Servicing should be performed by an authorized service representative. SINGER is the exclusive trademark of The Singer Company Limited S.à.r.l. or its Affi liates. ©2015 The Singer Company Limited S.à.r.l. or its Affi liates. All rights reserved. -
Page 3: Table Of Contents
CONTENTS IMPORTANT SAFETY INSTRUCTIONS ..... 2 WHERE TO USE EACH STITCH ...... 48 MODEL 8060 ............8 STRAIGHT STITCH SEWING ......50 MAIN PARTS ............. 10 A. STRAIGHT STITCH ...............50 B. STRAIGHT STITCH WITH AUTO-LOCK STITCH (PATTERN ACCESSORIES..........12 NO. 3, 4) .................50 HARD SIDED DUST COVER ...... -
Page 4: Consignes De Sécurité Importantes
La maintenance de la machine doit être assurée exclusivement par un professionnel agréé. SINGER est une marque exclusive de The Singer Company Limited S.à.r.l. ou de ses Affi liés. ©2015 The Singer Company Limited S.à.r.l. ou de ses Affi liés. Tous droits réservés. - Page 5 TABLE DES MATIÈRES CONSIGNES DE SÉCURITÉ IMPORTANTES .. 4 DESCRIPTION DES POINTS ......49 MODÈLE 8060 ............ 9 COUTURE AU POINT DROIT ......51 PIÈCES PRINCIPALES ........11 A. POINT DROIT.................51 B. POINT DROIT AVEC POINT D’ARRÊT AUTOMATIQUE ACCESSOIRES..........13 (MODÈLES NO. 3, 4) .............51 HOUSSE DE PROTECTION SOUPLE .....
- Page 6 Las reparaciones deben ser realizadas únicamente por un servicio representativo autorizado. SINGER es una marca registrada de “The Singer Company Limited S.à.r.l.” o sus Afi liadas. ©2015 The Singer Company Limited S.à.r.l. o sus Afi liadas. Todos los daerechos reservados.
- Page 7 ÍNDICE NORMAS DE SEGURIDAD IMPORTANTES ..6 DÓNDE UTILIZAR CADA TIPO DE PUNTADA . 49 MODELO 8060 ............ 9 PUNTADA RECTA ..........51 PARTES PRINCIPALES ........11 A. PUNTADA RECTA ..............51 B. PUNTADA RECTA CON PUNTADA AUTO LOCK ACCESORIOS........... 13 (PATRÓN NO. 3, 4) ..............51 CUBIERTA ............
-
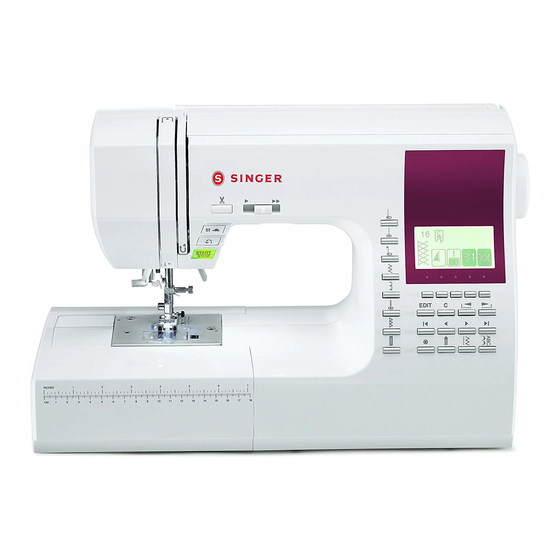
Page 8: Model 8060
MODEL 8060 PREFACE Thank you for your purchase of this sewing machine. This machine intended for household use will provide you with excellent performance in sewing from light to heavy material. Please refer to this booklet for proper use and optimum service. -
Page 9: Modèle 8060
MODÈLE 8060 MODELO 8060 PRÉFACE PRÓLOGO Merci d’avoir acheté cette machine à coudre. Gracias por la adquisición de esta máquina de La machine est destinée à l’usage domestique coser. et vous procurera d’excellents résultats pour Esta máquina ideada para uso doméstico le la couture de matériaux légers tout aussi bien... -
Page 10: Main Parts
MAIN PARTS 1. Handle 2. Top Cover 3. Thread Take-Up Lever (Inside) 4. Face Plate 5. Thread Cutter Button 6. Speed Control Button 7. Needle Up-Down / Slow Button 8. Reverse Stitch Button 9. Start/Stop Button 10. Removable Extension Table (accessories located here) 11. -
Page 11: Pièces Principales
PIÈCES PRINCIPALES PARTES PRINCIPALES 1. Asa 1.Poignée 2. Cubierta superior 2.Carter supérieur 3. Palanca tirahilos (interior) 3. Releveur de fi l (à l’intérieur) 4. Placa frontal 4. Plaque frontale 5. Botón Cortador de Hilo 5. Touche coupe-fi l 6. Botón de Control de Velocidad 6. -
Page 12: Accessories
ACCESSORIES Accessories are provided in the accessory case. (See next page, [Removable Extension Table]) 1. Needle Pack 2. 4 Bobbins ( 1 is in the machine) 3. Seam Ripper 4. Brush 5. Auxiliary Spool Pin with Felt Washer 6. Screwdriver 7. -
Page 13: Accessoires
ACCESSOIRES ACCESORIOS Les accessoires sont disposés dans le Los accesorios se encuentran en el compartimento compartiment à accessoires (Plateau de Rallonge de accesorios (Tabla Extensora Movible) Amovible) 1. Paquete de agujas 1. Assortiment d’aiguilles 2. 4 canillas (1 en la máquina) 2. -
Page 14: Extension Table
EXTENSION TABLE a. REMOVING THE EXTENSION TABLE Hook your fi nger under the bottom left side of the removable extension table, then slide the table toward the left. To reattach the table, push it to the right. b. OPENING THE ACCESSORY CASE Hook your fi... -
Page 15: Plateau D'extension
PLATEAU D’EXTENSION EXTENSIÓN a. DÉGAGER LE PLATEAU D’EXTENSION a. RETIRADA DE LA EXTENSION Glissez votre doigt en-dessous et sur le côté Enganche su dedo debajo de la parte inferior gauche du plateau de rallonge amovible, faites izquierda de la mesa de extensión extraíble, a ensuite glisser le plateau vers la gauche. -
Page 16: Inserting The Needle
Needle for knit and 2045 synthetic fabric Sweatshirt, Swim- All-purpose, SINGER wear, Double Knit, polyester Style 2001 or Sweater Knit 2045 Leather SINGER All-purpose, polyester, 2032 Leather heavy duty, topstitching thread Use a Singer brand needle for best sewing results. -
Page 17: Mise En Place De L'aiguille
Estilo Cuero Todos los tejidos, polyester, fi l SINGER SINGER poliéster, hilo para pour surpiqure, 2032 trabajo pesado y 2032 extra résistant pespuntes Utilice una aguja Singer para obtener los Pour un résultat optimal, utilisez une mejores resultados. aiguille Singer. -
Page 18: Connecting The Machine
CONNECTING THE MACHINE DANGER: To reduce the risk of electric shock. Never leave unattended when plugged in. Always unplug this machine from the electric outlet immediately after using and before maintenance. WARNING: To reduce the risk of burns, fi re, electric shock, or injury to persons. -
Page 19: Branchement De La Machine
BRANCHEMENT DE LA MACHINE CONEXIÓN DE LA MAQUINA PELIGRO: Para reducir el riesgo de DANGER - Pour réduire les risques descarga eléctrica. de décharge électrique : Nunca deje la máquina sola cuando esté Ne laissez jamais la machine branchée sans encendida. -
Page 20: Function Of Each Part
FUNCTION OF EACH PART A. START/STOP BUTTON The machine will start running when Start/Stop button is pressed and will stop when pressed the second time. The machine will rotate slowly at start of sewing. MONITOR LAMP Green Light “ON” Ready to sew or bobbin winding. Red Light “ON”... -
Page 21: Fonction Des Pièces Et Touches
FONCTION DES PIÈCES ET FUNCIÓN DE CADA UNA DE TOUCHES LAS PARTES A. TOUCHE MARCHE / ARRÊT A. BOTÓN INICIO / PARO La machine commence à coudre lorsque vous La máquina comenzará a funcionar cuando se appuyez sur la touche marche/arrêt et s’arrête presione el botón inicio / paro y se detendrá... -
Page 22: Thread Cutter Button
F. THREAD CUTTER BUTTON Press this button after sewing to cut the upper and bobbin threads. The machine will cut both threads automatically. CAUTION 1. Do not press this button when there is no fabric in the machine or no need to cut the threads. The thread may tangle, resulting in damage. -
Page 23: Touche Coupe-Fil
F. TOUCHE COUPE-FIL F. BOTÓN CORTADOR DE HILO Appuyez sur cette touche pour couper le fi l du haut Presione este botón después de coser para cortar et le fi l de canette. La machine coupera les 2 fi ls los hilos superior y de la bobina. -
Page 24: Control Panel
CONTROL PANEL When you turn on the power, machine will select the straight stitch and will display relevant informatin about that stitch on the L.C.D. A. L.C.D. DISPLAY Stitch information is indicated on this display. According to the pattern or mode, information will vary. -
Page 25: Écran D'affichage
ÉCRAN D’AFFICHAGE PANEL DE CONTROL Quand vous allumez la machine, celle-ci Al encender la máquina, se seleccionará la sélectionne le point droit et affi che les informations puntada recta y se indicará la información de esa concernant le point sur l’écran LCD. puntada en la pantalla LCD. -
Page 26: Cursor Buttons
J. CURSOR BUTTONS When decorative & letter stitch sewing, you can check and edit combined patterns or letters by pressing these buttons. K. TACK BUTTON UTILITY STITCH SEWING By pressing this button, you can sew a tack stitch at the beginning and at the end of a stitch. (See page 38) DECORATIVE &... -
Page 27: Touche Annulation
J. TOUCHES DE CURSEUR J. BOTONES DE CURSOR Lors de la couture avec points décoratifs ou de Cuando se cose con puntada decorativa y lettres, vous pouvez vérifi er et éditer les modèles de letras, puede revisar y editar los patrones combinés en appuyant sur ces touches. -
Page 28: Bobbin Setting
BOBBIN SETTING A. REMOVING THE BOBBIN 1. Pull the bobbin cover latch to the right and remove the bobbin cover. 2. Lift up the bobbin from the machine. B. SETTING SPOOL OF THREAD ON SPOOL 1. Pull up the left end of spool pin and set the spool of thread on spool pin so that the thread unrolls from the front of the spool. -
Page 29: Canette
CANETTE AJUSTE DE LA CANILLA A. RETIRER LA CANETTE A. CÓMO SACAR LA CANILLA 1. Déplacez le loquet d’ouverture du couvercle de 1. Mueva el seguro de la cubierta de la canilla la canette vers la droite et retirez le couvercle hacia la derecha y quite la cubierta. -
Page 30: Inserting The Bobbin
4. Pull thread out about 10 cm (4 inches). Replace the bobbin cover. Set the left tab into the hole in needle plate and push the right side of bobbin cover down until it clicks into place. NOTE: Use only SINGER Class 15J bobbins. -
Page 31: Mise En Place De La Canette
REMARQUE : NOTA: Utilisez uniquement des canettes de type 15J. Utilice sólo bobinas SINGER Clase 15J. -
Page 32: Threading The Machine
THREADING THE MACHINE A. PREPARING TO THREAD MACHINE 1. Raise the presser foot lifter. 2. Press the Needle Up/Down button and set the needle in up position. (Keep this position until needle eye threading.) B. SETTING SPOOL OF THREAD ON SPOOL 1. -
Page 33: Enfilage De La Machine
ENFILAGE DE LA MACHINE ENHEBRADO DE LA MÁQUINA A. PRÉPARATION EN VUE DE L’ENFILAGE 1. Remontez le releveur du pied presseur. A. PREPARACIÓN PARA ENHEBRAR LA 2. Appuyez sur la touche de positionnement de MÁQUINA l’aiguille et réglez l’aiguille en position haute. 1. -
Page 34: Threading The Needle Eye
D. THREADING THE NEEDLE EYE CAUTION: To prevent accidents. 1. Keep fi ngers away from all moving parts. Special care is required around the needle. 2. Do not lower the threader lever while machine is operating. NOTE: The needle threader is used for needle sizes 11/80, 14/90, and 16/100. -
Page 35: Enfilage Du Fil Dans Le Chas De L'aiguille
D. ENFILAGE DU FIL DANS LE CHAS DE D. ENHEBRADO DEL OJO DE LA AGUJA L’AIGUILLE PRECAUCIÓN: Para prevenir ATTENTION! Pour éviter les accidentes incidents : 1. Mantenga los dedos lejos de todas las partes móviles. Ponga especial cuidado en el área 1. -
Page 36: Starting To Sew
STARTING TO SEW The machine will be set to sew straight stitch when power switch is turned on. CAUTION: To prevent accidents. While sewing, special care is required around the needle. Machine automatically feeds the fabric, do not pull or push the fabric. A. -
Page 37: Début De La Couture
DÉBUT DE LA COUTURE COMENZAR A COSER La machine est programmée de façon à coudre Al poner la máquina en marcha, estará ajustada des points droits dès sa mise en marche. para dar puntadas rectas. ATTENTION! Pour éviter les PRECAUCIÓN: Para prevenir incidents : accidentes Pendant la couture, il est important de faire... -
Page 38: Reverse Stitching
B. REVERSE STITCHING Reverse stitching is used for reinforcing the ends of the seams. 1. Place the fabric in position where back stitching is to be made and lower the presser foot. 2. Press and hold the Reverse button. Sew 4-5 reverse stitch. 3. -
Page 39: Couture Arriere
B. COUTURE ARRIERE B. PUNTADA REVERSA La couture arrière est utilisée pour renforcer une La puntada reversa se usa para reforzar los fi nales fi n de couture. de las costuras. 1. Placez le tissu en position pour effectuer la 1. -
Page 40: Turning Corners
D. TURNING CORNERS 1. Stop the machine when you reach a corner. The machine will stop the needle into the fabric. 2. Raise the presser foot. 3. Use the needle as a pivot and turn fabric. 4. Lower the presser foot and resume sewing. E. -
Page 41: Couture Des Angles
D. COUTURE DES ANGLES D. CÓMO GIRAR EN LAS ESQUINAS 1. Arrêtez la machine lorsque vous atteignez un 1. Detenga la máquina cuando llegue a una coin. L’aiguille restera enfoncée dans le tissu. esquina. La máquina detendrá la aguja 2. Relevez le pied presseur. insertada en la tela. -
Page 42: Thread Tension
THREAD TENSION This machine adjusts the thread tension automatically when pattern is selected. However you can change the thread tension as follows. 1. Press the function F5 button directly under the tension mark. LCD changes to the thread tension mode. 2. -
Page 43: Tension Du Fil
TENSION DU FIL TENSIÓN DEL HILO Cette machine ajuste automatiquement la tension Esta máquina ajusta la tensión del hilo de forma du fi l lorsque le modèle est sélectionné. automática cuando se selecciona el patrón. Sin Cependant vous pouvez modifi er la tension telle embargo puede cambiar la tensión del hilo como que ci-dessous sigue. -
Page 44: Selecting Utility Stitch Pattern
SELECTING UTILITY STITCH PATTERN Utility stitches are indicated in the pattern chart located inside of the top cover. When you turn on the machine, straight stitch will be selected automatically. Select utility stitch pattern as follows. A. DIRECT STITCH PATTERN You can select basic utility stitch patterns directly by pressing the Direct Stitch Selection Buttons. -
Page 45: Sélection Des Points Utilitaires
SÉLECTION DES POINTS SELECCIÓN DE PUNTADAS UTILITAIRES UTILITARIAS Les points utilitaires sont indiqués dans le tableau Las puntadas utilitarias se indican en la tabla de puntadas situada en el interior de la cubierta superior. des points à l’intérieur du carter supérieur. Al poner la máquina en marcha, la puntada recta (n°... -
Page 46: Elongation
D. ELONGATION Some patterns may be elongated from the original length. You may elongate the pattern by pressing the Function button (F3) directly under the elongation icon. a. Regular length b. Elongated A pattern cannot be elongated if the elongation icon is not indicated. -
Page 47: Allongement
D. ALLONGEMENT D. ELONGACIÓNB (ALARGAMIENTO) Vous pouvez allonger le modèle de 2 fois sa Puede elongar el patrón a dos veces el largo longueur en appuyant sur la touche fonction (F3) presionando el botón de función (F3) directamente directement sous l‘indicateur Allongement. debajo de la marca de elongación. -
Page 48: Where To Use Each Stitch
WHERE TO USE EACH STITCH 01. Straight stitch center needle positon • For top stitching, zipper sewing etc. 02. Straight stitch left needle position • For top stitching etc. 03. Straight stitch with auto-reverse stitch center needle position 04. Straight stitch with auto-reverse stitch left needle position 05. -
Page 49: Description Des Points
DESCRIPTION DES DÓNDE UTILIZAR CADA POINTS TIPO DE PUNTADA 01. Point droit, position centrale de l’aiguille 01. Puntada recta con posición centrada de la Pour les travaux de couture ordinaires, les aguja: para pespuntes, costura de cremalleras, fermetures à glissière etc. etc. -
Page 50: Straight Stitch Sewing
STRAIGHT STITCH SEWING Straight stitch patterns should be selected to suit the type of fabric being sewn. Left needle position (No.2) is most suited for sewing light weight fabrics. No. 1. Center needle position No. 2. Left needle position No. 3. Center needle with built-in reverse stitch No. -
Page 51: Couture Au Point Droit
COUTURE AU POINT DROIT PUNTADA RECTA Les motifs au point droit doivent être sélectionnés Los diseños de puntada recta deben seleccionarse en fonction du type de tissu à coudre. en función del tipo de tejido que se vaya a coser. La position de l’aiguille à... -
Page 52: Basting
BASTING You can baste a garment before trying it on. No. 5 Basting Stitch Darning/Embroidery Foot A. ATTACHING THE DARNING/ EMBROIDERY FOOT 1. Lower the feed dogs by moving the drop feed lever to the left. 2. Remove the presser foot and holder. (See page 3. -
Page 53: Faufilage
FAUFILAGE HILVANADO Vous pouvez bâtir l’ouvrage avant de l’essayer. Puede hilvanar una prenda antes de ponérsela. N°5 Fil de bâti nº 5 Puntada de hilvanado Pied broderie et reprisage Prensatelas para zurcidos/bordados A. MISE EN PLACE DU PIED BRODERIE A. CÓMO COLOCAR EL PRENSATELAS ET REPRISAGE PARA ZURCIDO Y BORDADO 1. -
Page 54: Stretch Stitch Sewing
STRETCH STITCH SEWING Stretch stitches are strong and fl exible and will give with the fabric without breaking. Good for easy to ravel and knit fabrics as well as joining durable fabrics such as denims. No. 6 Straight Stretch Stitch No. -
Page 55: Couture Au Point Extensible
COUTURE AU POINT COSTURA RECTA EXTENSIBLE Las puntadas elásticas son fuertes y fl exibles y se Les points élastiques sont solides et souples, ce adaptarán al tejido sin romperse. Son adecuadas qui leur permet de suivre les mouvements du tissu para tejidos de fácil deshilachado y de punto, así... -
Page 56: Zigzag Stitch Sewing
ZIGZAG STITCH SEWING Your machine can sew zigzag stitches of various widths and lengths by changing the settings of the stitch width and stitch length. No. 9 Zigzag Stitch All-Purpose or Satin Foot (A, B) Zigzag stitches are very good for joining two pieces of fabrics, applique and sewing various decorative patterns. -
Page 57: Couture Au Point Zigzag
COUTURE AU POINT PUNTADA DE ZIG-ZAG ZIGZAG Su máquina puede coser puntadas de zig-zag de varios anchos y largos cambiando los ajustes del La machine peut effectuer des points zigzag de ancho y largo de puntada. différentes largeurs et longueurs quand vous changez les réglages de la largeur et de la nº... -
Page 58: Overcasting-Overlocking
OVERCASTING- OVERLOCKING A. USING THE OVERCASTING FOOT No. 9 (Stitch Width 5.0) No. 15, 16, 30 (Stitch Width 5.0-7.0) Overcasting Foot (C) Press fabric against the guide plate of the overcasting foot so that needle falls near the edge of seam. a. -
Page 59: Surjet - Surfilage
SURJET - SURFILAGE SOBREHILADO- REMALLADO A. AVEC LE PIED DE SURJET A. CON EL PRENSATELAS PARA N° 9 (réglage de la largeur du point : 5,0) SOBREHILADO N° 15, 16, 30 (réglage de la largeur du point : 5,0-7,0) nº 9 (ancho de puntada 5,0) Pied de surjet (C) n°... -
Page 60: Blind Hem Stitching
BLIND HEM STITCHING This stitch will sew without stitches showing on right side of fabric. No. 10 Blind hemming for stretch fabric. No. 11 Blind hem for regular fabric. Blind Hem Foot (D) 1. Fold the fabric as shown on drawing. a. -
Page 61: Couture D'ourlets Invisibles
COUTURE D’OURLETS DOBLADILLO DE PUNTADA INVISIBLES INVISIBLE Ce motif permet de coudre des points qui Esta puntada se cose sin que la puntada sea n’apparaissent pas sur l’endroit du tissu. visible en el lado derecho del tejido. N°10 : Ourlet invisible pour tissus extensibles. nº... -
Page 62: Patch Work
PATCH WORK For additional decorative purposes, use different kind of materials. No. 19, 20 All-Purpose or Satin Foot (A, B) 1. Place two pieces of fabric right sides together and sew a long straight stitch. 2. Press the seam open. 3. -
Page 63: Patchwork
PATCHWORK LABORES DE PARCHEADO Utilisez des matériaux différents pour accentuer Para efectos decorativos adicionales, use l’effet décoratif de votre ouvrage. diferentes tipos de materiales. N° 19, 20. nº 19, 20 Pied universel ou pied satin (A, B) Prensatelas para realce o universal (A, B) 1. -
Page 64: Inserting Zippers Centered Insertion
INSERTING ZIPPERS CENTERED INSERTION No. 1 Straight Stitch (Center Needle Position) Zipper Foot (E) CAUTION: To prevent accidents. Zipper Foot should be used for sewing center needle position straight stitch No. 1 only. It is possible that needle could hit the presser foot and break when sewing other patterns. -
Page 65: Fermeture À Glissière - Pose Bord À Bord
FERMETURE À GLISSIÈRE - INSERCIÓN DE POSE BORD À BORD CREMALLERAS INSERCIÓN CENTRADA N°1 Point droit (position centrale de l’aiguille) nº 1 Puntada recta (posición centrada de la aguja) Pied fermeture à glissière (E) Prensatelas para cremalleras (E) ATTENTION! Pour éviter les incidents : PRECAUCIÓN: Para prevenir Le pied fermeture à... -
Page 66: Lapped Insertion
INSERTING ZIPPERS LAPPED INSERTION No. 1 Straight Stitch (Center Needle Position) Zipper Foot (E) CAUTION: To prevent accidents. Zipper foot should be used for sewing center needle position straight stitch No. 1 only. It is possible that needle could hit the presser foot and break when sewing other patterns. -
Page 67: Pose Sous Patte
FERMETURE À GLISSIÈRE - INSERCIÓN DE POSE SOUS PATTE CREMALLERAS INSERCIÓN SOLAPADA N°1 Point droit (position centrale de l’aiguille) nº 1 Puntada recta (posición centrada de la aguja) Pied fermeture à glissière (E) Prensatelas para cremalleras (E) ATTENTION! Pour éviter les incidents : PRECAUCIÓN: Para prevenir Le pied fermeture à... -
Page 68: Buttonhole Sewing
BUTTONHOLE SEWING This machine can sew 13 types of buttonholes. 104. Bar-tack Buttonhole (Narrow) for light to medium weight fabrics 105. Bar-tack Buttonhole (Wide) for large buttons 106. Keyhole Buttonhole for heavy weight fabrics 107. Keyhole Buttonhole with reinforced bar tack 108. -
Page 69: Couture De Boutonnières
COUTURE DE BOUTONNIÈRES CÓMO COSER OJALES La machine est en mesure de coudre des Esta máquina puede coser 13 tipos de ojales. boutonnières de 13 formes différentes. 104. Ojal con presilla (estrecho) para tejidos 104. Boutonnière avec arrêt (étroite) pour les ligeros y medios tissus légers ou d’épaisseur moyenne 105. - Page 70 7. Machine will sew the buttonhole in the order as shown and stop automatically after sewing. 8. Press the thread cutter button and raise the presser foot to remove the fabric. b. To sew over same buttonhole, raise presser foot to return to original position.
- Page 71 7. La máquina coserá el ojal en el orden que 7. La machine coud la boutonnière comme indiqué se muestra y se detendrá automáticamente sur l’illustration et s’arrête automatiquement después de coser. après la couture. 8. Presione el botón del cortador de hilo y levante 8.
-
Page 72: Bound Buttonhole
BOUND BUTTONHOLE A bound buttonhole provides a professional tailored touch to women’s dresses, suits and coats. 116. Bound Buttonhole Buttonhole Foot 1. Cut a patch of fabric 2.5 cm wide, 1 cm longer than the fi nished buttonhole. Baste a patch so that the center line of patch will align with the center line mark of buttonhole. -
Page 73: Boutonniere Passepoilee
BOUTONNIERE OJAL REFORZADO PASSEPOILEE Un ojal reforzado proporciona un toque profesional a las prendas de dama, sacos y abrigos. Une boutonnière passepoilée amène une touche professionnelle à vos robes, costumes et 116. Ojal reforzado manteaux. Pie Ojalador (F) 116. Boutonnière passepoilée 1. -
Page 74: Eyelet
10.Fold the fabric and stitch along the seams on each side, just a needle width from the original stitching line. Remove the basting. c. Wrong side of fabric 11.Fold the fabric along the buttonhole end and stitch triangular ends on the original stitching line. -
Page 75: Oeillet
10. Pliez le tissu et coudre le long de la couture sur 10.Doble la tela y cosa a lo largo de las costuras chaque côté, juste à une largeur d’aiguille de la en cada lado, solo el ancho de la aguja a partir ligne de piquage originale. -
Page 76: Automatic Bar-Tack And Darning
AUTOMATIC BAR-TACK AND DARNING You can sew automatic bar-tack and darning using the Buttonhole Foot. No. 102 Bar-tack, to reinforce areas that will be subject to strain, such as pocket corners. No.103 Darning, mending and other applications. Buttonhole Foot 1. Adjust slide on base according to the length of bar-tack or darning. -
Page 77: Arrêt Et Reprisage Automatiques
ARRÊT ET REPRISAGE PRESILLAS Y ZURCIDOS AUTOMATIQUES AUTOMÁTICOS Le pied boutonnière permet d’effectuer un arrêt ou Puede realizar presillas y zurcidos automáticos un reprisage automatiquement. usando el prensatelas para ojales. N° 102 : Arrêt pour renforcer les zones fragiles, nº 102 Presilla, para reforzar las áreas sujetas a telles que les coins de poche. -
Page 78: Sewing On Buttons
SEWING ON BUTTONS No. 13 Button Sewing Foot 1. Lower the feed dogs by moving the drop feed lever to the left. 2. Attach the Button Sewing Foot. Align two holes of the button with slot of presser foot and lower foot to hold the button securely. -
Page 79: Couture De Boutons
COUTURE DE BOUTONS CÓMO COSER BOTONES N°13 nº 13 Pied pour boutons Prensatelas para coser botones 1. Abaissez les griffes en poussant le levier des 1. Baje los transportadores moviendo la palanca griffes vers la gauche. de arrastre hacia la izquierda. 2. -
Page 80: Narrow Hemming
NARROW HEMMING No. 1 Straight Stitch (Center Needle Position) Rolled Hem Foot 1. Fold edge of fabric over about 3 mm (1/8 inch), 3 mm then fold it over again 3 mm for about 5 cm (2 inches) along edge of fabric. 2. -
Page 81: Ourlet Roulé
DOBLADILLOS OURLET ROULÉ ARROLLADOS N° 1 Point droit (position centrale de l’aiguille) nº 1 Puntada recta (posición centrada de la aguja) Pied ourlet roulé Prensatelas para dobladillos arrollados 1. Pliez le bord du tissu à environ 3mm, puis 1. Doble el borde del tejido unos 3 mm y, a repliez 3 mm sur à... -
Page 82: Continuous Decorative Pattern
CONTINUOUS DECORATIVE PATTERN Use the Satin Foot for continuous decorative stitch patterns. This foot has a groove on the underside to easily allow closely spaced zigzag stitches and fabric to feed freely under foot. No. 19-100 Satin Foot (B) To tailor the continuous decorative stitch pattern, you may adjust the length and width of pattern. -
Page 83: Séquence De Motifs Décoratifs
SÉQUENCE DE MOTIFS PUNTADAS DECORATIVAS DÉCORATIFS CONTINUAS Pour les séquences de motifs décoratifs, utilisez le Utilice el prensatelas para realce para las pied satin. Ce pied a une dentelure complète sur puntadas decorativas continuas. le dessous, ce qui permet de réaliser des points Este prensatelas tiene una identación completa zigzag très rapprochés et un entraînement régulier en el lado de abajo para permitir, de forma fácil,... -
Page 84: Darning/Free-Hand Embroidery
DARNING/FREE-HAND EMBROIDERY No. 1.Center needle Position Darning/Embroidery Foot A. ATTACHING THE DARNING/ EMBROIDERY FOOT 1. Lower the feed dogs by moving the drop feed lever to the left. 2. Remove the presser foot and holder. (See page 3. The arm of Darning/Embroidery Foot should rest above the shaft of the needle clamp screw. -
Page 85: Reprisage / Broderie
REPRISAGE / BRODERIE ZURCIDO Y BORDADO A MANO LIBRE N°1 : Point droit (Position centrale de l’aiguille) nº 1 Posición centrada de la aguja Pied broderie et reprisage Prensatelas para zurcidos/bordados A. MISE EN PLACE DU PIED BRODERIE A. CÓMO COLOCAR EL PRENSATELAS ET REPRISAGE PARA ZURCIDO Y BORDADO 1. -
Page 86: Twin Needle Sewing
A twin needle is not provided with this machine. CAUTION: To prevent accidents. a. Use only needle designed for this machine (SINGER Style 2025). Other needles may break. b. The needle threader cannot be used. Thread each needle eye by hand. -
Page 87: Couture Avec Aiguille Jumelée
Utilice únicamente la aguja diseñada para esta a. N’utilisez que les aiguilles conçues spécialement máquina (Singer Style 2025). Otras agujas pour votre machine (Singer Style 2025). Les autres pueden romperse. aiguilles pourraient se casser. b. No utilice el enhebrador de agujas. Enhebre el b. -
Page 88: Decorative & Letter Stitch Sewing
DECORATIVE & LETTER STITCH SEWING You can combine decorative & letter stitches into a string by selecting each pattern. A. SELECTING DECORATIVE & LETTER STITCH (selecting mode) 1. Press the Decorative & Letter Stitch button. First 5 patterns of decorative patterns will be indicated on the lower line of LCD. -
Page 89: Couture De Lettres Et Points Décoratifs
PUNTADAS DECORATIVAS COUTURE DE LETTRES ET POINTS DÉCORATIFS Y LETRAS Vous pouvez combiner les lettres et les points Puede combinar puntadas decorativas y letras en décoratifs dans une seule séquence en una secuencia seleccionando cada puntada. A. SELECCIONANDO LA PUNTADA sélectionnant chaque motif. -
Page 90: To Check Selected Patterns
c. By pressing the far left cursor “I<” button, the fi rst selected pattern will be highlighted. d. By pressing the far right cursor “I>” button, the cursor is moved to the right side of selected patterns. The cursor is used to check selected patterns, insert patterns, delete patterns or editing of each pattern as described below. -
Page 91: Verifier Les Modeles Selectionnes
c. En appuyant sur la touche curseur “I<“, le c. Presionando el botón de cursor superior “I<”, se premier modèle apparaît en surbrillance. resaltará el primer patrón seleccionado. d. En appuyant sur la touche curseur “>I”, le d. Presionando el botón de cursor fi nal “>I”, el curseur apparaît sur le côté... -
Page 92: Editing Of Each Pattern
F. EDITING OF EACH PATTERN You can change the stitch width, length, mirror/ reverse stitch and elongation of each pattern. You can also change the thread tension of selected all patterns 1. Press the EDIT button. LCD will change to the editing mode. 2. -
Page 93: Edition De Chaque Modele
F. EDITION DE CHAQUE MODELE F. EDICIÓN DE CADA PATRÓN Vous pouvez modifi er la longueur et la largeur du Puede cambiar el ancho, largo de puntada, point ainsi que l’effet miroir/inversé ou allongement puntada inversa / reversa y elongación de cada de chaque point. -
Page 94: To Recall The Selected Patterns
c. Setting the stitch width and length Machine will pre-set the stitch width and length suitable for the pattern. 1. You can make changes by pressing the Function button (F4) directly under the witdh and length mark. 2. For narrower width, press Function button F2(–). For wider width, press Function button F3 (+). -
Page 95: Retrouver Les Modeles Selectionnes
c. Modifi er la longueur et largeur de point c. Ajuste del ancho y largo de puntada La machine propose une longueur et une La máquina preestablece el largo y ancho de puntada adecuados para el patrón en cuestión. largeur de point préréglée apparopriée pour 1. -
Page 96: Sewing The Selected Patterns
H. SEWING THE SELECTED PATTERNS a. Single sequence sewing You can combine the tack stitch by pressing the Tack button at selecting mode. When you combined the tack stitch or letter stitch at the end of pattern, machine will stop automatically after sewing selected patterns. -
Page 97: Coudre Les Modeles Selectionnes
H. COUDRE LES MODELES H.COSIENDO CON LOS PATRONES SELECTIONNES SELECCIONADOS a. Couture simple a. Costura sencilla Vous pouvez combiner le point d’arrêt en Puede combinar la puntada de refuerzo appuyant sur la touche point d’arrêt en Mode presionando el botón refuerzo (Tack) en el Sélection. -
Page 98: Decorative And Letter Stitch Chart
DECORATIVE AND LETTER STITCH CHART The decorative patterns in bold print are one unit of the stitch pattern. Description of Chart Symbols: Mirror Stitch included Reverse Stitch included Mirror and Reverse stitch included X5 Elongation included ADJUSTING THE FORWARD AND REVERSE STITCHES Depending on the type of fabric you sew, it may be necessary to adjust the forward and reverse stitches. -
Page 99: Tableau Des Lettres Et Points Décoratifs
TABLEAU DES LETTRES ET TABLA DE PUNTADAS POINTS DÉCORATIFS DECORATIVAS Y LETRAS La ligne épaisse du motif décoratif représente une Los grupos de puntadas decorativas están unité du motif. separados por una línea negra. Les symboles du tableau ont les signifi cations Las marcas de la tabla tienen los siguientes suivantes : signifi... -
Page 100: Maintenance
MAINTENANCE DANGER: To reduce the risk of electric shock. Disconnect the power line plug from electric outlet before carrying out any maintenance. CLEANING If lint and bits of thread accumulate in the hook, this will interfere with the smooth operation of the machine. -
Page 101: Entretien
ENTRETIEN MANTENIMIENTO DANGER! Pour réduire les risques PELIGRO: Para reducir el riesgo de de décharge électrique : descarga eléctrica. Débranchez le câble d’alimentation avant Desconecte el enchufe de la toma de corriente d’entreprendre toute opération d’entretien. antes de llevar a cabo ninguna labor de mantenimiento. -
Page 102: Messages On Lcd
MESSAGES ON LCD 1. Winding the bobbin. 2. Lower the buttonhole lever. 3. After sewing buttonhole, raise the presser foot lifter and set the frame of Buttonhole Foot to starting position. 4. Release the foot controller pedal. 5. Lower the presser foot. 6. -
Page 103: Messages Sur Écran Lcd
Messages sur écran LCD Mensajes en pantalla LCD 1. Remplissage de la bobine 1. Devanando la bobina. 2. Abaisser le levier boutonnière 2. Baje la palanca del ojalador. 3. Après couture de la boutonnière, relever le pied 3. Después de coser el ojal, levante la palanca et mettre le pied boutonnière en position de del pie prensatelas y coloque el marco del pie départ. -
Page 104: Helpful Hints
HELPFUL HINTS PROBLEM CAUSE CORRECTION Page Machine not properly threaded. Re-thread machine. Upper thread Thread tangled around bobbin. Remove tangled thread. breaks Needle inserted incorrectly. Re-insert needle. Thread tension too tight. Readjust thread tension. Thread of incorrect size or poor quality. Choose correct thread. -
Page 105: Solution Aux Problèmes Courants
SOLUTION AUX PROBLÈMES COURANTS Cause Anomalie Solution Page La machine n’est pas enfi lée correctement. Enfi lez à nouveau la machine. Le fi l s’est pris dans la canette. Retirez les fi ls emmêlés. L’aiguille n’est pas insérée correctement. Le fi l d’aiguille Insérez à... - Page 106 RECOMENDACIONES ÚTILES PROBLEMA CAUSA CORRECCIÓN Página La máquina está enhebrada incorrectamente. Vuelva a enhebrar la máquina. Hilo enrollado alrededor de la canilla. Retire el hilo enrollado. El hilo superior La aguja está insertada incorrectamente. Vuelva a insertar la aguja. se rompe El hilo está...
- Page 108 8060 English/Français/Español 35957 B5...