Endress+Hauser iTEMP HART TMT 182 Operating Instructions Manual
Temperature head transmitter
Hide thumbs
Also See for iTEMP HART TMT 182:
- Safety instructions (24 pages) ,
- Operating instructions manual (36 pages)

Related Manuals for Endress+Hauser iTEMP HART TMT 182


Summary of Contents for Endress+Hauser iTEMP HART TMT 182
- Page 1 ® ® iTEMP HART TMT 182 BA 105R/09/a3/04.02 510 02838 Betriebsanleitung Operating Instructions Mise en service...
- Page 2 Temperaturkopftransmitter Endress+Hauser...
- Page 3 Temperaturkopftransmitter ® ® Temperaturkopftransmitter iTEMP HART TMT 182 Deutsch Betriebsanleitung English 3 ... 30 (Bitte lesen, bevor Sie das Gerät in Betrieb nehmen) 19...34 Gerätenummer:........® ® Temperature head transmitter iTEMP HART TMT 182 English Operating manual English 31 ... 58 (Please read before installing the unit) 19...34 Unit number:........
-
Page 4: Table Of Contents
......11.1 Arbeitsweise und Systemaufbau ..28 Endress+Hauser... - Page 5 Störungsbehebung / Fehlersuche Seite 21 Beginnen Sie die Fehlersuche in jedem Fall mit der Checkliste, falls nach der Inbetriebnahme oder während des Messbetriebs Störungen auftreten. Über verschiedene Abfragen werden Sie gezielt zur Fehlerursache und den entspre- chenden Behebungsmaßnahmen geführt. Endress+Hauser...
-
Page 6: Sicherheitshinweise
Der Hersteller behält sich vor, technische Daten ohne spezielle Ankündigung dem ent- wicklungstechnischen Fortschritt anzupassen. Über die Aktualität und eventuelle Erwei- terungen der Betriebsanleitung erhalten Sie bei Ihrer Vertriebsstelle Auskunft. Rücksendung Rücksendung Bei Transportschäden informieren Sie bitte die Spedition und den Lieferanten. Endress+Hauser... -
Page 7: Sicherheitszeichen Und -Symbole
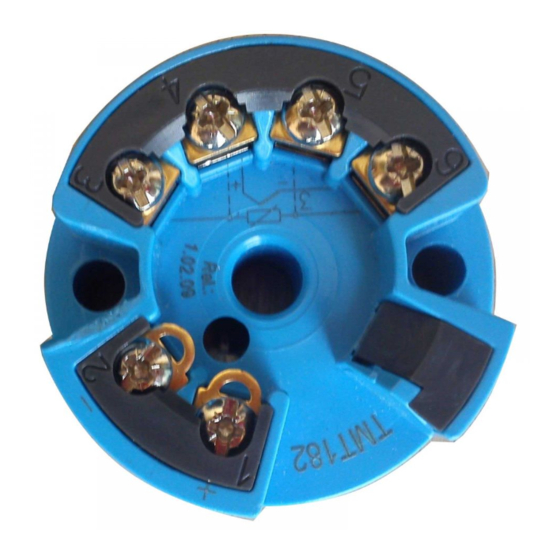
Anschlussleitungen in den explosionsgefährdeten Bereich führen. Identifizierung Gerätebezeichnung Gerätebezeichnung Vergleichen Sie die Typenschilder am Gerät mit den folgenden Abbildungen: Abb. 2-1: Typenschild des Kopftransmitters (beispielhaft) Abb. 2-2: Bestellcode mit Einstellung (beispielhaft) Abb. 2-3: Kennzeichnung für Ex-Bereich (beispielhaft, gültig nur bei Ex-Zulassung) Endress+Hauser... -
Page 8: Lieferumfang
• Für den Einsatz im Ex-Bereich sind die Grenzwerte der Zertifikate und Zulassungen (siehe Zusatz-BA ATEX) einzuhalten. Einbaumaße Die Abmessungen des Kopftransmitters finden Sie in Kap. 10 "Technische Daten" Einbauort • Sensoranschlusskopf nach DIN 43 729 Form B • Feldgehäuse Einbaulage Es bestehen keine Einschränkungen bezüglich der Einbaulage. Endress+Hauser... -
Page 9: Einbau
• Schrauben Sie den Kopftransmitter mit einem Schraubendreher am Feldgehäuse fest. " Achtung! Ziehen Sie die Montageschrauben nicht zu fest an, um eine Beschädigung des Kopf- transmitters zu vermeiden. Abb. 3-1: Einbau des Kopftransmitters in den Sensoranschlusskopf Form B (links) und in das Feldgehäuse (rechts) Endress+Hauser... -
Page 10: Verdrahtung
Der Messkreis muss eine Bürde von mindestens 250 Ω aufweisen. Bei den E+H Spei- segeräten RNS 221 und RN 221N ist dieser Widerstand bereits im Gerät integriert und deshalb nicht erforderlich (s. Abb. 4-2, Pos. b und Abb. 4-3, Pos. b)! Endress+Hauser... -
Page 11: Potenzialausgleich
Ausgangsseite (Ausgangssignal 4...20 mA) muss das gleiche Potenzial haben wie die Schirmung der Sensoranschlussseite! Für eine effektive Schirmung muss der Kabelschirm mit dem Feldgehäuse grossflächig verbunden sein. Dies wird durch das Auflegen des Kabelschirms auf die speziellen EMV Kabelverschraubungen erreicht. Endress+Hauser... -
Page 12: Bedienung
Der Einsatz des Commuwin II-Bedienprogramms ist unabhängig vom ® ® Gerätetyp und der Kommunikationsart (HART oder PROFIBUS ) möglich. Commuwin II bietet folgende Funktionen: • Parametrieren von Gerätefunktionen • Visualisieren von Messwerten • Datensicherung von Geräteparametern • Gerätediagnose • Messstellendokumentation Endress+Hauser... -
Page 13: Inbetriebnahme
Kopftransmitterfunktionen sind in 6.2.3 "Beschreibung Gerätefunktionen" beschrieben. Vorgehensweise: Handbediengerät einschalten: ® – Messgerät ist noch nicht angeschlossen. Das HART -Hauptmenü erscheint. ® Diese Menüebene erscheint bei jeder HART -Programmierung, d.h. unabhängig vom Messgerätetyp. Informationen zur Offline-Parametrierung finden Sie in der Handbediengerät “Communicator DXR 275” Betriebsanleitung. Endress+Hauser... - Page 14 Mit der HEIM-Funktionstaste “F3” gelangen Sie zurück zur Menüebene “Online”. Hier können Sie die aktuellen Werte ablesen, die der Transmitter mit den neuen Ein- stellungen misst. Abb. 6-1: Konfiguration am Handbediengerät am Beispiel "Sensoreingang" ® HART -Funktionsmatrix ® Abb. 6-2: HART -Funktionsmatrix Endress+Hauser...
- Page 15 Ausschalten der Einstellung "FIFO aktiviert". Gehen Sie dazu folgendermaßen vor: • Wählen Sie über das Menü ’START’ → ’EINSTELLUNGEN’ → ’SYSTEMSTEUERUNG’ → ’ANSCHLÜSSE’ den Menüpunkt ’COM-Port’ aus. Schalten Sie über den Menüpfad ’EINSTELLUNGEN → ’ERWEITERT’ den Befehl "FIFO aktiviert" aus. Endress+Hauser...
- Page 16 Eingabe nur möglich bei Auswahl einer externen Vergleichsmessstelle in der Gerätefunktion VERGLEICHSSTELLE. OFFSET Eingabe der Nullpunktkorrektur (Offset). • V0H5 Eingabe: -10,00...10,00 °C (°C, °F, K) 0,00 °C Hinweis! Eingegebener Wert wird bei Änderung des Sensortyps auf die Werksein- stellung zurückgesetzt! Endress+Hauser...
- Page 17 Eingabe: Grenzwerte siehe Gerätefunktion SENSORTYP. • V2H5 100 °C Anschlussart Eingabe der RTD Anschlussart • V2H6 Eingabe: 2-Leiter 3-Leiter • RTD Anschlussart 4-Leiter 3-Leiter Hinweis! Funktionsfeld ist nur bei Auswahl eines Widerstandsthermometers (RTD) in der Gerätefunktion SENSORTYP (V2H0) aktiv Endress+Hauser...
- Page 18 Anzeige: ja/nein nein Min. Prozesswert Anzeige des min. Prozesswertes. Der Prozesswert wird nach Beginn der • V9H3 Messung übernommen. Hinweis! Min. Prozesswert wird bei Schreibzugriff auf den aktuellen Prozesswert geändert. Bei Rücksetzung auf Werkseinstellung wird der Defaultwert ein- getragen. +10000 Endress+Hauser...
- Page 19 • VAH3 z. B.: 8010 entspricht einer Version 1.0 3 3 3 3 • Software Rev. Seriennummer 8-stellige Anzeige der E+H Geräte Seriennummer (vgl. Typenschild auf • VAH4 dem Gerät). Hinweis gilt nur für COMMUWIN II-Bedienmatrix nicht für Thermoelemente (TC) Endress+Hauser...
-
Page 20: Wartung
- Handbediengerät DXR 275 oder in ReadWin 2000 eingegeben werden. Hinweis! ® Für die PC-Konfigurationssoftware ReadWin 2000 ist die Integration des Programms SMC32.exe und ein Quick-Setup, in dem alle Parameter auf einen Blick dargestellt wer- den, geplant. Wartung Wartung Der Kopftransmitter ist wartungsfrei. Endress+Hauser... -
Page 21: Zubehör
Gerät nicht kalibriert Kopftransmitter zurück an den Lieferanten Up-/Download aktiv Keine (wird automatisch quit- tiert) Warnung: Messwert zu klein Andere Werte für Messber.- anfang eingeben Warnung: Messwert zu groß Andere Werte für Messber.-end- wert eingeben Gerät wird rückgesetzt (auf Keine Werkseinstellungen) Endress+Hauser... -
Page 22: Applikationsfehler Ohne Meldungen
Parameter ‘Anschlussart’ ändern fehlerhaft (Leiter-Anzahl) Transmitterprogrammierung ist Skalierung ändern fehlerhaft (Skalierung) Falscher RTD eingestellt Parameter ‘Sensortyp’ ändern Anschluss des Sensors (2-Leiter) Anschluss des Sensors überprü- Leitungswiderstand des Sensors Leitungswiderstand kompensie- (2-Leiter) wurde nicht kompensiert Offset falsch eingestellt Offset überprüfen Endress+Hauser... -
Page 23: Ersatzteile
Bei Rücksendung des Gerätes zur Überprüfung legen Sie bitte eine Notiz mit der Beschreibung des Fehlers und der Anwendung bei. Entsorgung Entsorgung Der Temperaturkopftransmitter ist aufgrund seines Aufbaus nicht reparierbar. Für eine spätere Entsorgung beachten Sie bitte die örtlichen Vorschriften. Endress+Hauser... -
Page 24: Technische Daten
• Bei 2-Leiteranschluss Software-Kompensation des Leitungswiderstandes möglich (0...30 Ω ). • Bei 3-, 4-Leiteranschluss Sensorleitungswiderstand bis max. 11 Ω je Lei- tung • Sensorstrom ≤ 0,2 mA 10... 400 Ω 10 Ω Widerstand ( Ω ) Widerstandsgeber 10...2000 Ω 100 Ω Endress+Hauser... - Page 25 = 3,8 mA) Galvanische Trennung U = 2 kV AC (Eingang/Ausgang) Hilfsenergie Elektrische Anschlüsse siehe Kapitel 4 "Verdrahtung" Versorgungsspannung = 10...35 V, Verpolungsschutz ≤ 3 V bei U ≥ 13 V, f Restwelligkeit Zul. Restwelligkeit U = 1 kHz max. Endress+Hauser...
- Page 26 Einbauhinweise • Einbaulage: keine Einschränkungen • Einbauposition: Anschlusskopf nach DIN 43 729 Form B; Feldgehäuse TAF 10 Einsatzbedingungen (Umgebungsbedingungen) − 40...+85 °C (für Ex-Bereich siehe Ex-Zertifikat) Umgebungstemperatur Lagerungstemperatur -40...+100 °C Klimaklasse nach EN 60 654-1, Klasse C Betauung zulässig Endress+Hauser...
- Page 27 Daten finden Sie in separaten Dokumentationen, die Sie bei Bedarf ebenfalls anfordern können. CE-Zeichen Das Gerät erfüllt die gesetzlichen Anforderungen aus den EU-Richtlinien. Endress+Hauser bestätigt die erfolgreiche Prüfung des Gerätes mit der Anbringung des CE-Zeichens. Ergänzende Dokumentationen Ergänzende Dokumen- •...
-
Page 28: Anhang
Ausgangssignal (4...20 mA oder 20...4 mA). Fehlerüberwachung bei: • Messbereichsüber- bzw. unterschreitung • Fühlerbruch und -kurzschluss Der Einsatz im Ex-Bereich ist nach Zulassung ATEX II 1 G EEx ia IIC T4/T5/T6 zulässig. 1. Nicht für Thermoelemente (TC) Endress+Hauser... - Page 29 LINEARISIERUNG ......18 SERVICE ....... 18 Endress+Hauser...
- Page 30 Index Temperaturkopftransmitter Endress+Hauser...
- Page 31 Temperature head transmitter ® ® Temperaturkopftransmitter iTEMP HART TMT 182 Deutsch Betriebsanleitung English 3 ... 30 (Bitte lesen, bevor Sie das Gerät in Betrieb nehmen) 19...34 Gerätenummer:........® ® Temperature head transmitter iTEMP HART TMT 182 English Operating manual English 31 ...
- Page 32 11.1.1 Function ..... . . 56 5.1.1 HART Communicator DXR 275 ..40 11.1.2 Measurement system ... . . 56 5.1.2 Commuwin II-operating programme . . 40 Endress+Hauser...
- Page 33 Trouble shooting / fault-finding page 49 If problems occur after commissioning or during operation always start fault finding using the check list. Special questions will act as a guide to the cause of the fault and the necessary cure. Endress+Hauser...
-
Page 34: Safety Notes
The manufacturer reserves the right to change the technical data without notification if this advances the technical development. Details regarding the validity and further expansions to these instructions can be obtained from your nearest sales office. Returns Returns On transport damage please contact both the supplier and shipping agent. Endress+Hauser... -
Page 35: Safety Pictograms And Symbols
Compare the legend plates on the head transmitter with the following figures: Fig. 2-1: Head transmitter legend plate (example) Fig. 2-2: Order code with configuration (example) Fig. 2-3: Identification for hazardous area use (example, only on Ex certified units) Endress+Hauser... -
Page 36: Delivery Contents
The head transmitter dimensions can be found in chapter 10 "Technical Data". Installation point • Sensor connection head to DIN 43 729 Form B • Field housing Installation angle There are no limits as to the angle on installation. Endress+Hauser... -
Page 37: Installation
• Screw the head transmitter into the field housing using a screwdriver. " Attention! In order to avoid damaging the head transmitter, do not over-tighten the installation screws. Fig. 3-1: Installation of head transmitter into a Form B sensor connection head (left side) and a field housing (right side). Endress+Hauser... -
Page 38: Wiring
The measurement circuit must have a load of at least 250 Ω. If using the E+H power supplies RNS 221 and RN 221N this resistance is already installed in the unit and is therefore not required externally (s. fig. 4-2, and s. fig. 4-3)! Endress+Hauser... -
Page 39: Potential Leveling
The screen on the output (output signal 4...20 mA) must be at the same potential as the screen at the sensor connection. For an effective screening the cable screen must be solidly connected to the field housing. This can be achieved by connecting the cable screen to the special EMC cable gland. Endress+Hauser... -
Page 40: Operation
• Data security of unit parameters • Unit diagnostics • Measurement point documentation Hint! More detailed information to Commuwin II can be found in the E+H documentation: • System Information: SI 018F/00/en “Commuwin II” • Operating manual: BA 124F/00/en “Commuwin II” operating programme Endress+Hauser... -
Page 41: Commissioning
(PV) and output current (AO) are continuously displayed. Entry into the TMT 182 operating matrix is done using the line “Matrix Parameter”. This matrix systematically contains all ® HART accessible functions. Endress+Hauser... - Page 42 A return to the "Online" menu level is made using the F3 "HOME" function key. Here, the actual transmitter values measured with the new settings can be read. Fig. 6-1: Configuration at the hand module example "Sensor input" ® HART function matrix ® Fig. 6-2: HART function matrix Endress+Hauser...
- Page 43 In order to do this proceed as follows: • Using the menu 'START' → 'SETTINGS' → 'SYSTEM CONTROL' → 'CONNECTIONS' select the menu point 'COM-Port'. Switch off the ’FIFO active’ command off using the menu path 'SETTINGS’ → ’EXPANDED'. Endress+Hauser...
-
Page 44: Description Of Unit Functions
Entry only possible on selection of an external cold junction compensation in unit function RJ MODE. OFFSET Entry of zero point correction (Offset). • V0H5 Entry: -10.00...10.00 °C (°C, °F, K) 0.00 °C Hint! Entry returns to factory default values when changing sensor type! Endress+Hauser... - Page 45 Entry of RTD connection mode • V2H6 Entry: 2 wire 3 wire 3 3 3 3 • RTD connection 4 wire 3 wire Hint! Function field is only active on selection of resistance thermometer (RTD) in the unit function SENSOR TYPE (V2H0) Endress+Hauser...
- Page 46 Display the minimum process value. The process value is accepted at the • V9H3 beginning of the measurement. Hint! Min. process value will be changed to the actual process value on write. On reset to factory default, the default value is entered. +10000 Endress+Hauser...
- Page 47 8010 indicates version 1.0. 3 3 3 3 • Software Rev. Serial number 8-digit display of E+H device serial numbers (see legend plates on the • VAH4 device). Hint only for Commuwin II operating matrix not for thermocouples (TC) Endress+Hauser...
-
Page 48: Configuration Using Hart
Hint! ® Integration into the ReadWin 2000 PC configuration programme of both the SMC32.exe programme and a Quick set up under which all parameters can be seen at a glance is planned. Maintenance Maintenance The head transmitter is maintenance-free. Endress+Hauser... -
Page 49: Accessories
None (will be automatically acknowledged) Warning: Measured value too Enter other values for measured small value range start Warning: Measured value too Enter other values for measured large value range end Unit is reset (to factory default None settings) Endress+Hauser... -
Page 50: Application Faults Without Messages
Change parameter ‘Connection (wire number) type’ Transmitter programming faulty Change scale (scale) Wrong RTD used Change parameter ‘Sensor type’ Sensor connection (2 wire) Check sensor connections Sensor cable (2 wire) not compen- Compensate cable resistance sated Offset incorrectly set Check offset Endress+Hauser... -
Page 51: Spare Parts
When returning the unit for repair, please add a description of both the fault and the application. Disposal Disposal Due to its construction, the head transmitter cannot be repaired. When disposing of the head transmitter please take note of the local disposal regulations. Endress+Hauser... -
Page 52: Technical Data
(0...30 Ω ) • Sensor cable resistance max. 11 Ω per cable in the 3 and 4 wire system • Sensor current: ≤ 0.2 mA 10... 400 Ω 10 Ω Resistance ( Ω ) Resistance transmitter 10...2000 Ω 100 Ω Endress+Hauser... - Page 53 See “Wiring” on page 38. Supply voltage = 10...35 V, polarity protected ≤ 3 V at U ≥ 13 V, f Residual ripple Allowable ripple U = 1 kHz max. Performance characteristics Response time Reference conditions Calibration temperature +23 °C ± 5 K Endress+Hauser...
- Page 54 Connection head accord. to DIN 43 729 Form B; TAF 10 field housing Operating conditions (Environment) −40...+85 °C (for hazardous-areas see Ex-certification) Ambient temperature range Storage temperature -40...+100 °C range Climate class according to EN 60 654-1, Class C Condensation allowable Ingress protection IP 00, IP 66 installed Endress+Hauser...
- Page 55 Ex documentation. If required, please request copies from us or your E+H sales organisation. CE mark The measurement system fulfills the requirements demanded by the EU regulations. Endress+Hauser acknowledges successful unit testing by adding the CE mark. Further Documentation ®...
-
Page 56: Appendix
• Voltage sensors into a scalable analogue output signal (4...20 mA or 20...4 mA). Fault monitoring of: • Measurement range override or undercut • Sensor breakage and short circuit Application in hazardous areas is certified to ATEX II 1 GEEx ia IIC T4/T5/T6. 1.Not for thermocouples (TC) Endress+Hauser... - Page 57 Thermocouple (TC) ......54 Voltage transmitter (mV) ..... . 54 Endress+Hauser...
- Page 58 Temperature head transmitter Endress+Hauser...
- Page 59 Transmetteur de température ® ® Temperaturkopftransmitter iTEMP HART TMT 182 Deutsch Betriebsanleitung English 3 ... 30 (Bitte lesen, bevor Sie das Gerät in Betrieb nehmen) 19...34 Gerätenummer:........® ® Temperature head transmitter iTEMP HART TMT 182 English Operating manual English 31 ...
- Page 60 11.1.1 Principe de fonctionnement ..84 Commuwin II ....68 11.1.2 Système de mesure ..84 Endress+Hauser...
- Page 61 Toujours commencer la recherche de défauts par la checklist, si des défauts sont apparus après la mise en service ou lors de la mesure. Grâce à dif- férentes questions, vous serez orientés vers les causes du défaut et les mesures correctives correspondantes. Endress+Hauser...
-
Page 62: Conseils De Sécurité
Le fabricant se réserve le droit de modifier les caractéristiques techniques de l’appareil sans préavis. Pour connaître les mises à jour du manuel, contacter l’agence commerciale. Retour de matériel Retour de matériel En cas de dommages dus au transport, informer le transporteur et le fournisseur. Endress+Hauser... -
Page 63: Symboles Utilisés
Comparez les plaques signalétiques sur l’appareil avec les figures suivantes : Fig. 2-1 : Plaque signalétique du transmetteur (exemple) Fig. 2-2: Référence de commande avec réglages (exemple) Fig. 2-3: Désignation pour l’appareil en zone explosible (uniquement pour agrément Ex) Endress+Hauser... -
Page 64: Contenu De La Livraison
(voir annexe BA ATEX). Dimensions Les dimensions du transmetteur figurent au chapitre 10 "Caractéristiques techniques". Lieu de montage • Tête de sonde selon DIN 43 729 forme B • Boîtier de terrain Implantation Pas de restriction. Endress+Hauser... -
Page 65: Montage
• Visser le transmetteur dans le boîtier de terrain avec un tournevis. " Attention ! Ne pas trop serrer les vis de montage pour éviter d’endommager le transmetteur. Fig. 3-1: Montage du transmetteur dans la tête de sonde forme B (gauche) et dans le boîtier de terrain (droite) Endress+Hauser... -
Page 66: Raccordement
Le raccordement se fait directement par le biais de la liaison 4...20 mA (Fig. 4-1, bornes 1 et 2) ou par des prises de communication d’une alimentation ou d’un séparateur d’alimentation (v. Fig. 4-2 et Fig. 4-3). Pour le raccordement du transmetteur en configuration Ex, se référer à la documentation Ex séparée. Endress+Hauser... -
Page 67: Compensation De Potentiel
Pour la version séparée en boîtier de terrain, tenir compte des consignes suivantes : le blindage côté sortie (signal de sortie 4...20 mA) doit avoir le même potentiel que le blindage côté capteur ! Pour ceci, il suffit de relier le blindage du câble au PE spécial CEM. Endress+Hauser... -
Page 68: Exploitation
(HART ® PROFIBUS Commuwin II offre les fonctions suivantes : • Paramétrage des fonctions de l’appareil • Visualisation des valeurs mesurées • Sauvegarde des paramètres de l’appareil • Diagnostic de l’appareil • Données concernant les points de mesure Endress+Hauser... -
Page 69: Mise En Service
Ce menu apparaît pour toutes les programmations HART et ne dépend donc pas du type d’appareil de mesure. Vous trouverez les informations relatives au paramétrage offline dans le manuel de mise en service du terminal portable “Communicator DXR 275”. Endress+Hauser... - Page 70 La touche de fonction “F3” "RETOUR" permet de retourner au menu “Online”. Vous pouvez alors lire les valeurs actuelles mesurées par le transmetteur avec les nou- veaux réglages. Fig. 6-1: Configuration de "l’entrée capteur" du terminal portable ® Matrice de programmation HART ® Fig. 6-2: Matrice de programmation HART Endress+Hauser...
- Page 71 Pour ce faire procéder comme suit : • Par le biais du menu 'DEMARRER' → 'PARAMETRES' → ’PANNEAU DE CONFIGURA- TION' → 'PORTS' le point 'COM1'. Par le biais du chemin 'PARAMETRES’ → 'AVANCE' désactiver la commande ’FIFO activé’. Endress+Hauser...
-
Page 72: Description Des Fonctions De L'appareil
MODE RJ. OFFSET Entrée de la correction du zéro (Offset). • V0H4 Entrée : -10,00...10,00 °C (°C, °F, K) 0,00 °C Remarque ! Lors du changement du type de capteur, la valeur entrée est ramenée au réglage usine ! Endress+Hauser... - Page 73 Entrée du type de raccordement RTD • V2H6 Entrée : 2 fils 3 fils • Type de raccorde- 4 fils ment RTD 3 fils Remarque ! Champ actif uniquement si Thermorésistance électrique (RTD) a été sélec- tionnée dans la fonction TYPE DE CAPTEUR (V2H0) Endress+Hauser...
- Page 74 Affichage de la valeur process min. La valeur process est reprise après le • V9H3 début de la mesure. Remarque ! La valeur process min. est modifiée par accès à la valeur process actuelle. La valeur par défaut est enregistrée lors du retour au réglage usine. +10000 Endress+Hauser...
- Page 75 Ver. logiciel Numéro série Affichage à 8 chiffres du numéro de série de l’appareil E+H (voir plaque • VAH4 signalétique sur l’appareil). La remarque n’est valable que pour la matrice de commande COMMUWIN II Pas pour les thermocouples (TC) Endress+Hauser...
-
Page 76: Configuration Avec Protocole
-DXR 275 ou dans ReadWin 2000. Remarque ! ® Pour le logiciel de configuration ReadWin 2000 il est prévu l'intégration du programme SMC32.exe et un Quick-Setup, qui donne une vue d'ensemble de tous les paramètres. Maintenance Maintenance Le transmetteur ne nécessite aucune maintenance. Endress+Hauser... -
Page 77: Accessoires
Up-/Download actifs Aucune (est automatiquement val- idé) Avertissement : valeur mesurée trop faible Entrer d’autres valeurs de début d’échelle Avertissement : valeur mesurée trop Entrer d’autres valeurs de fin grande d’échelle Appareil remis à zéro (retour aux réglages Aucune usine) Endress+Hauser... -
Page 78: Erreurs D'application Sans Message
Réglage sur le mauvais RTD Modifier le paramètre ‘Type de capteur’ Raccordement du capteur (câble Vérifier le raccordement du cap- 2 fils) teur La résistivité du capteur (2 fils) n’a Compenser la résistivité pas été compensée Mauvais réglage offset Vérifier l’offset Endress+Hauser... -
Page 79: Pièces De Rechange
Lorsque vous retournez l’appareil pour vérification, veuillez joindre une note décrivant le défaut et l’application. Mise au rebut Mise au rebut De par sa conception, le transmetteur n’est pas réparable. Pour la mise au rebut, tenir compte des normes en vigueur. Endress+Hauser... -
Page 80: Caractéristiques Techniques
(0 à 30 Ω ) • Pour raccordement 3 ou 4 fils, résistance de ligne max. 11 Ω par ligne • Courant de capteur : ≤ 0,2 mA 10... 400 Ω 10 Ω Résistance ( Ω ) Résistance 10...2000 Ω 100 Ω Endress+Hauser... - Page 81 (entrée / sortie) Alimentation auxiliaire Raccordements voir chapitre 4 "Raccordement" électriques Tension d’alimentation = 10...35 V, protection contre les inversions de polarité ≤ 3 V pour U ≥ 13 V, f Ondulation résiduelle Ondulation résiduelle admissible U = 1 kHz max. Endress+Hauser...
- Page 82 Tête de raccordement selon DIN 43 729 forme B; boîtier de terrain TAF 10 Conditions d’utilisation (Conditions ambiantes) − 40...+85 °C (pour zone Ex, voir certificat Ex) Température ambiante Température de -40...+100 °C stockage Classe climatique selon EN 60 654-1, classe C Endress+Hauser...
- Page 83 à la protection anti-déflagration dans des documents séparés, également disponibles sur demande. Marque CE L’appareil est conforme aux exigences des directives CE. Par l’apposition de la marque CE, Endress+Hauser certifie que l’appareil a passé le contrôle avec succès. Documentation complémentaire Documentations com- •...
-
Page 84: Annexe
• Dépassement par excès ou par défaut de la gamme de mesure • Rupture de sonde et court-circuit L’utilisation en zone explosible est autorisée conformément à ATEX II 1 G EEx ia IIC T4/ T5/T6. 1. Pas pour thermocouple (TC) Endress+Hauser... - Page 85 Limites de la gamme de mesure ....80 Zone explosible ......62 Endress+Hauser...
- Page 86 Tel. ++55 (11) 50313455, Fax (11) 50313067 Tel. ++675 (3) 251188, Fax (3) 259556 ❑ Endress+Hauser Ges.m.b.H. Poland Wien Canada Philippines ❑ Endress+Hauser Polska Sp. z o.o. ❑ Endress+Hauser Ltd. Tel. ++43 (1) 88056-0, Fax (1) 88056-35 Brenton Industries Inc. Warszawy Burlington, Ontario Makati Metro Manila Belarus Tel.