Advertisement
Quick Links
Advertisement

Related Manuals for Fisher-Price W3066


Summary of Contents for Fisher-Price W3066
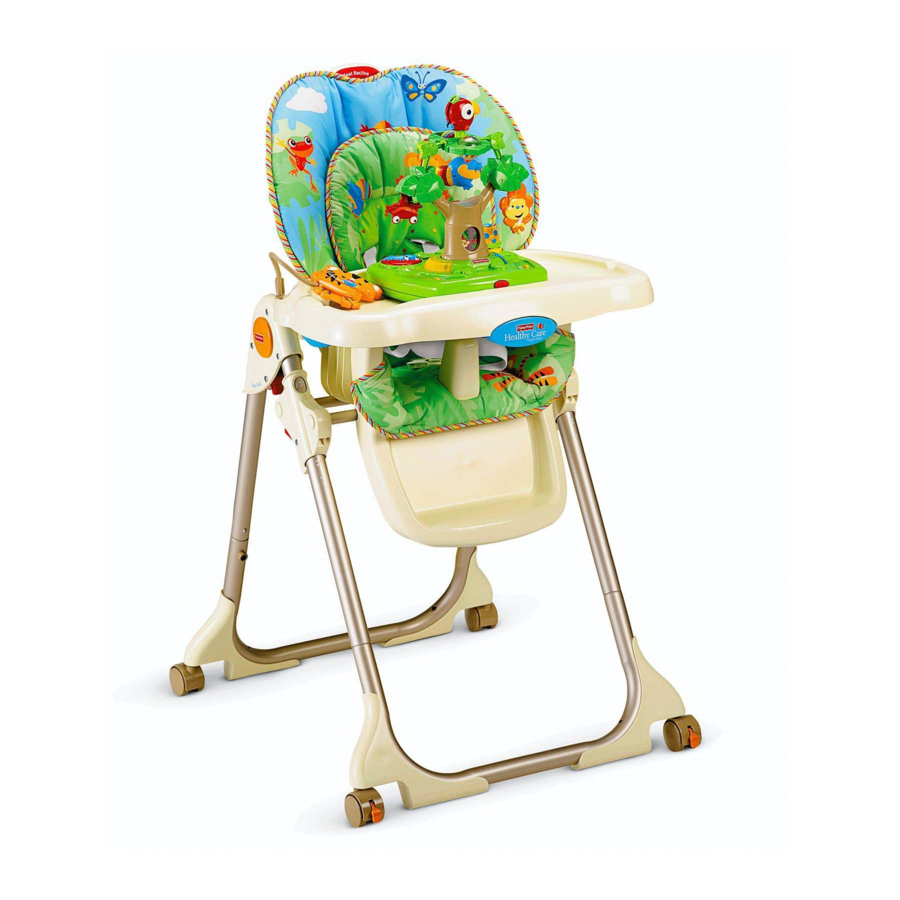
- Page 1 W3066 W3066 www.fisher-price.com...
- Page 2 WARNING ADVERTENCIA AVERTISSEMENT Prevent serious injury or death from falls or sliding out: • The child should be secured in the high chair at all times by the restraint system, either in the reclining or upright position. The restraint belts must be adjusted to fit your child snugly. The tray is not designed to hold the child in the chair.
- Page 3 Consumer Information Información para el consumidor Renseignements pour les consommateurs IMPORTANT! Please keep these instructions for future reference, IMPORTANT ! Conserver ces instructions car elles contiennent as they contain important information. des renseignements importants. • Please read these instructions before assembly and use of •...
- Page 4 Parts Piezas Pièces Seat Back Seat Bottom Respaldo Almohadilla Asiento Dossier du siège Coussin Siège 2 Frames Back Base Front Base 2 armazones Base trasera Base delantera 2 structures Base arrière Base avant Footrest Hinge Rod 2 Seat Bottom Tubes Resposapiés Varilla de bisagra 2 tubos del asiento...
- Page 5 Parts Piezas Pièces Food Tray Base Tray Bandeja de alimentos Bandeja de base Plateau pour aliments Plateau de base Tree Árbol Arbre Teether Toy Toy Base Newborn Pillow Base de juguete Juguete mordible Almohada de recién nacido Base du jouet Jouet de dentition Oreiller pour nouveau-né...
- Page 6 IMPORTANT! Before assembly and each use, inspect this product for damaged hardware, loose joints, missing parts or sharp edges. Footrest DO NOT use if any parts are missing or broken. Contact Fisher-Price ® Reposapiés for replacement parts and instructions if needed. Never substitute parts.
- Page 7 Assembly Montaje Assemblage Insert Screws Here Introducir los tornillos aquí Insérer les vis ici • Insert two #10 x " (2,2 cm) black screws through the footrest and into the seat bottom. Tighten the screws. This may require • Align the holes in the plastic rings and the seat bottom tubes. extra force.
- Page 8 Assembly Montaje Assemblage Seat Back Pin Seat Back Pin Clavija del respaldo Clavija del respaldo Cheville du dossier Cheville du dossier Hinge Varilla Tige Hinge Rod Varilla de bisagra Tige de support Slot Slot Apertura Apertura Cavité Cavité • Turn the seat assembly face down. •...
- Page 9 Assembly Montaje Assemblage • Jalar hacia afuera la pata del armazón de cada armazón para abrirlo. Frame Leg Cerciorarse de que haga un ‘clic’. • Colocar un armazón de modo que el lado decorado quede Pata del armazón hacia afuera. Patte de la structure •...
- Page 10 Assembly Montaje Assemblage Seat Assembly Unidad de la silla Siège Seat Height Adjusters Ajustadores de la altura de la silla Régleurs de la hauteur du siège Sockets Zócalos Position 4 Logements Posición 4 Position 4 Seat Bottom Tubes Press Lever Tubos del asiento Presionar la palanca Tubes du siège...
- Page 11 Assembly Montaje Assemblage PUSH PUSH PRESIONE PRESIONE POUSSER POUSSER Screw Retainers Sujetadores de tornillo Fixations pour vis Front Base Base delantera Base avant Seat Bottom Tube Ends Extremos de los tubos del asiento Extrémités des tubes du siège • Insert the frame front legs onto the front base. •...
- Page 12 Assembly Montaje Assemblage Seat Height Adjusters Ajustadores de la altura de la silla Régleurs de la hauteur du siège PRESS PRESS PRESIONE PRESIONE APPUYER APPUYER • Squeeze the restraint release tabs together. • Remove the ends of the restraint system from the peg. Seat Bottom Tube Ends Extremos de los tubos del asiento •...
- Page 13 Assembly Montaje Assemblage Shoulder Straps Clips Correas de los hombros Crotch Strap Sujetadores Courroies d’épaule Correa de la Pinces entrepierna Courroie d’entrejambe • Remove both shoulder straps from the seat back. • Remove the crotch strap from the seat back. •...
- Page 14 Assembly Montaje Assemblage Shoulder Straps Up Upper Slots Correas de los Ranuras hombros hacia arriba superiores Courroies Fentes Lowest Slot d’épaule en haut supérieures Ranura más baja Fente inférieure Newborn Pillow Almohada de recién Crotch Strap Down nacido Straps Correa de la Oreiller pour Cinturones entrepierna...
- Page 15 Assembly Montaje Assemblage Newborn Pillow Shoulder Straps Almohada de Correas de recién nacido los hombros Oreiller pour Courroies nouveau-né d’épaule Larger Baby • Insert the ends of the shoulder straps through the slots in the • From the front of the product, insert the ends of the shoulder newborn pillow and the lower slots in the pad.
-
Page 16: Battery Installation
Battery Installation Colocación de las pilas Installation des piles Información de seguridad sobre las pilas En circunstancias excepcionales, las pilas pueden desprender líquido corrosivo que puede provocar quemaduras o dañar el producto. Para evitar el derrame de líquido corrosivo: • No mezclar nunca pilas nuevas con gastadas (cambiarlas todas al mismo tiempo) ni mezclar nunca pilas alcalinas, estándar (carbono-cinc) y recargables (níquel-cadmio). - Page 17 Secure Child Asegure al niño Comment installer l'enfant Waist/Shoulder Belt Waist/Shoulder Belt Cinturón de la Cinturón de la cintura/hombro cintura/hombro WARNING Courroie abdominale Courroie abdominale et d’épaule et d’épaule ADVERTENCIA AVERTISSEMENT Prevent serious injury or death from falls or sliding out: The child should be secured in the high chair at all times by the restraint system, either in the reclining or upright position.
- Page 18 Secure Child Asegure al niño Comment installer l'enfant Adjuster Adjuster Ajustador Ajustador Régleur Régleur Free End Free End Extremo libre Extremo libre Extrémité libre Extrémité libre Anchored End Anchored End Extremo fijo Extremo fijo Extrémité fixe Extrémité fixe TIGHTEN LOOSEN APRETAR AFLOJAR SERRER...
- Page 19 Secure Child Asegure al niño Comment installer l'enfant PUSH PUSH PUSH PUSH EMPUJE EMPUJE EMPUJE EMPUJE POUSSER POUSSER POUSSER POUSSER Shoulder Straps Correas de los hombros Courroies d’épaule • From the front of the high chair, pull the shoulder portions of the To change strap slots: restraint system out and then fit them back through the desired •...
- Page 20 Using the Trays Cómo utilizar las bandejas Utilisation des plateaux Base Tray Bandeja de la base WARNING Plateau de base ADVERTENCIA Armrest AVERTISSEMENT Reposabrazos Accoudoir Prevent serious injury or death from falls or sliding out: The child should be secured in the high chair at all times by the restraint system, either in the reclining or upright position.
- Page 21 Using the Trays Using the Teether Toy Cómo utilizar las bandejas Uso del juguete mordible Utilisation des plateaux Utilisation de jouet de dentition Teether Toy Juguete mordible Jouet de dentition Lengüeta PUSH Patte EMPUJAR APPUYER Slot • While pushing the release bar on the front of the base tray, Ranura pull the tray base towards you and remove.
- Page 22 Using the Electronic Toy Usar el juguete electrónico Utilisation de jouet électronique Rainforest Toy Juguete de naturaleza Jouet forêt tropicale Button Botón Bouton Groove Lengüeta Ranura Patte Rainure Power/Mode Switch Interruptor de encendido/modalidad Volume Switch Interrupteur/sélecteur de mode Control de volumen Sélecteur de volume •...
-
Page 23: Using The Brakes
Using the Brakes Usar los frenos Utilisation des freins WARNING ADVERTENCIA AVERTISSEMENT Prevent serious injury or death from falls or sliding out: • Always leave wheels locked. • Never use near steps. Evitar lesiones graves o la muerte debido a caídas: •... -
Page 24: Adjusting The Seat
Adjusting the Seat Ajustar el asiento Réglage du siège Hint: Adjust the seat angle to any of three positions: Upright, Semi-Recline or Recline. WARNING Consejo: Ajustar el ángulo del asiento en una de tres posiciones: vertical, semi-reclinado o reclinado. ADVERTENCIA Remarque : Régler l’angle du siège à... - Page 25 Adjusting the Seat Ajustar el asiento Storage Almacenamiento Réglage du siège Rangement Hint: Adjust the seat height to any of seven positions! Pull Frame Release Latch Consejo: Ajustar la altura del asiento en una de las siete Jalar el seguro posiciones disponibles.
- Page 26 Care Mantenimiento Entretien • The pad, frame, base tray and electronic toy may be wiped clean • Le coussin, la structure, le plateau de base et le jouet électronique using a mild cleaning solution and a damp cloth. Do not immerse peuvent être essuyés avec une solution nettoyante douce et un the electronic toy.
-
Page 27: Consumer Information
Consumer Information Información para el consumidor Renseignements pour les consommateurs FCC Statement (United States Only) Énoncé de la FCC (États-Unis seulement) This equipment has been tested and found to comply with the Cet équipement a été testé et jugé conforme aux limites de Classe limits for a Class B digital device, pursuant to Part 15 of the FCC B pour un appareil numérique en vertu de l’article 15 de la Rules. - Page 28 CONSUMER ASSISTANCE AYUDA AL CONSUMIDOR SERVICE À LA CLIENTÈLE 1-800-432-5437 (US & Canada) Fisher-Price, Inc., 636 Girard Avenue, East Aurora, NY 14052. Hearing-impaired consumers/Clientes con problemas auditivos/ Pour les malentendants : 1-800-382-7470. En México: 59-05-51-00 Ext. 5205 ó 01-800-463-59-89 CANADA VENEZUELA Mattel Canada Inc., 6155 Freemont Blvd., Mississauga,...