Table of Contents
Advertisement
Quick Links
G5580A BenchCel Microplate Handler
Quick Guide
This guide contains the following topics:
•
"About this guide" on page 2
•
"Safety guidelines" on page 3
•
"Emergency stops" on page 4
•
"Hardware components and axes of motion" on page 7
•
"Labware considerations" on page 11
•
"Starting up and shutting down" on page 12
•
"Handling labware racks safely" on page 14
•
"Filling and emptying the labware racks" on page 14
•
"Installing and uninstalling labware racks" on page 17
•
"Using BenchCel Diagnostics" on page 20
•
"Cleaning up after use" on page 29
Original Instructions
Advertisement
Table of Contents

Related Manuals for Agilent Technologies BenchCel Microplate Handler


Summary of Contents for Agilent Technologies BenchCel Microplate Handler
-
Page 1: Table Of Contents
G5580A BenchCel Microplate Handler Quick Guide This guide contains the following topics: • “About this guide” on page 2 • “Safety guidelines” on page 3 • “Emergency stops” on page 4 • “Hardware components and axes of motion” on page 7 •... -
Page 2: About This Guide
BenchCel Microplate Handler User Guide. This guide assumes the following: • The BenchCel Microplate Handler is installed correctly. For details, see the BenchCel Microplate Handler User Guide. • The device profile for the specific BenchCel Microplate Handler configuration is already created and the teachpoints are already set. For setup instructions, see the BenchCel Microplate Handler User Guide. -
Page 3: Safety Guidelines
WAR N IN G specified in the user documentation can expose you to moving-parts hazards and hazardous voltage. Before using the BenchCel Microplate Handler, make sure you are aware of the potential hazards and understand how to avoid being exposed to them. -
Page 4: Emergency Stops
Emergency stops Emergency stops The BenchCel Microplate Handler is equipped with an interlock circuit and emergency- stop pendant. When the BenchCel Microplate Handler is integrated with other devices in a third-party system, Agilent Technologies recommends that you install a main emergency-stop button to safely stop the robot and all devices simultaneously. - Page 5 Ignores the current command or task and continues to the next command or task in the protocol sequence. Abort Aborts the current command or task in the run. Select Abort if you have determined that the protocol run is not recoverable. G5580A BenchCel Microplate Handler Quick Guide...
- Page 6 Upstack the microplate that the robot is currently holding. • Replace the lid on the microplate. • Home the robot. • Verify teachpoints. If a physical crash occurred, always start BenchCel Diagnostics to home the robot and verify teachpoints. G5580A BenchCel Microplate Handler Quick Guide...
-
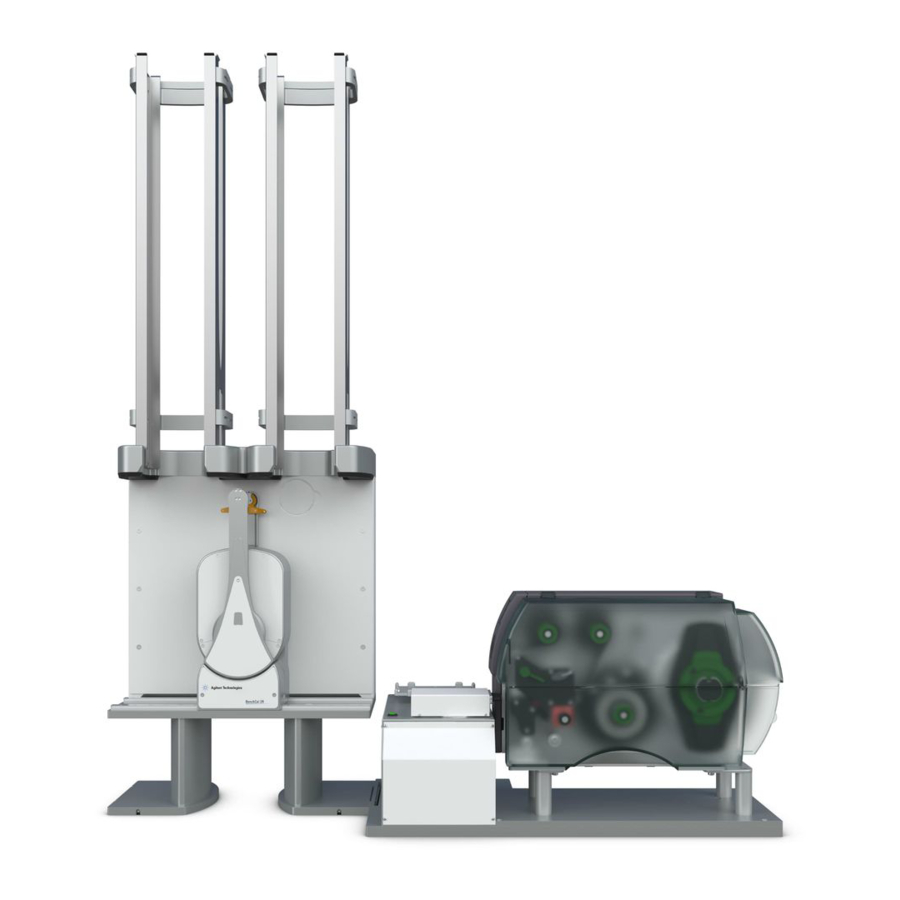
Page 7: Hardware Components And Axes Of Motion
Hardware components and axes of motion Front view The following figure and table describe the primary hardware components and axes of motion. Figure BenchCel Microplate Handler components (front view) Item Feature Description Labware The accessory that stores labware to be processed in a run. - Page 8 Red. The clamps are open without a rack installed. Do not install a rack until the clamps are closed. Robot head The component that moves (1) horizontally along the x-axis and (2) vertically along the z-axis. G5580A BenchCel Microplate Handler Quick Guide...
- Page 9 The structures inside the robot arms that close and open to hold and release a grippers microplate. Using the provided software, you can adjust the distance between the grippers (1) to hold a microplate loosely or tightly. G5580A BenchCel Microplate Handler Quick Guide...
- Page 10 Connects the serial cable from the controlling computer to the BenchCel device to allow communication between the computer and the device. Use this port as an alternative to the Ethernet connection. Pendant port Connects the pendant to the safety interlock circuit. G5580A BenchCel Microplate Handler Quick Guide...
-
Page 11: Labware Considerations
Some labware vendors might offer alternative lids that are shallower. Contact the vendor for details. Figure Lidded microplate examples Item Description No lid: excellent gripper clearance Shallow lid: good gripper clearance Deep lid: no gripper clearance, must be held by skirt G5580A BenchCel Microplate Handler Quick Guide... -
Page 12: Starting Up And Shutting Down
Microplate Handler when you are operating it as a standalone device. For instructions on how to turn on and turn off the BenchCel Microplate Handler when it is integrated into a workstation or system, see the workstation or system user documentation. - Page 13 Starting up and shutting down Turn on the compressed air supply to the BenchCel Microplate Handler. Turn on the controlling computer. See the user documentation from the computer manufacturer. Start the VWorks software. To do this, on the Windows desktop, double-click the VWorks shortcut icon.
-
Page 14: Handling Labware Racks Safely
Before filling or emptying a rack: • Position the rack so that the opening is facing you. • Determine how the microplates should be oriented in the rack. G5580A BenchCel Microplate Handler Quick Guide... - Page 15 On each side of the rack, slide the (1) door-release (black) buttons forward, while pushing outward on the (2) thumb tabs. The (3) rack doors open. Figure Door mechanism on the front-load rack and opening the front-load rack G5580A BenchCel Microplate Handler Quick Guide...
- Page 16 Using both hands, carefully slide a small stack of labware down through the top of the rack. You can use one hand to support underneath the labware stack, while the other hand holds the top of the labware to keep it level. See figure. G5580A BenchCel Microplate Handler Quick Guide...
-
Page 17: Installing And Uninstalling Labware Racks
Carefully slide the labware in small stacks, up and out of the top of the rack. Installing and uninstalling labware racks Before you start Make sure the BenchCel Microplate Handler power and compressed air are turned on IMPORTANT before you install or uninstall a labware rack. - Page 18 Installing labware racks on the BenchCel Microplate Handler To install a labware rack: At the BenchCel Microplate Handler, verify that the clamps are closed (extended) in the stacker head. Note: To close the clamps, open BenchCel Diagnostics. In the Controls tab, click Stacker at the top of the rack that you want to remove, and then click Close Stacker grippers.
- Page 19 To unlock the rack, press the green rack-release button at the top of the stacker head. Wait for the click to sound as the locks retract. While the green light is flashing, lift the labware rack up and out of the stacker head. G5580A BenchCel Microplate Handler Quick Guide...
-
Page 20: Using Benchcel Diagnostics
To open BenchCel Diagnostics: In the VWorks window, ensure that simulation is off and the correct device file (*.dev) is open. In the Devices area, select the BenchCel Microplate Handler device, and then click Device Diagnostics. G5580A BenchCel Microplate Handler Quick Guide... - Page 21 The BenchCel Diagnostics dialog box opens. By default, the Profiles tab is displayed. Initializing the BenchCel Microplate Handler in Diagnostics Before you use BenchCel Diagnostics to operate the BenchCel Microplate Handler, you must initialize an appropriate BenchCel profile to: •...
- Page 22 To send the robot to the home position: In the Controls tab, click the Jog/Teach tab. Click Go Home. G5580A BenchCel Microplate Handler Quick Guide...
- Page 23 Select the option to enable the x-axis motor. Clear the check box to disable the x-axis motor. Select the option to enable the z-axis motor. Clear the check box to disable the z-axis motor. G5580A BenchCel Microplate Handler Quick Guide...
- Page 24 Jogs the robot head down from the current position by the specified z-axis increment. Opens the robot grippers by the specified grip increment. Closes the robot grippers by the specified grip increment. G5580A BenchCel Microplate Handler Quick Guide...
- Page 25 Tools > Options dialog box. If the robot is holding a microplate, the slower of the following will be applied: the speed in the Labware Editor or the speed in the Tools > Options dialog box. For more information, see the VWorks Automation Control User Guide. G5580A BenchCel Microplate Handler Quick Guide...
- Page 26 Lidded labware only. Removes the lid from the labware that is <teachpoint> at the selected teachpoint. Relid to Lidded labware only. Replaces the lid on the labware that is at <teachpoint> the selected teachpoint. G5580A BenchCel Microplate Handler Quick Guide...
- Page 27 Resting the microplates on the shelves levels the microplates, allowing the robot grippers to accurately hold the microplate at the specified offset position. Compressed air is used to move the shelves. G5580A BenchCel Microplate Handler Quick Guide...
- Page 28 In BenchCel Diagnostics, click the Controls tab. In the graphical display area at the top of the desired rack, click Stacker, and then choose Extend Shelf or Retract Shelf. A click sounds as the shelves extend or retract. G5580A BenchCel Microplate Handler Quick Guide...
-
Page 29: Cleaning Up After Use
Unload used labware from the labware racks. See “Filling and emptying the labware racks” on page Uninstall the labware racks from the BenchCel Microplate Handler. See “Installing and uninstalling labware racks” on page Make sure the power and compressed air are turned on when removing the racks. - Page 30 © Agilent Technologies, Inc. 2020 January 2020 *SD-V1000027* SD-V1000027 Revision B...