
Related Manuals for Juniper QFX Series


Summary of Contents for Juniper QFX Series
- Page 1 QFX3000 Hardware Documentation Published: 2012-03-23 Copyright © 2012, Juniper Networks, Inc.
- Page 2 Products made or sold by Juniper Networks or components thereof might be covered by one or more of the following patents that are owned by or licensed to Juniper Networks: U.S. Patent Nos. 5,473,599, 5,905,725, 5,909,440, 6,192,051, 6,333,650, 6,359,479, 6,406,312, 6,429,706, 6,459,579, 6,493,347, 6,538,518, 6,538,899, 6,552,918, 6,567,902, 6,578,186, and 6,590,785.
-
Page 3: Table Of Contents
Legacy Data Center Architecture ........3 QFX Series QFabric System Architecture ......5 Understanding the QFabric System Hardware Architecture . - Page 4 Device ............57 Copyright © 2012, Juniper Networks, Inc.
- Page 5 Port and Interface Specifications ........105 USB Port Specifications for the QFX Series ......105 Console Port Connector Pinouts for the QFX Series .
- Page 6 QFX3000 Hardware Documentation Management Port Connector Pinouts for the QFX Series ....107 Network Module Port Connector Pinouts for a QFX3100 Director Device ..107 Interface Specifications for SFP+ Transceivers for QFX3500 Device Access Ports .
- Page 7 Agency Approvals for the QFX Series ........
- Page 8 Two-Post Rack Mounting ........234 viii Copyright © 2012, Juniper Networks, Inc.
- Page 9 Connecting a QFX3500 Node Device to a QFX3008-I Interconnect Device ..284 Connecting a QFX Series Device to a Management Console ....285 Chapter 23 Performing the Initial Configuration .
- Page 10 Removing a Rear Card from a QFX3008-I Interconnect Device ... . . 356 Installing a Rear Card in a QFX3008-I Interconnect Device ....358 Copyright © 2012, Juniper Networks, Inc.
- Page 11 Removing a Transceiver from a QFX Series Device ......373 Installing a Transceiver in a QFX Series Device ......374 Disconnecting a Fiber-Optic Cable from a QFX Series Device .
- Page 12 Contacting Customer Support to Obtain a Return Materials Authorization for a QFX Series Device or Component ....... . . 435 Chapter 35 Alarms and System Log Messages .
- Page 13 Figure 1: Legacy Data Center Architecture ....... . . 4 Figure 2: QFX Series QFabric System Architecture ......5 Figure 3: QFabric System Hardware Architecture .
- Page 14 Figure 61: Installing the Mounting Hardware for a Two-Post Rack ... . 232 Figure 62: Installing a QFX3008-I Interconnect Device in a Four-Post Rack ..237 Copyright © 2012, Juniper Networks, Inc.
- Page 15 Figure 85: QFX3500 Node Device Control Plane Connections ....282 Figure 86: Connecting a QFX Series Device to a Management Console Through a Console Server ..........285 Figure 87: Connecting a QFX Series Device Directly to a Management Console .
- Page 16 Replacing Transceivers and Fiber-Optic Cables ..... . 373 Figure 124: Installing an SFP Transceiver in a QFX Series Device ... . . 376 Figure 125: Installing a QSFP+ Transceiver in a QFX Series Device .
- Page 17 Device ............425 Figure 145: Location of the Serial Number ID Label on a QFX3500 Device ..432 Copyright © 2012, Juniper Networks, Inc. xvii...
- Page 18 QFX3000 Hardware Documentation xviii Copyright © 2012, Juniper Networks, Inc.
- Page 19 Device ............94 Copyright © 2012, Juniper Networks, Inc.
- Page 20 QFX Series ........
- Page 21 Device ............392 Table 76: Rear Card LEDs on a QFX3008-I Interconnect Device ... . . 393 Copyright © 2012, Juniper Networks, Inc.
- Page 22 Table 88: QFX3500 Chassis Alarm Messages ......443 xxii Copyright © 2012, Juniper Networks, Inc.
-
Page 23: About The Documentation
® To obtain the most current version of all Juniper Networks technical documentation, see the product documentation page on the Juniper Networks website at http://www.juniper.net/techpubs/ If the information in the latest release notes differs from the information in the documentation, follow the product Release Notes. -
Page 24: Table 1: Notice Icons
The console port is labeled CONSOLE on routing platform components. < > (angle brackets) Enclose optional keywords or variables. < > stub default-metric metric xxiv Copyright © 2012, Juniper Networks, Inc. -
Page 25: Documentation Feedback
Software release version (if applicable) Requesting Technical Support Technical product support is available through the Juniper Networks Technical Assistance Center (JTAC). If you are a customer with an active J-Care or JNASC support contract, Copyright © 2012, Juniper Networks, Inc. -
Page 26: Self-Help Online Tools And Resources
7 days a week, 365 days a year. Self-Help Online Tools and Resources For quick and easy problem resolution, Juniper Networks has designed an online self-service portal called the Customer Support Center (CSC) that provides you with the following features: Find CSC offerings: http://www.juniper.net/customers/support/... -
Page 27: Overview
PART 1 Overview QFX3000 QFabric Switch Overview on page 3 QFX3100 Overview on page 21 QFX3008-I Overview on page 33 QFX3500 Overview on page 59 Copyright © 2012, Juniper Networks, Inc. - Page 28 QFX3000 Hardware Documentation Copyright © 2012, Juniper Networks, Inc.
-
Page 29: Qfx3000 Qfabric Switch Overview
Juniper Networks data center solution. This topic covers: Legacy Data Center Architecture on page 3 QFX Series QFabric System Architecture on page 5 Legacy Data Center Architecture Service providers and companies that support data centers are familiar with legacy multi-tiered architectures, as seen in Figure 1 on page Copyright ©... -
Page 30: Figure 1: Legacy Data Center Architecture
This processing overhead results in potentially poor performance for time-sensitive applications, such as voice, video, or financial transactions. Copyright © 2012, Juniper Networks, Inc. -
Page 31: Qfx Series Qfabric System Architecture
Chapter 1: QFX3000 QFabric Switch Overview QFX Series QFabric System Architecture In contrast to legacy multi-tiered data center architectures, the Juniper Networks QFX Series QFabric System architecture provides a simplified networking environment that solves the most challenging issues faced by data center operators. A fabric is a set of devices that act in concert to behave as a single switch. - Page 32 Related Understanding QFabric Switch Terminology Documentation Understanding the QFabric System Hardware Architecture on page 7 Understanding the QFabric Switch Software Architecture Copyright © 2012, Juniper Networks, Inc.
-
Page 33: Understanding The Qfabric System Hardware Architecture
A representation of these components is shown in Figure 3 on page Figure 3: QFabric System Hardware Architecture Director devices Node devices Interconnect devices Virtual Chassis (control plane) Copyright © 2012, Juniper Networks, Inc. - Page 34 QFabric system can scale to support thousands of servers and storage devices. The four major QFabric system components can be assembled from a variety of hardware options. Currently supported hardware configurations are shown in Table 3 on page Copyright © 2012, Juniper Networks, Inc.
-
Page 35: Qfabric System Features
48 10-Gigabit Ethernet ports, provides up to 160 Gbps of bandwidth into the QFabric system Interconnect backplane). Low port-to-port latencies that scale as the system size grows from 48 to 6144 10-Gigabit Ethernet ports. Copyright © 2012, Juniper Networks, Inc. -
Page 36: Understanding Qfx3000-G Qfabric System Hardware Configurations
2-Gbps, 4-Gbps, or 8-Gbps Fibre Channel ports, and 36 of these ports through ) can be configured as Gigabit Ethernet ports. There are no limitations on which ports can be configured as 10-Gigabit Ethernet ports. However, if you are Copyright © 2012, Juniper Networks, Inc. -
Page 37: Understanding The Director Group
Director devices: ones that contain a hard drive and ones that do not. Enhanced Director devices with a hard drive provide full processing services, while Director devices without a hard drive provide auxiliary support. Therefore, use enhanced Copyright © 2012, Juniper Networks, Inc. -
Page 38: Director Group Services
Routing Engines are located and what services they provide, enables you to troubleshoot the QFabric system and ensure that it is running the way it should. This topic covers: Hardware-Based Routing Engines on page 13 Software-Based External Routing Engines on page 13 Copyright © 2012, Juniper Networks, Inc. -
Page 39: Hardware-Based Routing Engines
Chapter 1: QFX3000 QFabric Switch Overview Hardware-Based Routing Engines A traditional Juniper Networks Routing Engine is a hardware field-replaceable unit that runs routing protocols, builds the routing and switching tables, sends routing information to the Packet Forwarding Engine, and handles several software processes for the device (such as interface control, chassis component monitoring, system management, and user access). -
Page 40: Understanding Interconnect Devices
To reduce latency to a minimum, the Interconnect device implements multistage Clos switching to provide nonblocking connections between any of the Node devices in the system. Figure 5 on page 15 shows an example of how Clos switching works in an Interconnect device. Copyright © 2012, Juniper Networks, Inc. -
Page 41: Qfx3008-I Interconnect Devices
QFabric system. In addition, four interfaces (two per Control Board) provide Gigabit Ethernet access to the control plane management network. Figure 6 on page 16 shows an example of the data plane and control plane connections for a QFX3008-I Interconnect device. Copyright © 2012, Juniper Networks, Inc. -
Page 42: Figure 6: Qfx3008-I Data Plane And Control Plane Connections
Related Understanding Node Devices on page 17 Documentation Understanding the QFabric Switch Data Plane Understanding the QFabric Switch Control Plane Understanding the QFabric System Hardware Architecture on page 7 Copyright © 2012, Juniper Networks, Inc. -
Page 43: Understanding Node Devices
The control plane requires two management ports on the QFX3500 chassis to connect the Node device to the control plane network. Figure 7 on page 18 shows an example of the data plane and control plane connections for a QFX3500 Node device. Copyright © 2012, Juniper Networks, Inc. -
Page 44: Figure 7: Qfx3500 Data Plane And Control Plane Connections
Configuring Node Groups for the QFabric Switch Understanding Node Groups on page 19 Understanding Interconnect Devices on page 14 Understanding the QFabric Switch Data Plane Understanding the QFabric Switch Control Plane Understanding the QFabric System Hardware Architecture on page 7 Copyright © 2012, Juniper Networks, Inc. -
Page 45: Understanding Node Groups
You can override the default assignment by manually configuring a redundant server Node group that contains a maximum of two Node devices. You can use a redundant server Node group to provide multihoming services Copyright © 2012, Juniper Networks, Inc. - Page 46 Related Configuring Node Groups for the QFabric Switch Documentation Understanding Node Devices on page 17 Understanding Routing Engines in the QFabric System on page 12 Understanding the QFabric System Hardware Architecture on page 7 Copyright © 2012, Juniper Networks, Inc.
-
Page 47: Qfx3100 Overview
AC Power Supply in a QFX3100 Director Device on page 30 QFX3100 Director Device Overview The Juniper Networks QFX3100 Director device is used to manage the Juniper Networks QFX3000-G QFabric system. You connect Gigabit Ethernet ports on a QFX3100 Director device to Gigabit Ethernet ports on two Virtual Chassis composed of Juniper Networks EX4200 Ethernet switches to form the control plane and management network for the QFabric system. -
Page 48: Software
(SFP) ports. The ports connect to the control plane and management network for the QFabric switch. The ports on the network modules are also used to connect QFX3100 Director devices together to form a QFX3100 Director group. Copyright © 2012, Juniper Networks, Inc. -
Page 49: Hard Disk Drive Modules
You can remove and replace them without powering off the device or disrupting the switching function of the QFX3000-G QFabric system. Table 4 on page 24 lists the FRUs for the QFX3100 Director device and actions to take before removing them. Copyright © 2012, Juniper Networks, Inc. -
Page 50: Functionality
None. Fan modules None. NOTE: If you have a Juniper Networks J-Care service contract, register any addition, change, or upgrade of hardware components at https://www.juniper.net/customers/csc/management/updateinstallbase.jsp Failure to do so can result in significant delays if you need replacement parts. This note does not apply if you replace existing components with the same type of component. -
Page 51: Qfx3100 Director Device Component Redundancy
Chassis with FRUs installed: 41.2 lb (18.7 kg) Related Cabinet Requirements for a QFX3100 Director Device on page 97 Documentation Mounting a QFX3100 Director Device on Two Posts in a Rack or Cabinet on page 215 Copyright © 2012, Juniper Networks, Inc. -
Page 52: Front Panel Of A Qfx3100 Director Device
Management Port LEDs on a QFX3100 Director Device on page 382 Installing and Removing QFX3100 Director Device Hardware Components on page 309 Rear Panel of a QFX3100 Director Device The rear panel of a QFX3100 Director device consists of the following components: Fan modules Copyright © 2012, Juniper Networks, Inc. -
Page 53: Cooling System And Airflow In A Qfx3100 Director Device
AC power supply. The fan modules are located in the fan module slots on the rear of the QFX3100 Director device. The QFX3100 Director device provides front to back airflow. See Figure 12 on page Copyright © 2012, Juniper Networks, Inc. -
Page 54: Network Modules In A Qfx3100 Director Device
There are two types of network modules: RJ-45 network module—Provides four 1000BASE-T RJ-45 ports. See “Cable Specifications for Control Plane Connections for the QFX Series” on page 129 information about the required cables. SFP network module—Provides four 1-Gbps small form-factor pluggable (SFP) ports. -
Page 55: Hdd Modules In A Qfx3100 Director Device
Fan modules provide cooling to a QFX3100 Director device. All QFX3100 Director devices are shipped with three fan modules installed in the fan module slots on the rear panel of the chassis. See Figure 14 on page Copyright © 2012, Juniper Networks, Inc. -
Page 56: Ac Power Supply In A Qfx3100 Director Device
All QFX3100 Director devices are shipped with two AC power supplies. Each AC power supply weighs approximately 2.5 lb (1.1 kg). See Figure 15 on page Copyright © 2012, Juniper Networks, Inc. -
Page 57: Figure 15: Ac Power Supplies
Installing a Power Supply in a QFX3100 Director Device on page 311 Documentation AC Power Specifications for a QFX3100 Director Device on page 135 AC Power Supply LED on a QFX3100 Director Device on page 384 Copyright © 2012, Juniper Networks, Inc. - Page 58 QFX3000 Hardware Documentation Copyright © 2012, Juniper Networks, Inc.
-
Page 59: Qfx3008-I Overview
QFX3008-I Interconnect Device Overview The QFX3008-I Interconnect device is a half-rack, modular, fully redundant chassis that provides the data plane switch fabric for Juniper Networks QFX3500 Node devices. Together the QFX3500 Node device and the QFX3008-I Interconnect device form a multistage, nonblocking switch fabric that provides a high-performance, low-latency, unified interconnect solution for next-generation data centers. -
Page 60: Software
QFX Series devices run under the Juniper Networks Junos OS, which provides Layer 2 and Layer 3 switching, routing, and security services. The same Junos OS code base that runs on QFX Series devices also runs on all Juniper Networks EX Series switches, and J Series, M Series, MX Series, and T Series routers. -
Page 61: Qfx3008-I Overview
Chapter 3: QFX3008-I Overview Figure 16: QFX3008-I Interconnect Device Front Front cards 0 7 Side fan Side fan trays trays and and air filters air filters Front panel display and bottom fan tray Air intake ESD point Copyright © 2012, Juniper Networks, Inc. -
Page 62: 16-Port Qsfp+ Front Card
. See “16-Port QSFP+ Front Cards in a QFX3008-I Interconnect Device” on page 48 “Understanding the QFabric System Hardware Architecture” on page Copyright © 2012, Juniper Networks, Inc. -
Page 63: Control Board
“Wiring Tray in a QFX3008-I Interconnect Device” on page CAUTION: Mixing different types of wiring trays in the same chassis is not a supported configuration. Related Understanding Redundancy of QFX3008-I Interconnect Device Components and Documentation Functionality on page 39 Copyright © 2012, Juniper Networks, Inc. -
Page 64: Field-Replaceable Units In A Qfx3008-I Interconnect Device
Rear Card Offline in a QFX3008-I Interconnect Device” on page 355. Optical transceivers None. We recommend that you disable the interface using the set interface-name disable command. See “Disconnecting a Fiber-Optic Cable from a QFX Series Device” on page 376. Copyright © 2012, Juniper Networks, Inc. -
Page 65: Understanding Redundancy Of Qfx3008-I Interconnect Device Components And Functionality
Chapter 3: QFX3008-I Overview NOTE: If you have a Juniper J-Care service contract, register any addition, change, or upgrade of hardware components at https://www.juniper.net/customers/csc/management/updateinstallbase.jsp Failure to do so can result in significant delays if you need replacement parts. This note does not apply if you replace existing components with the same type of component. -
Page 66: Slot Numbering For A Qfx3008-I Interconnect Device
15 Cooling system—Eight side fan tray slots run vertically on the sides of the front of the chassis; four on one side of the chassis behind two identical access panels, four on the Copyright © 2012, Juniper Networks, Inc. -
Page 67: Chassis Physical Specifications For A Qfx3008-I Interconnect Device
Chassis depth from mid-mounting brackets to rear of chassis is 23.73 in. (60.27 cm) Maximum chassis depth with FRUs, including the optional cable manager and lockable front doors installed, is 40.37 in. (102.54 cm) Copyright © 2012, Juniper Networks, Inc. -
Page 68: Midplane In A Qfx3008-I Interconnect Device
High levels of electrical energy are distributed across the device midplane. Do not touch the midplane connectors or any component connected to the midplane with any metallic object while you are servicing components installed in the device. Copyright © 2012, Juniper Networks, Inc. -
Page 69: Front Panel Display Of The Qfx3008-I Interconnect Device
QFX3008-I Interconnect device. Figure 19 on page 44 shows the location of the front panel display on the chassis. Figure 18: Chassis Status LEDs System LCD panel LEDs Alarm Power supply LEDs LEDs LEDs Copyright © 2012, Juniper Networks, Inc. -
Page 70: Cooling System And Airflow In A Qfx3008-I Interconnect Device
Eight fan trays install vertically on the front sides of the chassis, one fan tray installs directly below the front card cage, and one in the rear of the chassis at the top. See Figure 20 on page 45 Figure 21 on page Copyright © 2012, Juniper Networks, Inc. -
Page 71: Figure 20: Location Of Bottom And Side Fan Trays
Figure 20: Location of Bottom and Side Fan Trays Front cards 0 7 Side fan Side fan trays trays and and air filters air filters Front panel display and bottom fan tray Air intake ESD point Copyright © 2012, Juniper Networks, Inc. -
Page 72: Figure 21: Location Of Top Fan Tray
The same air intake directs cool air to the power supplies and wiring trays. The hot air passes through the power supplies and wiring trays and exhausts on the rear of the chassis at the bottom. See the side view in Figure 22 on page 47 for this airflow. Copyright © 2012, Juniper Networks, Inc. -
Page 73: Figure 22: Airflow Through The Front Card Cage And Powerhouse
If the chassis temperature rises above the acceptable threshold the speed of the working fans is automatically adjusted to keep the temperature within the acceptable range. If Copyright © 2012, Juniper Networks, Inc. -
Page 74: 16-Port Qsfp+ Front Cards In A Qfx3008-I Interconnect Device
QFX3000 QFabric system varies based on how your QFX3500 Node devices are connected to the QFX3008-I Interconnect device and the traffic mix flowing through them. See “Understanding Redundancy of QFX3008-I Interconnect Device Components and Functionality” on page Copyright © 2012, Juniper Networks, Inc. -
Page 75: Control Board In A Qfx3008-I Interconnect Device
Installing a 16-Port QSFP+ Front Card in a QFX3008-I Interconnect Device on page 353 Control Board in a QFX3008-I Interconnect Device The Control Board performs Routing Engine functions in a QFX3008 Interconnect device. Figure 25 on page Copyright © 2012, Juniper Networks, Inc. -
Page 76: Figure 25: Control Board In A Qfxc08 Chassis
Monitors and controls the LCD panel and chassis status LEDs Monitors the communication of the 16-port QSFP+ front cards with the rear cards Monitors the status of the power supplies The Control Board has these components: Copyright © 2012, Juniper Networks, Inc. -
Page 77: Rear Cards In A Qfx3008-I Interconnect Device
USB port—Provides an interface through which you can recover the device by reinstalling Junos OS software. See “USB Port Specifications for the QFX Series” on page 105 “Performing a Recovery Installation on a QFX3500 Device and QFX3008-I Interconnect Device” on page 409. -
Page 78: Ac Power Supply In A Qfx3008-I Interconnect Device
The second pair is sized for UNC ¼-20 screws and is located below the second wiring tray on the bottom right corner at the rear of the chassis. The grounding points are spaced at 0.625 in. (15.86 mm). Copyright © 2012, Juniper Networks, Inc. -
Page 79: Figure 27: Ac Power Supply
Table 8 on page 54 lists the pairs of power supplies and the components they power in a QFX3008-I Interconnect device. Copyright © 2012, Juniper Networks, Inc. -
Page 80: Wiring Tray In A Qfx3008-I Interconnect Device
The chassis is pluggable type A equipment installed in a restricted-access location. It has a separate protective earthing terminal provided on the chassis. This separate protective earthing terminal must be permanently connected to earth ground. Copyright © 2012, Juniper Networks, Inc. - Page 81 Three LEDs on the faceplate indicate the status of each power channel. Each wiring tray also has a power switch on the faceplate. See Figure 28 on page 56 Figure 29 on page Copyright © 2012, Juniper Networks, Inc.
-
Page 82: Figure 28: Single-Phase Wiring Tray
Installing a Wiring Tray in a QFX3008-I Interconnect Device on page 328 Removing a Wiring Tray from a QFX3008-I Interconnect Device on page 326 Preparing Delta and Wye Three-Phase Power Cords on page 241 Copyright © 2012, Juniper Networks, Inc. -
Page 83: Grounding Cable And Lug Specifications For A Qfx3008-I Interconnect
Connecting Earth Ground to a QFX3008-I Interconnect Device on page 237 Documentation Connecting AC Power to a QFX3008-I Interconnect Device with Single-Phase Wiring Trays on page 239 Connecting AC Power to a QFX3008-I Interconnect Device with Three-Phase Delta Wiring Trays on page 246 Copyright © 2012, Juniper Networks, Inc. - Page 84 QFX3000 Hardware Documentation Connecting AC Power to a QFX3008-I Interconnect Device with Three-Phase Wye Wiring Trays on page 250 Copyright © 2012, Juniper Networks, Inc.
-
Page 85: Qfx3500 Overview
Ethernet to transport the FC frames over the physical Ethernet network. In a QFX3000 QFabric system, a QFX3500 device functions as a Node device, connected to the QFabric system through 40-Gbps uplink ports to a Juniper Networks QFX3008-I Interconnect Device. Together, the QFX3500 devices and QFX3008-I Interconnect... -
Page 86: Software
QFX3500 devices use the Junos operating system (OS), which provides Layer 2 and Layer 3 switching, routing, and security services. The same Junos OS code base that runs on QFX3500 devices also runs on all Juniper Networks EX Series switches, and J Series, M Series, MX Series, and T Series routers. -
Page 87: Sfp+ Access Ports
Because of this limitation, a maximum of 18 copper transceivers can be installed in ports through . We recommend using only the top row of access ports for copper transceivers. Copyright © 2012, Juniper Networks, Inc. -
Page 88: Qsfp+ Uplink Ports
QSFP+ ports provide 15 10-Gigabit Ethernet interfaces. NOTE: The QSFP+ uplink ports are not supported in Junos OS Release 11.1. The QSFP+ uplink ports and QSFP+ to four SFP+ breakout cables are supported in Junos OS Release 11.2 and later. Copyright © 2012, Juniper Networks, Inc. -
Page 89: Field-Replaceable Units In A Qfx3500 Device
“Removing a Management Board from a QFX3500 Device” on page 369. Optical transceivers None. We recommend that you disable the interface using the set interface-name disable command. See “Disconnecting a Fiber-Optic Cable from a QFX Series Device” on page 376. Copyright © 2012, Juniper Networks, Inc. -
Page 90: Functionality
QFX3000 Hardware Documentation NOTE: If you have a Juniper J-Care service contract, register any addition, change, or upgrade of hardware components at https://www.juniper.net/customers/csc/management/updateinstallbase.jsp Failure to do so can result in significant delays if you need replacement parts. This note does not apply if you replace existing components with the same type of component. -
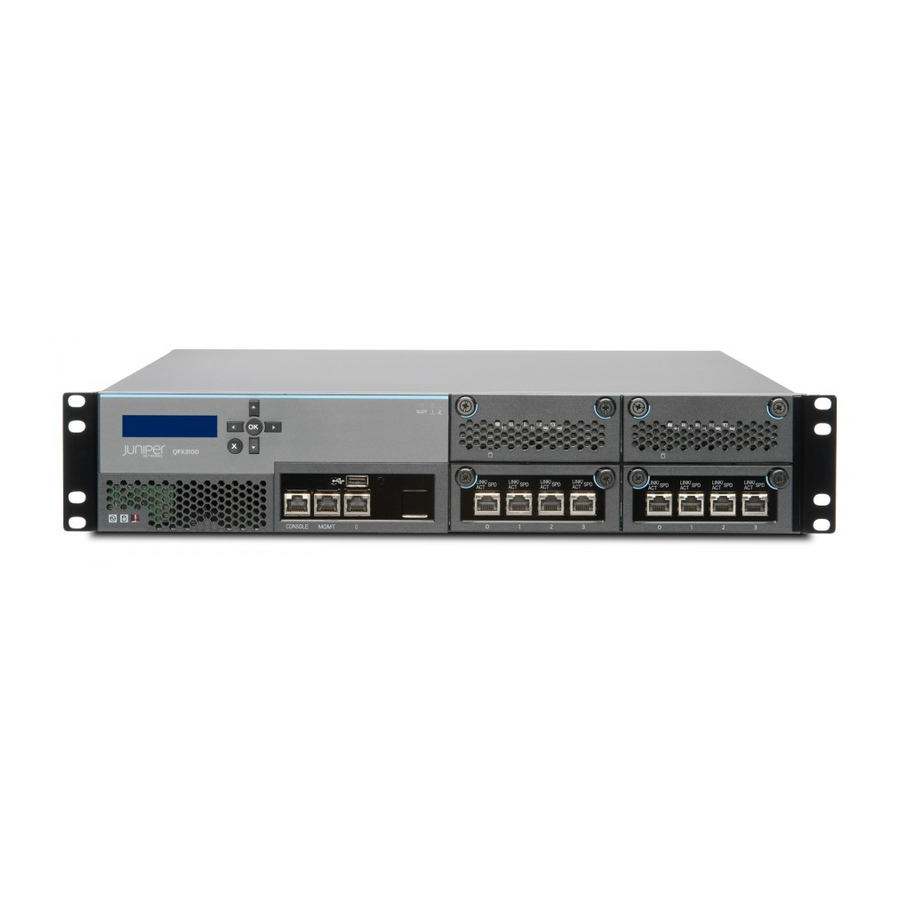
Page 91: Front Panel Of A Qfx3500 Device
Figure 35 on page 66 show the front of a QFX3500 device. Figure 34: QFX3500 Device Front Panel QFX3500-48S4Q AC power Management AC power Fan tray 0 Fan tray 1 supply 0 board supply 1 Copyright © 2012, Juniper Networks, Inc. -
Page 92: Rear Panel Of A Qfx3500 Device
Field-Replaceable Units in a QFX3500 Device on page 63 Documentation Rear Panel of a QFX3500 Device on page 66 USB Port Specifications for the QFX Series on page 105 Management Board for a QFX3500 Device on page 71 Chassis Status LEDs on a QFX3500 Device on page 397... -
Page 93: Figure 36: Qfx3500 Device Rear Panel
46 47 24 25 26 27 28 29 30 31 32 33 34 35 36 37 38 39 40 41 42 43 44 45 46 47 QSFP+ uplink ports 42 43 44 45 46 47 Copyright © 2012, Juniper Networks, Inc. -
Page 94: Cooling System And Airflow For A Qfx3500 Device
The QFX3500 device provides FRU-side-to-port-side or port-side-to-FRU-side airflow depending on the device model you purchase. Table 11 on page 69 lists the different QFX3500 device models and their direction of airflow. Copyright © 2012, Juniper Networks, Inc. -
Page 95: Figure 39: Fru-Side-To-Port-Side Airflow Through The Qfx3500 Chassis
Chapter 4: QFX3500 Overview NOTE: In QFX Series device model names, AFI, or airflow in, describes FRU-side-to-port-side airflow. AFO, or airflow out, describes port-side-to-FRU-side airflow. NOTE: The front panel of the device where the power supplies, fan trays, and management boards are located is the FRU -side of the device. -
Page 96: Figure 40: Port-Side-To-Fru-Side Airflow Through The Qfx3500 Chassis
Table 11 on page 69 determine your model’s airflow direction. Figure 41: Label Identifying Airflow Direction on Power Supply Handle Table 12 on page 71 lists the QFX3500 device FRUs and their direction of airflow. Copyright © 2012, Juniper Networks, Inc. -
Page 97: Management Board For A Qfx3500 Device
Removing a Management Board from a QFX3500 Device on page 369 Management Board for a QFX3500 Device The management board for a QFX3500 device (see Figure 42 on page 72) is a field-replaceable unit (FRU) that you install on the front panel. Copyright © 2012, Juniper Networks, Inc. -
Page 98: Figure 42: Management Board For A Qfx3500 Device
If you are using the QFX3500 device as a Node device in a QFabric system, see “Cable Specifications for Control Plane Connections for the QFX Series” on page 129 information about the required cables. If you are using the QFX3500 device as a standalone switch, see “Cable Specifications... -
Page 99: Ac Power Supply For A Qfx3500 Device
Documentation USB Port Specifications for the QFX Series on page 105 Connecting a QFX Series Device to a Management Console on page 285 Connecting a QFX3500 Node Device to the Control Plane Network on page 282 Connecting a QFX3500 Device to a Network for Out-of-Band Management... -
Page 100: Figure 43: Ac Power Supply In Qfx3500 Devices
) LED will blink amber. Table 14 on page 74 shows the different power supplies and their direction of airflow. Table 14: Airfow Direction in QFX3500 Power Supplies Model Direction of Airflow JPSU-650W-AC-AFO Port-side-to-FRU-side QFXC01-PWRACI-650A FRU-side-to-port-side Copyright © 2012, Juniper Networks, Inc. -
Page 101: Dc Power Supply For A Qfx3500 Device
“DC Power Wiring Sequence Warning” on page 201 “DC Power Electrical Safety Guidelines” on page 197. Figure 45: DC Power Supply for a QFX3500 Device A F I 1— Handle 3— Ejector lever 2—Terminal block Copyright © 2012, Juniper Networks, Inc. -
Page 102: Figure 46: Dc Power Supply Faceplate For A Qfx3500 Device
If you install power supplies with two different airflow directions, Junos OS raises an alarm, and the status ( ) LED blinks amber. OK/! Copyright © 2012, Juniper Networks, Inc. -
Page 103: Grounding Cable And Lug Specifications For A Qfx3500 Device
The grounding points are studs sized for M4 hex nuts. The grounding points are spaced at 0.625 in. (15.86 mm). M4 hex nuts with integrated washers are provided in the accessory kit. Copyright © 2012, Juniper Networks, Inc. - Page 104 (2 mm²), minimum 60° C wire, or as permitted by the local code. Related AC Power Supply for a QFX3500 Device on page 73 Documentation Connecting AC Power to a QFX3500 Device on page 265 Copyright © 2012, Juniper Networks, Inc.
-
Page 105: Planning
Port and Interface Specifications on page 105 Cable Specifications on page 129 Planning QFX3100 Power Requirements on page 135 Planning QFX3008-I Power Requirements on page 137 Planning QFX35000 Power Requirements on page 147 Compliance on page 151 Copyright © 2012, Juniper Networks, Inc. - Page 106 QFX3000 Hardware Documentation Copyright © 2012, Juniper Networks, Inc.
-
Page 107: Site Preparation
Rack Requirements for a QFX3008-I Interconnect Device on page 95 Rack Requirements for a QFX3500 Device on page 96 Rack Requirements for EX4200 Switches For the dimensions and weights of the devices, see the following topics: Copyright © 2012, Juniper Networks, Inc. -
Page 108: Site Preparation
1000BASE-T Ethernet over copper wiring. Each network segment can be a maximum length of 100 m (328 ft). See “Cable Specifications for Control Plane Connections for the QFX Series” on page 129. -
Page 109: Site Preparation Checklist For A Qfx3100 Director Device
Plan the rack or cabinet location, including required space “Clearance Requirements for Airflow clearances. and Hardware Maintenance for a QFX3100 Director Device” on page 99 Secure the rack or cabinet to the floor and building structure. Cables Copyright © 2012, Juniper Networks, Inc. -
Page 110: Site Preparation Checklist For A Qfx3008-I Interconnect Device
“Environmental Requirements and Specifications for temperature and humidity do not exceed switch a QFX3008-I Interconnect Device” on page 90 tolerances. Power Measure the distance between the external power sources and the chassis installation site. Copyright © 2012, Juniper Networks, Inc. - Page 111 “Calculating Power Requirements for a QFX3008-I Interconnect Device” on page 143 “Calculating the Fiber-Optic Cable Power Budget for a QFX Series Device” on page 132 “Calculating the Fiber-Optic Cable Power Margin for a QFX Series Device” on page 132 Rack or Cabinet Select the type of rack or cabinet and verify that “Rack Requirements for a QFX3008-I Interconnect...
-
Page 112: Site Preparation Checklist For A Qfx3500 Device
Plan the cable routing and management. Related General Safety Guidelines and Warnings on page 161 Documentation General Site Guidelines on page 87 Installing and Connecting a QFX3500 Device on page 259 Copyright © 2012, Juniper Networks, Inc. -
Page 113: General Site Guidelines
EX Series Redundant Power System (RPS), and the XRE200 External Routing Engine. This topic also applies to hardware devices in the QFX Series. Efficient device operation requires proper site planning and maintenance and proper layout of the equipment, rack or cabinet (if used), and wiring closet. -
Page 114: Table 19: Site Electrical Wiring Guidelines
AC Power Supplies in an EX6200 Switch DC Power Supply in an EX6200 Switch AC Power Supply in an EX8200 Switch DC Power Supply in an EX8200 Switch AC Power Supply in a QFX3100 Director Device on page 30 Copyright © 2012, Juniper Networks, Inc. -
Page 115: Device
Nonoperating storage temperature in shipping container: –40° F through 158° F (–40° C through 70° C) NOTE: Install QFX Series devices only in restricted areas, such as dedicated equipment rooms and equipment closets, in accordance with Articles 110-16, 110-17, and 110-18 of the National Electrical Code, ANSI/NFPA 70. -
Page 116: Device
Designed to comply with Zone 4 earthquake requirements per NEBS GR-63-CORE, Issue 3. NOTE: Install QFX Series devices only in restricted areas, such as dedicated equipment rooms and equipment closets, in accordance with Articles 110-16, 110-17, and 110-18 of the National Electrical Code, ANSI/NFPA 70. -
Page 117: Environmental Requirements And Specifications For The Qfx3500 Device
Designed to comply with Zone 4 earthquake requirements per NEBS GR-63-CORE, Issue 3. NOTE: Install QFX Series devices only in restricted areas, such as dedicated equipment rooms and equipment closets, in accordance with Articles 110-16, 110-17, and 110-18 of the National Electrical Code, ANSI/NFPA 70. - Page 118 QFX3000 Hardware Documentation Copyright © 2012, Juniper Networks, Inc.
-
Page 119: Rack And Cabinet Requirements
Rack requirements consist of: Rack type Mounting bracket hole spacing Rack size and strength Rack connection to the building structure Table 23 on page 94 provides the rack requirements and specifications for the QFX3100 Director device. Copyright © 2012, Juniper Networks, Inc. -
Page 120: Table 23: Rack Requirements And Specifications For The Qfx3100 Director
Rack-Mounting and Cabinet-Mounting Warnings on page 179 Mounting a QFX3100 Director Device on Four Posts in a Rack or Cabinet on page 217 Mounting a QFX3100 Director Device on Two Posts in a Rack or Cabinet on page 215 Copyright © 2012, Juniper Networks, Inc. -
Page 121: Rack Requirements For A Qfx3008-I Interconnect Device
Secure the rack to the building structure. structure If earthquakes are a possibility in your geographical area, secure the rack to the floor. Secure the rack to the ceiling brackets as well as wall or floor brackets for maximum stability. Copyright © 2012, Juniper Networks, Inc. -
Page 122: Rack Requirements For A Qfx3500 Device
Secure the rack to the ceiling brackets as well as wall or floor brackets for maximum stability. Related Chassis Physical Specifications for a QFX3500 Chassis on page 64 Documentation Rack-Mounting and Cabinet-Mounting Warnings on page 179 Copyright © 2012, Juniper Networks, Inc. -
Page 123: Cabinet Requirements For A Qfx3100 Director Device
Ensure that the spacing of rails and adjacent cabinets allows for the proper clearance around the QFX3100 Director device and cabinet. A cabinet larger than the minimum required provides better airflow and reduces the chance of overheating. Copyright © 2012, Juniper Networks, Inc. -
Page 124: Cabinet Requirements For A Qfx3008-I Interconnect Device
“Clearance Requirements for Airflow and Hardware Maintenance for a QFX3008-I Interconnect Device” on page 100. Related Rack-Mounting and Cabinet-Mounting Warnings on page 179 Documentation Rack Requirements for a QFX3008-I Interconnect Device on page 95 Copyright © 2012, Juniper Networks, Inc. -
Page 125: Cabinet Requirements For A Qfx3500 Device
Mounting a QFX3500 Device in a Rack or Cabinet on page 261 Clearance Requirements for Airflow and Hardware Maintenance for a QFX3100 Director Device When planning the site for installing a QFX3100 Director device, you must allow sufficient clearance around the device. Copyright © 2012, Juniper Networks, Inc. -
Page 126: Clearance Requirements For Airflow And Hardware Maintenance For A Qfx3008-I Interconnect Device
For the cooling system to function properly, the airflow around the chassis must be unrestricted. Do not block the air intake or exhaust areas shown in Figure 49 on page 101 Figure 50 on page 101. Copyright © 2012, Juniper Networks, Inc. -
Page 127: Figure 49: Airflow Through The Front Card Cage And Powerhouse
Leave at least 24 in. (61 cm) both in front of and behind the switch. Allow at least 6 in. (15.2 cm) of clearance on each side of the chassis. Leave adequate space at the front of the switch for service personnel to remove and install hardware components. NEBS Copyright © 2012, Juniper Networks, Inc. -
Page 128: Figure 51: Clearance Requirements For Airflow And Hardware Maintenance For
Clearance Requirements for Airflow and Hardware Maintenance for a QFX3500 Device When planning the site for installing a QFX3500 device, you must allow sufficient clearance around the installed device (see Figure 52 on page 103). Copyright © 2012, Juniper Networks, Inc. -
Page 129: Figure 52: Clearance Requirements For Airflow And Hardware Maintenance For
Related Rack Requirements for a QFX3500 Device on page 96 Documentation Cabinet Requirements for a QFX3500 Device on page 99 General Site Guidelines on page 87 Rack-Mounting and Cabinet-Mounting Warnings on page 179 Copyright © 2012, Juniper Networks, Inc. - Page 130 QFX3000 Hardware Documentation Copyright © 2012, Juniper Networks, Inc.
-
Page 131: Port And Interface Specifications
USB flash drives. CAUTION: Remove the USB flash drive before upgrading Junos OS or rebooting the QFX Series device. Failure to do so could expose your device to unpredictable behavior. Copyright © 2012, Juniper Networks, Inc. -
Page 132: Console Port Connector Pinouts For The Qfx Series
Table 29 on page 106 provides the pinout information for the RJ-45 console connector. An RJ-45 cable and RJ-45 to DB-9 adapter are supplied with the QFX Series device. NOTE: If your laptop or PC does not have a DB-9 male connector pin and you... -
Page 133: Management Port Connector Pinouts For The Qfx Series
Signal Description CTS Input Clear to send Related Connecting a QFX Series Device to a Management Console on page 285 Documentation Management Port Connector Pinouts for the QFX Series The 1000BASE-T RJ-45 management ports (labeled ) in QFX3500 devices use an RJ-45 connector to connect to either the control plane and management network in a QFabric system, or a management device for out-of-band management if you are using the QFX3500 as a standalone switch. -
Page 134: Ports
. We recommend using only the top row of access ports for copper transceivers. NOTE: Use only transceivers purchased from Juniper Networks for your QFX Series device. The optical transceivers installed in QFX3500 devices support digital optical monitoring (DOM): you can view the diagnostic details for these transceivers by issuing the operational... - Page 135 . The command does not give any show interfaces diagnostics optics output for copper transceivers or transceivers not purchased from Juniper Networks. The three tables in this topic describe the optical interface support over single-mode fiber-optic (SMF) and multimode fiber-optic (MMF) cables and copper interface support...
-
Page 136: Table 32: Copper Interface Support And Optical Interface Support For Gigabit Ethernet Sfp Transceivers In Qfx3500 Devices
Minimum receiver sensitivity – Maximum input power – DOM support Not available Software required Junos OS Release 11.1 or later Fiber type Copper Core/cladding size – Modal bandwidth – Distance 100 m (328 ft) Copyright © 2012, Juniper Networks, Inc. - Page 137 50/125 µm 50/125 µm Fiber grade FDDI – Modal bandwidth 160 MHz/km 200 MHz/km 400 MHz/km 500 MHz/km Distance 220 m (721 ft) 275 m (902 ft) 500 m 550 m (1640 ft) (1804 ft) Copyright © 2012, Juniper Networks, Inc.
- Page 138 Minimum receiver sensitivity –25 dBm Maximum input power –3 dBm DOM support Available Software required Junos OS Release 11.1 or later Fiber type Core/cladding size 9/125 µm Modal bandwidth – Distance 10 km (6.2 miles) Copyright © 2012, Juniper Networks, Inc.
-
Page 139: Table 33: Optical Interface Support For Fibre Channel Sfp+ Transceivers In
4.25 Gbps: 70 m 4.25 Gbps: 150 m 4.25 Gbps: 380 m (229 ft) (492 ft) (1246 ft) 8.5 Gbps: 21 m (68 8.5 Gbps: 50 m 8.5 Gbps: 150 m (164 ft) (492 ft) Copyright © 2012, Juniper Networks, Inc. -
Page 140: Table 34: Optical Interface Support For 10-Gigabit Ethernet Sfp+ Transceivers
Fiber type Core/cladding size 62.5/125 µm 50/125 µm 50/125 µm Fiber grade (OM4 compatible) Modal bandwidth 200 MHz/km 500 MHz/km 1500 MHz/km Distance 10 m (32 ft) 30 m (98 ft) 100 m (328 ft) Copyright © 2012, Juniper Networks, Inc. - Page 141 (OM4 compatible) Modal bandwidth 160 MHz/km 200 MHz/km 400 MHz/km 500 MHz/km 1500 MHz/km Distance 26 m (85 ft) 33 m (108 ft) 66 m (216 ft) 82 m (269 ft) 300 m (984 ft) Copyright © 2012, Juniper Networks, Inc.
- Page 142 Minimum receiver –18 dBm sensitivity Maximum input power 0.5 dBm DOM support Available Software required Junos OS Release 11.1 or later Fiber type Core/cladding size 9/125 µm Modal bandwidth – Distance 10 km (6.2 miles) Copyright © 2012, Juniper Networks, Inc.
-
Page 143: Ports
Rear Panel of a QFX3500 Device on page 66 Documentation Installing a Transceiver in a QFX Series Device on page 374 Removing a Transceiver from a QFX Series Device on page 373 Interface Specifications for SFP+ DAC Cables for QFX3500 Device Access Ports... -
Page 144: Table 35: Third-Party Dac Cable Support
36 on page 119 describes the passive DAC cable specifications. Active DAC cables have signal amplification and equalization built into the cable assembly. Table 37 on page 122 describes the active DAC cable specifications. Copyright © 2012, Juniper Networks, Inc. -
Page 145: Table 36: Sfp+ Passive Direct Attach Copper Cable Specifications
Minimum cable bend radius 1 in. (2.54 cm) Cable characteristic impedance 100 ohms Crosstalk between pairs 1% maximum Time delay 4.3 nsec/m Length 1 m (3.3 ft) Software required Junos OS Release 11.1 or later Copyright © 2012, Juniper Networks, Inc. - Page 146 Minimum cable bend radius 1 in. (2.54 cm) Cable characteristic impedance 100 ohms Crosstalk between pairs 1% maximum Time delay 4.3 nsec/m Length 3 m (9.9 ft) Software required Junos OS Release 11.1 or later Copyright © 2012, Juniper Networks, Inc.
- Page 147 Minimum cable bend radius 1.25 in. (3.2 cm) Cable characteristic impedance 100 ohms Crosstalk between pairs 2% maximum Time delay 4.3 nsec/m Length 5 m (16.4 ft) Software required Junos OS Release 11.1 or later Copyright © 2012, Juniper Networks, Inc.
-
Page 148: Table 37: Sfp+ Active Direct Attach Copper Cable Specifications
Wire AWG 30 AWG Minimum cable bend radius 1 in. (2.54 cm) Cable characteristic impedance 100 ohms Crosstalk between pairs 2% maximum Length 3 m (9.9 ft) Software required Junos OS Release 11.1 or later Copyright © 2012, Juniper Networks, Inc. - Page 149 Wire AWG 30 AWG Minimum cable bend radius 1 in. (2.54 cm) Cable characteristic impedance 100 ohms Crosstalk between pairs 2% maximum Length 7 m (23 ft) Software required Junos OS Release 11.3 or later Copyright © 2012, Juniper Networks, Inc.
-
Page 150: System
Removing a Transceiver from a QFX Series Device on page 373 Interface Specifications for Control Plane Connections for the QFabric System The QFX Series devices support using SFP transceivers to interconnect the QFabric system control plane. The SFP transceivers are installed in ports on the network modules in the QFX3100 Director device, the Control Boards in the QFX3008 Interconnect device, and the management board in the QFX3500 Node device. -
Page 151: Table 38: Interface Support For Gigabit Ethernet Sfp Transceivers For Control
Director device. For 1000BASE-T connections to the QFX3100 Director device, ensure that you have installed RJ-45 network modules. NOTE: Use only transceivers purchased from Juniper Networks for your QFX Series device. Table 38 on page 125 describes interface support for Gigabit Ethernet SFP transceivers. - Page 152 –3 dBm Minimum receiver sensitivity –21 dBm Maximum input power 0 dBm DOM support Available Software Required Junos OS for QFX Series, Release 11.3 or later Fiber type Core/cladding size 62.5/125 µm 62.5/125 µm 50/125 µm 50/125 µm Fiber grade FDDI –...
-
Page 153: Interface Specifications For Data Plane Connections For The Qfabric System
– Distance 10 km (6.2 miles) Related Installing a Transceiver in a QFX Series Device on page 374 Documentation Removing a Transceiver from a QFX Series Device on page 373 Interface Specifications for Data Plane Connections for the QFabric System QFX3000 QFabric system data plane connections use QSFP+ transceivers. -
Page 154: Table 39: Interface Support For 40-Gigabit Ethernet Qsfp+ Transceivers In Qfx3000 Qfabric Systems
16-Port QSFP+ Front Cards in a QFX3008-I Interconnect Device on page 48 Documentation Rear Panel of a QFX3500 Device on page 66 Installing a Transceiver in a QFX Series Device on page 374 Removing a Transceiver from a QFX Series Device on page 373 Copyright © 2012, Juniper Networks, Inc. -
Page 155: Cable Specifications
Understanding QFX Series Fiber-Optic Cable Signal Loss, Attenuation, and Dispersion on page 130 Calculating the Fiber-Optic Cable Power Budget for a QFX Series Device on page 132 Calculating the Fiber-Optic Cable Power Margin for a QFX Series Device on page 132... -
Page 156: Series
Specifications for SFP Transceivers for QFX3500 Device Management Ports for more information about the fiber-optic cables required for use with these transceivers. Table 41: Cable Specifications for Console and Management Connections for the QFX Series Port on QFX Device Series Device... -
Page 157: Attenuation And Dispersion In Fiber-Optic Cable
For information about the maximum transmission distance and supported wavelength range for the types of single-mode and multimode fiber-optic cables that are connected to QFX Series devices, see “Interface Specifications for Data Plane Connections for the QFabric System” on page 127 “Interface Specifications for SFP+ Transceivers for... -
Page 158: Calculating The Fiber-Optic Cable Power Budget For A Qfx Series Device
QFX3000 Hardware Documentation Related Calculating the Fiber-Optic Cable Power Budget for a QFX Series Device on page 132 Documentation Calculating the Fiber-Optic Cable Power Margin for a QFX Series Device on page 132 Calculating the Fiber-Optic Cable Power Budget for a QFX Series Device Calculate the link's power budget when planning fiber-optic cable layout and distances to ensure that fiber-optic connections have sufficient power for correct operation. -
Page 159: Table 42: Estimated Values For Factors Causing Link Loss
Before you begin to calculate the power margin: Calculate the power budget. See “Calculating the Fiber-Optic Cable Power Budget for a QFX Series Device” on page 132. To calculate the worst-case estimate for the power margin ( ) for the link:... - Page 160 Also, the power margin value does not exceed the maximum receiver input power. Refer to the specifications for your receiver to find the maximum receiver input power. Related Understanding QFX Series Fiber-Optic Cable Signal Loss, Attenuation, and Dispersion Documentation on page 130 Copyright © 2012, Juniper Networks, Inc.
-
Page 161: Planning Qfx3100 Power Requirements
60320. The plug at the male end of the power cord fits into the power source outlet that is standard for your geographical location. CAUTION: The supplied AC power cord for the switches is intended for use with the QFX3100 Director device only and not for any other use. Copyright © 2012, Juniper Networks, Inc. -
Page 162: Figure 53: Ac Plug Types
AC Power Supply in a QFX3100 Director Device on page 30 Documentation General Safety Guidelines and Warnings on page 161 General Electrical Safety Guidelines and Warnings on page 191 Prevention of Electrostatic Discharge Damage on page 192 Copyright © 2012, Juniper Networks, Inc. -
Page 163: Planning Qfx3008-I Power Requirements
AC input voltage 200–240 VAC AC input line frequency 50–60 Hz AC system current rating 16 A per appliance inlet (48 A per wiring tray) AC system input power 9000 W (3000 W per power supply) Copyright © 2012, Juniper Networks, Inc. -
Page 164: Ac Power Specifications For A Qfx3008-I Interconnect Device With Three-Phase
Table 47: AC Power Specifications for a QFX3008-I Interconnect Device with Three-Phase Wye Wiring Trays Item Specifications AC input voltage 380 VAC AC input line frequency 50–60 Hz AC system current rating 24 A AC system input power 13,333 W Copyright © 2012, Juniper Networks, Inc. -
Page 165: Ac Power Specifications For A Qfx3008-I Interconnect Device With Three-Phase
It has a separate protective earthing terminal provided on the chassis in addition to the grounding pin of the power supply cord. This separate protective earthing terminal must be permanently connected to earth. Copyright © 2012, Juniper Networks, Inc. -
Page 166: Table 49: Ac Power Cord Specifications For A Single-Phase Wiring Tray
250 VAC, 16 A, 50 Hz CEI 23-16 Type I/3/16 Japan 250 VAC, 16 A, 50 Hz NEMA 6-20 Type N6/20 NEMA L6-20 Type NEMA Locking 125VAC, 15A, 50 Hz NEMA 5-20 Type N5/20 Copyright © 2012, Juniper Networks, Inc. -
Page 167: Ac Power Cord Specifications For A Qfx3008-I Interconnect Device With Three-Phase Delta Wiring Trays
There are two types of three-phase wiring trays: delta (three-wire) and wye (four-wire). The delta AC terminal block consists of three input terminals labeled , and , from top to bottom in the common three-phase naming convention. Copyright © 2012, Juniper Networks, Inc. -
Page 168: Ac Power Cord Specifications For A Qfx3008-I Interconnect Device With Three-Phase Wye Wiring Trays
It has a separate protective earthing terminal provided on the chassis in addition to the grounding pin of the power supply cord. This separate protective earthing terminal must be permanently connected to earth. Copyright © 2012, Juniper Networks, Inc. -
Page 169: Calculating Power Requirements For A Qfx3008-I Interconnect Device
Wiring Trays on page 250 Calculating Power Requirements for a QFX3008-I Interconnect Device Use the information in this topic to calculate power consumption, system thermal output, and number of power supplies required for different QFX3008-I Interconnect device configurations. Copyright © 2012, Juniper Networks, Inc. -
Page 170: Power Consumption Of Different Qfx3008-I Interconnect Device Configurations
Compute the maximum system power consumption of a fully loaded configuration. See maximum system power consumption for a fully loaded configuration device in “Power Consumption of Different QFX3008-I Interconnect Device Configurations” on page 144. Copyright © 2012, Juniper Networks, Inc. - Page 171 Wiring Trays on page 137 AC Power Specifications for a QFX3008-I Interconnect Device with Three-Phase Delta Wiring Trays on page 138 AC Power Specifications for a QFX3008-I Interconnect Device with Three-Phase Wye Wiring Trays on page 138 Copyright © 2012, Juniper Networks, Inc.
- Page 172 QFX3000 Hardware Documentation Copyright © 2012, Juniper Networks, Inc.
-
Page 173: Planning Qfx35000 Power Requirements
General Electrical Safety Guidelines and Warnings on page 191 AC Power Cord Specifications for a QFX3500 Device Detachable AC power cords are supplied with the chassis. The coupler is type C13 as described by International Electrotechnical Commission (IEC) standard 60320. The plug Copyright © 2012, Juniper Networks, Inc. -
Page 174: Figure 54: Ac Plug Types
250 VAC, 10 A, 50 Hz BS 1363A Figure 54 on page 148 illustrates the plug on the power cord for some of the countries or regions listed in Table 53 on page 148. Figure 54: AC Plug Types Copyright © 2012, Juniper Networks, Inc. -
Page 175: Dc Power Specifications For A Qfx3500 Device
7 A maximum at nominal operating voltage (–48 VDC) Typical power consumption 250 W Maximum power consumption 385 W Related DC Power Supply for a QFX3500 Device on page 75 Documentation DC Power Supply LEDs on a QFX3500 Device on page 403 Copyright © 2012, Juniper Networks, Inc. - Page 176 QFX3000 Hardware Documentation Copyright © 2012, Juniper Networks, Inc.
-
Page 177: Compliance
CHAPTER 12 Compliance Agency Approvals for the QFX Series on page 151 Compliance Statements for EMC Requirements for the QFX Series on page 152 Declaration of Conformity for QFX Series Devices on page 156 Agency Approvals for the QFX Series... -
Page 178: Compliance Statements For Emc Requirements For The Qfx Series
EN 61000-4-6 Low Frequency Common Immunity EN 61000-4-11 Voltage Dips and Sags Related Compliance Statements for EMC Requirements for the QFX Series on page 152 Documentation Declaration of Conformity for QFX Series Devices on page 156 Compliance Statements for EMC Requirements for the QFX Series... -
Page 179: European Community
United States The QFX Series device has been tested and found to comply with the limits for a Class A digital device, pursuant to Part 15 of the FCC Rules. These limits are designed to provide Copyright © 2012, Juniper Networks, Inc. -
Page 180: Fcc Part 15 Statement
Connect the equipment into an outlet on a circuit different from that to which the receiver is connected. Consult the dealer or an experienced radio or TV technician for help. Nonregulatory Environmental Standards These QFX Series models are designed to be Network Equipment Building System (NEBS) compliant: QFX3500 QFX3008-I... - Page 181 Chapter 12: Compliance The equipment is suitable for installation in a central office (CO). Related Agency Approvals for the QFX Series on page 151 Documentation Declaration of Conformity for QFX Series Devices on page 156 Copyright © 2012, Juniper Networks, Inc.
-
Page 182: Declaration Of Conformity For Qfx Series Devices
QFX3000 Hardware Documentation Declaration of Conformity for QFX Series Devices Copyright © 2012, Juniper Networks, Inc. - Page 183 Chapter 12: Compliance Copyright © 2012, Juniper Networks, Inc.
- Page 184 QFX3000 Hardware Documentation Related Agency Approvals for the QFX Series on page 151 Documentation Compliance Statements for EMC Requirements for the QFX Series on page 152 Copyright © 2012, Juniper Networks, Inc.
- Page 185 PART 3 Safety General Safety Information on page 161 Radiation and Laser Warnings on page 167 Installation and Maintenance Safety Information on page 173 Power and Electrical Safety Information on page 191 Copyright © 2012, Juniper Networks, Inc.
- Page 186 QFX3000 Hardware Documentation Copyright © 2012, Juniper Networks, Inc.
-
Page 187: General Safety Information
EX Series Redundant Power System (RPS), and the XRE200 External Routing Engine. This topic also applies to hardware devices in the QFX Series. The following guidelines help ensure your safety and protect the device from damage. The list of guidelines might not address all potentially hazardous situations in your working environment, so be alert and exercise good judgment at all times. -
Page 188: Definitions Of Safety Warning Levels
This topic applies to hardware devices in the EX Series product family, which includes switches, the EX Series Redundant Power System (RPS), and the XRE200 External Routing Engine. This topic also applies to hardware devices in the QFX Series. The documentation uses the following levels of safety warnings (there are two “Warning” formats):... - Page 189 å unngå ulykker. Aviso Este símbolo de aviso indica perigo. Encontra-se numa situação que lhe poderá causar danos físicos. Antes de começar a trabalhar com qualquer equipamento, familiarize-se com os perigos relacionados com circuitos Copyright © 2012, Juniper Networks, Inc.
-
Page 190: Fire Safety Requirements
Laser and LED Safety Guidelines and Warnings for EX Series Switches Warning Statement for Norway and Sweden on page 166 Laser and LED Safety Guidelines and Warnings for the QFX Series on page 168 Fire Safety Requirements This topic applies to hardware devices in the EX Series product family, which includes switches, the EX Series Redundant Power System (RPS), and the XRE200 External Routing Engine. -
Page 191: Qualified Personnel Warning
To keep warranties effective, do not use a dry chemical fire extinguisher to control a fire at or near a Juniper Networks switch or other network device provided by Juniper. If a dry chemical fire extinguisher is used, the unit is no longer eligible for coverage under a service agreement. -
Page 192: Warning Statement For Norway And Sweden
This topic applies to hardware devices in the EX Series product family, which includes switches, the EX Series Redundant Power System (RPS), and the XRE200 External Routing Engine. This topic also applies to hardware devices in the QFX Series. WARNING: The equipment must be connected to an earthed mains socket-outlet. -
Page 193: Radiation And Laser Warnings
Radiation and Laser Warnings Radiation from Open Port Apertures Warning on page 167 Laser and LED Safety Guidelines and Warnings for the QFX Series on page 168 Radiation from Open Port Apertures Warning This topic applies to hardware devices in the EX Series product family, which includes switches, the EX Series Redundant Power System (RPS), and the XRE200 External Routing Engine. -
Page 194: Laser And Led Safety Guidelines And Warnings For The Qfx Series
Installation Instructions Warning on page 173 Grounded Equipment Warning on page 183 Laser and LED Safety Guidelines and Warnings for the QFX Series on page 168 Laser and LED Safety Guidelines and Warnings for the QFX Series QFX Series devices are equipped with laser transmitters: SFP and SFP+ transceivers are classified as Class 1 Laser Products (complies with 21 CFR 1040.10 and 1040.11 except for deviations pursuant to Laser Notice 50, dated July... -
Page 195: General Laser Safety Guidelines
Varning! Laserprodukter av Klass 1M (IEC). Class 1M Laser Radiation Warning WARNING: Class 1M laser radiation when open. Do not view directly with optical instruments. Class 1 Laser Product Warning WARNING: Class 1 laser product. Copyright © 2012, Juniper Networks, Inc. -
Page 196: Class 1 Led Product Warning
Do not stare into the laser beam or view it directly with optical instruments. Waarschuwing Niet in de straal staren of hem rechtstreeks bekijken met optische instrumenten. Varoitus Älä katso säteeseen äläkä tarkastele sitä suoraan optisen laitteen avulla. Copyright © 2012, Juniper Networks, Inc. -
Page 197: Unterminated Fiber-Optic Cable Warning
à une distance inférieure à 100 mm peut poser des risques pour les yeux. Warnung Eine unsichtbare Laserstrahlung kann vom Ende des nicht angeschlossenen Glasfaserkabels oder Steckers ausgestrahlt werden. Nicht in den Laserstrahl schauen oder diesen mit einem optischen Instrument direkt Copyright © 2012, Juniper Networks, Inc. - Page 198 (t.ex. lupper, förstoringsglas och mikroskop) från ett avstånd på 100 mm kan skada ögonen. Related General Safety Guidelines and Warnings on page 161 Documentation Radiation from Open Port Apertures Warning on page 167 Installation Instructions Warning on page 173 Grounded Equipment Warning on page 183 Copyright © 2012, Juniper Networks, Inc.
-
Page 199: Installation And Maintenance Safety Information
This topic applies to hardware devices in the EX Series product family, which includes switches, the EX Series Redundant Power System (RPS), and the XRE200 External Routing Engine. This topic also applies to hardware devices in the QFX Series. WARNING: Read the installation instructions before you connect the device to a power source. - Page 200 General Safety Guidelines and Warnings on page 161 Documentation Laser and LED Safety Guidelines and Warnings for EX Series Switches Laser and LED Safety Guidelines and Warnings for the QFX Series on page 168 Grounded Equipment Warning on page 183 Connecting AC Power to an EX2200 Switch...
-
Page 201: Chassis Lifting Guidelines For A Qfx3100 Director Device
The weight of an empty QFX3008-I Interconnect device and midplane is approximately 205 lb (93 kg). WARNING: Because of the QFX3008-I Interconnect device size and weight, we require the use of a mechanical lift to install the QFX3008-I Interconnect Copyright © 2012, Juniper Networks, Inc. -
Page 202: Chassis Lifting Guidelines For A Qfx3500 Device
Balance the load evenly and be sure that your footing is solid. Related General Safety Guidelines and Warnings on page 161 Documentation Installation Instructions Warning on page 173 Mounting a QFX3500 Device in a Rack or Cabinet on page 261 Copyright © 2012, Juniper Networks, Inc. -
Page 203: Restricted Access Warning
Uma área de acesso restrito é uma área à qual apenas tem acesso o pessoal de serviço autorizado, que possua uma ferramenta, chave e fechadura especial, ou qualquer outra forma de segurança. Esta área é controlada pela autoridade responsável pelo local. Copyright © 2012, Juniper Networks, Inc. -
Page 204: Ramp Warning
This topic applies to hardware devices in the EX Series product family, which includes switches, the EX Series Redundant Power System (RPS), and the XRE200 External Routing Engine. This topic also applies to hardware devices in the QFX Series. WARNING: When installing the device, do not use a ramp inclined at more than 10 degrees. -
Page 205: Rack-Mounting And Cabinet-Mounting Warnings
EX Series Redundant Power System (RPS), and the XRE200 External Routing Engine. This topic also applies to hardware devices in the QFX Series. Ensure that the rack or cabinet in which the device is installed is evenly and securely supported. - Page 206 Les directives ci-dessous sont destinées à assurer la protection du personnel: Le rack sur lequel est monté le Juniper Networks switch doit être fixé à la structure du bâtiment. Si cette unité constitue la seule unité montée en casier, elle doit être placée dans le bas.
- Page 207 Le seguenti direttive vengono fornite per garantire la sicurezza personale: Il Juniper Networks switch deve essere installato in un telaio, il quale deve essere fissato alla struttura dell'edificio. Questa unità deve venire montata sul fondo del supporto, se si tratta dell'unica unità...
- Page 208 Para garantizar su seguridad, proceda según las siguientes instrucciones: El Juniper Networks switch debe instalarse en un bastidor fijado a la estructura del edificio. Colocar el equipo en la parte inferior del bastidor, cuando sea la única unidad en el mismo.
-
Page 209: Grounded Equipment Warning
This topic applies to hardware devices in the EX Series product family, which includes switches, the EX Series Redundant Power System (RPS), and the XRE200 External Routing Engine. This topic also applies to hardware devices in the QFX Series. WARNING: The device is intended to be grounded. During normal use, ensure that you have connected earth ground to the chassis. -
Page 210: Maintenance And Operational Safety Guidelines And Warnings
This topic applies to hardware devices in the EX Series product family, which includes switches, the EX Series Redundant Power System (RPS), and the XRE200 External Routing Engine. This topic also applies to hardware devices in the QFX Series. While performing the maintenance activities for devices, observe the following guidelines and warnings:... -
Page 211: Jewelry Removal Warning
Warnung Vor der Arbeit an Geräten, die an das Netz angeschlossen sind, jeglichen Schmuck (einschließlich Ringe, Ketten und Uhren) abnehmen. Metallgegenstände erhitzen sich, wenn sie an das Netz und die Erde angeschlossen werden, und können schwere Verbrennungen verursachen oder an die Anschlußklemmen angeschweißt werden. Copyright © 2012, Juniper Networks, Inc. -
Page 212: Lightning Activity Warning
Warnung Arbeiten Sie nicht am System und schließen Sie keine Kabel an bzw. trennen Sie keine ab, wenn es gewittert. Avvertenza Non lavorare sul sistema o collegare oppure scollegare i cavi durante un temporale con fulmini. Copyright © 2012, Juniper Networks, Inc. -
Page 213: Operating Temperature Warning
104° F (40° C) for EX6200 switches, EX8208 switches, EX8216 switches, QFX Series devices, and XRE200 External Routing Engines and 113° F (45° C) for EX2200, EX3300, EX3200, EX4200, and EX4500 switches. To prevent airflow restriction, allow at least 6 in. -
Page 214: Product Disposal Warning
15,2 cm à volta das aberturas de ventilação. ¡Atención! Para impedir que un encaminador de la serie Juniper Networks switch se recaliente, no lo haga funcionar en un área en la que se supere la temperatura ambiente máxima recomendada de 40°... - Page 215 Laser and LED Safety Guidelines and Warnings for EX Series Switches Installation Instructions Warning on page 173 Grounded Equipment Warning on page 183 Laser and LED Safety Guidelines and Warnings for the QFX Series on page 168 Copyright © 2012, Juniper Networks, Inc.
- Page 216 QFX3000 Hardware Documentation Copyright © 2012, Juniper Networks, Inc.
-
Page 217: Power And Electrical Safety Information
This topic applies to hardware devices in the EX Series product family, which includes switches, the EX Series Redundant Power System (RPS), and the XRE200 External Routing Engine. This topic also applies to hardware devices in the QFX Series. WARNING: Certain ports on the device are designed for use as intrabuilding... -
Page 218: Prevention Of Electrostatic Discharge Damage
DC Power Electrical Safety Guidelines on page 197 Prevention of Electrostatic Discharge Damage This topic applies to hardware devices in the EX Series product family, which includes switches, the EX Series Redundant Power System (RPS), and the XRE200 External Routing Engine. Copyright © 2012, Juniper Networks, Inc. -
Page 219: Figure 55: Place A Component Into An Antistatic Bag
Chapter 16: Power and Electrical Safety Information This topic also applies to hardware devices in the QFX Series. Device components that are shipped in antistatic bags are sensitive to damage from static electricity. Some components can be impaired by voltages as low as 30 V. You can easily generate potentially damaging static voltages whenever you handle plastic or foam packing material or if you move components across plastic or carpets. -
Page 220: Ac Power Electrical Safety Guidelines
This topic applies to hardware devices in the EX Series product family, which includes switches, the EX Series Redundant Power System (RPS), and the XRE200 External Routing Engine. This topic also applies to hardware devices in the QFX Series. CAUTION: For devices with AC power supplies, an external surge protective device (SPD) must be used at the AC power source. - Page 221 Connecting AC Power to a QFX3008-I Interconnect Device with Three-Phase Delta Wiring Trays on page 246 Connecting AC Power to a QFX3008-I Interconnect Device with Three-Phase Wye Wiring Trays on page 250 Connecting AC Power to a QFX3500 Device on page 265 Copyright © 2012, Juniper Networks, Inc.
-
Page 222: Ac Power Disconnection Warning
This topic applies to hardware devices in the EX Series product family, which includes switches, the EX Series Redundant Power System (RPS), and the XRE200 External Routing Engine. This topic also applies to hardware devices in the QFX Series. WARNING: Before working on the switch or near power supplies, unplug all the power cords from an AC switch. -
Page 223: Dc Power Electrical Safety Guidelines
This topic applies to hardware devices in the EX Series product family, which includes switches and the XRE200 External Routing Engine. This topic also applies to hardware devices in the QFX Series. A DC-powered device is equipped with a DC terminal block that is rated for the power requirements of a maximally configured device. -
Page 224: Dc Power Disconnection Warning
This topic applies to hardware devices in the EX Series product family, which includes switches and the XRE200 External Routing Engine. This topic also applies to hardware devices in the QFX Series. WARNING: Before performing any of the DC power procedures, ensure that power is removed from the DC circuit. - Page 225 Varning! Innan du utför någon av följande procedurer måste du kontrollera att strömförsörjningen till likströmskretsen är bruten. Kontrollera att all strömförsörjning är BRUTEN genom att slå AV det överspänningsskydd som skyddar likströmskretsen och tejpa fast överspänningsskyddets omkopplare i FRÅN-läget. Copyright © 2012, Juniper Networks, Inc.
-
Page 226: Dc Power Grounding Requirements And Warning
This topic applies to hardware devices in the EX Series product family, which includes switches and the XRE200 External Routing Engine. This topic also applies to hardware devices in the QFX Series. An insulated grounding conductor that is identical in size to the grounded and ungrounded branch circuit supply conductors but is identifiable by green and yellow stripes is installed as part of the branch circuit that supplies the device. -
Page 227: Dc Power Wiring Sequence Warning
This topic applies to hardware devices in the EX Series product family, which includes switches and the XRE200 External Routing Engine. This topic also applies to hardware devices in the QFX Series. WARNING: Wire the DC power supply using the appropriate lugs. When connecting power, the proper wiring sequence is ground to ground, +RTN to +RTN, then –48 V to –48 V. -
Page 228: Dc Power Wiring Terminations Warning
DC Power Wiring Terminations Warning on page 202 DC Power Wiring Terminations Warning This topic applies to hardware devices in the EX Series product family, which includes switches and the XRE200 External Routing Engine. Copyright © 2012, Juniper Networks, Inc. - Page 229 Chapter 16: Power and Electrical Safety Information This topic also applies to hardware devices in the QFX Series. WARNING: When stranded wiring is required, use approved wiring terminations, such as closed-loop or spade-type with upturned lugs. These terminations must be the appropriate size for the wires and must clamp both the insulation and conductor.
-
Page 230: Multiple Power Supplies Disconnection Warning
This topic applies to hardware devices in the EX Series product family, which includes switches, the EX Series Redundant Power System (RPS), and the XRE200 External Routing Engine. This topic also applies to hardware devices in the QFX Series. WARNING: For a device that has more than one power supply connection, you must ensure that all power connections are fully disconnected so that power to the device is completely removed. -
Page 231: Action To Take After An Electrical Accident
EX Series Redundant Power System (RPS), and the XRE200 External Routing Engine. This topic also applies to hardware devices in the QFX Series. If an electrical accident results in an injury, take the following actions in this order: Use caution. - Page 232 General Safety Guidelines and Warnings on page 161 Documentation General Electrical Safety Guidelines and Warnings on page 191 AC Power Electrical Safety Guidelines on page 194 DC Power Electrical Safety Guidelines on page 197 Copyright © 2012, Juniper Networks, Inc.
- Page 233 Installing a QFX3008-I Interconnect Device on page 223 Installing QFX3008-I Optional Components on page 255 Installing a QFX3500 Node Device on page 259 Cabling the QFabric Switch on page 271 Performing the Initial Configuration on page 287 Copyright © 2012, Juniper Networks, Inc.
- Page 234 QFX3000 Hardware Documentation Copyright © 2012, Juniper Networks, Inc.
-
Page 235: Before You Begin
Site Preparation Checklist for a QFX3500 Device on page 86 Site Preparation Checklist for a QFX3008-I Interconnect Device on page 84 Site Preparation Checklist for a QFX3100 Director Device on page 83 Site Preparation Checklist for EX4200 Switches Copyright © 2012, Juniper Networks, Inc. - Page 236 Interconnect the two QFX3100 Director devices for control plane redundancy. See “Connecting QFX3100 Director Devices in a Director Group” on page 274. Connect each QFX Series device to each Virtual Chassis for control plane interconnection. See: Connecting QFX3100 Director Devices to the Control Plane Network on page 275...
- Page 237 Chapter 17: Before You Begin Related QFabric Switch Initial and Default Configuration Information Documentation Copyright © 2012, Juniper Networks, Inc.
- Page 238 QFX3000 Hardware Documentation Copyright © 2012, Juniper Networks, Inc.
-
Page 239: Installing A Qfx3100 Director Device
Device on page 99 Unpacking a QFX3100 Director Device The QFX3100 Director devices are shipped in a cardboard carton, secured with foam packing material. The carton also contains an accessory box and quick start instructions. Copyright © 2012, Juniper Networks, Inc. -
Page 240: Figure 56: Unpacking A Qfx3100 Director Device
Save the shipping carton and packing materials in case you need to move or ship the device later. Figure 56: Unpacking a QFX3100 Director Device Table 55: Inventory of Components Provided with a QFX3100 Director Device Component Quantity QFX3100 Director device Copyright © 2012, Juniper Networks, Inc. -
Page 241: Mounting A Qfx3100 Director Device On Two Posts In A Rack Or Cabinet
Ensure that you have the following parts and tools available: Electrostatic discharge (ESD) grounding strap (provided) Phillips (+) screwdriver, number 2 Four mid-mount mounting brackets and mounting screws (provided) Screws to secure the chassis to the rack (not provided) Copyright © 2012, Juniper Networks, Inc. -
Page 242: Figure 57: Mounting The Qfx3100 Director Device On Two Posts In A Rack
Related Rack-Mounting and Cabinet-Mounting Warnings on page 179 Documentation Installing and Connecting a QFX3100 Director Device on page 213 Connecting AC Power to a QFX3100 Director Device on page 218 Copyright © 2012, Juniper Networks, Inc. -
Page 243: Mounting A Qfx3100 Director Device On Four Posts In A Rack Or Cabinet
Have one person grasp both sides of the device, lift it, and position it in the rack, aligning the bracket holes with the holes in the rack. Copyright © 2012, Juniper Networks, Inc. -
Page 244: Connecting Ac Power To A Qfx3100 Director Device
(FRU) located on the far right side of the rear panel. You can remove and replace a single power supply without powering off the QFX3100 Director device or disrupting QFX3100 Director device functions. Before you begin connecting AC power to a QFX3100 Director device: Copyright © 2012, Juniper Networks, Inc. - Page 245 Pressing the power switch for 4 seconds or longer causes an abrupt power shutdown. Verify that the power LED on the power supply is lit and is on steadily. Copyright © 2012, Juniper Networks, Inc.
-
Page 246: Powering On A Qfx3100 Director Device
Director Group 0 or role, the second device to be powered on assumes the Director Group 1 or role. To power on the QFX3100 Director device: Copyright © 2012, Juniper Networks, Inc. - Page 247 Related Powering Off a QFX3100 Director Device on page 295 Documentation AC Power Supply in a QFX3100 Director Device on page 30 AC Power Cord Specifications for a QFX3100 Director Device on page 135 Copyright © 2012, Juniper Networks, Inc.
- Page 248 QFX3000 Hardware Documentation Copyright © 2012, Juniper Networks, Inc.
-
Page 249: Installing A Qfx3008-I Interconnect Device
Install the mounting hardware on your four-post or two-post rack or cabinet by following the instructions in “Installing QFX3008-I Interconnect Device Mounting Hardware on Four-Post Racks or Cabinets” on page 227 “Installing QFX3008-I Interconnect Device Mounting Hardware on Two-Post Racks” on page 231. Copyright © 2012, Juniper Networks, Inc. -
Page 250: Unpacking A Qfx3008-I Interconnect Device
The device ships in a cardboard box that has a two-layer wooden pallet base with foam cushioning between the layers. The device chassis is bolted to the pallet base. Quick Start installation instructions and a cardboard accessory box are also included in the shipping crate. Copyright © 2012, Juniper Networks, Inc. -
Page 251: Parts Inventory (Packing List) For A Qfx3008-I Interconnect Device
If any part on the packing list is missing, contact your customer service representative or contact Juniper Networks customer care from within the U.S. or Canada by telephone at 1-800-638-8296. For international-dial or direct-dial options in countries without toll-free numbers, see http://www.juniper.net/support/requesting-support.html... -
Page 252: Table 57: Qfx3008-I Interconnect Device Accessory Kit Part Contents
Electrostatic discharge (ESD) grounding strap RJ-45 cable and RJ-45 to DB-9 adapter for console port connection Table 58: QFX3008-I Interconnect Device Accessory Kit Document Contents Documents QFX3008-I Interconnect Device Quick Start End User License Agreement (EULA) Copyright © 2012, Juniper Networks, Inc. -
Page 253: Installing Qfx3008-I Interconnect Device Mounting Hardware On Four-Post Racks Or Cabinets
Cabinets Before you install the QFX3008-I Interconnect device in a four-post rack or cabinet, you must first install mounting hardware and remove the center-mounting brackets from the chassis (see Figure 60 on page 228). Copyright © 2012, Juniper Networks, Inc. -
Page 254: Figure 60: Installing The Mounting Hardware For A Four-Post Rack Or Cabinet
Spacer Small Hole Distance Above U Division Shelf Bars Shelf 29.51 in. (74.9 cm) 16.86 U 24.26 in. (61.6 cm) 13.86 U 19.01 in. (48.3 cm) 10.86 U 17.26 in. (43.8 cm) 9.86 U Copyright © 2012, Juniper Networks, Inc. -
Page 255: Installing Cage Nuts For Qfx3008-I Interconnect Device Four-Post Rack Or Cabinet Mounting
Installing the Small Mounting Shelf for QFX3008-I Interconnect Device Four-Post Rack or Cabinet Mounting To mount the chassis on a four-post rack or cabinet, you must first install the mounting shelves and spacer bars on the rack or cabinet. Copyright © 2012, Juniper Networks, Inc. -
Page 256: Installing The Large Mounting Shelf And Spacer Bars For Qfx3008-I Interconnect Device Four-Post Rack Or Cabinet Mounting
The device is shipped with each spacer bar attached to the rear of each front-mounting flange. Remove each spacer bar by removing the seven screws that fasten the spacer bar to the front-mounting bracket. Copyright © 2012, Juniper Networks, Inc. -
Page 257: Removing The Adjustable Center-Mounting Brackets For Qfx3008-I Interconnect Device Four-Post Rack Or Cabinet Mounting
Interconnect devices on a 42 U rack provided that the racks meet the strength requirements to support the combined weight of the devices. If you are mounting two QFX3008-I Interconnect devices on a rack, mount the first device on the bottom of the rack. Copyright © 2012, Juniper Networks, Inc. -
Page 258: Racks
17.26 in. (43.8 cm) 9.86 U 15.51 in. (39.4 cm) 8.86 U 13.76 in. (34.9 cm) 7.86 U 12.01 in. (30.5 cm) 6.86 U 10.26 in. (26.0 cm) 5.86 U 8.51 in. (21.6 cm) 4.86 U Copyright © 2012, Juniper Networks, Inc. -
Page 259: Installing Cage Nuts For Qfx3008-I Interconnect Device Two-Post Rack
Table 61 on page 232 the large shelf. Installing the Small Mounting Shelf for QFX3008-I Interconnect Device Two-Post Rack Mounting To mount the chassis on a two-post rack, you must first install the mounting shelves on the rack. Copyright © 2012, Juniper Networks, Inc. -
Page 260: Installing The Large Mounting Shelf For Qfx3008-I Interconnect Device Two-Post Rack Mounting
(The remainder of this topic uses “rack” to mean “rack or cabinet.”) The chassis also comes with small and large mounting shelves to support it in the rack, and spacer bars to accommodate the installation of the mounting shelves in four-post racks. Copyright © 2012, Juniper Networks, Inc. - Page 261 14 mounting screws appropriate for your rack if you are installing the device in a four-post rack 18 mounting screws appropriate for your rack if you are installing the device in a two-post rack Copyright © 2012, Juniper Networks, Inc.
- Page 262 After ensuring that the device is aligned properly, tighten the screws. Copyright © 2012, Juniper Networks, Inc.
-
Page 263: Connecting Earth Ground To A Qfx3008-I Interconnect Device
“AC Power Cord Specifications for a QFX3008-I Interconnect Device with Single-Phase Wiring Trays” on page 139, “AC Power Cord Specifications for a QFX3008-I Interconnect Device with Three-Phase Delta Wiring Trays” on page 141, “AC Power Cord Specifications Copyright © 2012, Juniper Networks, Inc. - Page 264 M6 screws, and the right pair is sized for UNC ¼-20 screws. Using the torque screwdriver, secure the grounding lug to the protective earthing terminal, first with the washers, then with the screws. Copyright © 2012, Juniper Networks, Inc.
-
Page 265: Connecting Ac Power To A Qfx3008-I Interconnect Device With Single-Phase
AC power outlet by using the AC power cord appropriate for your geographical location. See “AC Power Cord Specifications for a QFX3008-I Interconnect Device with Single-Phase Wiring Trays” on page 139. Copyright © 2012, Juniper Networks, Inc. - Page 266 Locate the power cord or cords shipped with the device; the cords have plugs appropriate for your geographical location. Insert the coupler end of the power cord into the AC appliance inlet on the wiring tray faceplate. See Figure 64 on page 241. Copyright © 2012, Juniper Networks, Inc.
-
Page 267: Preparing Delta And Wye Three-Phase Power Cords
Figure 68 on page 243 show the power cords installed on the wiring trays in the two different positions. Figure 69 on page 244 shows the wiring tray being installed in the chassis, using the flat connector. Copyright © 2012, Juniper Networks, Inc. -
Page 268: Figure 65: Assembling A Power Cord Using A 90° Connector
QFX3000 Hardware Documentation Figure 65: Assembling a Power Cord Using a 90° Connector Figure 66: Assembling a Power Cord Using a Flat Connector Copyright © 2012, Juniper Networks, Inc. -
Page 269: Figure 67: Wye Wiring Tray With A 90° Connector Installed
Chapter 19: Installing a QFX3008-I Interconnect Device Figure 67: Wye Wiring Tray with a 90° Connector Installed Figure 68: Delta Wiring Tray with a Flat Connector Installed Copyright © 2012, Juniper Networks, Inc. -
Page 270: Figure 69: Installing A Three-Phase Wiring Tray With A Power Cord Installed
“AC Power Cord Specifications for a QFX3008-I Interconnect Device with Three-Phase Delta Wiring Trays” on page 141 “AC Power Cord Specifications for a QFX3008-I Interconnect Device with Three-Phase Wye Wiring Trays” on page 142. Copyright © 2012, Juniper Networks, Inc. - Page 271 Insert the power cord in the wire strain relief by compressing the wire strain relief to enlarge the opening. Pull enough cord through the strain relief to allow easy wiring connections to the terminal block. Copyright © 2012, Juniper Networks, Inc.
-
Page 272: Delta Wiring Trays
A QFX3008-I Interconnect device receives additional grounding when you plug the power supply in the device into a grounded AC power outlet by using the AC power cord appropriate for your geographical location. See “AC Power Copyright © 2012, Juniper Networks, Inc. - Page 273 “Removing a Wiring Tray from a QFX3008-I Interconnect Device” on page 326. The power cord must be attached to the wiring tray as described in “Preparing Delta and Wye Three-Phase Power Cords” on page 241. Copyright © 2012, Juniper Networks, Inc.
- Page 274 Using a number 1 Phillips (+) screwdriver, loosen the four screws on the metal AC wiring compartment on the side of the wiring tray (see Figure 70 on page 249). Open the metal door of the wiring tray compartment. Copyright © 2012, Juniper Networks, Inc.
-
Page 275: Figure 70: Connecting Power To A Three-Phase Delta Ac Power Supply
Insert the wire labeled into the input terminal. Figure 70: Connecting Power to a Three-Phase Delta AC Power Supply NOTE: The color of each AC power wire might vary. Verify that the power cable connections are correct. Copyright © 2012, Juniper Networks, Inc. -
Page 276: Connecting Ac Power To A Qfx3008-I Interconnect Device With Three-Phase Wye Wiring Trays
Ensure that you understand how to prevent ESD damage. See “Prevention of Electrostatic Discharge Damage” on page 192. Ensure that a licensed electrician has prepared the power cords. See “Preparing Delta and Wye Three-Phase Power Cords” on page 241. Copyright © 2012, Juniper Networks, Inc. - Page 277 Using a number 1 Phillips (+) screwdriver, loosen the four screws on the metal AC wiring compartment on the side of the wiring tray (see Figure 71 on page 252). Open the metal door of the wiring tray compartment. Copyright © 2012, Juniper Networks, Inc.
-
Page 278: Figure 71: Connecting Power To The Three-Phase Wye Wiring Tray
Insert the wire labeled into the input terminal Figure 71: Connecting Power to the Three-Phase Wye Wiring Tray NOTE: The color of each AC power wire might vary. Verify that the power cable connections are correct. Copyright © 2012, Juniper Networks, Inc. -
Page 279: Powering On A Qfx3008-I Interconnect Device
Connecting AC Power to a QFX3008-I Interconnect Device with Three-Phase Delta Wiring Trays on page 246 Connecting AC Power to a QFX3008-I Interconnect Device with Three-Phase Wye Wiring Trays on page 250 Powering Off a QFX3008-I Interconnect Device on page 296 Copyright © 2012, Juniper Networks, Inc. - Page 280 QFX3000 Hardware Documentation Copyright © 2012, Juniper Networks, Inc.
-
Page 281: Installing Qfx3008-I Optional Components
Place the cable management system on the chassis, aligning the holes on its faceplate with the mounting holes on the chassis. Install each of the mounting screws, tightening them by turning them clockwise using the Phillips (+) screwdriver, number 1. Copyright © 2012, Juniper Networks, Inc. -
Page 282: Installing The Lockable Front Doors On A Qfx3008-I Interconnect Device
Phillips (+) screwdriver, number 1. Repeat Step through Step for the other door. NOTE: The doors must be in the open position to remove or install the bottom fan tray and front panel display. Copyright © 2012, Juniper Networks, Inc. -
Page 283: Figure 73: Installing The Lockable Front Doors On A Qfx3008-I Interconnect
Chapter 20: Installing QFX3008-I Optional Components Figure 73: Installing the Lockable Front Doors on a QFX3008-I Interconnect Device Copyright © 2012, Juniper Networks, Inc. - Page 284 QFX3000 Hardware Documentation Copyright © 2012, Juniper Networks, Inc.
-
Page 285: Installing A Qfx3500 Node Device
Related Rack Requirements for a QFX3500 Device on page 96 Documentation Cabinet Requirements for a QFX3500 Device on page 99 Clearance Requirements for Airflow and Hardware Maintenance for a QFX3500 Device on page 102 Copyright © 2012, Juniper Networks, Inc. -
Page 286: Unpacking A Qfx3500 Device
Chassis with management board, two fan trays, and one or two power supplies Rear installation blades RJ-45 cable and RJ-45 to DB-9 adapter SFP/SFP+ port dust covers QSFP+ port dust covers Electrostatic discharge (ESD) grounding strap Copyright © 2012, Juniper Networks, Inc. -
Page 287: Mounting A Qfx3500 Device In A Rack Or Cabinet
Mounting the chassis using only the front brackets will damage the chassis and can result in serious bodily injury. CAUTION: If you are installing the QFX3500 device above 60 in. (152.4 cm) from the floor, you must remove the power supplies, fan trays, and Copyright © 2012, Juniper Networks, Inc. -
Page 288: Figure 74: Installing An Installation Blade In A Rack
Figure 75 on page 263. TIP: If someone is assisting you, have one person stand at the rear of the rack where the installation blade is installed, to help guide the device onto the installation blade. Copyright © 2012, Juniper Networks, Inc. -
Page 289: Figure 75: Mounting The Qfx3500 Device On Four Posts In A Rack
Related Rack-Mounting and Cabinet-Mounting Warnings on page 179 Documentation Connecting AC Power to a QFX3500 Device on page 265 Configuring a QFX3500 Device Copyright © 2012, Juniper Networks, Inc. -
Page 290: Connecting Earth Ground To A Qfx3500 Device
AC power outlet by using an AC power cord appropriate for your geographical location. See “AC Power Cord Specifications for a QFX3500 Device” on page 147. To connect earth ground to a QFX3500 device: Copyright © 2012, Juniper Networks, Inc. -
Page 291: Connecting Ac Power To A Qfx3500 Device
Ensure that you have taken the necessary precautions to prevent electrostatic discharge (ESD) damage (see “Prevention of Electrostatic Discharge Damage” on page 192). Ensure that you have connected the device chassis to earth ground. Copyright © 2012, Juniper Networks, Inc. - Page 292 Insert the coupler end of the power cord into the AC power cord inlet on the AC power supply faceplate. Push the power cord retainer onto the power cord (see Figure 77 on page 267). Copyright © 2012, Juniper Networks, Inc.
-
Page 293: Connecting Dc Power To A Qfx3500 Device
The power supply in a QFX3500 device is a hot-removable and hot-insertable field-replaceable unit (FRU). You can remove and replace it without powering off the device or disrupting device functions. WARNING: DC-powered QFX3500 devices are intended for installation only in a restricted access location. Copyright © 2012, Juniper Networks, Inc. - Page 294 (+) and will be installed on the V+ (return) DC power input terminal. The cable with very high resistance (indicating an open circuit) to chassis ground is negative (–) and will be installed on the V– (input) DC power input terminal. Copyright © 2012, Juniper Networks, Inc.
- Page 295 Secure the ring lug of the positive (+) DC power source cable to the V+ terminal on the DC power supply. Secure the ring lug of the negative (–) DC power source cable to the V– terminal on the DC power supply. Copyright © 2012, Juniper Networks, Inc.
-
Page 296: Figure 78: Dc Power Supply Faceplate For A Qfx3500 Device
LEDs on the power supply are lit green and are on steadily. Related DC Power Supply for a QFX3500 Device on page 75 Documentation DC Power Supply LEDs on a QFX3500 Device on page 403 Copyright © 2012, Juniper Networks, Inc. -
Page 297: Cabling The Qfabric Switch
Interconnecting Two Virtual Chassis for QFabric System Control Plane Redundancy A QFX3000 QFabric system control plane and management network is formed by connecting the QFX series devices in your network to two Virtual Chassis composed of four EX4200 switches each. For redundancy and communication, you must connect the... -
Page 298: Table 63: Virtual Chassis-To-Virtual Chassis Control Plane Port Assignments
Table 63: Virtual Chassis-to-Virtual Chassis Control Plane Port Assignments Member 0 Member 1 Member 2 Member 3 Connect Connect Connect Connect xe-0/1/0 xe-0/1/0 xe-1/1/0 xe-1/1/0 xe-2/1/0 xe-2/1/0 xe-3/1/0 xe-3/1/0 Connect Connect Connect Connect xe-0/1/2 xe-0/1/2 xe-1/1/2 xe-1/1/2 xe-2/1/2 xe-2/1/2 xe-3/1/2 xe-3/1/2 Copyright © 2012, Juniper Networks, Inc. -
Page 299: Figure 81: Connecting A Fiber-Optic Cable To An Optical Transceiver Installed In
Do not let fiber-optic cables hang free from the connector. Do not allow fastened loops of cables to dangle, which stresses the cables at the fastening point. Copyright © 2012, Juniper Networks, Inc. -
Page 300: Connecting Qfx3100 Director Devices In A Director Group
Ensure that you have appropriate transceivers and cables available. For cable specifications, see “Cable Specifications for Control Plane Connections for the QFX Series” on page 129 “Interface Specifications for Control Plane Connections for the QFabric System” on page 124. Copyright © 2012, Juniper Networks, Inc. -
Page 301: Connecting Qfx3100 Director Devices To The Control Plane Network
Connecting QFX3100 Director Devices to the Control Plane Network A QFX3000 QFabric system control plane and management network is formed by connecting the QFX series devices in your network to two Virtual Chassis composed of four EX4200 switches each. QFX3100 Director devices have two 4-port Gigabit Ethernet network modules with RJ-45 connectors. -
Page 302: Figure 83: Qfx3100 Director Group To Virtual Chassis Connections
QFX3100 Director Devices in a Director Group” on page 274. Ensure that you have 12 RJ-45 patch cables available. For cable specifications, see “Cable Specifications for Control Plane Connections for the QFX Series” on page 129. Copyright © 2012, Juniper Networks, Inc. -
Page 303: Management
Connecting a QFX3100 Director Device to a Network for Out-of-Band Management Use the management port on your QFX3100 Director device to connect each Director device in your Director group to your out-of-band management network. Copyright © 2012, Juniper Networks, Inc. -
Page 304: Connecting A Qfx3008-I Interconnect Device To The Control Plane Network
Connecting a QFX3008-I Interconnect Device to the Control Plane Network A QFX3000 QFabric system control plane and management network is formed by connecting the QFX Series devices in your network to two Virtual Chassis composed of four EX4200 switches each. QFX3008-I Interconnect Devices have four small form factor pluggable plus (SFP+) management ports on each Control Board. -
Page 305: Figure 84: Qfx3008-I Interconnect Device Control Plane Connections
Install your Virtual Chassis hardware. For more information, see Installing and Connecting an EX4200 Switch. Create two Virtual Chassis of four EX4200 switches each. For more information, see Configuring an EX4200 or EX4500 Virtual Chassis (CLI Procedure). Copyright © 2012, Juniper Networks, Inc. - Page 306 “Interface Specifications for Control Plane Connections for the QFabric System” on page 124 “Installing a Transceiver in a QFX Series Device” on page 374. Ensure that you have four RJ-45 patch cables available for each Interconnect device. For cable specifications, see “Cable Specifications for Control Plane Connections for...
- Page 307 Connecting a QFX3500 Node Device to a QFX3008-I Interconnect Device on page 284 Connecting QFX3100 Director Devices to the Control Plane Network on page 275 Connecting QFX3100 Director Devices in a Director Group on page 274 Copyright © 2012, Juniper Networks, Inc.
-
Page 308: Connecting A Qfx3500 Node Device To The Control Plane Network
Connecting a QFX3500 Node Device to the Control Plane Network A QFX3000 QFabric system control plane and management network is formed by connecting the QFX series devices in your network to two Virtual Chassis composed of four EX4200 switches each. QFX3500 Node devices have two management ports with RJ-45 connectors. -
Page 309: Table 66: Qfx3500 Node Device-To-Virtual Chassis Control Plane Port
Connecting a QFX3008-I Interconnect Device to the Control Plane Network on page 278 Documentation Connecting a QFX3500 Node Device to a QFX3008-I Interconnect Device on page 284 Connecting QFX3100 Director Devices to the Control Plane Network on page 275 Copyright © 2012, Juniper Networks, Inc. -
Page 310: Connecting A Qfx3500 Node Device To A Qfx3008-I Interconnect Device
Ensure that you have taken the necessary precautions for safe handling of lasers (see “Laser and LED Safety Guidelines and Warnings for the QFX Series” on page 168). Ensure you have installed QSFP+ transceivers in each port you are using. See “Installing... -
Page 311: Connecting A Qfx Series Device To A Management Console
108 Connecting a QFX Series Device to a Management Console QFX Series devices have a console port with an RJ-45 connector. Use the console port to connect the device to a management console or to a console server. Ensure that you have an RJ-45 to DB-9 rollover cable available. An RJ-45 cable with an RJ-45 to DB-9 adapter is provided with the device. -
Page 312: Figure 87: Connecting A Qfx Series Device Directly To A Management
QFX3000 Hardware Documentation Figure 87: Connecting a QFX Series Device Directly to a Management Console To Console port Laptop CPU (on device) Related Console Port Connector Pinouts for the QFX Series on page 106 Documentation Copyright © 2012, Juniper Networks, Inc. -
Page 313: Performing The Initial Configuration
Range of reserved MAC addresses for your QFabric system (at least 4000) Root password for your Director group Root password for the QFabric system components such as the Node devices, Interconnect devices, and infrastructure Copyright © 2012, Juniper Networks, Inc. -
Page 314: Initial Setup
QFX3000 Hardware Documentation NOTE: To request your MAC address block for your QFabric system, contact your Juniper Networks sales representative or Professional Services team member. Initial Setup on page 288 Restoring a Backup Configuration on page 291 Initial Setup The initial setup can be performed either manually or by using a previously saved backup configuration. - Page 315 Does the following configuration appear correct? Initial Setup Review Director Group 0 IP/prefix [10.49.214.74/24] Director Group 1 IP/prefix [10.49.214.75/24] Director Group gateway IP [10.49.214.254] QFabric default partition IP [10.49.214.150] Starting MAC address [00:11:00:00:00:00] Copyright © 2012, Juniper Networks, Inc.
- Page 316 Configuring the QFabric default partition IP address [10.49.214.150] Reconfiguring the QFabric software static configuration Applying the new Director device password Applying the QFabric component password Configuration complete. Director Group services will auto start within 30 seconds. Copyright © 2012, Juniper Networks, Inc.
-
Page 317: Restoring A Backup Configuration
Starting MAC address [00:11:00:00:00:00] Number of MAC addresses [4000] QFabric serial ID [qfsn-123456789] Director device password [********] QFabric component password [********] Confirm the backup restoration. Backup Restoration [y/n]: yes Confirmation The Director device displays the configuration. Copyright © 2012, Juniper Networks, Inc. - Page 318 QFabric Switch Initial and Default Configuration Information Installing and Connecting a QFX3100 Director Device on page 213 Performing a QFabric Switch Recovery Installation on the Director Group on page 410 request system software configuration-backup Copyright © 2012, Juniper Networks, Inc.
- Page 319 Replacing Transceivers and Fiber-Optic Cables on page 373 Routine Maintenance on page 379 Viewing QFX3100 System Information on page 381 Viewing QFX3008-I System Information on page 387 Viewing QFX3500 System Information on page 397 Copyright © 2012, Juniper Networks, Inc.
- Page 320 QFX3000 Hardware Documentation Copyright © 2012, Juniper Networks, Inc.
-
Page 321: Removing Or Replacing A Device
If the device you want to power off is the master Director device, issue the request fabric administration director-group change-master director-device director-device-name Copyright © 2012, Juniper Networks, Inc. -
Page 322: Powering Off A Qfx3008-I Interconnect Device
CLI command. request fpc offline This command shuts down the front cards gracefully. As the front cards go offline, traffic will be routed to other QFX3008-I Interconnect devices in your QFX3000 QFabric system. Copyright © 2012, Juniper Networks, Inc. - Page 323 Trays on page 239 Connecting AC Power to a QFX3008-I Interconnect Device with Three-Phase Delta Wiring Trays on page 246 Connecting AC Power to a QFX3008-I Interconnect Device with Three-Phase Wye Wiring Trays on page 250 Copyright © 2012, Juniper Networks, Inc.
-
Page 324: Powering Off A Qfx3500 Device
For instructions about connecting a management device to the console ( ) port, “Connecting a QFX Series Device to a Management Console” on page 285. If you are using the QFX3500 device as a standalone switch, you can shut down the QFX3500 device from a management device on your out-of-band management network. -
Page 325: Removing A Qfx3100 Director Device From A Rack Or Cabinet
When you remove multiple devices from a rack, remove the device in the top of the rack first and proceed to remove the rest of the devices from top to bottom. Before removing a QFX3100 Director device from a rack: Copyright © 2012, Juniper Networks, Inc. -
Page 326: Removing A Qfx3008-I Interconnect Device From A Rack Or Cabinet
Ensure that the rack or cabinet is stable and secured to the building. Ensure that there is enough space to place the removed device in its new location and along the path to the new location. Copyright © 2012, Juniper Networks, Inc. - Page 327 Use the number 2 Phillips (+) screwdriver to remove the mounting hardware from the rack. Use the lift to transport the device to its new location. Related Installing and Connecting a QFX3008-I Interconnect Device on page 223 Documentation Copyright © 2012, Juniper Networks, Inc.
-
Page 328: Removing A Qfx3500 Device From A Rack Or Cabinet
Place the removed screws and mounting blades in a labeled bag. You will need them when you reinstall the chassis. Transport the QFX3500 device to your desired new location. Related Mounting a QFX3500 Device in a Rack or Cabinet on page 261 Documentation Copyright © 2012, Juniper Networks, Inc. -
Page 329: Replacing A Qfx3100 Director Device In A Qfx3000-G Qfabric System
CLI command. Related Example: Configuring the Virtual Chassis for the QFabric Switch Control Plane Documentation Removing a QFX3100 Director Device from a Rack or Cabinet on page 299 Copyright © 2012, Juniper Networks, Inc. -
Page 330: System
Uncable the old device. Label each cable as you remove it, so that you can easily connect the replacement Interconnect device. Connect the new QFX3008-I Interconnect device to the QFX3000-G QFabric system control plane network. See “Connecting a QFX3008-I Interconnect Device to the Control Plane Network” on page 278. Copyright © 2012, Juniper Networks, Inc. - Page 331 QFabric system using the show fabric administration inventory operational-mode CLI command. Related Example: Configuring the Virtual Chassis for the QFabric Switch Control Plane Documentation Removing a QFX3008-I Interconnect Device from a Rack or Cabinet on page 300 Copyright © 2012, Juniper Networks, Inc.
-
Page 332: System
If the new device is using Junos 11.2 or earlier, upgrade the software on the new device to the Junos OS release currently running in the QFX3000 QFabric switch. See Upgrading Software on a QFX3500 Switch. Copyright © 2012, Juniper Networks, Inc. - Page 333 Aliases take the place of the hardware serial numbers and help to simplify configuration tasks. Related Example: Configuring the Virtual Chassis for the QFabric Switch Control Plane Documentation Removing a QFX3500 Device from a Rack or Cabinet on page 302 Copyright © 2012, Juniper Networks, Inc.
- Page 334 QFX3000 Hardware Documentation Copyright © 2012, Juniper Networks, Inc.
-
Page 335: Replacing Qfx3100 Components
See these topics for instructions for installing and removing components: Installing a Power Supply in a QFX3100 Director Device on page 311 Removing a Power Supply from a QFX3100 Director Device on page 310 Copyright © 2012, Juniper Networks, Inc. -
Page 336: Removing A Power Supply From A Qfx3100 Director Device
Push the power supply faceplate ejector lever to the right while pulling the power supply away from the QFX3100 Director device to release the latch. Stop pulling the power supply once the lever is released. Copyright © 2012, Juniper Networks, Inc. -
Page 337: Installing A Power Supply In A Qfx3100 Director Device
ESD grounding strap NOTE: Each AC power supply must be connected to a dedicated AC power source outlet. To install an AC power supply in the QFX3100 Director device (see Figure 89 on page 312): Copyright © 2012, Juniper Networks, Inc. -
Page 338: Removing A Fan Module From A Qfx3100 Director Device
(FRUs). You can remove and replace a fan module without powering off the QFX3100 Director device or disrupting QFX3100 Director device functions. Before you begin removing a fan module from a QFX3100 Director device: Copyright © 2012, Juniper Networks, Inc. -
Page 339: Figure 90: Removing A Fan Module From A Qfx3100 Director Device
Figure 90: Removing a Fan Module from a QFX3100 Director Device Loosen captive screws Related Installing a Fan Module in a QFX3100 Director Device on page 314 Documentation Fan Modules in a QFX3100 Director Device on page 29 Copyright © 2012, Juniper Networks, Inc. -
Page 340: Installing A Fan Module In A Qfx3100 Director Device
Tighten both screws on the fan module using your fingers. Figure 91: Installing a Fan Module in a QFX3100 Director Device Tighten captive screws Copyright © 2012, Juniper Networks, Inc. -
Page 341: Removing A Network Module From A Qfx3100 Director Device
Gently pull the network module toward you and out of the network module slot, being careful to keep one hand underneath the module to support it when it is removed from the chassis. Place the network module in the antistatic bag or on the antistatic mat. Copyright © 2012, Juniper Networks, Inc. -
Page 342: Installing A Network Module In A Qfx3100 Director Device
See “Removing a Network Module from a QFX3100 Director Device” on page 315. Taking care not to touch network module components, pins, leads, or solder connections, remove the network module from its bag. Copyright © 2012, Juniper Networks, Inc. -
Page 343: Removing An Hdd Module From A Qfx3100 Director Device
Before you begin removing an HDD module from a QFX3100 Director device: Ensure that you understand how to prevent electrostatic discharge (ESD) damage. “Prevention of Electrostatic Discharge Damage” on page 192. Ensure that you have the following parts and tools available: Copyright © 2012, Juniper Networks, Inc. -
Page 344: Installing An Hdd Module In A Qfx3100 Director Device
HDD Modules in a QFX3100 Director Device on page 29 Installing an HDD Module in a QFX3100 Director Device QFX3100 Director devices have two 2-terabyte (TB) hard disk drive (HDD) module slots on the front panel. HDD modules are field-replaceable units (FRUs). Copyright © 2012, Juniper Networks, Inc. -
Page 345: Figure 95: Installing An Hdd Module In A Qfx3100 Director Device
Tighten both screws on the HDD module, using your fingers. Figure 95: Installing an HDD Module in a QFX3100 Director Device Tighten captive screws. Tighten captive screws. Slot Slot Loosen captive screws. Loosen captive screws. Tighten captive screws. Slot Slot Slot Slot Copyright © 2012, Juniper Networks, Inc. - Page 346 QFX3000 Hardware Documentation Related HDD Modules in a QFX3100 Director Device on page 29 Documentation Rear Panel of a QFX3100 Director Device on page 26 Copyright © 2012, Juniper Networks, Inc.
-
Page 347: Replacing Qfx3008-I Components
Taking the Rear Card Offline in a QFX3008-I Interconnect Device on page 355 Removing a Rear Card from a QFX3008-I Interconnect Device on page 356 Installing a Rear Card in a QFX3008-I Interconnect Device on page 358 Copyright © 2012, Juniper Networks, Inc. - Page 348 To install a 16-port QSFP+ front card in a QFX3008-I Interconnect device, follow the instructions in “Installing a 16-Port QSFP+ Front Card in a QFX3008-I Interconnect Device” on page 353. To remove a 16-port QSFP+ front card from a QFX3008-I Interconnect device, Copyright © 2012, Juniper Networks, Inc.
-
Page 349: Removing An Ac Power Supply From A Qfx3008-I Interconnect Device
Rear Card from a QFX3008-I Interconnect Device” on page 356. To install a transceiver in a QFX3008-I Interconnect device, follow the instructions in “Installing a Transceiver in a QFX Series Device” on page 374. To remove a transceiver from a QFX3008-I Interconnect device, follow the instructions in “Removing a Transceiver... -
Page 350: Installing An Ac Power Supply In A Qfx3008-I Interconnect Device
(FRU). Six AC power supplies are installed in the chassis. All power supplies install in the rear of the chassis in the slots provided at the bottom. See “Slot Numbering for a QFX3008-I Interconnect Device” on page Copyright © 2012, Juniper Networks, Inc. - Page 351 Push the captive screw into the power supply faceplate. Ensure that the screw is seated inside the corresponding hole on the faceplate. Tighten the captive screw using your fingers. When the screw is completely tight, the latch locks into the device chassis. Copyright © 2012, Juniper Networks, Inc.
-
Page 352: Removing A Wiring Tray From A Qfx3008-I Interconnect Device
QFX3008-I Interconnect device: Electrostatic discharge (ESD) grounding strap Phillips (+) screwdriver, number 1 Replacement wiring tray CAUTION: Do not leave the wiring tray slot empty while the device is operational. Replace the wiring tray promptly. Copyright © 2012, Juniper Networks, Inc. -
Page 353: Figure 98: Removing A Wiring Tray From A Qfx3008-I Interconnect Device
Figure 98: Removing a Wiring Tray from a QFX3008-I Interconnect Device Loosen thumbscrew and depress the tab. Related Wiring Tray in a QFX3008-I Interconnect Device on page 54 Documentation Installing a Wiring Tray in a QFX3008-I Interconnect Device on page 328 Copyright © 2012, Juniper Networks, Inc. -
Page 354: Installing A Wiring Tray In A Qfx3008-I Interconnect Device
Push the captive screw into the wiring tray faceplate. Ensure that the screw is seated inside the corresponding hole on the faceplate. Tighten the captive screw using your fingers. When the screw is completely tight, the latch locks into the device chassis. Copyright © 2012, Juniper Networks, Inc. -
Page 355: Removing A Bottom Fan Tray And Front Panel Display From A Qfx3008-I Interconnect Device
A handle on the panel display faceplate facilitates handling of the fan tray. There is a captive screw at the top of the panel display to secure the fan tray in the chassis. Copyright © 2012, Juniper Networks, Inc. - Page 356 Wait for approximately 15 seconds to allow all the fans to stop spinning. Slide the fan tray completely out of the chassis. Copyright © 2012, Juniper Networks, Inc.
-
Page 357: Installing A Bottom Fan Tray And Front Panel Display In A Qfx3008-I Interconnect Device
Ensure that you have the following parts and tools available to install a bottom fan tray in a QFX3008-I Interconnect device: Electrostatic discharge (ESD) grounding strap CAUTION: The fan trays can be removed and replaced while the QFX3008-I Interconnect device is operating. However, you must replace the fan tray Copyright © 2012, Juniper Networks, Inc. -
Page 358: Removing A Side Fan Tray From A Qfx3008-I Interconnect Device
CAUTION: Do not remove a fan tray unless you have a replacement fan tray available. Copyright © 2012, Juniper Networks, Inc. - Page 359 You can damage the air filter. Wait for approximately 15 seconds to allow all the fans to stop spinning. Slide the fan tray completely out of the chassis, being careful to use your other hand to support the weight. Copyright © 2012, Juniper Networks, Inc.
-
Page 360: Installing A Side Fan Tray In A Qfx3008-I Interconnect Device
“Prevention of Electrostatic Discharge Damage” on page 192. Ensure that you have the following parts and tools available to install a fan tray in a QFX3008-I Interconnect device: Electrostatic discharge (ESD) grounding strap Replacement fan tray Copyright © 2012, Juniper Networks, Inc. -
Page 361: Figure 103: Installing A Side Fan Tray In A Qfx3008-I Interconnect Device
Figure 103: Installing a Side Fan Tray in a QFX3008-I Interconnect Device Related Cooling System and Airflow in a QFX3008-I Interconnect Device on page 44 Documentation Removing a Side Fan Tray from a QFX3008-I Interconnect Device on page 332 Copyright © 2012, Juniper Networks, Inc. -
Page 362: Removing A Top Fan Tray From A Qfx3008-I Interconnect Device
Pull firmly on the latch to slide the fan tray about 5 in. (13 cm) out of the chassis. WARNING: There is no fan guard on the fans. Be careful to keep your fingers clear of the moving fan blades when you are removing the fan tray. Copyright © 2012, Juniper Networks, Inc. -
Page 363: Installing A Top Fan Tray In A Qfx3008-I Interconnect Device
“Prevention of Electrostatic Discharge Damage” on page 192. Ensure that you have the following parts and tools available to install a fan tray in a QFX3008-I Interconnect device: Electrostatic discharge (ESD) grounding strap Replacement fan tray Copyright © 2012, Juniper Networks, Inc. -
Page 364: Removing A Bottom Air Filter From A Qfx3008-I Interconnect Device
There are two captive screws on either side of the air filter door that secure the air filter in the chassis. CAUTION: Do not run the device for more than 2 minutes without the air filter in place. Copyright © 2012, Juniper Networks, Inc. -
Page 365: Figure 106: Removing A Bottom Air Filter From A Qfx3008-I Interconnect
Open the door, being careful to lower it gently, until it stops. Pull on the air filter tab, located in the center of the filter, and slide the air filter straight out. Figure 106: Removing a Bottom Air Filter from a QFX3008-I Interconnect Device Copyright © 2012, Juniper Networks, Inc. -
Page 366: Installing A Bottom Air Filter In A Qfx3008-I Interconnect Device
Slide the air filter into the chassis. The air filter has a label indicating which side should be facing up. Close the air filter door, and tighten the captive screws on each side of the air filter door. Copyright © 2012, Juniper Networks, Inc. -
Page 367: Removing A Side Air Filter From A Qfx3008-I Interconnect Device
“Prevention of Electrostatic Discharge Damage” on page 192. Ensure that you have the following parts and tools available to remove a side air filter from a QFX3008-I Interconnect device: Electrostatic discharge (ESD) grounding strap Replacement air filter Copyright © 2012, Juniper Networks, Inc. -
Page 368: Figure 108: Removing A Side Fan Tray From A Qfx3008-I Interconnect
Pull firmly on the screw to detach the cover panel. Pull the air filter tab to the side and slide the filter out of the fan tray module. Figure 108: Removing a Side Fan Tray from a QFX3008-I Interconnect Device Copyright © 2012, Juniper Networks, Inc. -
Page 369: Installing A Side Air Filter In A Qfx3008-I Interconnect Device
This could damage device components. Before you remove an air filter, ensure that you understand how to prevent ESD damage. “Prevention of Electrostatic Discharge Damage” on page 192. Copyright © 2012, Juniper Networks, Inc. -
Page 370: Figure 110: Installing A Side Air Filter In A Qfx3008-I Interconnect Device Side
Push the screw end of the cover panel into the chassis. Tighten the captive screw on the cover panel using your fingers. Figure 110: Installing a Side Air Filter in a QFX3008-I Interconnect Device Side Fan Tray Copyright © 2012, Juniper Networks, Inc. -
Page 371: Taking A Control Board Offline In A Qfx3008-I Interconnect Device
Interconnect device. Data traffic over other QFX3008-I Interconnect devices in your QFX3000 QFabric system is not disrupted. NOTE: We recommend that you take the backup Control Board offline before removing it. Before you offline a Control Board: Copyright © 2012, Juniper Networks, Inc. -
Page 372: Taking A Master Control Board Offline
Use the command to confirm that mastership has changed. show chassis routing-engine Connect the management device to the console ( CONSOLE ) port on the new master Control Board in the QFX3008-I Interconnect device. Copyright © 2012, Juniper Networks, Inc. -
Page 373: Taking A Backup Control Board Offline
345 for more information. CAUTION: When you switch Control Board mastership, or when a master Control Board fails, traffic is not forwarded over the QFX3008-I Interconnect device until the backup Control Board assumes mastership. Copyright © 2012, Juniper Networks, Inc. - Page 374 Taking care not to touch the leads, pins, or solder connections, place one hand underneath the Control Board to support it, and slide it completely out of the chassis. Place the Control Board in the antistatic bag or on the antistatic mat. Copyright © 2012, Juniper Networks, Inc.
-
Page 375: Installing A Control Board In A Qfx3008-I Interconnect Device
NOTE: When you install a new Control Board in the QFX3008-I Interconnect device, the Junos OS is updated to the same version that is running on the QFX3100 Director group. Copyright © 2012, Juniper Networks, Inc. - Page 376 Verify that the Control Board is installed correctly and functioning normally by checking the LEDs on the faceplate of the Control Board. The LED and POWER STATUS should be lit steady green a few minutes after the Control Board is installed. Copyright © 2012, Juniper Networks, Inc.
-
Page 377: Figure 113: Installing A Control Board In A Qfx3008-I Interconnect Device
Installing a 16-Port QSFP+ Front Card in a QFX3008-I Interconnect Device on page 353 Documentation 16-Port QSFP+ Front Cards in a QFX3008-I Interconnect Device on page 48 16-Port QSFP+ Front Card LEDs on a QFX3008-I Interconnect Device on page 391 Copyright © 2012, Juniper Networks, Inc. - Page 378 Taking care not to touch the leads, pins, or solder connections, place the other hand on the base of the front card to support its weight and slide it out of the chassis completely. Copyright © 2012, Juniper Networks, Inc.
-
Page 379: Device
“Slot Numbering for a QFX3008-I Interconnect Device” on page CAUTION: Do not lift modules by holding the ejector levers. The levers cannot support the weight of the module. Lifting the module by the levers might Copyright © 2012, Juniper Networks, Inc. - Page 380 Push both the ejector levers simultaneously toward the faceplate of the front card until the levers are flush against the faceplate and are fully engaged. Copyright © 2012, Juniper Networks, Inc.
-
Page 381: Taking The Rear Card Offline In A Qfx3008-I Interconnect Device
16-Port QSFP+ Front Card LEDs on a QFX3008-I Interconnect Device on page 391 Taking the Rear Card Offline in a QFX3008-I Interconnect Device To prevent data loss, we recommend that you take a rear card offline before removing it from a QFX3008-I Interconnect device. Copyright © 2012, Juniper Networks, Inc. -
Page 382: Removing A Rear Card From A Qfx3008-I Interconnect Device
Ensure that you understand how to prevent ESD damage. See “Prevention of Electrostatic Discharge Damage” on page 192. (Recommended) Take the rear card offline. See “Taking the Rear Card Offline in a QFX3008-I Interconnect Device” on page 355. Copyright © 2012, Juniper Networks, Inc. -
Page 383: Figure 116: Removing A Rear Card From A Qfx3008-I Interconnect Device
Rear Cards in a QFX3008-I Interconnect Device on page 51 Documentation Rear Card LEDs on a QFX3008-I Interconnect Device on page 393 Installing a Rear Card in a QFX3008-I Interconnect Device on page 358 Copyright © 2012, Juniper Networks, Inc. -
Page 384: Installing A Rear Card In A Qfx3008-I Interconnect Device
Verify that the rear card is installed correctly and functioning normally by checking the LEDs on the faceplate of the rear card. The LED and LED should STATUS POWER be lit steady green a few minutes after the rear card is installed. Copyright © 2012, Juniper Networks, Inc. -
Page 385: Figure 117: Installing A Rear Card In A Qfx3008-I Interconnect Device
Figure 117: Installing a Rear Card in a QFX3008-I Interconnect Device Related Rear Cards in a QFX3008-I Interconnect Device on page 51 Documentation Rear Card LEDs on a QFX3008-I Interconnect Device on page 393 Copyright © 2012, Juniper Networks, Inc. - Page 386 QFX3000 Hardware Documentation Copyright © 2012, Juniper Networks, Inc.
-
Page 387: Replacing Qfx3500 Components
1 minute of removal to prevent chassis overheating. To install a power supply in a QFX3500 device, follow the instructions in “Installing a Power Supply in a QFX3500 Device” on page 362. To remove a power supply from a Copyright © 2012, Juniper Networks, Inc. -
Page 388: Installing A Power Supply In A Qfx3500 Device
369. To install an SFP, SFP+, or QSFP+ transceiver in a QFX3500 device, follow the instructions “Installing a Transceiver in a QFX Series Device” on page 374. To remove an SFP, SFP+, or QSFP+ transceiver from a QFX3500 device, follow the instructions in “Removing a... -
Page 389: Figure 118: Installing A Power Supply In A Qfx3500 Device
Each power supply must be connected to a dedicated power source outlet. NOTE: If you have a Juniper J-Care service contract, register any addition, change, or upgrade of hardware components at https://www.juniper.net/customers/csc/management/updateinstallbase.jsp Failure to do so can result in significant delays if you need replacement parts. -
Page 390: Removing A Power Supply From A Qfx3500 Device
DC power supply—Switch the circuit breaker on the panel board that services the DC circuit to the OFF position. Copyright © 2012, Juniper Networks, Inc. -
Page 391: Installing A Fan Tray In A Qfx3500 Device
CAUTION: Replace a failed fan tray with a new fan tray within 1 minute of removal to prevent chassis overheating. Before removing the fan tray, ensure you have a replacement fan tray. Copyright © 2012, Juniper Networks, Inc. -
Page 392: Figure 120: Installing A Fan Tray In A Qfx3500 Device
“Cooling System and Airflow for a QFX3500 Device” on page 68 for more information. Figure 120: Installing a Fan Tray in a QFX3500 Device Related Removing a Fan Tray from a QFX3500 Device on page 367 Documentation Copyright © 2012, Juniper Networks, Inc. -
Page 393: Removing A Fan Tray From A Qfx3500 Device
When the fans stop spinning, slide the fan tray completely out of the chassis. Place the fan tray in the antistatic bag or on the antistatic mat placed on a flat, stable surface. Copyright © 2012, Juniper Networks, Inc. -
Page 394: Installing A Management Board In A Qfx3500 Device
Ensure that you have the following parts and tools available to install a management board in a QFX3500 device: ESD grounding strap To install a management board in a QFX3500 device (see Figure 122 on page 369): Copyright © 2012, Juniper Networks, Inc. -
Page 395: Removing A Management Board From A Qfx3500 Device
Documentation Field-Replaceable Units in a QFX3500 Device on page 63 Connecting a QFX Series Device to a Management Console on page 285 Connecting a QFX3500 Node Device to the Control Plane Network on page 282 Connecting a QFX3500 Device to a Network for Out-of-Band Management... -
Page 396: Figure 123: Removing A Management Board From A Qfx3500 Device
Management Board for a QFX3500 Device on page 71 Documentation Field-Replaceable Units in a QFX3500 Device on page 63 Front Panel of a QFX3500 Device on page 65 Connecting a QFX3500 Device to a Network for Out-of-Band Management Copyright © 2012, Juniper Networks, Inc. - Page 397 Chapter 27: Replacing QFX3500 Components Connecting a QFX Series Device to a Management Console on page 285 Installing a Management Board in a QFX3500 Device on page 368 Copyright © 2012, Juniper Networks, Inc.
- Page 398 QFX3000 Hardware Documentation Copyright © 2012, Juniper Networks, Inc.
-
Page 399: Replacing Transceivers And Fiber-Optic Cables
(FRUs). You can remove and replace them without powering off the device or disrupting device functions. Before you begin removing a transceiver from a QFX Series device, ensure that you have taken the necessary precautions for safe handling of lasers (see “Laser and LED Safety... -
Page 400: Installing A Transceiver In A Qfx Series Device
Place the dust cover over the empty port. Related Installing a Transceiver in a QFX Series Device on page 374 Documentation Installing a Transceiver in a QFX Series Device The transceivers for a QFX Series device are hot-removable and hot-insertable field-replaceable units (FRUs). - Page 401 Chapter 28: Replacing Transceivers and Fiber-Optic Cables Before you begin installing a transceiver in a QFX Series device, ensure that you have taken the necessary precautions for safe handling of lasers (see “Laser and LED Safety Guidelines and Warnings for the QFX Series” on page 168).
-
Page 402: Disconnecting A Fiber-Optic Cable From A Qfx Series Device
Removing a Transceiver from a QFX Series Device on page 373 Documentation Connecting a Fiber-Optic Cable to a QFX Series Device on page 377 Disconnecting a Fiber-Optic Cable from a QFX Series Device QFX Series devices have field-replaceable unit (FRU) optical transceivers to which you can connect fiber-optic cables. -
Page 403: Connecting A Fiber-Optic Cable To A Qfx Series Device
QFX Series devices have field-replaceable unit (FRU) optical transceivers to which you can connect fiber-optic cables. Before you connect a fiber-optic cable to an optical transceiver installed in a QFX Series device, ensure that you have taken the necessary precautions for safe handling of lasers (see “Laser and LED Safety Guidelines and Warnings for the QFX Series”... - Page 404 QFX3000 Hardware Documentation To connect a fiber-optic cable to an optical transceiver installed in a QFX Series device: WARNING: Do not look directly into a fiber-optic transceiver or into the ends of fiber-optic cables. Fiber-optic transceivers and fiber-optic cables connected to transceivers emit laser light that can damage your eyes.
-
Page 405: Routine Maintenance
Routine Maintenance Maintaining the Air Filters in a QFX3008-I Interconnect Device on page 379 Maintaining Fiber-Optic Cables in a QFX Series Device on page 379 Maintaining the Air Filters in a QFX3008-I Interconnect Device To maintain the air filters in a QFX3008-I Interconnect device. - Page 406 Cletop-S Fiber Cleaner. Follow the directions in the cleaning kit you use. Related Connecting a Fiber-Optic Cable to a QFX Series Device on page 377 Documentation Disconnecting a Fiber-Optic Cable from a QFX Series Device on page 376 Copyright © 2012, Juniper Networks, Inc.
-
Page 407: Viewing Qfx3100 System Information
LEDs on a QFX3100 Director device, their colors and states, and the status they indicate. Table 67: Chassis LEDs on a QFX3100 Director Device Color State Description Power Unlit Device is powered off. Green On steadily Device is powered on. Copyright © 2012, Juniper Networks, Inc. -
Page 408: Management Port Leds On A Qfx3100 Director Device
(see Figure 127 on page 382). Figure 127: LEDs on the Management Port on a QFX3100 Director Device Link/Activity Speed MGMT Table 68 on page 383 describes the Link/Activity and Speed LED. Copyright © 2012, Juniper Networks, Inc. -
Page 409: Network Module Port Leds On A Qfx3100 Director Device
LEDs on the SFP network module ports are identical. Figure 128: Network Module Port LEDs on a QFX3100 Director Device LINK/ ACT SPD Link/Activity Speed Table 69 on page 384 describes the network module port LEDs. Copyright © 2012, Juniper Networks, Inc. -
Page 410: Ac Power Supply Led On A Qfx3100 Director Device
Figure 129: AC Power Supply LEDs on a QFX3100 Director Device Ejector lever AC Power supply status LED Table 70 on page 385 describes the power supply status LED on an AC power supply in a QFX3100 Director device. Copyright © 2012, Juniper Networks, Inc. -
Page 411: Table 70: Power Supply Led On A Qfx3100 Director Device
Related AC Power Specifications for a QFX3100 Director Device on page 135 Documentation Connecting AC Power to a QFX3100 Director Device on page 218 Copyright © 2012, Juniper Networks, Inc. - Page 412 QFX3000 Hardware Documentation Copyright © 2012, Juniper Networks, Inc.
-
Page 413: Viewing Qfx3008-I System Information
System LCD panel LEDs Alarm Power supply LEDs LEDs LEDs Table 71 on page 388 describes the chassis status LEDs in a QFX3008-I Interconnect device, their colors and states, and the status they indicate. Copyright © 2012, Juniper Networks, Inc. -
Page 414: Table 71: Chassis Status Leds On A Qfx3008-I Interconnect Device
System power Unlit The device is powered off. Amber Blinking One or more power component failures are generating one or more alarms. Green On steadily The AC input and DC output for the system are Copyright © 2012, Juniper Networks, Inc. -
Page 415: Control Board Leds On A Qfx3008-I Interconnect Device
Auxiliary port port Management port ports port Ejector levers Control board Status and status LEDs Link/Activity LEDs Table 72 on page 390 describes these LEDs, their colors and states, and the status they indicate. Copyright © 2012, Juniper Networks, Inc. -
Page 416: Table 72: Control Board Leds On A Qfx3008-I Interconnect Device
Status Unlit No transceiver is installed in the port, the port is configured for a different interface, or the transceiver is not supported. Green On steadily A transceiver is installed in the port. Copyright © 2012, Juniper Networks, Inc. -
Page 417: 16-Port Qsfp+ Front Card Leds On A Qfx3008-I Interconnect Device
Figure 132: 16-Port QSFP+ Front Card LEDs on a QFX3008-I Interconnect Device Link/Activity and Status LEDs Front card status LEDs Table 74 on page 392 describes these LEDs, their colors and states, and the status they indicate. Copyright © 2012, Juniper Networks, Inc. -
Page 418: Table 74: 16-Port Qsfp+ Front Card Leds On A Qfx3008-I Interconnect
A transceiver is installed in the port. Related 16-Port QSFP+ Front Cards in a QFX3008-I Interconnect Device on page 48 Documentation Installing a 16-Port QSFP+ Front Card in a QFX3008-I Interconnect Device on page 353 Copyright © 2012, Juniper Networks, Inc. -
Page 419: Rear Card Leds On A Qfx3008-I Interconnect Device
“Installing a Rear Card in a QFX3008-I Interconnect Device” on page 358. Green On steadily Rear card is powered on. Amber Blinking Rear card is offline. Copyright © 2012, Juniper Networks, Inc. -
Page 420: Ac Power Supply Leds On A Qfx3008-I Interconnect Device
Power supply is not supplying DC power There is a status LED for each correctly. channel. Solid Green DC power output is within normal operating range. Blinking Amber Power supply has been disabled internally by the system. Copyright © 2012, Juniper Networks, Inc. -
Page 421: Wiring Tray Leds On A Qfx3008-I Interconnect Device
LED corresponds to. See Figure 135 on page 395 Figure 136 on page 396. Figure 135: AC Single-Phase Wiring Tray LEDs on a QFX3008-I Interconnect Device Status LEDs Copyright © 2012, Juniper Networks, Inc. -
Page 422: Figure 136: Ac Three-Phase Wiring Tray Leds On A Qfx3008-I Interconnect
AC Power Specifications for a QFX3008-I Interconnect Device with Single-Phase Documentation Wiring Trays on page 137 Power Requirements for a QFX3008-I Interconnect Device on page 139 Connecting AC Power to a QFX3008-I Interconnect Device with Single-Phase Wiring Trays on page 239 Copyright © 2012, Juniper Networks, Inc. -
Page 423: Viewing Qfx3500 System Information
LEDs on a QFX3500 device, their colors and states, and the status they indicate. You can view the colors of the three LEDs remotely through the CLI by issuing the operational mode command show chassis lcd Copyright © 2012, Juniper Networks, Inc. -
Page 424: Management Port Leds On A Qfx3500 Device
LEDs to help determine where the error is occurring. If the amber Power LED begins blinking again, power off the QFX3500 device and contact customer support. See “Contacting Customer Support to Obtain a Return Materials Authorization for a QFX Series Device or Component” on page 435. Status Green On steadily Junos OS has been loaded on the device. -
Page 425: Access Port And Uplink Port Leds On A Qfx3500 Device
LEDs: Figure 139 on page 400 shows the location of the LEDs on the SFP+ access ports. Figure 140 on page 400 shows the location of the LEDs on the QSFP+ uplink ports. Copyright © 2012, Juniper Networks, Inc. -
Page 426: Figure 139: Leds On The Sfp+ Access Ports
No transceiver is installed in the port, the port is configured for a different interface, or the transceiver is not supported. Green On steadily An Ethernet transceiver is installed in the port. Amber On steadily A Fibre Channel transceiver is installed in the port. Copyright © 2012, Juniper Networks, Inc. -
Page 427: Fan Tray Led On A Qfx3500 Device
Rear Panel of a QFX3500 Device on page 66 Documentation Installing a Transceiver in a QFX Series Device on page 374 Connecting a Fiber-Optic Cable to a QFX Series Device on page 377 Fan Tray LED on a QFX3500 Device Figure 141 on page 401 shows the location of the LED on the fan tray. -
Page 428: Ac Power Supply Leds On A Qfx3500 Device
An error has been detected in the power supply. Replace the power supply as soon as possible. To maintain proper airflow through the chassis, leave the power supply installed in the chassis until you are ready to replace it. Copyright © 2012, Juniper Networks, Inc. -
Page 429: Dc Power Supply Leds On A Qfx3500 Device
Table 85: DC Power Supply LEDs on a QFX3500 Device Name Color State Description Input Unlit The power supply is disconnected from power, or power is not coming into the power supply. Green On steadily Power is coming into the power supply. Copyright © 2012, Juniper Networks, Inc. - Page 430 Related DC Power Supply for a QFX3500 Device on page 75 Documentation Connecting DC Power to a QFX3500 Device on page 267 Copyright © 2012, Juniper Networks, Inc.
-
Page 431: Troubleshooting
PART 6 Troubleshooting Restoring Junos OS on page 407 Returning Hardware on page 423 Alarms and System Log Messages on page 437 Copyright © 2012, Juniper Networks, Inc. - Page 432 QFX3000 Hardware Documentation Copyright © 2012, Juniper Networks, Inc.
-
Page 433: Restoring Junos Os
Creating an Emergency Boot Device for a QFX Series Device If Junos OS on your QFX Series device is damaged in some way that prevents the software from loading properly, you can use an emergency boot device to repartition the primary disk and load a fresh installation of Junos OS. - Page 434 % exit user@device> Related USB Port Specifications for the QFX Series on page 105 Documentation Performing a Recovery Installation on a QFX3500 Device and QFX3008-I Interconnect Device on page 409 Performing a QFabric Switch Recovery Installation on the Director Group on page 410 Performing a Recovery Installation of the Director Group on page 420 Copyright ©...
-
Page 435: Performing A Recovery Installation On A Qfx3500 Device And Qfx3008-I Interconnect Device
Copying the software can take up to 10 minutes. When the device is finished copying the software, you are presented with the following prompt: *** Mon Mar 21 21:08:41 UTC 2011 *** Installation successful.. Copyright © 2012, Juniper Networks, Inc. -
Page 436: Performing A Qfabric Switch Recovery Installation On The Director Group
Create a new configuration as you did when the device was shipped from the factory, or restore the previously saved configuration file to the device. Related Creating an Emergency Boot Device for a QFX Series Device on page 407 Documentation Performing a QFabric Switch Recovery Installation on the Director Group... -
Page 437: Performing A Recovery Installation Using A Juniper Networks External Usb Flash Drive With Preloaded Software
Performing a Recovery Installation Using a Juniper Networks External Blank USB Flash Drive on page 415 Performing a Recovery Installation Using a Juniper Networks External USB Flash Drive with Preloaded Software This procedure describes how to perform a recovery installation using the external USB flash drive you received from Juniper Networks. - Page 438 Please specify the full path of the configuration backup file. : /mnt/myusb/mybackup-20110907 Enter y to continue. Enter y and specify the path to the backup configuration file located on the external USB flash drive. /mnt/myusb/mybackup-20110907 Copyright © 2012, Juniper Networks, Inc.
- Page 439 JUNOS Base OS Software Suite [11.3X30.6] JUNOS Kernel Software Suite [11.3X30.6] JUNOS Crypto Software Suite [11.3X30.6] JUNOS Online Documentation [11.3X30.6] JUNOS Enterprise Software Suite [11.3X30.6] JUNOS Packet Forwarding Engine Support (QFX RE) [11.3X30.6] JUNOS Routing Software Suite [11.3X30.6] FC-0: Copyright © 2012, Juniper Networks, Inc.
- Page 440 JUNOS Base OS Software Suite [11.3X30.6] JUNOS Kernel Software Suite [11.3X30.6] JUNOS Crypto Software Suite [11.3X30.6] JUNOS Online Documentation [11.3X30.6] JUNOS Enterprise Software Suite [11.3X30.6] JUNOS Packet Forwarding Engine Support (QFX RE) [11.3X30.6] JUNOS Routing Software Suite [11.3X30.6] Copyright © 2012, Juniper Networks, Inc.
-
Page 441: Usb Flash Drive
Performing a Recovery Installation Using a Juniper Networks External Blank USB Flash Drive If you do not have an external USB flash drive preloaded with the software from Juniper Networks to use as an emergency boot device, you can create your own, using a blank external USB flash drive provided by Juniper Networks. - Page 442 Untar the install-media-qfabric-<version> .img.tgz file on your UNIX workstation. tar -xvzf install-media-qfabric-11.3X30.6.img.tgz Insert a blank external USB (4-gigabyte) flash drive supplied by Juniper Networks into your UNIX workstation. Burn the software image you just downloaded to your UNIX workstation onto your external USB flash drive using the dd command: dd if=install-media-qfabric-11.3X30.6.img of=/dev/sdb bs=16k...
- Page 443 Please specify the full path of the configuration backup file. : /mnt/myusb/mybackup-20110907 Enter y to continue. Enter y and specify the path to the backup configuration file located on the external USB flash drive. /mnt/myusb/mybackup-20110907 Copyright © 2012, Juniper Networks, Inc.
- Page 444 JUNOS Kernel Software Suite [11.3X30.6] JUNOS Crypto Software Suite [11.3X30.6] JUNOS Online Documentation [11.3X30.6] JUNOS Enterprise Software Suite [11.3X30.6] JUNOS Packet Forwarding Engine Support (QFX RE) [11.3X30.6] JUNOS Routing Software Suite [11.3X30.6] FC-0: Hostname: qfabric Model: qfx-jvre Copyright © 2012, Juniper Networks, Inc.
- Page 445 JUNOS Base OS Software Suite [11.3X30.6] JUNOS Kernel Software Suite [11.3X30.6] JUNOS Crypto Software Suite [11.3X30.6] JUNOS Online Documentation [11.3X30.6] JUNOS Enterprise Software Suite [11.3X30.6] JUNOS Packet Forwarding Engine Support (QFX RE) [11.3X30.6] JUNOS Routing Software Suite [11.3X30.6] interconnectdevice1: Copyright © 2012, Juniper Networks, Inc.
-
Page 446: Performing A Recovery Installation Of The Director Group
Insert the external USB device in the USB port. A menu like the following appears once you are connected to the Director group: Juniper Networks QFabric Director Install/Recovery Media To boot from the USB device, wait 10 seconds or press the <ENTER> key. - Page 447 When the reboot is complete, the Director group displays the login prompt. Create a new configuration as you did when the Director group was shipped from the factory, or restore the previously saved configuration file to the Director group. Copyright © 2012, Juniper Networks, Inc.
- Page 448 QFX3000 Hardware Documentation Copyright © 2012, Juniper Networks, Inc.
-
Page 449: Returning Hardware
Series Device or Component on page 435 Returning a QFX3100 Director Device or Component for Repair or Replacement If you need to return a QFX3100 Director device or component to Juniper Networks for repair or replacement, follow this procedure: Determine the serial number of the component. For instructions, see “Locating the... -
Page 450: Locating The Serial Number On A Qfx3100 Director Device Or Component
Locating the Serial Number on a QFX3100 Director Device or Component If you are returning a device or component to Juniper Networks for repair or replacement, you must locate the serial number of the device or component. You must provide the serial number to the Juniper Networks Technical Assistance Center (JTAC) when you contact them to obtain a Return Materials Authorization (RMA). -
Page 451: Locating Serial Number Id Labels On Fru Components
423 Packing a QFX3100 Director Device or Component for Shipping If you are returning a QFX3100 Director device or component to Juniper Networks for repair or replacement, pack the item as described in this topic. Before you begin packing QFX3100 Director device or component, ensure that you have: Taken the necessary precautions to prevent ESD damage (see “Prevention of... -
Page 452: Packing A Qfx3100 Director Device For Shipping
Close the top of the cardboard shipping box and seal it with packing tape. Write the RMA number on the exterior of the box to ensure proper tracking. Copyright © 2012, Juniper Networks, Inc. -
Page 453: Replacement
Locating the Serial Number on a QFX3008-I Interconnect Device or Component If you are returning a device or component to Juniper Networks for repair or replacement, you must locate the serial number of the device or component. You must provide the serial number to the Juniper Networks Technical Assistance Center (JTAC) when you contact them to obtain a Return Materials Authorization (RMA). -
Page 454: Listing The Chassis And Component Details With The Cli
Networks Technical Assistance Center (JTAC) representative if you do not have these materials, to learn about approved packing materials. See “Contacting Customer Support to Obtain a Return Materials Authorization for a QFX Series Device or Component” on page 435. Ensure that you have the following parts and tools available:... -
Page 455: Packing A Qfx3008-I Interconnect Device For Shipping
Chapter 34: Returning Hardware Packing a QFX3008-I Interconnect Device for Shipping If you need to transport the device to another location or return the device to Juniper Networks, you need to pack the device securely in its original packaging to prevent damage during transportation. -
Page 456: Packing Qfx3008-I Interconnect Device Components For Shipping
427 Returning a QFX3500 Device or Component for Repair or Replacement If you need to return a QFX3500 device or component to Juniper Networks for repair or replacement, follow this procedure: Determine the serial number of the component. For instructions, see “Locating the... -
Page 457: Locating The Serial Number On A Qfx3500 Device Or Component
Locating the Serial Number on a QFX3500 Device or Component If you are returning a device or component to Juniper Networks for repair or replacement, you must locate the serial number of the device or component. You must provide the serial number to the Juniper Networks Technical Assistance Center (JTAC) when you contact them to obtain a Return Materials Authorization (RMA). -
Page 458: Locating The Chassis Serial Number Id Label On A Qfx3500 Device
Documentation Packing a QFX3500 Device or Component for Shipping If you are returning a QFX3500 device or component to Juniper Networks for repair or replacement, pack the item as described in this topic. Before you pack a QFX3500 device or component:... -
Page 459: Packing A Qfx3500 Device For Shipping
) port in a QFX3500 device. For instructions about connecting a management device to the console ( ) port, see “Connecting a QFX Series Device to a Management Console” on page 285. TIP: You can also shut down the QFX3500 device from a management device on your out-of-band management network. -
Page 460: Packing Qfx3500 Device Components For Shipping
Write the RMA number on the exterior of the box to ensure proper tracking. Packing QFX3500 Device Components for Shipping CAUTION: Do not stack device components. Return individual components in separate boxes if they do not fit together on one level in the shipping box. Copyright © 2012, Juniper Networks, Inc. -
Page 461: Contacting Customer Support To Obtain A Return Materials Authorization For A Qfx Series Device Or Component
Contacting Customer Support to Obtain a Return Materials Authorization for a QFX Series Device or Component If you are returning a QFX Series device or component to Juniper Networks for repair or replacement, obtain a Return Materials Authorization (RMA) from the Juniper Networks Technical Assistance Center (JTAC). - Page 462 The support representative validates your request and issues an RMA number for return of the component. Related Returning a QFX3500 Device or Component for Repair or Replacement on page 430 Documentation Packing a QFX3500 Device or Component for Shipping on page 432 Copyright © 2012, Juniper Networks, Inc.
-
Page 463: Alarms And System Log Messages
Chassis Alarm Messages on a QFX3500 Device on page 442 Interface Alarm Messages on page 445 Understanding Alarms QFX Series devices support different alarm types and severity levels. Table 86 on page 437 provides a list of alarm terms and definitions that may help you in monitoring the device. -
Page 464: Chassis Alarm Messages On A Qfx3008-I Interconnect Device
A yellow alarm condition requires monitoring or maintenance. Table 87 on page 439 describes the chassis alarm messages on a QFX3008-I Interconnect device. Copyright © 2012, Juniper Networks, Inc. -
Page 465: Table 87: Qfx3500 Chassis Alarm Messages
Control Boards installed, but one has been removed. The chassis can continue to operate without the Control Board, but airflow can be affected by the empty slot. Replace the missing Control Board as soon as possible. Copyright © 2012, Juniper Networks, Inc. - Page 466 Front and rear cards Major (red) FPC slot-number Hard errors Replace the specified card and report the failure to customer support. Replace the specified card and report the FPC slot-number Volt Sensor Fail failure to customer support. Copyright © 2012, Juniper Networks, Inc.
- Page 467 The chassis can continue to operate without the power supply, but airflow can be affected by the empty slot. Replace the missing power supply as soon as possible. Copyright © 2012, Juniper Networks, Inc.
-
Page 468: Chassis Alarm Messages On A Qfx3500 Device
Minor (yellow or amber)—Indicates a noncritical condition on the device that, if left unchecked, might cause an interruption in service or degradation in performance. A yellow alarm condition requires monitoring or maintenance. Table 88 on page 443 describes the chassis alarm messages on QFX3500 devices. Copyright © 2012, Juniper Networks, Inc. -
Page 469: Table 88: Qfx3500 Chassis Alarm Messages
Fan-number is NOT spinning @ correct speed , where fan-number may be 1, 2, or 3. Remove and check the fan for Fan fan-number Not Spinning obstructions, and then reinsert the fan. If the problem persists, replace the fan. Copyright © 2012, Juniper Networks, Inc. - Page 470 The device can continue to operate with a single power supply. If you wish to remove this alarm message, reboot the device with one power supply. Copyright © 2012, Juniper Networks, Inc.
-
Page 471: Interface Alarm Messages
[ alarm edit chassis ] hierarchy level. You can specify the ethernet fibre-channel , or interface type. management-ethernet Related Understanding Alarms on page 437 Documentation alarm Copyright © 2012, Juniper Networks, Inc. - Page 472 QFX3000 Hardware Documentation Copyright © 2012, Juniper Networks, Inc.