Table of Contents
Advertisement
Quick Links
Advertisement
Table of Contents

Related Manuals for Belkin F5D6060


Summary of Contents for Belkin F5D6060
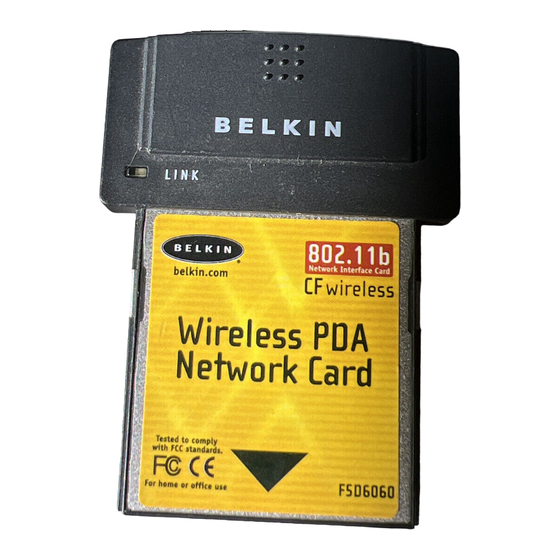
- Page 2 Wireless PDA Network Card F5D6060...
-
Page 3: Table Of Contents
• • • • • • • • • • • • • • • • • • • • • • • • • • • • • • • • • Knowing your Belkin Wireless PDA Network Card... -
Page 4: Wireless Networking
Introduction Thank you for purchasing the Belkin Wireless PDA Network Card (the Card). This high-speed Card provides you with an innovative wireless networking solution that is easy to set up and use. The Card transmits at a rate of 11, 5.5, 2 or 1Mbps to let you share files and printers on the network—without... - Page 5 wireless networking Product Specifications Host Interface: Power Consumption: Physical Dimensions: Weight: OS Support: Certification: Operating Temperature: Storage Temperature: Typical Operating Range: Humidity: System Requirements • PDA with CompactFlash Type II expansion slot PC running Windows® 98 SE, 2000, NT ® , Me, or XP and •...
- Page 6 Toshiba® e570 • Toshiba e740 • Other PDAs with an available CompactFlash Type II expansion slot Contents of Package • Belkin Wireless PDA Network Card • Protective Carrying Case • Software CD • User Manual *iPAQ requires CompactFlash expansion module...
- Page 7 Knowing your Belkin Wireless PDA Network Card Your Card provides an LED indicator, which lets you know its status as you use it. The LED signifies two modes: Solid: Linked to the wireless network Blinking: Scanning for wireless network The plastic on the top of the Card houses the antenna.
- Page 8 wireless networking Installing and Setting Up the Card There are three basic steps to setting up your Card for operation with your portable device. Install the software FIRST. If you insert the Card into the CompactFlash Type II slot of your PDA first, it will not work until you install the software.
- Page 9 Before installing the driver, make sure that your PDA is already connected to the PC and is able to synchronize with the PC. Insert the CD into your CD-ROM Drive. Within 15 seconds, the Belkin Wireless PDA Network Adapter Product wizard will automatically appear on your screen.
- Page 10 wireless networking Double-click on the “Setup” icon in the window. This will start the “InstallShield Wizard”. The screen below will appear. Click “Next”. The InstallShield Wizard will automatically choose a folder where it will copy the needed files. Click “Next” to continue. The InstallShield Wizard will ask you to review your settings before starting to copy files.
- Page 11 wireless networking The InstallShield Wizard will ask if you will use the default application to install directory. Click “Yes” to continue. The InstallShield Wizard will begin the application installation. After the application download is complete, the screen below will appear. Click “OK”...
- Page 12 wireless networking Inserting the Card into the CompactFlash Type II Slot of your PDA Note: Install the software FIRST. If you insert the Card into the CompactFlash Type II slot of your PDA first, it will not work until you install the software.
-
Page 13: Using The Card
wireless networking Using the Card After inserting the Card for the first time, if you have installed the software, the Wireless Configuration Utility screen (see below) will appear automatically on your portable device. If you are using the Card in a wireless network with an access point or wireless router, then the factory settings of the Card should already be set correctly to enable access to a wireless network that is NOT using encryption. -
Page 14: Opening The Wireless Configuration Utility Screen
wireless networking Opening the Wireless Configuration Utility Screen If the Wireless Configuration Utility Screen is not open, you can open it by following these steps: Click “Start”. Click “Settings”. Select the “System” tab. In the “System” window, click the icon called “Wireless Config Utility”. -
Page 15: Profile
wireless networking Profile The first thing you will notice is the “Profile” bar. Using Profiles allows you to save configurations for different wireless networks. For instance, if you use your Card at your workplace as well as your home, your wireless network settings may be different for each location. -
Page 16: Mode
wireless networking Mode Under the “Mode” drop-down list, you may choose either Infrastructure or Ad-Hoc operating mode. The Infrastructure mode allows the Card to communicate with a wired network that is using an access point or a wireless router. Ad-Hoc mode allows peer-to-peer (device-to-device) communication. -
Page 17: Ad-Hoc
wireless networking Ad-Hoc Use Ad-Hoc mode if you wish to communicate directly with another wireless device. For Ad-Hoc communication, all wireless devices must be set to the same SSID and Channel. If using encryption, the encryption settings on each device must also match. To Configure Ad-Hoc Mode: Click the down-facing arrowhead next to “Mode”. -
Page 18: Ssid
wireless networking SSID The SSID (Service Set Identifier) is the wireless network name. Every wireless network uses an SSID or wireless network name very much the same way a wired network uses a workgroup name. The SSID is a means of identifying the wireless network. -
Page 19: Ssid In Ad-Hoc Mode
wireless networking SSID in Ad-Hoc Mode In Ad-Hoc mode, each wireless device will use the same SSID to create a small wireless network. For instance, if you want to connect a PDA to a PC, then both must have the same SSID such as “WLAN”. In addition, the wireless channel must also be the same. -
Page 20: Transmit Rate
wireless networking Transmit Rate The 802.11b wireless Ethernet standard was engineered to operate at different data rates depending on the environment in which it is operating. The maximum data rate is 11Mbps (11 megabits per second or 11 million bits per second). Under the best of circumstances, the data will be transferred at the highest rate. -
Page 21: Power Save Enabled
wireless networking Power Save Enabled Power Save mode is only available when using Infrastructure mode. When enabled, Power Save mode will let the Card go to “sleep” (ultralow power mode) when it is not transmitting or receiving data. To conserve battery life, you can select to enable the Power Save mode. -
Page 22: Ad-Hoc Channel
wireless networking Ad-Hoc Channel An Ad-Hoc network is a peer-to-peer (device-to-device) network. Up to 64 wireless devices can create an Ad-Hoc network in the same space. There are two major requirements to establish this type of network. First, each device must be set to the same SSID. Secondly, each device must be set to the same Ad-Hoc Channel. -
Page 23: Encryption
wireless networking Encryption For security, the 802.11b standard incorporates a method of “scrambling” the data being sent over the air. This is called WEP (Wired Equivalent Privacy). There are two different levels of WEP: 64-bit encryption and 128-bit encryption. 64-bit encryption is powerful and secure. 128-bit encryption is very powerful and very secure. - Page 24 wireless networking To create an encryption key using a passphrase: Click the “Encryption” tab. (see below) Select the rate of Encryption you need to use from the drop-down menu. Select “Create Keys with Passphrase”. Type the network passphrase you need to use into the “Passphrase” box. For instance, “Passphrase”.
- Page 25 wireless networking Create 64-bit keys on a Pocket PC To create an encryption key manually: Click the “Encryption” tab. Select the rate of encryption you need to use from the drop-down menu. Select “Create Keys Manually”. Depending on the rate of encryption you are using, follow the steps below: 64-bit: If you selected 64-bit encryption, then enter a 10-digit hex key into “Key 1”.
- Page 26 wireless networking Link The “Link” tab shows you the current connection status. Link displayed on a Pocket PC Link displayed on a handheld PC...
- Page 27 wireless networking State Shows the MAC address of the access point or wireless router that your Card is currently associated with. Current Channel Displays the current channel of the wireless network. Current Tx Rate Shows the current connection speed in Mbps. Throughput (bytes/sec) Shows the current throughput statistics for transmit (Tx) and receive (Rx).
- Page 28 wireless networking Configuring TCP/IP Settings Using a Pocket PC TCP/IP settings are sometimes required to access certain networks. In many cases, the factory settings of the Card will be properly set to access your network. If you need specific TCP/IP information, you should contact your network administrator.
- Page 29 From the Connections window, double-click on the “Network” icon. Select “Belkin Wireless PDA Network Card”.
- Page 30 wireless networking The “IP address” page will be displayed. Depending on your network settings, you will have to enter the proper information into the IP address settings. If you are using your Card with a network that assigns IP addresses automatically using a DHCP server, then select “Use server-assigned IP address”.
- Page 31 wireless networking Type in the IP address, subnet mask, and default gateway. This information can be provided to you by your network administrator if you do not have it. Next, click the “Name Servers” tab. Enter the DNS address and the Alt DNS address. If you also require WINS addresses, type these in as well.
- Page 32 To access the TCP/IP setup (handheld PC): From the “Start” menu, select “Settings” and bring up the “Control Panel”. From the Control Panel, double-click on the “Network” icon. Select “Belkin Wireless PDA Network Card”. The TCP/IP screen will appear.
- Page 33 wireless networking Depending on your network settings, you will have to enter the proper information into the IP address settings. If you are using your Card with a network that assigns IP addresses automatically using a DHCP server, then select “Use server-assigned IP address”. This is the factory default setting.
-
Page 34: Fcc Statement
FCC Statement DECLARATION OF CONFORMITY WITH FCC RULES FOR We, Belkin Components, of 501 West Walnut Street, Compton, CA 90220, declare under our sole responsibility that the product, to which this declaration relates, complies with Part 15 of the FCC Rules. Operation is subject to the following... - Page 35 Modifications The FCC requires the user to be notified that any changes or modifications to this device that are not expressly approved by Belkin Components may void the users authority to operate the equipment. Canada- Industry Canada (IC) The wireless radio of this device complies with RSS 139 &...
- Page 36 Belkin Components warrants this product against defects in materials and workman- ship for its lifetime. If a defect is discovered, Belkin will, at its option, repair or replace the product at no charge provided it is returned during the warranty period, with transportation charges prepaid, to the authorized Belkin dealer from whom you purchased the product.
- Page 37 Express Business Park • Shipton Way • Rushden © 2002 Belkin Components. All rights reserved. All trade names are registered Belkin Components 501 West Walnut Street Compton • CA • 90220 • USA Tel: 310.898.1100 Fax: 310.898.1111 Technical Support Tel: 800.223.5546 ext.