VeriFone VX 805 Manual
Hide thumbs
Also See for VX 805:
- Reference manual (149 pages) ,
- Step-by-step instructions (57 pages) ,
- Manual (40 pages)
Table of Contents
Advertisement
th
One Blue Hill Plaza, 16
Floor, PO Box 1546
Pearl River, NY 10965
1-800-PC-AMERICA, 1-800-722-6374
(Voice) 845-920-0800 (Fax) 845-920-0880
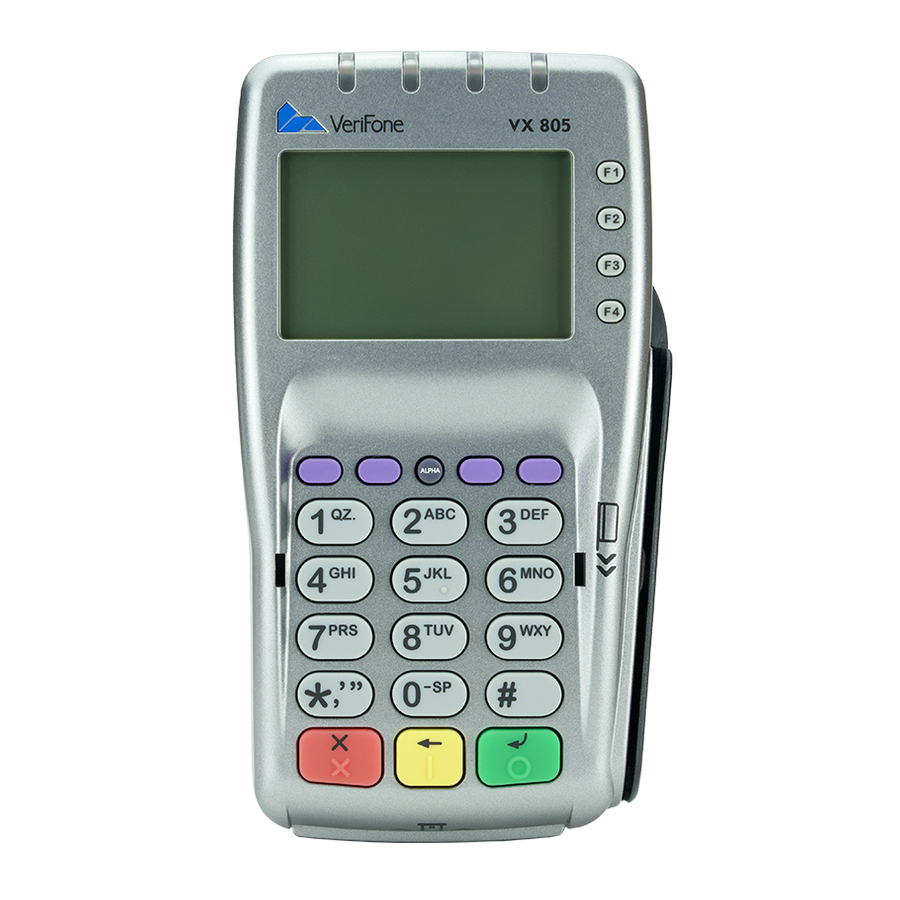
VeriFone VX 805 with Valutec
(Mellennia) through Datacap
This document provides step-by-step instructions on installing the VeriFone VX 805, configuring settings,
and processing gift cards in CRE/RPE using Valutec through DataCap. You must be on version 12.8015 or
higher to use this gift card processor with the VX 805.
Note:
You must have a Deployment ID for the computer acting as the GIFTePay server created prior to
attempting this installation. You must also have a License for each station that is processing
transactions through the GIFTePay server. If you do not have them, please contact your reseller or
processor for information on how to obtain them.
Advertisement
Table of Contents

Related Manuals for VeriFone VX 805


Summary of Contents for VeriFone VX 805
- Page 1 VeriFone VX 805 with Valutec (Mellennia) through Datacap This document provides step-by-step instructions on installing the VeriFone VX 805, configuring settings, and processing gift cards in CRE/RPE using Valutec through DataCap. You must be on version 12.8015 or higher to use this gift card processor with the VX 805.
-
Page 2: Table Of Contents
TABLE OF CONTENTS INSTALLING THE VX 805 DRIVER INSTALLING DSIPDCX CONTROL (REQUIRED ON EACH PC USING A VX 805) INSTALLING GIFTEPAY (REQUIRED ON PC THAT WILL ACT AS DATACAP SERVER ONLY) CONFIGURING CRE/RPE FOR GIFT CARD (REQUIRED ON EACH PC THAT WILL PROCESS GIFT CARD... -
Page 3: Installing The Vx 805 Driver
Installing the VX 805 driver Leave the VX805 pin pad DISCONNECTED from the computer before installing the driver. Download the VX 805 driver from the following link: http://download2.pcamerica.com/drivers/Manufacturer/Verifone/VX805_Driver.zip 1. Locate the downloaded file VX805_Driver.zip. Right- click on the file and extract its contents. - Page 4 4. Wait while the driver installs. When it is finished the installer window will close automatically. 5. On the VX 805, first take the USB connector. 6. Then connect it to any available USB port on the computer.
- Page 5 7. The screen should display a Welcome message when fully booted. 8. In Windows, go to Control Panel > Device Manager. 9. Expand the Ports branch. You should now see the VX 805 with a COM port assigned to it in parenthesis. This is usually configured for COM9.
- Page 6 10. In Windows Control Panel > Programs and Features, 11. An entry for VeriFone Vx Installer version should also be created if the driver installed correctly.
-
Page 7: Installing Dsipdcx Control (Required On Each Pc Using A Vx 805)
Installing dsiPDCX control (required on each PC using a VX 805) Download the latest dsiPDCX control software for Valutec from the following link: http://www.datacapepay.com/epay50/1229/ 1. Under dsiPDCX 1.4*, click on Download. 2. Right-click on the dsiPDCX-14*- Install201*****-W8.exe file and click on Run as administrator. - Page 8 4. Accept the agreement and click Next. 5. Enter a User Name and Organization then click Next. 6. Click Install.
- Page 9 7. Click Finish. 8. Click on Yes when prompted to restart the computer.
- Page 10 Installing GIFTePay (required on PC that will act as DataCap server only) If the Computer that is running GIFTePay is turned off, all other stations will not be able to process Gift Cards. Download the latest GIFTePay software from the following link: http://www.datacapepay.com/epay50/1229/ 1.
- Page 11 4. Enter a User Name and Organization then click Next. 5. Click Install. 6. Click Finish. 7. Click on Yes when prompted to restart.
- Page 12 8. Locate DSI_Gift.exe. It can typically be found at the following path on your computer after the GIFTePay installation: C:\Program Files (x86)\Datacap Systems\GIFTePay Right-click on the file DSIValutec_GIFT50.exe and select Run as administrator. A shortcut may also be located on the desktop. 9.
- Page 13 12. Click Setup > Setup Information. 13. You will see the Setup GIFTePay Parameters screen. Click Load New Parameters. 14. Click Yes to Attempt Activation. 15. Click I Have My Deployment...
- Page 14 16. In the dialog box that displays, enter the Deployment ID you received, then click OK. 17. Click Yes, This is the Correct Merchant. If the information is not correct, click Cancel and retry entry from the beginning of Step 18.
- Page 15 19. Select Ok from the Setup GIFTePay Parameters screen. 20. If you are prompted by a Windows Security Alert, select allow access for the type of network you currently use. Important Note: GIFTePay must always be running to process transactions. We recommend the default location in the POS system tray.
-
Page 16: Configuring Cre/Rpe For Gift Card
Company dropdown, select Valutec 4. Under IP Address, Enter the IP Address of the computer running GIFTePay. 5. Select Verifone VX805 from the pinpad dropdown. 6. Enter the # of the Com Port 7. Enter the Merchant Number; enter the Terminal Number (if provided by processor) 8. - Page 17 CRE version 12.8030 and older configuration steps In older versions of CRE you must select the PINpad and its communication port in the Hardware section of the setup screen before configuring the payment processing parameters. 1. In CRE/RPE go to Options/Manager >...
- Page 18 Company dropdown, select Valutec 4. Under IP Address, Enter the IP Address of the computer running GIFTePay. 5. Select Verifone VX805 from the pinpad dropdown. 6. Enter the # of the Com Port 7. Enter the Merchant Number; enter the Terminal Number (if provided by processor) 8.
- Page 19 CRE version 12.8030 and older configuration steps In older versions of CRE you must select the PINpad and its communication port in the Hardware section of the setup screen before configuring the payment processing parameters. 9. In CRE/RPE go to Options/Manager >...
-
Page 20: Activating A Gift Card
Activating a Gift Card 1. From the invoice screen select the gift card item, by default it is located in the None department. 2. You will be prompted to enter the amount you want to put on the gift card. 3. - Page 21 5. The pin pad will prompt you to swipe the card, swipe the gift card now. 6. The pin pad will display processing after the card has been swiped. 7. The screen will then go back to the WELCOME standby screen.
-
Page 22: Adding Funds To An Activated Gift Card
Adding Funds to an Activated Gift Card The process to add funds to an already active gift card is exactly the same as activating a gift card, the only difference is you must swipe the gift card twice on the pin pad. 1. - Page 23 4. Select the payment method you wish to use to pay for the gift card amount to complete the transaction. 5. The pin pad will prompt you to swipe the card, swipe the gift card now. 6. The pin pad will prompt you again to swipe the card, swipe the gift card again.
- Page 24 7. The pin pad will display processing after the card has been swiped. 8. The screen will then go back to the WELCOME standby screen.
-
Page 25: Performing A Gift Card Sale
CRE at this point. You can cancel by hitting the red button on the keypad or by waiting for the process to time out. 3. On the VX 805 hit the green key on the keypad to proceed with the sale. - Page 26 4. Swipe the gift card to process the transaction. 5. Wait while the transaction processes.
- Page 27 6. Wait for the approval. 7. The screen will then go back to the WELCOME standby screen.
-
Page 28: Performing A Manual Gift Card Sale
Performing a manual Gift Card Sale 1. Ring up a sale and from the amount tendered screen select Gift Card as the payment method. 2. The amount tendered screen may appear grayed out like the picture on the left. 3. Hit the red key on the keypad. - Page 29 4. A prompt will appear asking to type in the gift card number. Enter the gift card number now. 5. Wait while the transaction processes. 6. When the transaction has finished processing, the screen will then go back to the WELCOME standby screen.
-
Page 30: Performing A Gift Card Refund
Performing a Gift Card Refund 1. Ring up a refund and from the amount tendered screen select Gift Card as the payment method. 2. The amount tendered screen may appear grayed out like the picture on the left. 3. Hit the green key on the keypad. - Page 31 4. Swipe the gift card to process the transaction. 5. Wait while the transaction processes. 6. When the transaction has finished processing, the screen will then go back to the WELCOME standby screen.
-
Page 32: Associating Valutec Cards With Existing Customers
Associating Valutec cards with Existing Customers To associate the customer loyalty cards provided by Valutec to an existing customer, select Manager from the login screen, provide the requested credentials, and follow these steps. 1. Select Options or Manager 2. Select Administrative followed by Customer Maintenance. -
Page 33: Accumulate Points With Valutec Loyalty
Accumulate points with Valutec Loyalty 1. From the invoice screen Select Quick Find or Find If Quick find was selected: You must enter the exact customer Swipe ID # in order to associate them with the invoice, this is usually used with magnetic stripe loyalty cards through a magnetic stripe reader, NOT the VX805 pin pad. - Page 34 3. The screen will then go back to the WELCOME standby screen. 4. When CRE has located the customer, it will associate the customer with the invoice and track their purchase. To learn more about configuring loyalty plans and incentives. Read this guide. ***NOTE: You do NOT swipe any loyalty cards through the VX805 pin pad.
- Page 35 NETePay and GIFTePay are running on the same computer. In this case, you must install a different driver for the VX805s. If you have the pinpads connected and the previous driver installed, disconnect the pinpads and uninstall the current VeriFone driver. After that follow the instructions below 1. Create a folder on the desktop, Download the VerifoneUnifiedDriverInstaller.zip...
- Page 36 5. Uncheck Single device system 6. Select Next 7. Select Install Note: if it’s prompt the UAC control, select yes to allow the install. 8. Select Finish. Note: Now connect each pinpad one at a time, Check device manager for the new com port numbers.