Advertisement
Quick Links
ACP 106 EU/MK • Setup Guide
The Extron ACP 106 EU/MK Audio Control Panels are fully configurable control interfaces for use with any Extron ACP-enabled
device.
Each ACP 106 EU/MK includes two ACP ports, which support power and communication between the host device and the
ACP 106 EU/MK. Up to eight ACP panels can be used per host device for more demanding control needs.
NOTE:
The ACP 106 EU front and rear panels are identical to those of the ACP 106 MK. The only difference is the shape of
the plastic faceplate attached to the front of the device. The panels function identically.
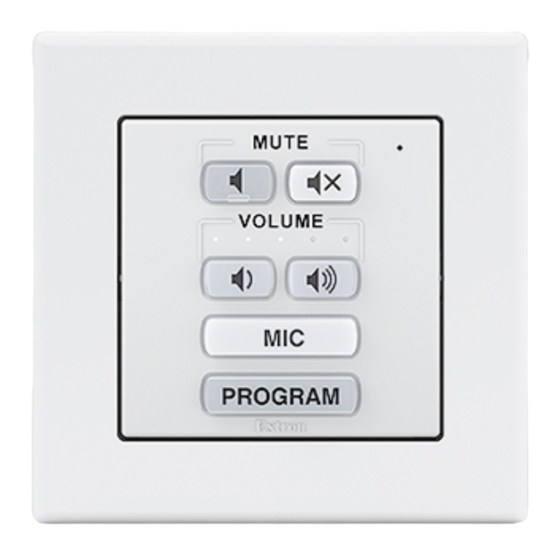
Front Panel Features
MUTE
A A
VOLUME
C C
E E
MIC
F F
PROGRAM
Extron
ACP 106 EU Front Panel
Figure 1.
Mute Buttons
A
Transmit LED
B
Volume Buttons
C
Volume LED Meter
D
Function Button 1
E
Function Button 2
F
Planning the System and Installation
When planning to install an ACP system, consider how many ACP panels to use, maximum cable distance, and mounting (see
the ACP 106 EU and ACP 106 MK product pages at
Installation
Step 1: Get Ready
Use the following checklist to prepare for the installation:
…
Download and install the latest version of software, firmware, and device drivers needed to configure the host device and
configure the connected ACP products (see the host device user guide, available on www.extron.com, for details on
software and drivers).
…
Obtain cables, mounting hardware, and any other supplies required for ACP 106 EU and MK installation.
B B
D D
www.extron.com
Rear Panel Features
A A
C C
B B
D D
ACP 106 EU Rear Panel
Figure 2.
ACP Ports (2)
A
Connection Status LED
B
Reset Button
C
Bus ID DIP Switches
D
for more information about the ACP 106 EU/MK).
1
Advertisement

Related Manuals for Extron electronics ACP 106 EU


Summary of Contents for Extron electronics ACP 106 EU
- Page 1 ACP 106 EU/MK. Up to eight ACP panels can be used per host device for more demanding control needs. NOTE: The ACP 106 EU front and rear panels are identical to those of the ACP 106 MK. The only difference is the shape of the plastic faceplate attached to the front of the device. The panels function identically.
-
Page 2: Step 2: Prepare The Installation Site
Extron offers an assortment of mud rings, optional UL Listed in-wall junction boxes, external wall boxes (EWBs), and surface or tabletop mounting boxes for use with the ACP button panels. The ACP 106 EU and ACP 106 MK are 1-gang EU and MK size devices. - Page 3 ACP 106 EU/MK Rear Panel and Bus ID DIP Switch Assembly 1 2 3 4 5 6 000010 Set the bus identification (bus ID) DIP switches for the ACP 106 EU/MK and any other ACP panels being connected to the system. Each ACP device 1 2 3 4 5 6 must have a unique bus ID.
- Page 4 In most cases, the ACP devices are powered by the host DMP Plus Series device. Power is carried on the V+ pin of the ACP 106 EU/MK and other ACP devices.
- Page 5 3/16" (5 mm) Max. +12 VDC + Signal - Signal Ground Cabling ACP Devices with a PS 1220EB Power Inserter Figure 4. ACP 106 EU ACP 106 EU Rear Panel Rear Panel 3/16" (5 mm) Max. Ground ACP port - Signal...
-
Page 6: Device Status
The ACP 106 EU/MK has a rear panel LED that can be used as a diagnostic tool. Your model may have a single monochrome LED (green) or a single bicolor LED that can light green, amber, or red (amber + green). The device status indicated by the... - Page 7 Mounting ACP 106 EU or ACP 106 MK Units to an Electrical Wall Box The ACP 106 EU can be mounted in any standard 1-gang EU electrical junction box. The ACP 106 MK can be mounted in any standard 1-gang MK electrical junction box.
- Page 8 The ACP 106 EU/MK is secured to the metal mounting bracket by two catches (one on each side) and holds the wallplate in place. Removing ACP 106 EU or MK Wall Plates If you need to remove an ACP 106 EU or MK wallplate from where it is mounted, follow these steps: Wall Box...