Table of Contents
Advertisement
Advertisement
Table of Contents

Related Manuals for Chicco MyFit Harness+Booster


Summary of Contents for Chicco MyFit Harness+Booster
- Page 1 Harness+Booster User Guide LIRE LE MODE D’EMPLOI avant d’utiliser cet Mode d’emploi ensemble de retenue. For future use, STORE USER GUIDE in compartment at front of base. Pour consultation ultérieure, RANGER CE MODE D’EMPLOI dans le compartiment situé à l'avant de la base. IM9033.CAN.EF_02...
- Page 2 If you have any problems with your Chicco Child Restraint, or any questions regarding installation or use, please call: En cas de problèmes avec cet ensemble de retenue Chicco, ou pour toute question concernant son installation ou son utilisation, communiquer avec : Elfe Juvenile Products Customer Service 1-800-667-8184 or email us at service@chicco.ca...
-
Page 3: Table Of Contents
TABLE OF CONTENTS / TABLE DES MATIÈRES Registration and Recall Adjusting Recline Enregistrement et rappels Réglage de l’inclinaison Child Guidelines Adjusting Headrest Directives concernant l’enfant Réglage de l’appuie-tête Safe Use Checklist Cup Holder Utilisation sécuritaire – Liste de vérification Porte-gobelets Important Warnings VEHICLE INFORMATION Mises en garde importantes... - Page 4 TABLE OF CONTENTS / TABLE DES MATIÈRES HARNESS MODE BOOSTER MODE RENSEIGNEMENTS SUR LE VÉHICULE MODE SIÈGE D’APPOINT Harness Setup Booster Seat Setup Réglage du harnais Réglage du siège d’appoint Install Using UAS Booster Seat Installation Installation avec le SAU Installation du siège d’appoint Install Using LAP-SHOULDER BELT Securing Child in Booster Seat...
-
Page 5: Registration And Recall
Saint-Laurent (QC) H4S 1N1 or call 1-800-667-8184, or register online at www.chicco.ca ou appeler au 1-800-667-8184 ou enregistrer le produit en ligne à l’adresse www.chicco.ca For recall information, call Transport Canada at 1-800-333-0371 or go to www.tc.gc.ca Pour obtenir de l’information sur les rappels, communiquer avec Transport Canada :... -
Page 6: Child Guidelines
CHILD GUIDELINES HARNESS MODE is designed for children who are at least 2 years old. ONLY use this Child Restraint if the child meets BOTH of the following Weight and Height requirements: MODE HARNAIS est conçu pour les enfants de 2 ans ou plus. Utiliser cet ensemble de retenue SEULEMENT si l’enfant satisfait aux DEUX exigences suivantes en matière de poids et de taille : •... -
Page 7: Directives Concernant L'enfant
DIRECTIVES CONCERNANT L’ENFANT BOOSTER MODE is designed for children who are at least 4 years old. ONLY use this Child Restraint if the child meets ALL of the following requirements: MODE SIÈGE D’APPOINT est conçu pour les enfants de 4 ans ou plus . Utiliser cet ensemble de retenue SEULEMENT si l’enfant satisfait à... -
Page 8: Safe Use Checklist
SAFE USE CHECKLIST YOUR CHILD’S SAFETY DEPENDS ON YOU! You MUST follow the detailed instructions in this User Guide to ensure the steps below are performed correctly! LA SÉCURITÉ DE L’ENFANT EST VOTRE RESPONSABILITÉ! Suivre RIGOUREUSEMENT les instructions de ce mode d’emploi pour que chacune des étapes ci-dessous soit exécutée correctement! Make sure your child meets the age, weight, and height requirements: Refer to the “Child Guidelines”... -
Page 9: Utilisation Sécuritaire - Liste De Vérification
UTILISATION SÉCURITAIRE – LISTE DE VÉRIFICATION Ensure that the Child Restraint is properly leveled when installed: S’assurer que l’ensemble de retenue est correctement mis de niveau une fois installé : Requirements on HARNESS MODE page 60, BOOSTER MODE page 112 Exigences relatives au MODE HARNAIS, page 60,... -
Page 10: Important Warnings
IMPORTANT WARNINGS WARNING DEATH or SERIOUS INJURY CAN OCCUR MISE EN GARDE RISQUE DE BLESSURES GRAVES OU MORTELLES FAILURE TO FOLLOW THESE INSTRUCTIONS AND THE PRODUCT LABELS CAN RESULT IN SERIOUS INJURY OR DEATH TO YOUR CHILD. LE NON-RESPECT DES INSTRUCTIONS CI-DESSOUS ET DES DIRECTIVES FIGURANT SUR LES ÉTIQUETTES DE CE PRODUIT POURRAIT ENTRAÎNER DES BLESSURES GRAVES OU MORTELLES. -
Page 11: Mises En Garde Importantes
MISES EN GARDE IMPORTANTES • Before installing this Child Restraint in a vehicle, be sure to also check the vehicle owner’s manual for information on proper installation. Avant d’installer cet ensemble de retenue dans un véhicule, consulter le manuel d’entretien du véhicule pour toute information concernant l’installation d’un siège d’auto. - Page 12 IMPORTANT WARNINGS WARNING DEATH or SERIOUS INJURY CAN OCCUR MISE EN GARDE RISQUE DE BLESSURES GRAVES OU MORTELLES Make Sure Child Fits This Child Restraint S’assurer que cet ensemble de retenue est adapté à l’enfant • Use ONLY in BOOSTER MODE with children who weigh between 18 kg (40 lbs) and 45.3 kg (100 lbs) and whose height is 97 - 145 cm (38 - 57 inches).
- Page 13 MISES EN GARDE IMPORTANTES A snug strap should not allow any slack. It lies in a relatively straight line without sagging. It does not press on the child’s flesh or push the child’s body into an unnatural position. Lorsqu’elles sont étroitement ajustées, les sangles ne doivent présenter aucun mou. Elles doivent être relativement droites et ne doivent pas s’affaisser.
- Page 14 IMPORTANT WARNINGS WARNING DEATH or SERIOUS INJURY CAN OCCUR MISE EN GARDE RISQUE DE BLESSURES GRAVES OU MORTELLES Secure Child Properly Attacher correctement l’enfant • ALWAYS check to make sure the buckle is securely latched. If the buckle separates, child could be killed or seriously injured.
- Page 15 MISES EN GARDE IMPORTANTES • Position Lap-Shoulder Belt on your child in this Booster Seat. A loose or improperly positioned Lap-Shoulder Belt could cause the child to be ejected in a sudden stop or crash, resulting in serious injury or death. Ajuster la ceinture sous-abdominale et le baudrier au corps de l’enfant dans le siège d’appoint.
- Page 16 IMPORTANT WARNINGS WARNING DEATH or SERIOUS INJURY CAN OCCUR MISE EN GARDE RISQUE DE BLESSURES GRAVES OU MORTELLES Install Child Restraint Correctly Installer l’ensemble de retenue correctement • ALWAYS install this Child Restraint in a back seat if possible. Dans la mesure du possible, TOUJOURS installer cet ensemble de retenue sur un siège arrière du véhicule.
- Page 17 MISES EN GARDE IMPORTANTES • ALWAYS use this Child Restraint in the forward-facing orientation. TOUJOURS installer cet ensemble de retenue sur les sièges orientés vers l’avant. • ALWAYS secure this Child Restraint with the vehicle’s child restraint anchorage system (UAS) if available OR the vehicle seat belt when used in harness mode.
- Page 18 IMPORTANT WARNINGS WARNING DEATH or SERIOUS INJURY CAN OCCUR MISE EN GARDE RISQUE DE BLESSURES GRAVES OU MORTELLES Install Child Restraint Correctly Installer l’ensemble de retenue correctement • ALWAYS secure this seat, with the UAS system or the vehicle’s lap-shoulder belt when unoccupied. It could injure other occupants in a sudden stop or crash.
- Page 19 MISES EN GARDE IMPORTANTES • NEVER use Child Restraint in a vehicle seating position where it cannot be secured tightly when installed for harness mode. A loosely installed Child Restraint will not protect your child in a crash. Lorsqu’il est utilisé en mode harnais, NE JAMAIS installer l’ensemble de retenue sur un siège de véhicule où...
- Page 20 Chicco. Doing so will void the warranty of this Child Restraint. NE PAS utiliser d’accessoires, de coussins ou autres produits qui n’ont pas été fournis avec l’ensemble de retenue, sauf s’ils sont approuvés par Chicco. Le non-respect de cette directive annulera la garantie de l’ensemble de retenue.
- Page 21 Ne pas modifier l’ensemble de retenue. • NEVER remove harness from Child Restraint without the proper removal and installation instructions available from Chicco. Contact us by visiting the Chicco website at www.chicco.ca or call 1-800-667-8184. NE JAMAIS retirer le harnais de l’ensemble de retenue sans suivre les instructions appropriées de retrait et d’installation fournies par Chicco.
-
Page 22: Best Practices
BEST PRACTICES • Ensure all vehicle occupants are properly restrained before traveling. Unrestrained occupants can be thrown around and may be seriously injured or seriously injure other occupants in a sharp turn, sudden stop or crash. S’assurer que tous les occupants du véhicule sont attachés correctement avant de prendre la route. -
Page 23: Meilleures Pratiques
• Never use any accessories that are not included with this Child Restraint, unless specifically approved by Chicco. For more information, go to www.chicco.ca. Ne jamais utiliser d’accessoires qui n’ont pas été fournis avec l’ensemble de retenue, sauf s’ils sont approuvés par Chicco. Pour obtenir de plus amples renseignements, consulter le site www.chicco.ca. -
Page 24: Need Help
Voici plusieurs ressources à consulter pour vérifier si l’ensemble de retenue est installé correctement : • Contact Chicco, Canada by visiting our website at www.chicco.ca or calling our Customer Service 1-800-667-8184. Please have Model and Serial Number available when you call. These are located on a label on the bottom of the Child Restraint. -
Page 25: Besoin D'aide
BESOIN D’AIDE? • Refer to your vehicle manual for Child Restraint installation tips. Consulter les conseils relatifs à l’installation d’un ensemble de retenue dans le manuel d’entretien du véhicule. • Contact a certified Child Passenger Safety Technician in your area. Communiquer avec un technicien qualifié... -
Page 26: Child Restraint Components
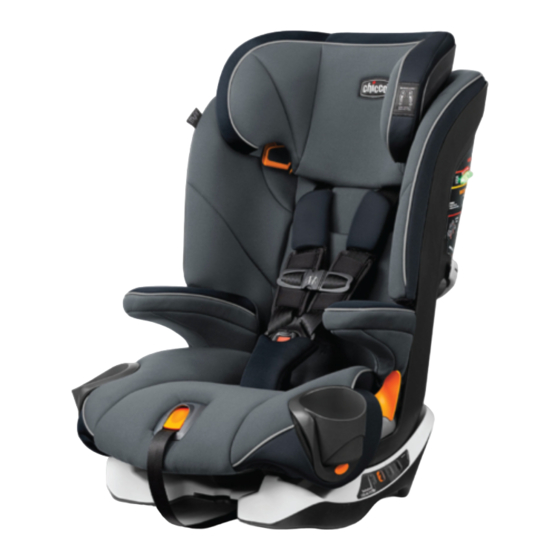
CHILD RESTRAINT COMPONENTS Booster Shoulder Belt Guide Shoulder Pads Guide de baudrier Couvre-bretelles Chest Clip Chest Clip Pads Coussins de Attache l’attache pectorale pectorale Harness Buckle Harness Boucle du harnais Release Button Bouton Booster de réglage Belt Path du harnais Point de passage de la ceinture pour le siège d’appoint... -
Page 27: Composants De L'ensemble De Retenue
COMPOSANTS DE L’ENSEMBLE DE RETENUE Harness Strap Bretelle du harnais UAS Storage Crotch Strap Pad Compartment Coussins Compartiment de de la sangle rangement pour SAU d’entrejambe Cup Holder Harness Adjustment Porte-gobelet Strap Cup Holder Sangle Release Button d’ajustement du harnais Bouton de retrait du porte-gobelet... - Page 28 CHILD RESTRAINT COMPONENTS Headrest Tether Adjustment Tab Strap Dispositif de Sangle réglage de d’attache l’appuie-tête Tether Storage Rangement de la sangle d’attache Recline Position Indicator Indicateur d’inclinaison...
- Page 29 COMPOSANTS DE L’ENSEMBLE DE RETENUE Bubble Level Indicator Niveau à bulle Vehicle Belt Vehicle Belt Lock-Off Lock-Off Dispositif de Dispositif blocage de la de blocage ceinture de sécurité de la ceinture de sécurité UAS Adjuster Sangle de réglage du SAU...
- Page 30 CHILD RESTRAINT COMPONENTS TETHER: SANGLE D’ATTACHE : Tether Strap Sangle d’attache Tether Strap Adjuster Dispositif de réglage de la sangle d’attache Tether Hook Crochet d’attache...
- Page 31 COMPOSANTS DE L’ENSEMBLE DE RETENUE UAS: SAU : UAS Adjuster Sangle de réglage du SAU UAS Strap Sangle du SAU UAS Connectors Connecteurs du SAU...
-
Page 32: Uas And Tether Storage
UAS AND TETHER STORAGE Always make sure UAS Components are properly stored in the compartments when not in use. Toujours ranger les composants du SAU dans les compartiments prévus lorsqu’ils ne servent pas à l’installation. UAS STORAGE: RANGEMENT DU SAU : Pull forward on the Seat Bottom Pad to locate the UAS Storage Compartment. -
Page 33: Rangement Du Sau Et De La Sangle D'attache
RANGEMENT DU SAU ET DE LA SANGLE D’ATTACHE TETHER STORAGE: RANGEMENT DE LA SANGLE D’ATTACHE : Store Tether in the compartment in the back of Child Restraint when not in use. Attach Tether Hook onto bar and pull on strap to remove slack. -
Page 34: Selecting Harness/Booster Mode
SELECT HARNESS MODE WARNING! HARNESS MODE use of this Child Restraint is ONLY for children who meet ALL of the requirements shown here. If the child is not within these requirements because they are too small, select a different child seat (select a rear facing child restraint). If the child is not within these requirements because the child is too large, review the BOOSTER MODE guidelines on page 34. -
Page 35: Choix Du Mode Harnais Ou Siège D'appoint
CHOIX DU MODE HARNAIS HARNESS MODE with children: Exigences pour l’utilisation du MODE HARNAIS HARNESS MODE MODE HARNAIS NO UAS SANS SAU 11.4 kg 18 kg 29.5 kg • Who are at least two years old. (25 lbs.) (40 lbs.) (65 lbs.) L’enfant doit avoir au moins 2 ans. - Page 36 SELECT BOOSTER MODE WARNING! BOOSTER MODE use of this Child Restraint is ONLY for children who meet ALL of the requirements shown here. If the child is not within these requirements because the child is too small, review the HARNESS MODE guidelines on page 32.
- Page 37 CHOIX DU MODE SIÈGE D’APPOINT BOOSTER MODE with children: Exigences pour l’utilisation du MODE SIÈGE D’APPOINT BOOSTER MODE MODE SIÈGE D’APPOINT 18 kg 45.3 kg (40 lbs.) (100 lbs.) • Who are at least four year old. L’enfant doit avoir au moins 4 ans. • Who weigh between 18 –...
-
Page 38: Adjusting Crotch Strap
ADJUSTING CROTCH STRAP Undo the Chest Clip and Buckle Tongues. Remove Crotch Strap Pad (see page 106). Pull forward on the Seat Bottom pad and push the Crotch Strap through the slot on the Seat Bottom pad. Ouvrir l’attache pectorale et sortir les languettes de la boucle. Retirer le coussin de la sangle d’entrejambe (voir page 106). -
Page 39: Réglage De La Sangle D'entrejambe
RÉGLAGE DE LA SANGLE D’ENTREJAMBE With the Crotch Strap in the Position 1 (2a), guide the Crotch Strap forward through the Crotch Strap compartment (2b) and pull the Crotch Strap into Position 2 (2c). Thread Crotch Strap through the correct crotch strap opening and reposition the Seat Bottom pad. -
Page 40: Adjusting Recline
ADJUSTING RECLINE Squeeze the Recline Adjustment Handle on the front of the Child Restraint and adjust to a upright or reclined position, as desired (1a). Serrer la poignée de réglage de l’inclinaison située à l’avant de l’ensemble de retenue, puis redresser ou incliner l’ensemble de retenue, selon le cas (1a). -
Page 41: Réglage De L'inclinaison
RÉGLAGE DE L’INCLINAISON... -
Page 42: Adjusting Headrest
ADJUSTING HEADREST Correctly fit the Child Restraint to your child by adjusting the Headrest. Pull up on the Headrest Adjustment Tab located on the back of the Child Restraint, and adjust the Headrest up or down. Adapter correctement l’ensemble de retenue à l’enfant en réglant l’appuie-tête. -
Page 43: Réglage De L'appuie-Tête
RÉGLAGE DE L’APPUIE-TÊTE The Headrest has 9 height positions to allow the Child Restraint to grow with your child. Ensure that the child’s head is positioned correctly within the Headrest and that the Shoulder Belt is positioned correctly at or just above the child’s shoulders. -
Page 44: Cup Holder
CUP HOLDER WARNING - Do NOT use Cup Holder to hold hot liquids. PLASTIC CONTAINERS ONLY - No glass or metal containers. Only use cups with less than 355 ml (12 oz) capacity. Never place sharp or pointed objects in Cup Holder. In a crash these objects could hit you or your child and cause serious injuries. -
Page 45: Porte-Gobelets
PORTE-GOBELETS REMOVING THE CUP HOLDER: RETRAIT DES PORTE-GOBELETS : To remove, press the button located on the bottom edge of the Cup Holder. Lift up to remove. Appuyer sur le bouton qui se trouve sur la bordure inférieure des porte-gobelets, puis soulever chaque porte-gobelet pour le détacher de l’ensemble de retenue. -
Page 46: Vehicle Seating Positions
VEHICLE SEATING POSITIONS WARNING! WHEN USING THIS CHILD RESTRAINT, DO NOT PLACE THIS CHILD RESTRAINT IN A VEHICLE SEATING LOCATION WITH A FRONTAL AIR BAG, UNLESS THE AIR BAG CAN BE TURNED OFF. MISE EN GARDE! NE PAS INSTALLER CET ENSEMBLE DE RETENUE SUR UN SIÈGE DE VÉHICULE MUNI D’UN COUSSIN GONFLABLE FRONTAL, SAUF SI LE COUSSIN GONFLABLE EST DÉSACTIVÉ. -
Page 47: Choix De L'emplacement Dans Le Véhicule
CHOIX DE L’EMPLACEMENT DANS LE VÉHICULE The back seat is the safest place for children 12 and under. See your vehicle owner’s manual for Booster Seat installation and instructions. Le siège arrière et l’endroit le plus sûr pour les enfants de 12 ans ou moins. Consulter les directives d’installation d’un siège d’appoint dans le manuel d’entretien du véhicule. - Page 48 VEHICLE SEATING POSITIONS Some vehicles have no seating positions which are compatible with this Child Restraint. If in doubt, contact the vehicle manufacturer for assistance. Only forward-facing vehicle seats should be used with this Child Restraint. Certains véhicules n’offrent aucun siège convenant à...
- Page 49 CHOIX DE L’EMPLACEMENT DANS LE VÉHICULE Make sure no more than 7.6 cm (3 inches) of the Child Restraint base is past the edge of the vehicle seat. S’assurer que la base de l’ensemble de retenue ne dépasse pas le bord du siège du véhicule de plus de 7,6 cm (3 po).
-
Page 50: Vehicle Seat Belts Harness Mode
VEHICLE SEAT BELTS - HARNESS MODE The information in this section only applies to installation with vehicle seat belts in HARNESS MODE La présente section concerne uniquement l’installation de l’ensemble de retenue en MODE HARNAIS à l’aide des ceintures du véhicule. Vehicle seat belts differ from vehicle to vehicle. - Page 51 CEINTURES DU VÉHICULE – MODE HARNAIS The following types of vehicle belts MUST NOT be used to install this Child Restraint in HARNESS MODE. If any of the belt types listed below are in the chosen seating position, choose another vehicle seating position OR use UAS if available. Les types de ceintures ci-dessous ne doivent PAS servir à...
-
Page 52: Vehicle Seat Belts Booster Mode
VEHICLE SEAT BELTS - BOOSTER MODE The information in this section only applies to installation with vehicle seat belts in BOOSTER MODE La présente section concerne uniquement l’installation de l’ensemble de retenue MODE SIÈGE D’ A PPOINT à l’aide des ceintures du véhicule. Shoulder belt with switchable retractor: Baudrier à... -
Page 53: Mode Siège D'appoint
CEINTURES DU VÉHICULE – MODE SIÈGE D’APPOINT The following types of vehicle belts MUST NOT be used to install this Child Restraint in BOOSTER MODE. Les types de ceintures ci-dessous ne doivent PAS servir à l’installation de l’ensemble de retenue en MODE SIÈGE D’APPOINT. -
Page 54: What Is Uas
WHAT IS UAS? WARNING: This Child Restraint is designed to be used with lower UAS anchors at the standard spacing 28 cm (11 inches) ONLY! Refer to vehicle owner’s manual for information about UAS and Child Restraint installation positions. MISE EN GARDE : L’ensemble de retenue est conçu pour utilisation avec un SAU dont les ancrages sont placés à... -
Page 55: Qu'est-Ce Que Le Sau
QU’EST-CE QUE LE SAU? UAS in the vehicle consists of two lower anchor points. Some vehicle owner’s manuals use the term “ISOFIX”. Vehicle UAS can also be used in vehicle seating positions Lower Anchor Points equipped with ISOFIX. Le SAU comprend deux points d’ancrage inférieurs. Certains manuels d’entretien utilisent le terme «... -
Page 56: What Is A Tether
WHAT IS A TETHER? Tether anchor locations vary from vehicle to vehicle. Check your vehicle owner’s manual and look for the tether anchor symbol as shown. A tether reduces movement of a forward facing child restraint in a crash and helps to achieve a tight installation. L’emplacement du point d’ancrage de la sangle d’attache varie d’un véhicule à... - Page 57 QU’EST-CE QUE LE POINT D’ANCRAGE DE LA SANGLE D’ATTACHE? Vehicle Roof Toit du véhicule Rear Shelf Tablette arrière Back Wall Paroi arrière Back of Seat Dos du siège Vehicle Floor Plancher du véhicule...
-
Page 58: Harness Setup
HARNESS SETUP Before placing the Child Restraint in the vehicle, remove the tether from the tether compartment. Avant d’asseoir l’enfant sur l’ensemble de retenue à l’intérieur du véhicule, sortir la sangle d’attache de son compartiment. See page 44 for “Vehicle Seating Positions” before installing. Make sure the vehicle is on a level surface, if possible. -
Page 59: Réglage Du Harnais
RÉGLAGE DU HARNAIS TILT INCLINER... - Page 60 HARNESS SETUP Place the Child Restraint on the vehicle seat making sure the installation lines (located on the Seat Base) are PARALLEL with the vehicle seating surface. Placer l’ensemble de retenue sur le siège du véhicule; s’assurer que les lignes guides d’installation (situées sur la base de l’ensemble de retenue) sont PARALLÈLES à...
- Page 61 RÉGLAGE DU HARNAIS Installation Lines Vehicle Seating Lignes guides Surface d’installation Assise du siège du véhicule...
- Page 62 HARNESS SETUP With the Child Restraint facing forward on selected vehicle seat; make sure it is not blocking the vehicle belt buckle. Lay Tether Strap over the back of the vehicle seat. L’ensemble de retenue doit être orienté vers l’avant sur le siège de véhicule choisi;...
- Page 63 RÉGLAGE DU HARNAIS Installation Options: Options d’installation : • UAS installation continued on page 62. Installation avec SAU – suite à la page 62. • Lap-Shoulder Belt installation continued on page 70. Installation avec ceinture sous-abdominale et baudrier – suite à la page 70. •...
-
Page 64: Install Using Uas
INSTALL USING UAS Do not use the UAS anchors of the Child Restraint anchorage system with the internal harness of the child restraint when restraining a child weighing more than 18 kg (40 lbs). Always use the Top Tether. Ne pas utiliser les ancrages du SAU de l’ensemble de retenue pour fixer cet ensemble de retenue lorsque l’enfant attaché... - Page 65 RÉGLAGE DU HARNAIS If UAS anchors are out and in correct position skip to Step 6 (pg 66). Undo the snap attaching the Armrest Fabric to the Backrest Seat Pad. Repeat this step for the other side. Si les ancrages du SAU sont sortis et placés correctement, passer à l’étape 6 (page 66).
- Page 66 INSTALL USING UAS Thread the UAS connectors behind the seat fabric and out the side openings on the seat back, as shown. Passer les connecteurs du SAU derrière la housse du siège par les ouvertures de chaque côté du dossier, comme l’indique l’illustration. Loosen BOTH UAS Adjuster straps to their full length.
-
Page 67: Installation Avec Le Sau
INSTALLATION AVEC SAU... - Page 68 INSTALL USING UAS Reminder: Make sure to lay the tether strap over the seat before installing in UAS mode. Before placing the Child Restraint in the vehicle, remove the tether from the tether compartment. Rappel : S’assurer de passer la sangle d’attache par-dessus le dossier du siège du véhicule avant d’attacher l’ensemble de retenue à...
- Page 69 INSTALLATION AVEC SAU Do not install by this method for a child weighing more than 18 kg (40 lbs). Ne pas utiliser ce mode d’installation si l’enfant pèse plus de 18 kg (40 lb). “CLICK” “CLIC” “CLICK” “CLIC”...
- Page 70 INSTALL USING UAS While pushing down on the Child Restraint (7a), pull on the UAS Adjuster strap to tighten (7b). Presser la base contre le siège du véhicule (7a) et, simultanément, tirer sur la sangle d’ajustement du SAU jusqu’à ce qu’elle soit bien tendue (7b). Locate Tether Anchor in your vehicle.
- Page 71 INSTALLATION AVEC SAU CHECK YOUR WORK VÉRIFIER L’INSTALLATION Hold Child Restraint at each side near forward-facing vehicle belt path. Pull side to side and forward. Child Restraint should not move more than 25 mm (1”) from vehicle seat back or side-to-side. En tenant l’ensemble de retenue près des points passage de la ceinture, tirer d’un côté, de l’autre, puis vers l’avant.
-
Page 72: Install Using Lap-Shoulder Belt
INSTALL USING LAP-SHOULDER BELT Undo the snap attaching the Armrest Fabric to the Backrest Seat Pad. Repeat this step for the other side. Détacher le bouton-pression qui sert à fixer la housse de l’accoudoir sur la housse du dossier. Procéder ainsi des deux côtés. Route vehicle lap-shoulder belt through the red HARNESS MODE seat belt path on the side of Child Restraint. - Page 73 INSTALLATION AVEC LA CEINTURE SOUS-ABDOMINALE ET LE BAUDRIER...
- Page 74 INSTALL USING LAP-SHOULDER BELT Lift up on the Backrest Seat Pad. Pass the vehicle belt along the back of the Child Restraint and pull the vehicle belt down through the red HARNESS MODE seat belt path on the opposite side of the Child Restraint.
- Page 75 INSTALLATION AVEC LA CEINTURE SOUS-ABDOMINALE ET LE BAUDRIER “CLICK” “CLIC”...
- Page 76 INSTALL USING LAP-SHOULDER BELT While pushing down on the Child Restraint (5a) pull the vehicle shoulder belt (5b) to tighten vehicle lap belt. Presser la base contre le siège du véhicule (5a) et, simultanément, tirer sur le baudrier (5b) pour tendre la ceinture sous-abdominale. While still pulling the shoulder belt tight, slide the vehicle shoulder belt into the Lock-Off.
- Page 77 INSTALLATION AVEC LA CEINTURE SOUS-ABDOMINALE ET LE BAUDRIER...
- Page 78 INSTALL USING LAP-SHOULDER BELT Locate Tether anchor in your vehicle. Attach Tether Hook. Pull Tether Adjuster strap to tighten. Trouver le point d’ancrage de la sangle d’attache dans le véhicule. Fixer la sangle d’attache au point d’ancrage à l’aide du crochet. Tirer sur la sangle jusqu’à...
- Page 79 INSTALLATION AVEC LA CEINTURE SOUS-ABDOMINALE ET LE BAUDRIER CHECK YOUR WORK VÉRIFIER L’INSTALLATION Hold Child Restraint at each side near FORWARD-FACING vehicle belt path. Pull side to side and forward. Vehicle belt should remain tight and Child Restraint should not move more than 25 mm (1”) from vehicle seat back or side-to-side. En tenant l’ensemble de retenue près des points passage de la ceinture, tirer d’un côté, de l’autre, puis vers l’avant.
-
Page 80: Install Using Lap Belt Only
INSTALL USING LAP BELT ONLY Undo the snap attaching the Armrest Fabric to the Backrest Seat Pad. Repeat this step for the other side. Détacher le bouton-pression qui sert à fixer la housse de l’accoudoir sur la housse du dossier. Procéder ainsi des deux côtés. Route vehicle lap belt through the red HARNESS MODE seat belt... -
Page 81: Installation Avec La Ceinture Sous
INSTALLATION AVEC LA CEINTURE SOUS-ABDOMINALE SEULEMENT... - Page 82 INSTALL USING LAP BELT ONLY Lift up on the Backrest Seat Pad. Pass the vehicle belt along the back of the Child Restraint and pull the vehicle belt down through the red HARNESS MODE seat belt path on the opposite side of the Child Restraint.
- Page 83 INSTALLATION AVEC LA CEINTURE SOUS-ABDOMINALE SEULEMENT “CLICK” “CLIC”...
- Page 84 INSTALL USING LAP BELT ONLY While pushing down on the Child Restraint (5a) pull the loose end of the vehicle lap belt (5b) to tighten. Presser la base contre le siège du véhicule (5a) et, simultanément, tirer sur l’extrémité libre de la ceinture sous-abdominale (5b) pour tendre la ceinture.
- Page 85 INSTALLATION AVEC LA CEINTURE SOUS-ABDOMINALE SEULEMENT CHECK YOUR WORK VÉRIFIER L’INSTALLATION Hold Child Restraint at each side near FORWARD-FACING vehicle belt path. Pull side to side and forward. Vehicle belt should remain tight and Child Restraint should not move more than 25 mm (1”) from vehicle seat back or side-to-side. En tenant l’ensemble de retenue près des points passage de la ceinture, tirer d’un côté, de l’autre, puis vers l’avant.
-
Page 86: Securing Child With Harness
SECURING CHILD WITH HARNESS If Crotch Strap is under child, it will need to be re-positioned. Refer to page 36 “Adjusting Crotch Strap”. Si la sangle d’entrejambe se trouve sous l’enfant, il faut la déplacer. Consulter la section Réglage de la sangle d’entrejambe à la page 36. Loosen Harness by pressing Harness Release Button on the front of the Child Restraint and pulling out on both of the Harness Straps. -
Page 87: Attacher L'enfant Avec Le Harnais
ATTACHER L’ENFANT AVEC LE HARNAIS... - Page 88 SECURING CHILD WITH HARNESS Place child in Child Restraint with child’s back flat against the back of the seat. Pull Harness Straps over the child’s shoulders and around the child’s waist. Make sure there are no twists in Harness Strap. Asseoir l’enfant sur l’ensemble de retenue et s’assurer qu’il est bien appuyé...
- Page 89 ATTACHER L’ENFANT AVEC LE HARNAIS...
- Page 90 SECURING CHILD WITH HARNESS Adjust Harness Strap height position up or down by pulling up on the Headrest Adjustment Tab on the back of the Child Restraint and moving the Headrest up or down. Position the Harness Straps at or just above the child’s shoulders.
- Page 91 ATTACHER L’ENFANT AVEC LE HARNAIS AT OR ABOVE MÊME HAUTEUR PLUS HAUT...
- Page 92 SECURING CHILD WITH HARNESS Insert each Buckle Tongue into Harness Buckle; listen for a click (6a). Pull up firmly on both Buckle Tongues to make sure that they are securely latched (6b). Insérer les languettes dans la boucle; chaque languette doit se mettre en place avec un déclic (6a).
- Page 93 ATTACHER L’ENFANT AVEC LE HARNAIS “CLICK” “CLIC”...
- Page 94 SECURING CHILD WITH HARNESS Fasten Chest Clip by snapping both sides together; listen for a click. Emboîter les deux pièces de l’attache pectorale; appuyer pour que l’attache se ferme avec un déclic. Push Chest Clip, Chest Clip Pads and Shoulder Pads down away from the child’s neck and towards the Harness Buckle.
- Page 95 ATTACHER L’ENFANT AVEC LE HARNAIS “CLICK” “CLIC”...
- Page 96 SECURING CHILD WITH HARNESS Tighten the harness by pulling slowly on Harness Adjustment Strap until the harness is snug on child (9a). If you can pinch a fold in the strap at the child’s shoulders, harness is too loose (9b). If the harness is too loose pull the Harness Adjuster strap more.
- Page 97 ATTACHER L’ENFANT AVEC LE HARNAIS...
-
Page 98: Securing Child Checklist
SECURING CHILD CHECKLIST Harness Straps must be snug. If you can pinch a fold in the strap, the harness is too loose. A snug strap should not allow any slack. It lies in a relatively straight line without sagging. It does not press on the child’s flesh or push the child’s body into an unnatural position. -
Page 99: Attacher L'enfant - Liste De Vérification
ATTACHER L’ENFANT – LISTE DE VÉRIFICATION Check the position of Chest Clip: Chest Clip should be centered on the child’s chest, level with the armpits. Vérifier la position de l’attache pectorale : l’attache pectorale doit être centrée sur la poitrine de l’enfant, à... -
Page 100: Booster Seat Setup
BOOSTER SEAT SETUP Store the Harness Straps and Crotch Strap properly when using the Child Restraint in BOOSTER MODE. Ranger correctement le harnais et la sangle d’entrejambe avant d’utiliser l’ensemble de retenue en MODE SIÈGE D’APPOINT. Completely loosen Harness by pressing Harness Release Button on the front of the Child Restraint and pulling out on both of the Harness Straps as far as possible. -
Page 101: Réglage Du Siège D'appoint
RÉGLAGE DU SIÈGE D’APPOINT... - Page 102 BOOSTER SEAT SETUP Pull the fabric out from the groove around the Child Restraint. Repeat for the other side. Extraire le tissu de la rainure autour de l’ensemble de retenue. Procéder ainsi des deux côtés. Unhook the elastic strap from the side hook (4a) and the top hook (4b) located near the vehicle belt path.
- Page 103 RÉGLAGE DU SIÈGE D’APPOINT...
- Page 104 BOOSTER SEAT SETUP Undo the snap attaching the Armrest Fabric to the Backrest Seat Pad. Repeat this step for the other side. Détacher le bouton-pression qui sert à fixer la housse de l’accoudoir sur la housse du dossier. Procéder ainsi des deux côtés. Remove the Backrest Seat Pad from the Child Restraint.
- Page 105 RÉGLAGE DU SIÈGE D’APPOINT...
- Page 106 BOOSTER SEAT SETUP Connect the Chest Clip together and slide it down to the buckle tongues. Insert the Chest Clip and the buckle tongues into the compartment at the bottom of the Seat Back. Emboîter les deux pièces de l’attache pectorale et baisser l’attache jusqu’aux languettes de la boucle.
- Page 107 RÉGLAGE DU SIÈGE D’APPOINT...
- Page 108 BOOSTER SEAT SETUP Remove the Crotch Strap Pad by pushing the fabric Tab through the slot on the BACK of the Harness Buckle (10a). Then pull Tab out of the FRONT (10b) and remove Crotch Strap Pad (10c). Retirer le coussin de la sangle d’entrejambe : insérer la languette en tissu dans la fente DERRIÈRE la boucle du harnais (10a).
- Page 109 RÉGLAGE DU SIÈGE D’APPOINT...
- Page 110 BOOSTER SEAT SETUP To Store the Crotch Strap, fit the Crotch Strap buckle into the Crotch Strap compartment, which is located next to the crotch strap adjustment slots in the seat base (12a). Pour ranger la sangle d’entrejambe, placer la boucle de la sangle d’entrejambe dans le compartiment situé...
- Page 111 RÉGLAGE DU SIÈGE D’APPOINT...
-
Page 112: Booster Seat Installation
BOOSTER SEAT INSTALLATION BOOSTER INSTALLATION See page 47 for “Vehicle Seating Positions” before installing. Make sure the vehicle is on a level surface, if possible. Avant l’installation, consulter la section Choix de l’emplacement dans le véhicule (page 47). Mettre le véhicule sur un terrain plat, dans la mesure du possible. -
Page 113: Installation Du Siège D'appoint
INSTALLATION DU SIÈGE D’APPOINT If the vehicle headrest pushes the Child Restraint forward, check your vehicle owner’s manual to see if the headrest removal is permitted. If so, follow the vehicle owner’s manual to remove the headrest. If it is not permitted, raise the vehicle headrest or move the Child Restraint to a different vehicle seating location. - Page 114 BOOSTER SEAT INSTALLATION BOOSTER INSTALLATION Make sure the Child Restraint is not blocking the vehicle belt buckle. S’assurer que l’ensemble de retenue ne bloque pas l’accès à la boucle de la ceinture de sécurité. Installation on a Level Surface: Locate the Bubble Level Indicator label and re-adjust the seat recline to any position that the Bubble falls between the lines.
- Page 115 INSTALLATION DU SIÈGE D’APPOINT À P L AT L E V E L...
- Page 116 BOOSTER SEAT INSTALLATION BOOSTER INSTALLATION Use of UAS in BOOSTER MODE is completely optional. If UAS is not used, make sure the UAS Straps are properly stored. See page 30. L’utilisation du SAU est facultative en MODE SIÈGE D’APPOINT. Si le siège d’appoint est installé...
- Page 117 INSTALLATION DU SIÈGE D’APPOINT If the seat is not secured with the UAS anchors, the seat must be secured with the vehicle Lap-Shoulder belt when not in use. S’il n’est pas fixé aux ancrages du SAU, le siège d’appoint doit rester attaché au moyen de la ceinture abdominale et du baudrier du véhicule, même lorsque l’enfant ne s’y trouve pas.
- Page 118 SECURING CHILD IN BOOSTER SEAT Place the child into the Child Restraint, making sure the child is sitting with his/her back against the Backrest. Asseoir l’enfant sur le siège d’appoint; s’assurer que l’enfant a le dos bien appuyé contre le dossier. The Shoulder Belt guide must be positioned at or just slightly above the child’s shoulders.
-
Page 119: Attacher L'enfant Sur Le Siège D'appoint
ATTACHER L’ENFANT SUR LE SIÈGE D’APPOINT... - Page 120 SECURING CHILD IN BOOSTER SEAT BOOSTER INSTALLATION Route the lap belt UNDER the 1st Armrest and across the child’s thighs. Then route the shoulder belt and the lap belt UNDER the 2nd Armrest closest to the vehicle buckle, as shown. Passer la ceinture sous-abdominale SOUS le premier accoudoir, puis sur les cuisses de l’enfant.
- Page 121 ATTACHER L’ENFANT SUR LE SIÈGE D’APPOINT “CLICK” “CLIC”...
-
Page 122: Securing Child In Booster Seat
SECURING CHILD IN BOOSTER SEAT Slide the shoulder belt between the Headrest and the side of the Seat back (5a). Thread the shoulder belt through the orange Shoulder Belt Guide (5b), located at the bottom of the headrest. Make sure the Shoulder belt lays flat and is not twisted (5c). - Page 123 ATTACHER L’ENFANT SUR LE SIÈGE D’APPOINT Ensure the child is secured correctly, as shown. S’assurer que l’enfant est attaché correctement, comme l’indique l’illustration. Check that the shoulder belt is snug on the child’s shoulder and that it does not rub on the neck. It should lie flat across the child’s chest and middle of shoulder.
-
Page 124: Convert To Harness Mode
CONVERT TO HARNESS MODE To convert the Booster Mode back to Harness Mode, remove the Backrest Seat Pad and lift the Headrest Pad. (Refer to pages 98-102 and complete steps 2-6) Pour remettre l’ensemble de retenu en mode harnais, retirer la housse du dossier et soulever la housse de l’appuie-tête. -
Page 125: Retour Au Mode Harnais
RETOUR AU MODE HARNAIS Replace the Backrest Seat Pad by following step on page 98-102 in REVERSE. Replacer la housse du dossier en exécutant EN SENS INVERSE les étapes décrites aux pages 98 à 102. Seat Pad Seat Pad Groove Groove Échancrure Échancrure... -
Page 126: Securing Child Checklist
SECURING CHILD CHECKLIST ALWAYS check to make sure vehicle seat belt is securely buckled. If buckle separates, child could be killed or seriously injured. TOUJOURS s’assurer que la ceinture du véhicule est bouclée solidement. Si elle se détache, l’enfant pourrait subir des blessures graves ou mortelles. ... -
Page 127: Attacher L'enfant - Liste De Vérification
ATTACHER L’ENFANT – LISTE DE VÉRIFICATION Slide the shoulder belt through the orange Shoulder Belt Guide. Passer le baudrier dans le guide de baudrier orange. Do not let your child slide forward or downward while in the Booster Seat. Ne pas laisser l’enfant glisser vers l’avant ou vers le bas lorsqu’il est sur le siège d’appoint. - Page 128 SECURING CHILD CHECKLIST To avoid injury to others, ALWAYS secure this child restraint in BOOSTER MODE when unoccupied. An unsecured Booster Seat could injure other occupants in a sudden stop or crash. Pour éviter les blessures, TOUJOURS attacher l’ensemble de retenue lorsqu’il est utilisé en MODE SIÈGE D’...
- Page 129 ATTACHER L’ENFANT – LISTE DE VÉRIFICATION CHECK YOUR WORK VÉRIFIER L’INSTALLATION Make sure Bubble is between lines on the bubble label. If necessary, loosen the vehicle belt and UAS, re-adjust recline and repeat installation steps to make sure BOOSTER SEAT is installed properly.
-
Page 130: Installation On An Aircraft
INSTALLATION ON AN AIRCRAFT When traveling by airplane with your child, Chicco recommends taking the Child Restraint on the airplane with you so that you can use it with your child. Not only will it protect your child during take-off, landing, and turbulence, it will also allow your child to be more comfortable. -
Page 131: Installation Dans Un Avion
INSTALLATION DANS UN AVION • Install Child Restraint on an aircraft the same way it is installed in a vehicle when using a vehicle lap belt. Reference Lap belt install in Harness Mode on page 78. Dans un avion, installer l’ensemble de retenue de la même façon que dans un véhicule en suivant la méthode d’installation avec ceinture sous-abdominale. -
Page 132: Cleaning And Maintenance
CLEANING AND MAINTENANCE DO NOT USE BLEACH, solvents or household cleaners as they may weaken plastics and straps. NE PAS UTILISER D’AGENTS DE BLANCHIMENT, de solvants ou de produits de nettoyage domestique, car ils peuvent affaiblir les pièces en plastique et les sangles. DO NOT USE SOAPS OR LUBRICANTS on Harness Adjuster Strap, Buckle, and UAS hardware. -
Page 133: Nettoyage Et Entretien
Sponge clean using warm water and mild soap. Towel dry. Laver à l’éponge à l’eau chaude avec du savon doux. Essuyer avec une serviette. For softgood removal instructions visit the Chicco website at www.chicco.ca or call 1-800-667-8184. Pour savoir comment retirer les pièces en tissu, communiquer avec... - Page 134 DO NOT USE Child Restraint if any part of the harness is damaged. For proper removal and installation of the harness straps visit the Chicco website at www.chicco. ca or call 1-800-667-8184. NE PAS UTILISER l’ensemble de retenue si les pièces du harnais sont endommagées de quelque manière que ce soit.
- Page 135 Laisser sécher à l’air. Do NOT remove Adjuster straps. For additional information visit the Chicco website at www.chicco.ca or call 1-800-667-8184.