Shindaiwa DGW500DM Operator's Manual
Hide thumbs
Also See for DGW500DM:
- Owner's and operator's manual (44 pages) ,
- Owner's and operator's manual (44 pages)
Table of Contents
Advertisement
Quick Links
Advertisement
Table of Contents

Related Manuals for Shindaiwa DGW500DM


Summary of Contents for Shindaiwa DGW500DM
- Page 1 OPERATORS MANUAL 500/UK...
-
Page 2: Table Of Contents
10. Simultaneous Use of Welder And Generator ........ 26 11. Checking and Maintenance ............. 26 12. Long Term Storage ................31 13. Trouble Shooting ................32 Shindaiwa Limited POWERCENTER 15 Four Ashes, Wolverhampton, UK PC15-OM-Vs: 1 T: +44 (0)1902 791855... -
Page 3: Safety Guidelines
Introduction Thank you for purchasing Shindaiwa Sound Proof Diesel Engine Generator/Welder. • This user manual was created to ensure the safe operation of this equipment. Therefore, the manufacturer of this equipment strongly recommends that the user follow the instructions herein, to avoid unnecessary accidents and repairs. - Page 4 ()Danger: Suffocation from exhaust fume • Exhaust fume from the engine contains many elements harmful to human. Do not operate this equipment in poorly ventilated area, such as inside a room or in a tunnel. () Danger : Electric Shock •...
-
Page 5: Use
Caution : Explosion • Do not use the equipment or charge the battery, in the case the battery fluid level is lower than the LOWER level. • Battery may emit some combustible gas, so keep it away from fire and sparks. Caution : Fire •... - Page 6 111 Location of Warning labels When the warning labels become unreadable or damaged, place new labels on the appropriate locations, as specified in the following figure. When ordering the label, use the following part numbers. CD Suffocation from exhaust fume (No. 19402-00194) ®...
-
Page 7: Specifications
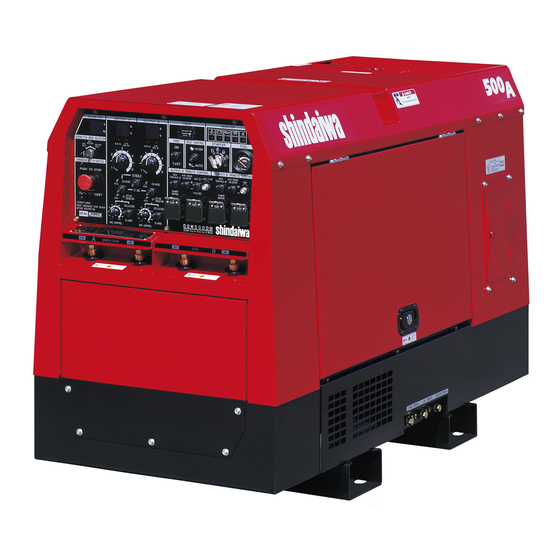
Model DGW500DM Generating Method Rotating Field OPERATION SINGLE DUAL Rated Current (A) Rated Voltage (V) 39.2 29.2 Duty Cycle CC MODE Current Adj. Range (A) 60-500 30 -280 Welding Rod (cf>) 2.6-8.0 2.0 -6.0 © Gouging Rod (cf>) 3.2-9.5 3.2-5.0 ©... - Page 8 CONTROL PANEL WELDING TERMINAL A WELDING TERMINAL B DC METER AC METER VRD LAMP OPERATION MODE SELECTOR SWITCH OUTPUT CONTROL DIAL EMERGENCY STOP SWITCH SINGLE/DUAL ROD SELECTOR SELECTOR SWITCH SWITCH SELECTOR SWITCH ARC CONTROL DIAL IDLE CONTROL HOUR METER STARTER SWITCH MONITOR LAMP SWITCH VRD SWITCH...
- Page 9 1-P RECEPTACLE 3-P RECEPTACLE MAIN BREAKER EARTH LEAKAGE CIRCUIT BREAKER (ELCB) r==�=====�=-F =t== =¥===i 1-P BREAKER 3-P BREAKER BONNET GROUNDING TERMINAL HOLES FOR THE FORKLIFT RIGHT DOOR AIR CLEANER OIL PLUG BATTERY OIL INLET ISOLATOR SUB TANK FUSE (60A, 20A) FUEL INLET FUEL COVER FUEL LEVER...
-
Page 10: Equipment
5-1. Welding Output Control (1) CV/CC The equipment incorporates CV (Constant Voltage) and CC (Constant Current) characteristic feature. Connecting a wire feeder and then turning the CC/CV Selector Switch to [CV-WIRE], semi-automatic welding such as MIG, MAG, SS, etc. is available to perform. -
Page 11: Vrd
5-2. VRD T he equipment incorporates VRD ( Voltage Reduction Device ) feature, for the purpose of protecting an operator from electric shock with welding current. When the VRD Switch is turned to [ON], the voltage changes to 35V or lower during no welding period. -
Page 12: Operation Mode Selector
(5) Circuit Protector for Wire Feeder When the over current (more than SA) is flown into 14-Pin Connector for wire feeder, the Circuit Protector will be activated to shut off the current. <Caution> • Resolve the over current issue to proceed the necessary maintenance when the Circuit Protector was activated, with reset the trip button. -
Page 13: Monitor Lamp
(2) AC Meter The meter displays the 3-Phase voltage (U-V) and the frequency in AC output. <Caution> • While Operation Mode Selector Switch is [GEN. WELDER] or [G EN. ONLY], AC Meter displays 3-Phase voltage and frequency. When the Operation Mode Selector Switch is [WELDER ONLY], AC Meter display will goes off. - Page 14 (2) Battery Charge Monitor Lamp When the battery turns unable to be charged during operation, the battery charge monitor lamp will flash and the automatic shutoff will be engaged. In the event this occurs, consult with the authorized distributor or our engineering section.
-
Page 15: Earth Leakage Relay
5-7. Earth Leakage Relay � Danger : Electric Shock • Ground every grounding terminal to the earth as set out in the manual. If even one of all is unconnected by mistake or accident, it will be much more dangerous for human body than the NO RELAY case, because leaking current inevitably goes through the bod y . -
Page 16: Auto Idle Feature
(3) The Earth Leakage Relay has activated Caution : Electric Shock/ Injuries • Be sure to disconnect all the loads to the equipment when turning the breakers ON again, after the earth leakage relay has activated. When the earth leakage relay has activated, the ELCB (lever) turns to [OFF]. In the case, stop the engine promptly and find the leakage point to repair. -
Page 17: Initialization And Pre-Check
Caution : Fire · Burns · Injuries • When checking engine, always stop the engine, and keep away from fire. Wait until the engine cools down, before performing any checks. 6-1. Checking Engine Oil When checking for engine oil, be sure to keep the equipment leveled, and insert the oil gauge all the way in. -
Page 18: Checking Fuel
(1) Filling to the Reservoir Tank G) Remove the sub tank cap. ® Fill up the sub tank to the FULL level. @ Install the cap back. (2) Filling to the Radiator G) Open the top plate. ® Remove the radiator cap. @ Fill the radiator up to the top. -
Page 19: Checking For Leaks
6-4. Checking Fuel, Engine Oil and Water Leakage Caution : Fire • Do not use this equipment when a leak is found. Repair the equipment before use. Be sure to check any leakage for fuel, oil and coolant/water at the hose connections by opening side doors. -
Page 20: Operation
() Danger : Suffocation from exhaust fume • Exhaust fume from the engine contains many elements harmful to human. Do not operate this equipment in poorly ventilated area, such as inside a room or in a tunnel. Caution : Suffocation from exhaust fume •... -
Page 21: Stopping
<Caution> • Do not drive the starter motor for more than 15 seconds successively. • If you need to restart, wait for 30 seconds or more before retry. • Once the engine has started, never turn the starter switch to [START]. Restart after stopping due to fuel shortage This equipment is incorporated in automatic vacuuming air feature. -
Page 22: Welding Operation
Cg) Turn the Emergency Stop Switch to arrow mark (clockwise) to release the feature. <Caution> • Be sure to re-start the engine after releasing the Emergency Stop feature. • The engine does not start again though the starter motor is running, without releasing the emergency stop feature. -
Page 23: Connection Of Welding Cable
(1) Welding Rod (include Gouging Rod) Application Connection Generals Welding, such as Plus to the Earth (Material) Normal Polarity Construction Minus to holder (Rod) T hin Plate, Build-Up Welding, Plus to holder (Rod) Reverse Polarity Stainless Steel , Gouging Minus to the Earth (Material) (2) Semi-automatic wire feeder Application Connection... -
Page 24: Duty Cycle
8-4. Duty Cycle Duty cycle is the percentage of time the load is being applied in a 10 minutes period. For example, a 60% duty cycle represents 6 minutes of load and 4 minutes of no load in a 10 minutes period. <Caution>... -
Page 25: Generating Operation
(1) Welding Rod (include Gouging Rod) G) Turn the Weld Terminals Switch to [WELD TERMINALS ON]. ® Turn the SINGLE/DUAL Selector Switch to [SINGLE] or [DUAL], according to the operation. @ Turn the CV/CC Selector Switch to [CC-STICK, GOUGING]. @ Turn the Rod Selector Switch to [CELLLOSE] on cellulose rod welding or to [OTHERS] on gouging or ordinal welding rods except cellulose rod. -
Page 26: Output Limitation
9-2. Output Limitation Please refer to the following table, because electric tools and home appliances cannot be judged only by the rated output or the power consumption due to the efficiency and character of the components. Applicable Load (For reference purpose only) Capacity (kW) 1-Phase 3-Phase... - Page 27 Caution : Injuries • Be sure to connect to output terminals or insert a plug to a receptacle, after confirming that all the switches in the loads are positioned to [OFF]. Caution : Damage to the property · Aftermath • Whenever connecting to use medical equipment or appliances, be sure to consult with the medical equipment company, doctor or hospital personnel.
-
Page 28: Simultaneous Use Of Welder And Generator
The circuit breakers (Main, 3-P, 1-P) react on the AC power supply circuit only. In the simultaneous use of welding and generating, there sometimes happens overload to the engine. Refer to the following table and limit the AC power use. •... - Page 29 <Caution> • The authorized technicians should perform all checking and maintenance work, except for the pre-startup checks. • Request for the maintenance item with mark to the authorized distributor or our engineering section. • Always use our genuine parts of replacement. •...
- Page 30 Checking Time Startup Every Every Every Every Every Checking Items Check 1000 2000 50hrs Check/Add Battery Change Water Clean 1 st after 14 Clean Air Element 15 Change Air Element • 1 st • after Adjust Tension V-Belt 17 Change V-Belt years •...
- Page 31 (2) Oil Filter Change First lime 50 hour mark or after Every 200 hours � RIGHT DOOR OIL FILTER CD Drain the engine oil completely, as described in W11 ( 1) Oil Change.11 @ Loosen and remove the oil filter, using an oil filter wrench. @ Smear a little engine oil on the rubber gasket of a new filter.
- Page 32 (4) Clean/Change Fuel Strainer Clean 50 hours and Every 100 hours afterwards Replace Every 400 hours FUEL LEVER RETAINER RING RIGHT DOOR ELEMENT FUEL STRAINER Turn the fuel lever to [CLOSE]. ® Unscrew the retainer ring counterclockwise, and remove the cup and the filter element.
-
Page 33: Long Term Storage
(6) Drain Water from Fuel Tank J Drain Water j Every 200 hours G) Unscrew the fuel drain plug. ® Reinstall the drain plug, after draining water completely ooQooQo <Caution> FUEL DRAIN PLUG • Change the packing, whenever changing oil. •... -
Page 34: Trouble Shooting
If the generator/welder will not be used for more than two months, perform the following maintenance and storage procedures. CD Remove the battery. Cg) Change the engine oil. Drain fuel from the fuel tank, the Fuel Strainer and the Water Separator. @ Clean all parts, cover the generator/welder, and keep it in the storage, away from dust and humidity. - Page 35 Symptoms Possible Cause Corrective Actions 1. SINGLE/DUAL Selector Switch 1. Turn to [SINGLE] mode position is incorrectly selected to [DUAL] mode 2. Wrong Output Control Dial 2. Turn the dial clockwise position 3. Arc Control Dial is set to 3. Turn the Arc Control Dial negative(-) side for CC mode clockwise to positive(+) side Welding Arc is...
- Page 36 13-2. Error Code Display Inspect the following items accordingly when the Error Code E01-E05 are displayed on the control panel. Error No. Possible Causes Corrective Actions Turn the Idle Control Switch to [AUTO] and cool down the unit with no-load operation until [OVERHEAT] Monitor Lamp blinking will be stopped.
- Page 37 STOP WIRE COLORS SOLENOID WATER TEMP. 0 IL PRESS COLOR CODE Block CHARGING MONITOR LAMP White PULL GENERATOR lL le CPRINTED CIRCUIT) � FUEL MOTOR PUMP Green . PREHEAT FREQ. ����� CHARGE PR RELAY RELAY Yellow ""C:= · � Brown G Br W L W FUEL...
- Page 39 14PJN[A) 14PIN(Bl 9PIN{A) 9ViN(8) OUTPUT WORK REHO REMOTE 11 5 V CIRCUIT OUTPU W0!1K CIRCUIT r - , ,---, TRIGGER CONTROL ,---, TR I GGER CONTROL CONTROLLER EART H CONTROLLER B) (0:lI@ A) J� ]) C D E G:X:0 H) 8 ();:@:8) J) (K} F �...
- Page 42 Shindaiw Corporation Head Office : 6-2-11, Ozuka-Nishi, Asaminami-ku,Hiroshima 731-3167 ,Japan Telephone: 81-82-849-2220 FAX: 81-82-849-2481...