iOptron CEM26 Instruction Manual
Center balanced equatorial mount
Hide thumbs
Also See for CEM26:
- Quick start manual (6 pages) ,
- Manual (6 pages) ,
- Instructions (3 pages)

Related Manuals for iOptron CEM26


Summary of Contents for iOptron CEM26
- Page 1 ® iOptron CEM26 Center Balanced Equatorial Mount Instruction Manual Product CEM26 and CEM26EC...
- Page 2 You must hold the mount firmly when disengaging or adjusting the gear switches. Otherwise personal injury and/or equipment damage may occur. Any worm system damage due to improper gear meshing/slippage will not be covered by iOptron’s limited warranty. If you have any questions please contact us at support@ioptron.com...
-
Page 3: Table Of Contents
2.4.2. The LCD Screen ..........................9 2.5. Check the Battery ..........................10 2.6. Bench Testing the Mount ........................10 3. CEM26 Mount Assembly ..........................11 3.1. CEM26 Mount Assembly ........................11 4. Getting Started .............................. 21 4.1. Setup the Mount and Polar Alignment ....................21 4.2. - Page 4 Appendix F. Go2Nova Star List ........................40 IOPTRON TWO YEAR TELESCOPE, MOUNT, AND CONTROLLER WARRANTY ......49 Ver. 1.0 2020.12 iOptron reserves the rights to revise this instruction without notice. Actual color/contents/design/function may differ from those described in this instruction.
-
Page 5: Cem26 Overview
CEM26EC delivers precise pointing and accurate tracking (PE <0.3 arcsec rms on the EC model). The 212,000 object library ensures you’ll never run out of targets to see or image. The CEM26 and CEM26EC set the new standard for compact equatorial mounts. -
Page 6: Cem26 Terms
2. CEM26 Terms 2.1. Parts List SHIPPING CONTENTS Your new CEM26 mount comes in two shipping boxes. One box contains a CEM26/CEM26EC mount, hand controller, one 10.4 lbs (4.7kg) counterweight, counterweight shaft, tripod spreader and accessories. The other box contains a tripod. -
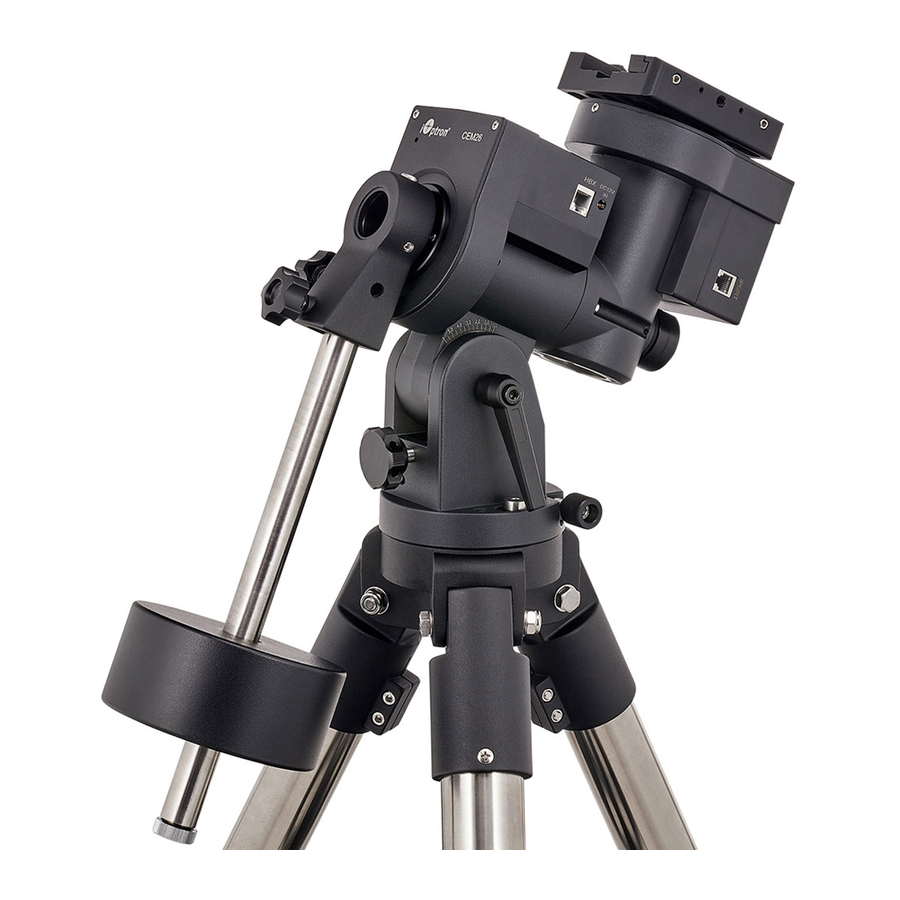
Page 7: Identification Of Parts
Az. adj. knob CW bar Azi. locking screw CW safety screw Tripod Alignment Peg Alignment Peg Center Rod Knob Center Rod Knob Accessory Tray Accessory Tray Tray Locking Knob Tray Locking Knob Tripod Leg Lock Tripod Leg Lock Figure 1.CEM26 mount assembly... -
Page 8: Cem26 Port
8409 hand controller (HC) shown in Figure 4 is the standard controller used on the CEM26 mount. It has a large LCD screen, function, direction, and number keys on the front; and an HBX (6- pin) and a USB port at the bottom. -
Page 9: Key Description
0 Key: Stop the mount during GOTO. Also toggling between starting and stopping tracking. HBX (Handbox) port: connect the HC to the CEM26 mount using a 6P6C RJ11 cable. USB port: connect the HC to a computer for firmware upgrade and computer control. -
Page 10: Check The Battery
The LCD screen will switch to the information screen, as indicated in Figure 6, with pressing any button. Magnitude Target Name Declination Right Ascension Altitude Azimuth N/S Hemisphere Mount Status Current Time Slew Speed Figure 6. 8409 HC LCD Information Screen 1. -
Page 11: Cem26 Mount Assembly
3. CEM26 Mount Assembly 3.1. CEM26 Mount Assembly NOTE: The CEM26 mount is a precision astronomical instrument. It is highly recommended that you read the entire manual and become familiar with the nomenclature and function of all components before starting the assembly. - Page 12 Before pulling the Allen wrench out from the RA axle, make sure the RA gear switch is locked, as shown in Figure 11. There are three RA axle locking positions for the CEM26 mount: Zero Position, East and West position.
- Page 13 Safety Cap back onto the shaft. Move the CW to the bottom of the shaft and tighten the CW locking Screw. CEM26 comes with a 10.4 lbs (4.7 kg) CW, which should be sufficient for an 6” scope with total payloads up to about 13 lbs (6kg). Use extra CW or CW Extension Bar to balance higher payloads.
- Page 14 Figure 14. Install counterweight Step 7. Install telescope CEM26 has a 3.5” Vixen dovetail saddle, with a Center Adjusting Block. This can be used to accommodate dovetail bars with different width and keep the OTA centered. Release the locking screws (blue circled) on the Center Adjusting Bar first.
- Page 15 Step 8. Balance payload After attaching the scope and accessories, the mount head assembly must be balanced in both DEC and RA axes to ensure minimum stresses on the mount driving mechanism. CAUTION: The telescope may swing freely when the R.A. or DEC Gear Switch is disengaged. Always hold on to the mount and/or telescope assembly before releasing the Gear Switches to prevent it from sudden swinging, which can cause personal injuries and/or equipment damages.
- Page 16 GPS OK (It takes a few minutes in normal conditions). STEP 10. Set hand controller If a CEM26 is equipped with a GPS receiver, it will receive the time, longitude and latitude information from satellites after the link is established. However, there are still some parameters need to be entered to reflect your location, such as time zone info (UTC offset) and daylight saving time (DST).
- Page 17 In order to make the hand controller reflect your correct local time, time zone information has to be entered. Press the ◄ or ► key, move the cursor to the third line “UTC -300 Minute(s)” to set the time zone information (add or subtract 60 minutes per time zone). For example: ...
- Page 18 To perform the polar alignment: (1) Level the CEM26 mount and set it to the Zero Position. Make sure the telescope optical axis is parallel to the polar axis (R.A. axis) of the mount. If using a finder scope, adjust it to be parallel to...
- Page 19 (2) Remove both the polar axis cover. Thread the polar scope LED to the Polar Scope. Connect one end of the polar scope power cable to the illumination LED and the other end to the DC12V output located on RA Unit (Figure 22). (3) Turn the mount power on.
- Page 20 STEP 11. Return Mount to Zero Position After polar alignment and balancing OTA, return the mount to Zero Position. The Zero Position is the position with the CW shaft pointing toward the ground, OTA at the highest position with its axis parallel to the polar axis and the OTA pointing to the Celestial Pole.
-
Page 21: Getting Started
4.1. Setup the Mount and Polar Alignment Assemble your CEM26 mount according to Section 3.1. Mount an OTA and accessories, and carefully balance the mount around the polar axis. Turn the mount power switch on. Check the date and site info. -
Page 22: Star Identifying Function
4.6. Power-Down Memorization The CEM26 mount can memorize its R.A. and DEC positions if the mount power is lost during operation, even during high speed slewing. After the power is back, just do a Select and Slew to the same star when the power is lost. -
Page 23: Complete Functions Of Go2Nova 8409 Hand Controller
® The Go2Nova 8409 hand controller for CEM26 mount has a database of over 212,000 objects. Use the ► or ◄ buttons to move the cursor. Use the number buttons to enter the number, or the ▼ or ▲ ”... -
Page 24: Enter R.a. Dec
5.3.1. Pole Star Position ® This function displays the position of the Pole Star for Quick Polar Alignment using the iOptron AccuAlign polar scope. In the Northern Hemisphere the position of Polaris is displayed, while in the Southern Hemisphere the position of Sigma Octantis is shown. -
Page 25: Three Star Align
after the mount slews to it. Press ENTER when finished. The hand controller will prompt you to choose a second star. After centering the second star, the two-star alignment is finished. After the two-star alignment, the altitude and azimuth errors will be displayed. This number can be used to fine tune the Quick Polar Alignment. -
Page 26: Settings
Losmandy/ Takahashi/ Vixen, make sure a proper guiding cable is used. Refer to your guiding camera and guiding software for detailed operation. WARNING: DO NOT plug your ST-4 guiding camera cable into the iOptron port or HBX port. It may damage the mount or guiding camera electronics. -
Page 27: Set Parking Position
5.4.6. Set Parking Position You may park the telescope before powering off the mount. This is very useful if the mount is on a permanent pier or the mount will not be moved in between observation sessions. The mount will keep all the alignment info and reference points. -
Page 28: Language
5.5. Electric Focuser This function controls an iOptron electric focuser. 5.6. PEC Option PEC for short is a system that improves the tracking accuracy of the drive by reducing the number of user corrections needed to keep a guide star centered in the eyepiece. -
Page 29: Pec Data Integrity
5.6.3. PEC Data Integrity This function will check the recorded PEC data integrity. 5.7. Edit User Objects Besides various star lists available in the hand controller, you can add, edit or delete your own user- defined objects. This is especially useful for newly found comets. You can also add your favorite observation object into the user object list for easy sky surfing. -
Page 30: Firmware Information
Add a New Object Browse Objects Delete an Object Clear All Objects Select “Add a New Object”. A screen will be displayed asking you to Enter R.A. and DEC coordinates: Enter R.A. and DEC R.A.: 00h00m00s DEC: +00d00m00s You may enter the R.A. and DEC coordinates of the object you want to store, and press ENTER to confirm. -
Page 31: Maintenance And Servicing
Customer Service hours are 9:00 AM to 5:00 PM, Eastern Time, Monday through Friday. Call in the U.S. 1.781.569.0200. In the unlikely event that the mount requires factory servicing or repairing, write or call iOptron Customer Service Department first to receive a RMA# before returning the mount to the factory. Please provide details as to the nature of the problem as well as your name, address, e-mail address, purchase info and daytime telephone number. -
Page 32: Appendix A. Technical Specifications
Mount weight 10 lb (4.5kg) Payload/Mount weight 2.60 Structure Material All metal, Casting + CNC machined <±10 arcsec for CEM26 Periodic Error (PE)** <0.3 arcsec rms for CEM26EC Permanent PEC/Real-time PEC Φ88mm, 144 teeth aluminum Right Ascension worm wheel Φ88mm, 144 teeth aluminum Declination worm wheel Φ35mm steel... -
Page 33: Appendix B. Go2Nova
® Appendix B. Go2Nova 8409 HC MENU STRUCTURE MENU Select and Slew Solar System Mercury Venus Mars Jupiter Saturn Uranus Neptune Moon Deep Sky Objects Named Object Messier Catalog Caldwell Catalog Abell Catalog Herschel Catalog Stars Named Stars Double/Multi Stars Hipparcors Catalog Comets Asteroids... - Page 34 Alignment Position of Pole Star One Star Alignment Two Star Alignment Three Star Alignment Solar System Align Polar Interate Align View Model Error Clear Alignment Data Settings Set Time and Site Set Beep Set Display Set Maximum Slew Rate Set Guiding Rate Set Parking Position Horizon Position 1 Zenith Position 1...
- Page 35 Electric Focuser PEC Options PEC Playback Record PEC PEC Data Integrity Park Telescope Edit User Objects User Defined Comet Add a New Comet Browse Comets Delete a Comet Clear All Comets Other Objects Add a New Object Browse Objects Delete an Object Clear All Objects Firmware Information Zero Position...
-
Page 36: Appendix C. Gear Meshing Adjustment
Appendix C. Gear Meshing Adjustment CEM26/GEM28 gear is designed adjustable by customer although in most cases not necessary. If you experienced DEC/RA motor stall occasionally, or there is free play between the worm and gear, follow this instruction to adjust the gear meshing. - Page 37 If the motor stalls or the mount does not tracking smoothly, most likely the meshing is too tight. You may loosen it by about 1/8 turn (or less for tracking). Tighten the set screw in the small hole to LOCK the gear screw (important) before test the mount.
-
Page 38: Appendix D. Firmware Upgrade
Appendix D. Firmware Upgrade The firmware in the 8409 hand controller and motor control boards can be upgraded by the customer. Please check iOptron’s website, www.iOptron.com, under the product page or Support Directory. -
Page 39: Appendix E. Computer Control An Cem26 Mount
Appendix E. Computer Control an CEM26 Mount The CEM26 mount can be controlled by a SmartPhone, a Tablet or a computer. It is supported by two types of computer connections: Connect to a computer via USB port on hand controller. The mount can be controlled via ASCOM protocol (Windows OS), or directly by some software, such as Sky Safari (Mac OS) ... -
Page 40: Appendix F. Go2Nova Star List
® Appendix F. Go2Nova Star List Named Deep Sky Object 47 Tucanae 47 Integral Sign Galaxy Andromeda Galaxy 48 Iris Nebula Antennae Galaxies 49 Jellyfish Nebula Barnard's Galaxy 50 Jewel Box Cluster Bear-Paw Galaxy 51 Lagoon Nebula Beehive Cluster 52 Lambda Centauri Nebula Black Eye Galaxy 53 Large Magellanic Cloud Blinking Planetary... - Page 41 Messier Catalog This table is licensed under the GNU Free Documentation License. It uses material from the Wikipedia article List of Messier objects...
- Page 42 Named Star Acamar Alrescha Deneb el Okab Lalande 21185 Achernar Alshain Deneb Kaitos Lesath Achird Altair Denebakrab Mahasim Acrab Altais Denebola Maia Acrux A Alterf Dschubba Marfik Acrux B Aludra Dubhe Marfikent Acubens Alula Australis Edasich Markab Adhafera Alula Borealis El Rehla Markeb Adhara...
- Page 43 Proxima Centauri Sadalbari Sulafat Vindemiatrix Rasalas Sadalmelik Syrma Vrischika Rasalgethi Sadalsuud Talitha Wasat Rasalhague Sadr Tania Australis Wazn Rastaban Saiph Tania Borealis Regor Sargas Tarazed Wezen Regulus Scheat Taygeta Yed Posterior Rigel Schedar Tejat Posterior Yed Prior Rigel Kentaurus A Seginus Thuban Zaniah...
- Page 44 Modern Constellations Constellation Abbreviation Constellation Abbreviation Andromeda Lacerta Antlia Apus Leo Minor Aquarius Lepus Aquila Libra Lupus Aries Lynx Auriga Lyra Boötes Mensa Caelum Microscopium Camelopardalis Monoceros Cancer Musca Canes Venatici Norma Canis Major Octans Canis Minor Ophiuchus Capricornus Orion Carina Pavo Cassiopeia...
- Page 45 Double/Multi Stars HC Item Constellation Name Rigel Kentaurus A Alpha Centauri Centaurus 71683 14396-6050 252838 Rigel Beta Orionis Orion 24436 05145-0812 131907 Gacrux Gamma Crucis Crux 61084 12312-5707 240019 Sargas Theta Scorpii Scorpius 86228 17373-4300 228201 Castor A Alpha Geminorum Gemini 36850 07346+3153 60198...
- Page 46 HC Item Constellation Name 53 HIP 95771 Alpha Vulpeculae Vulpecula Anser 19287+2440 87261 54 HIP 30867 Beta Monocerotis Monoceros 06288-0702 133316 55 HIP 35363 NV Puppis Puppis 07183-3644 197824 56 HIP 94761 Gliese 752 Aquila Wolf 1055, Ross 652 19169+0510 57 HIP 21683 Sigma2 Tauri Taurus...
- Page 47 HC Item Constellation Name 105 HIP 40167 Zeta1 Cancri Cancer Tegmen 08122+1739 97645 106 HIP 40817 Kappa Volantis Volans 08198-7131 256497 107 HIP 81292 17 Draconis Draco 16362+5255 30013 108 HIP 80197 Nu1 Coronae Borealis Corona Borealis 16224+3348 65257 109 HIP 88060 HD 163756 Sagittarius 17591-3015...
- Page 48 HC Item Constellation Name 157 HIP 28790 HD 41742 Puppis 06047-4505 217706 158 HIP 4675 HD 5788 Andromeda 01001+4443 36832 159 HIP 31676 8 Lyncis Lynx 06377+6129 13897 160 HIP 10176 59 Andromedae Andromeda 02109+3902 55330 161 HIP 25950 HD 36408 Taurus 05322+1703 94630...
-
Page 49: Ioptron Two Year Telescope, Mount, And Controller Warranty
As a condition to the obligation of iOptron to repair or replace such product, the product must be returned to iOptron together with proof-of-purchase satisfactory to iOptron.