Table of Contents
Advertisement
Quick Links
. . . . . . . . . . . . . . . . . . . . . . . . . . . . . . . . . . . . .
. . . . . . . . . . . . . . . . . . . . . . . . . . . . . . . . . . . . . . . . . . .
. . . . . . . . . . . . . . . . . . . . . . . . . . . . . . . . . . . . . . . . . . . . . . 10
. . . . . . . . . . . . . . . . . . . . . . . . . . . . . . . . . . . 10
. . . . . . . . . . . . . . . . . . . . . . . . . . . . . . . . . . . . . . . . . . . . . . 15
. . . . . . . . . . . . . . . . . . . . . . . . . . . . . . . . . . . . . . 15
. . . . . . . . . . . . . . . . . . . . . . . . . . . . . . . . . . . . . 15
. . . . . . . . . . . . . . . . . . . . . . . . . . . . . . . . . . . . . 16
. . . . . . . . . . . . . . . . . . . . . . . . . . . . . . . . . . . . . . . . . . . . . . 18
. . . . . . . . . . . . . . . . . . . . . . . . . . . . . . . . . . . . . . . . . . . . . . . 20
. . . . . . . . . . . . . . . . . . . . . . . . . . . . . . . . . . 21
Quick Start (this document)
Read this first. It explains basic operation.
PDF Manual (download from the web)
5
Reference Manual
This explains all the functions of the TD-50X.
5
Data List
This explains the parameters and sound of the TD-50X.
5
MIDI Implementation
This is detailed information about MIDI messages.
Before using this unit, carefully read "IMPORTANT SAFETY INSTRUCTIONS" (inside front cover), "USING THE UNIT SAFELY" (p. 2), and "IMPORTANT NOTES"
(p. 4). After reading, keep the document(s) where it will be available for immediate reference.
© 2021
Roland Corporation
. . . . . . . . . . . . . . . . . . . . . . . . . . . . . . . .
. . . . . . . . . . . . . . . . . . . . . . . . . . . . . . . . 15
. . . . . . . . . . . . . . . . . . . . . . . . . 15
. . . . . . . . . . . . . . . . . . . . . . . . . . . . 16
. . . . . . . . . . . . . . 16
. . . . . . . . . . . . . . . . . . . . 16
. . . . . . . . . . . . . . . . . . . . . . . . . . . . 17
. . . . . . 17
. . . . . . . . . 18
. . . . . . . 19
. . . . . . . . . . . . . . . . . . . . . . . . . . . . . . . . . 20
. . . . . . . . . . . 20
. . . . . . . . . . . . . . . . . . . . . . 21
2
. . . . . . . . . . . . . . . . . . . . . . . . . . . . . . . . . . . . . . . 22
4
5
. . . . . . . . . . . . . . . . . . . . . . . . . . . . . . . . . . . . . . . . . . . . . . 23
. . . . . . . . . . . . . . . . . . . . . . . . . . . . . . . . . . . . . . . . . 23
. . . . . . . . . . . . . . . . . . . . . . . . . . . . . . . . . . . . . . . . . . . . . . 24
. . . . . . . . . . . . . . . . . . . . . . . . . . . . . . . . . . . . . . 24
. . . . . . . . . . . . . . . . . . . . . . . . . . . . . . . . . . . . . . . . . . . . . . . . . . . 25
. . . . . . . . . . . . . . . . . . . . . . . . . . . . . . . . . . . . . . . . . . . . . . . . . 27
. . . . . . . . . . . . . . . . . . . . . . . . . . . . . . . . . . . . . . . . . . 27
. . . . . . . . . . . . . . . . . . . . . . . . . . . . . . . . . . . . . . . . . . 28
. . . . . . . . . . . . . . . . . . . . . . . . . . . . . . . . . . . . . 30
To obtain the PDF manual
1 .
Enter the following URL in your
computer.
http://www .roland .com/support/
2 .
Choose "TD-50X" as the product name.
Quick Start
. . . . . . . . . . . . . . . . . . . . . 22
. . . . . . . . . . . . . . . . . . . . . . . . . . . . . . . . . . 22
. . . . . . . . . . . . . . . . . . . . . . . . . . . . . . . . . 23
. . . . . . . . . . . . . . . . . . . . . . . . 23
. . . . . . . . . . . . . . . . . . . . . . . . . . . . . . . . 24
. . . . . . . . . . . . . . . . . . . . . . . . . . . . . . . . . . 25
. . . . . . . . . 25
. . . . . . . . . . . . . . . . . . . . . . . . . . . . . . . . . . 26
. . . . . . . . . . . . . . . . . . . . . . . . . . . . . . . . . . 27
. . . . . . . . . . . . . . . . 27
. . . . . . . . . . . . . . . . . . . . . . . . . . . . . . . . . . . 28
. . . . . . . . . . . . . . . . . . . . 28
. . . . . . . . . . . . . . . . . . . . . . . . . . . . . . . . . . . . 29
. . . . . . . . . . . . . . . . . . . . . 29
. . . . . . . . . . . . . . . . . . . . . . . . . 29
I
. . . 26
Advertisement
Table of Contents

Related Manuals for Roland V-Drums TD-50X


Summary of Contents for Roland V-Drums TD-50X
-
Page 1: Table Of Contents
PDF Manual (download from the web) Enter the following URL in your Reference Manual computer. This explains all the functions of the TD-50X. http://www .roland .com/support/ Data List This explains the parameters and sound of the TD-50X. MIDI Implementation Choose “TD-50X” as the product name. -
Page 2: Using The Unit Safely
Do not bend the power cord or place heavy or exhibits a marked change in performance. Roland service center, or an official For a list of Roland service centers and official objects on it Roland dealer. Roland dealers, refer to the Roland website. - Page 3 Roland distributor. Route all power cords and cables in such a way • Removable Parts For a list of Roland service centers and official as to prevent them from getting entangled Screws (p. 8) Roland dealers, refer to the Roland website.
-
Page 4: Important Notes
Roland unit; or move it farther away from the source to the cable’s internal elements. -
Page 5: Getting Ready
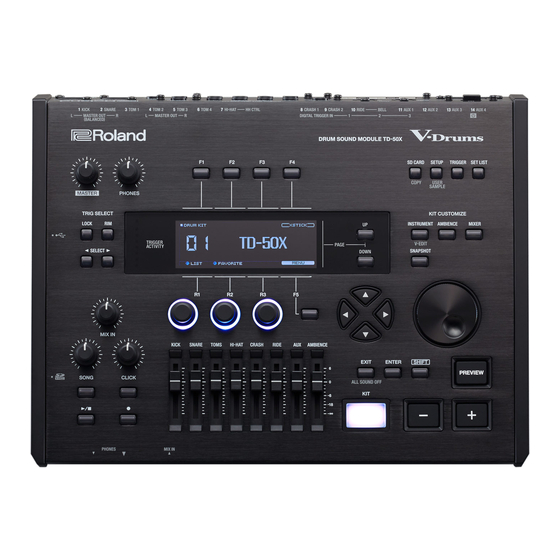
Getting Ready Panel Descriptions Top Panel PAGE [UP] [DOWN] buttons [MASTER] knob By pressing the PAGE [UP] [DOWN] buttons when they are lit, you can switch pages in the screen. Adjusts the volume of the MASTER OUT jacks. TRIGGER ACTIVITY indicator [PHONES] knob This lights when a trigger signal is received from a pad (a signal Adjusts the volume of the headphones connected to the PHONES... - Page 6 Getting Ready [t] button data. By holding down the [SHIFT] button and pressing the [SD CARD] Press this when you want to record your performance. button, you can copy the settings of a drum kit or instrument. Faders [SETUP] button Adjust the volume of the kick, snare, hi-hat, other percussion Allows you to make settings for functions that apply to the entire instruments, and ambience.
- Page 7 Getting Ready Side Panel/Front Panel * To prevent malfunction and equipment failure, always turn down the volume, and turn off all the units before making any connections. Computer SD card Audio player Headphones USB COMPUTER port * Never turn off the power or remove the SD card while the screen indicates “Processing .
- Page 8 Getting Ready Bottom Panel Mounting the TD-50X on the stand You can attach the TD-50X to a drum stand by using the sound module mounting plate included with the drum stand (sold separately: MDS series, PDS series). Using the screws on the bottom of the TD-50X, attach it as shown in the illustration. * Do not use any screws other than the screws from the bottom of the TD-50X.
- Page 9 Getting Ready Turning the Power On/Off * Once everything is properly connected (p. 8), be sure to follow the procedure below to turn on their power. If you turn on equipment in the wrong order, you risk causing malfunction or equipment failure. * Before turning the unit on/off, always be sure to turn the volume down.
-
Page 10: Making The Power Automatically Turn Off After A Time (Auto Off)
Getting Ready Making Hi-Hat Settings Making the Power Automatically Turn off After a Time (AUTO OFF) When using the VH-14D digital V-hi-hat or the VH-13, VH-11 or VH-10 V-hi-hats, adjust the offset on the TD-50X. The power to this unit will be turned off automatically after a predetermined amount of time has passed since it was This adjustment is required for pedal movements such as open or last used for playing music, or its buttons or controls were... - Page 11 Getting Ready Configuring the VH-11 (or VH-10) MEMO You can also press the [TRIGGER] button while holding down the [KIT] button on the TD-50X to adjust the offset. This shows how to configure the VH-11. The steps are the same for the VH-10, with only the model name being different.
- Page 12 Getting Ready Basic Operation Adjusting the overall volume Switching tabs and Switching pages specifying functions ([MASTER] knob, [PHONES] knob) (PAGE [UP] [DOWN] buttons) ([F1]–[F5] buttons, [R1]–[R3] knobs) [MASTER] [UP] [DOWN] Use the knob to adjust the volume that is output Use the PAGE buttons to switch pages in the [PHONES]...
- Page 13 Getting Ready About Performance Techniques The TD-50X responds to a variety of performance techniques just like an acoustic drum set. NOTE 5 Use only wooden or plastic sticks. Using a carbon or metal stick may cause the sensor to malfunction. 5 Use nylon brushes.
- Page 14 Getting Ready Cymbal Bow shot This is the most common playing method, playing the middle area of the cymbal. It Nuance changes corresponds to the sound of the “head- depending on the strike location side” of the connected trigger input. Edge shot This playing method involves striking the edge with the shoulder of the stick.
-
Page 15: Performing
Performing About the DRUM KIT screen Drum Kits and Instruments This is the TD-50X’s main screen; it will appear when you press a On the TD-50X, the sound you hear when you strike each pad is called [KIT] button. an “instrument. ” A “drum kit” is a set of sounds (instruments) assigned to the pads. -
Page 16: Playing With The Click
Performing Playing with the Click Performing Along with a Song Turning the click on/off Performing Along with an Audio Player Song Here’s how to connect an audio player (smartphone) to the MIX IN jack, and perform along with a song. Press the [CLICK] button. -
Page 17: Rhythm Training (Coach Mode)
Performing MEMO Rhythm Training (Coach Mode) 5 You can repeatedly play the entire song, or repeatedly play just a portion of the song. For details, refer to “Reference Manual” (PDF). This unit provides practice modes called “Coach Mode” which are 5 By outputting an audio file from the SD card as a click track, you designed to make your practicing as effective as possible. -
Page 18: Developing Internal Timing Sense (Quiet Count)
Performing Step 2: Auto Up/Down Developing Internal Timing Sense (QUIET COUNT) The tempo will gradually be raised and lowered. This lets you practice keeping the tempo with your body. For the first The tempo will increase by 1 BPM (beat-per-minute) for each beat few measures, the click is heard at the specified volume, but for the until the click reaches the upper limit;... -
Page 19: Registering/Recalling Favorite Drum Kits (Favorite)
Performing Registering/Recalling Favorite Drum Kits (FAVORITE) You can register frequently-used drum kits as “favorites” for instant recall. Registering a favorite Select the drum kit that you want to register (p. 15). In the DRUM KIT screen (p. 15), press the [F5] (MENU) button. -
Page 20: Recording
Recording Playback Recording a Performance You can easily record your own performance and play it back. Press the [s] button. * If you want to record on an SD card, you must first insert an SD card The recorded performance plays back. (p. -
Page 21: Recording On A Connected Computer
The USB driver is software that transfers data between the TD-50X and your computer software. In order to transmit and receive audio as USB AUDIO, you must install the USB driver. USB cable (sold separately) MEMO For details on downloading and installing the USB driver, refer to the Roland website. http://www.roland.com/support/... -
Page 22: Customizing A Kit
Customizing a Kit according to the force of the strike (SUB INSTRUMENT). For details, refer to “Reference Manual” (PDF). Saving the settings Selecting an Instrument On the TD-50X, your edits are saved automatically, so you don’t have to perform any operation to save the settings. Settings are also saved when you turn off the power. -
Page 23: Simulating The Ambience Of A Performance Space (Ambience)
Customizing a Kit Press the [MIXER] button. Simulating the Ambience of a Press the PAGE [UP] button several times to access Performance Space (AMBIENCE) the top page. This feature recreates the sound of the overhead microphone that Press the [F1] (VOLUME) button. captures sound from the entire kit, as well as the reverberation and The MIXER VOLUME screen appears. -
Page 24: Comparing With Or Reverting To The Unedited Drum Kit (Snapshot)
Customizing a Kit Press a function button to turn the setting on/off. Press the [F4] (RESTORE) button. A confirmation message appears. Screen Button Explanation PAD EQ screen [F4] button Turns pad equalizer on/off. PAD COMP screen [F4] button Turns pad compressor on/off. Turns on/off the multi-effect [F5] MFX1–3 screen... -
Page 25: Specifying The Illumination Color Of The [Kit] Button And Knobs
Customizing a Kit Specifying the Illumination Color of the [KIT] Renaming the Drum Kit Button and Knobs Here's how to rename the currently selected drum kit. For each kit, you can change the illumination color of the [KIT] button In the KIT SETTINGS screen (p. 24), press the [F4] and knobs. -
Page 26: Importing An Audio File
Customizing a Kit Importing an Audio File Assigning a User Sample to an Instrument and Playing It Here’s how to import an audio file into the TD-50X as a user sample. Insert an SD card into the TD-50X (p. 7). Press the [INSTRUMENT] button. -
Page 27: Settings
Settings Trigger Settings Adjusting the Sensitivity of Individual Pads By adjusting the sensitivity of a pad you can adjust the balance Here’s how to make trigger settings so that the signals from the pads between the force of the strike and the loudness of the sound. can be accurately processed by the TD-50X. -
Page 28: Backing Up Data
Settings Backing Up Data Loading Backup Data from an SD Card Here’s how backup data that was saved on an SD card can be loaded All settings stored in the TD-50X can be saved (backed up) to an SD into the TD-50X. card, or restored (loaded) into the TD-50X. -
Page 29: Formatting An Sd Card
Settings Menu Explanation Formatting an SD Card Check the remaining amount of internal INFO memory and the program version. Here’s how to format an SD card. FACTORY RESET Return the TD-50X to its factory settings. * Before using an SD card for the first time with the TD-50X, you must format the SD card. -
Page 30: Main Specifications
Kick: KD series, KT series Footswitch: BOSS FS-5U, FS-6 Hi-Hat: VH series Personal Drum Monitor: PM series * This document explains the specifications of the product at the time that the document was issued. For the latest information, refer to the Roland website.