JVC KD-G821 Instructions Manual
Hide thumbs
Also See for KD-G821:
- Instructions manual (129 pages) ,
- Installation & connection manual (4 pages) ,
- Instructions manual (129 pages)
Table of Contents
Advertisement
Available languages
Available languages
Quick Links
CD RECEIVER
RECEPTEUR CD
KD-G821
For canceling the display demonstration, see page 6.
Pour annuler la démonstration des affichages, référez-vous à la page 6.
For installation and connections, refer to the separate manual.
Pour l'installation et les raccordements, se référer au manuel séparé.
INSTRUCTIONS
MANUEL D'INSTRUCTIONS
GET0362-003A
[EX/EU]
Advertisement
Chapters
Table of Contents

Related Manuals for JVC KD-G821


Summary of Contents for JVC KD-G821
- Page 1 CD RECEIVER RECEPTEUR CD KD-G821 For canceling the display demonstration, see page 6. Pour annuler la démonstration des affichages, référez-vous à la page 6. For installation and connections, refer to the separate manual. Pour l’installation et les raccordements, se référer au manuel séparé.
- Page 2 Thank you for purchasing a JVC product. Please read all instructions carefully before operation, to ensure your complete understanding and to obtain the best possible performance from the unit. IMPORTANT FOR LASER PRODUCTS 1. CLASS 1 LASER PRODUCT 2. CAUTION: Do not open the top cover. There are no user serviceable parts inside the unit; leave all servicing to qualified service personnel.
-
Page 3: Table Of Contents
How to read this manual CONTENTS • Button operations are mainly explained with the illustrations in the table below. Control panel ........4 • Some related tips and notes are explained in “More about this unit” (see pages 35 – 39). Remote controller —... -
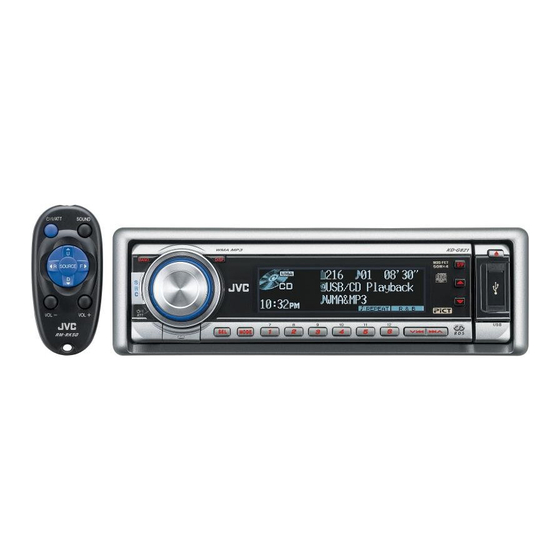
Page 4: Control Panel
Control panel Parts identification 1 BAND button 7 T/P (traffic programme/programme type) 2 • Control dial button 8 0 (eject) button • (standby/on attenuator) button 3 DISP (display) button 9 USB (Universal Serial Bus) input terminal 4 Remote sensor p SRC (source) button •... -
Page 5: Remote Controller
® • While listening to an Apple iPod or a – Do not leave the battery with other JVC D. player: metallic materials. – Pauses/stops or resumes playback with – Do not poke the battery with tweezers or D ∞. -
Page 6: Getting Started
5 SOURCE button • Selects the source. 6 2 R (reverse) / F (forward) 3 buttons • Searches for stations (or services) if For FM/AM tuner • pressed briefly. • Searches for ensembles if pressed and held. For DAB tuner •... -
Page 7: Radio Operations
Setting the clock 1 Press number button 4 ( “Clock Hr” (hour) appears. Then, turn the control dial to adjust the hour. “LARGE” (full display size) graphic* is displayed. 2 Press ¢ to select “Clock Min” (minute). Then, turn the control dial to adjust the minute. - Page 8 To tune in to a station manually In step ! on page 7... Select “SSM.” 2 Select a desired station frequency. When an FM stereo broadcast is hard to receive Local FM stations with the strongest signals are searched and stored automatically in the FM band.
-
Page 9: Fm Rds Operations
Follow steps 1 and 2 of “Using the Listening to a preset station number buttons” on page 8. • By holding 5 / ∞, the Preset Station List Using the number buttons will appear (go to step 4). Select the preset station (1 – 6) you Display the Preset Station List. -
Page 10: Searching For Your Favorite Fm Rds Programme
Searching for your favorite ⁄ Start searching for your favorite FM RDS programme programme. You can tune in to a station broadcasting your favorite programme by searching for a PTY code. • When appears on the display, you can move back to the previous display by pressing If there is a station broadcasting a number button 3. - Page 11 To deactivate the TA Standby Reception Store the selected PTY code. goes off. PTY Standby Reception PTY Standby Reception allows the unit to switch temporarily to your favorite programme type from any source other than AM. EX.: When “Classics” is selected in step 4 on page 10 •...
-
Page 12: Disc/Usb Memory Operations
Disc/USB memory Tracing the same programme— Network-Tracking Reception operations When driving in an area where FM reception Playing a disc in the unit is not sufficient enough, this unit automatically tunes in to another FM RDS station of the All tracks will be played repeatedly until you same network, possibly broadcasting the same change the source or eject the disc. -
Page 13: Playing A Usb Memory
Playing a USB memory Track and folder information (CD/CD Text/ This unit can play MP3/WMA tracks stored in a MP3/WMA/USB) USB memory. Once you insert a disc or attach a USB All tracks in the USB memory will be played memory, the total track number/total repeatedly until you change the source. - Page 14 • You cannot play any WMA disc in the CD changer. • Disc text information recorded in the CD To select a number from 07 – 12: Text can be displayed when a JVC CD Text compatible CD changer is connected. • For connection, see Installation/Connection Manual (separate volume).
- Page 15 • The list disappears and playback starts. move back to the previous display by pressing number button 3. Skipping tracks quickly during play Only possible on JVC MP3-compatible CD changer Select “LIST.” • For MP3/WMA/USB, you can skip tracks within the same folder.
- Page 16 Prohibiting disc ejection 7 Repeat play You can lock a disc in the loading slot. Mode Plays repeatedly • “No Eject” appears on the display. Track: The current track [ To cancel the prohibition, repeat the same Folder* : All tracks of the current folder procedure.
-
Page 17: Sound Adjustments
• 80Hz: Frequencies higher than Sound adjustments 80 Hz are cut off. • 120Hz: Frequencies higher than 120 Hz are cut off. Adjusting the sound • 160Hz: Frequencies higher than 160 Hz are cut off. You can adjust the sound characteristics to your 3 Turn the control dial to adjust the preference. - Page 18 3 Press number button 2 ( ), then turn the control dial to select the band width. Select a sound mode. Range/selectable items Sound elements High Level –06 to –06 to –06 to FREQ 60 Hz 500 Hz 10 kHz To display the rest (Frequency) 80 Hz...
-
Page 19: General Settings - Psm
The list below shows the preset value setting for each sound mode: Preset values Sound High modes Level FREQ Q (Band Level FREQ Q (Band Level FREQ Q (Band (Frequency) width) (Frequency) width) (Frequency) width) FLAT 60 Hz Q1.25 1 kHz Q1.25 10 kHz H.ROCK... - Page 20 Category Indications Selectable settings, [reference page] Demo/Link Demo: [Initial]; Display demonstration will be Display activated automatically, [6]. demonstration Image Link: To show a still image while playing MP3/ WMA tracks, [14, 37]. Off: Cancels. • Still image appears if no operation is done for about 20 seconds.
- Page 21 Category Indications Selectable settings, [reference page] Contrast 1 – 10: [Initial: 5]; Adjust the display contrast to Contrast make the display indications clear and legible. LCD Type Negative: [Initial]; Negative pattern of the display Display type (except still images and animation). Auto: Positive pattern will be selected during the day time*...
- Page 22 FM RDS stations, [12, 34]. reception Off: Cancels. Ext Input* Changer: [Initial]; To use a JVC CD changer, [12], an External input Apple iPod or a JVC D. player, [28]. Ext In: To use any other external component than the above, [30].
- Page 23 Select a picture size. Graphic displays Before starting the following procedure, prepare a CD-R including still images (pictures) and animations (movies). • With Image Converter (Ver 3.0) included in The display goes to the PICT menu. the supplied CD-ROM, you can create and download your own images and animations.
- Page 24 Downloading pictures or an animation Confirm the selection. • It takes a long time to download an animation. For details, see page 38. • To activate the downloaded files, see page 26. EX.: When “File1 Na” is selected Follow steps 2 to 4 on page 23. •...
- Page 25 • To delete all the stored pictures Delete the animation. 1 Press number button 2 ( EX.: When “LARGE” is selected in step 4 on page Exit from the setting. 2 Press number button 1 ( ) to delete all the stored pictures. Exit from the setting.
- Page 26 Activating the downloaded files Setting the time for dimmer Follow steps 2 to 4 on page 23. • When appears on the display, you can • In step 3, select “Set.” move back to the previous display by pressing number button 3. Select the display type.
- Page 27 Setting the display color Exit from the setting. Follow steps 1 to 3 on page 19. • In step 2, select “COLOR.” • In step 3, select “Color Sel.” Creating your own color—User Color You can create your own colors—“Day Color” or “NightColor.”...
-
Page 28: Title Assignment
• For external components: Select “Ext In” (see page 22). This unit is ready for operating an Apple iPod or a JVC D. player from the control panel. Display the TITLE input screen. Before operating your iPod or D. player:... - Page 29 To fast-forward or reverse the track Caution: Make sure to turn off this unit or turn off the vehicle’s ignition switch before connecting or disconnecting the iPod or D. player. To go to the next or previous tracks Preparations: Make sure “Changer” is selected for the external input setting (see page 22).
-
Page 30: Other External Component Operations
7 Random play Confirm the selection. To move back to the previous menu, press 5. • If a track is selected, playback starts automatically. • If the selected item has another layer, you will enter the layer. Repeat steps 2 and 3 Mode Plays at random until the desired track is played. -
Page 31: Dab Tuner Operations
When surrounding sounds are noisy KT-DB1000 with your unit. If you have Some service provides Dynamic Range Control another DAB tuner, consult your JVC (DRC) signals together with their regular IN-CAR ENTERTAINMENT dealer. programme signals. DRC will reinforce the low •... - Page 32 2 Select one of the DRC signals levels (1, 2, Select an ensemble (primary service). or 3). The reinforcement increases from 1 to 3. 3 Exit from the setting. Using the Preset Service List Follow steps above. • By holding 5 / ∞, the Preset Service List appears on the display.
- Page 33 Store the service. Using the standby reception You can use three types of Standby Reception. • Road Traffic News Standby Reception—TA Standby Reception (see the following). • Announcement Standby Reception (see the following) • PTY Standby Reception (see page 34). Tuning in to a preset DAB service Road Traffic News Standby Reception (TA Standby Reception)
- Page 34 Selecting an announcement type. Tracing the same programme— Alternative Frequency Reception You can keep listening to the same programme by activating the Alternative Frequency Reception. Exit from the setting. • While receiving a DAB service: When driving in an area where a service cannot be received, this unit automatically tunes in to another ensemble or FM RDS either lights up or flashes on the playback...
-
Page 35: More About This Unit
• When Alternative Frequency Reception More about this unit is activated (with AF selected), Network- Tracking Reception is also activated automatically. On the other hand, Network- Basic operations Tracking Reception cannot be deactivated Turning on the power without deactivating Alternative Frequency Reception. - Page 36 • This unit can play back MP3/WMA files Playing a CD-R or CD-RW meeting the conditions below: • Use only “finalized” CD-Rs or CD-RWs. – Bit rate: 8 kbps — 320 kbps • This unit can play back only files of the same –...
- Page 37 • If more than one <jtw> file are included in a Playing MP3/WMA track from a USB memory folder, a file with the youngest file number is • While playing from a USB memory, the used for Image Link. playback order may differ from other players. •...
- Page 38 • If you have already downloaded an animation, • Titles assigned to discs in the CD changer can downloading a new animation deletes the also be shown if you play back the disc from previously stored animation. the unit and vice versa. •...
-
Page 39: Maintenance
CD player in the following cases: correctly or as intended. In this case, visit the • After starting the heater in the car. following JVC web site: • If it becomes very humid inside the car. For iPod users: Should this occur, the CD player may <http://www.jvc.co.jp/english/car/support/... -
Page 40: Troubleshooting
Troubleshooting What appears to be trouble is not always serious. Check the following points before calling a service center. Symptoms Remedies/Causes • Sound cannot be heard from the • Adjust the volume to the optimum level. speakers. • Check the cords and connections. •... - Page 41 Symptoms Remedies/Causes • “Not Support” appears on the display Skip to the next track encoded in an appropriate and track skips. format or to the next non-copy-protected WMA track. • “NO MUSIC” appears on the display. Change the disc that contains MP3/WMA tracks. •...
- Page 42 Symptoms Remedies/Causes • Download does not seem to finish. It takes quite a long time to download an animation with many frames (see page 38). • Animation does not move. Wait until the operating temperature resumes. • The display graphic function does not work correctly.
-
Page 43: Specifications
Specifications AUDIO AMPLIFIER SECTION CD PLAYER/USB MEMORY SECTION Maximum Power Output: Type: Compact disc player Front: 50 W per channel Signal Detection System: Non-contact optical Rear: 50 W per channel pickup (semiconductor laser) Continuous Power Output (RMS): Number of Channels: 2 channels (stereo) Front: 19 W per channel into 4 Ω, 40 Hz Frequency Response: 5 Hz to 20 000 Hz to 20 000 Hz at no more than 0.8%... - Page 44 Merci pour avoir acheté un produit JVC. Veuillez lire attentivement toutes les instructions avant d’utiliser l’appareil afin de bien comprendre son fonctionnement et d’obtenir les meilleures performances possibles. IMPORTANT POUR PRODUITS LASER 1. PRODUIT LASER CLASSE 1 2. ATTENTION: N’ouvrez pas le couvercle supérieur. Il n’y a aucune pièce réparable par l’utilisateur à...
- Page 45 Comment lire ce manuel TABLE DES MATIERES • L’utilisation des touches est principalement expliquée avec des illustrations dans le tableau ci-dessous. Panneau de commande ..... 4 • Certains conseils et remarques sont donnés Télécommande — ....... 5 RM-RK50 dans la section “Pour en savoir plus à propos Pour commencer .......
-
Page 46: Panneau De Commande
Panneau de commande Identification des parties 1 Touche BAND 7 Touche T/P (programme d’informations 2 • Molette de commande routières/type de programme) 8 Touche 0 (éjection) • Touche (attente/sous tension 9 Prise d’entrée USB (bus série universel) atténuation) 3 Touche DISP (affichage) p Touche SRC (source) 4 Capteur de télécommande q Touche... -
Page 47: Télécommande
® • Lors de l’écoute de iPod Apple ou d’un – Ne piquez pas la pile avec des ciseaux ou lecteur D. JVC: d’autres objets similaires. – Pausez/arrêtez ou reprenez la lecture – Enveloppez la pile de ruban isolant avant avec D ∞. -
Page 48: Pour Commencer
5 Touche SOURCE • Choisit la source. 6 Touches 2 R (retour) / F (avance) 3 • Appuyez brièvement sur cette touche Pour le tuner FM/AM • pour rechercher les stations (ou services). • Maintenez cette touche pressée pour rechercher des ensembles. Pour le tuner DAB •... -
Page 49: Fonctionnement De La Radio
Réglage de l’horloge 1 Appuyez sur la touche numérique ). “Clock Hr” (heures) apparaît. Puis, tournez la molette de commande pour ajuster les heures. Un grand graphique “LARGE” (taille plein écran) * 2 Appuyez sur ¢ pour affiché. sélectionner “Clock Min” (minutes). Puis, tournez la molette de commande pour ajuster les minutes. - Page 50 Pour accorder une station manuellement À l’étape ! de la page 7... Choisissez “SSM”. 2 Choisissez une fréquence de station souhaitée. Quand une émission FM stéréo est difficile à recevoir Les stations FM locale avec les signaux les plus forts sont recherchées et mémorisées automatiquement dans la bande FM.
-
Page 51: Utilisation Du Système Fm Rds
Suivez les étapes 1 et 2 de “Utilisation Écoute d’une station préréglée des touches numériques” à la page 8. • Si vous maintenez pressée 5 / ∞, la liste Utilisation des touches numériques des stations préréglées apparaît (allez à l’étape 4). Choisissez la station préréglée (1 –... -
Page 52: Recherche De Votre Programme Fm Rds Préféré
Recherche de votre programme ⁄ Démarrez la recherche de votre FM RDS préféré programme préféré. Vous pouvez accorder une station diffusant votre programme préféré en effectuant une recherche par code PTY. • Quand apparaît sur l’affichage, vous pouvez retourner à l’affichage précédent en S’il y a une station diffusant un appuyant sur la touche numérique 3. - Page 53 Pour mettre hors service l’attente de réception TA Mémorisez le code PTY choisi. s’éteint. Attente de réception PTY L’attente de réception PTY permet à l’appareil de commuter temporairement sur votre type de programme préféré à partir de n’importe quelle source autre que AM. EX.: Si “Classics”...
-
Page 54: Utilisation D'un Disque/Mémoire Usb
Utilisation d’un disque/ Poursuite du même programme— Poursuite de réception en réseau mémoire USB Lorsque vous conduisez dans une région où la Lecture d’un disque dans réception FM n’est pas suffisamment forte, cet autoradio accorde automatiquement une autre l’autoradio station FM RDS du même réseau, susceptible de diffuser le même programme avec un signal Toutes les plages sont reproduites répétitivement plus fort (voir l’illustration ci-dessous). -
Page 55: Lecture D'une Mémoire Usb
Lecture d’une mémoire USB Informations sur la plage et le dossier Cet appareil peut reproduite les plages MP3/ (CD/CD Text/MP3/WMA/USB) WMA stockées sur une mémoire USB. Quand vous insérez un disque ou attachez Toutes les plages de la mémoire USB sont une mémoire USB, le nombre total de plage/ reproduites répétitivement jusqu’à... - Page 56 • Les textes d’information enregistrés sur les Pour choisir un numéro compris entre 07 et 12: CD Text peuvent être affichés quand un changeur de CD JVC compatible CD Text est connecté. • Pour les connexions, référez-vous au Manuel d’installation/raccordement (volume séparé).
- Page 57 à l’affichage précédent en Pour sauter les plages rapidement appuyant sur la touche numérique 3. pendant la lecture Possible uniquement sur un changeur de CD JVC compatible MP3 Choisissez “LIST”. • Pour les supports MP3/WMA/USB, vous pouvez sauter des plages à l’intérieur du même dossier.
- Page 58 Interdiction de l’éjection du disque 7 Lecture répétée Vous pouvez verrouiller un disque dans la fente d’insertion. Mode Reproduit répétitivement Track: La plage actuelle [ • “No Eject” apparaît sur l’affichage. Folder* : Toutes les plages du dossier actuel Pour annuler l’interdiction, répétez la même Disc* Toutes les plages du disque actuel procédure.
-
Page 59: Ajustements Sonores
• 80Hz: Les fréquences supérieures Ajustements sonores à 80 Hz sont coupées. • 120Hz: Les fréquences supérieures à 120 Hz sont coupées. Ajustement du son • 160Hz: Les fréquences supérieures à 160 Hz sont coupées. Vous pouvez ajuster les caractéristiques du son 3 Tournez la molette de commande comme vous le souhaitez. - Page 60 3 Appuyez sur la touche numérique ), puis tournez la molette de commande pour choisir la bande passante. Choisissez un mode sonore. Plage/réglages sélectionnables Éléments du High Niveau –06 à –06 à –06 à Pour afficher le reste FREQ 60 Hz 500 Hz 10 kHz (fréquence)
-
Page 61: Réglages Généraux - Psm
La liste ci-dessous montre les valeurs préréglées des réglages de chaque mode sonore: Valeurs préréglées Modes High sonores Niveau FREQ Q (bande Niveau FREQ Q (bande Niveau FREQ Q (bande (Fréquences) passante) (Fréquences) passante) (Fréquences) passante) FLAT 60 Hz Q1.25 1 kHz Q1.25 10 kHz... - Page 62 Catégorie Indications Réglages pouvant être choisis, [page de référence] Demo/Link Demo: [Réglage initial]; La démonstration Démonstration des des affichages est mise en service affichages automatiquement, [6]. Image Link: Pour afficher une image fixe lors de la lecture d’une plage MP3/WMA, [14, 37]. Off: Annulation.
- Page 63 Catégorie Indications Réglages pouvant être choisis, [page de référence] Contrast 1 – 10: [Réglage initial: 5]; Ajustez le contraste de Contraste l’affichage de façon que les indications soient nettes et lisibles. LCD Type Negative: [Réglage initial]; Affichage négatif (sauf pour Type d’affichage les images fixes et les animations).
- Page 64 Off: Annulation. Ext Input* Changer: [Réglage initial]; Pour utiliser un changeur Entrée extérieure de CD JVC, [12], iPod Apple ou un lecteur D. JVC, [28]. Ext In: Pour utiliser un autre appareil extérieur que ceux cités ci-dessus, [30]. Beep [Réglage initial]; Met en service la tonalité...
- Page 65 Choisissez une taille d’image. Affichages graphiques Avant de démarrer la procédure suivante, préparez un CD-R comprenant des images fixes et des animations (séquences vidéo). • Avec Image Converter (Ver 3,0) compris L’affichage passe au menu PICT. sur le CD-ROM fourni, vous pouvez créer et transférer vos propres images et animations.
- Page 66 Transfert d’images ou d’une animation Validez le choix. • Il faut un certain temps pour transférer une animation. Pour les détails, référez-vous à la page 38. • Pour activer les fichiers transférés, référez- EX.: Quand “File1 Na” est choisi vous à la page 26. Transférez le fichier.
- Page 67 • Pour supprimer toutes les images Supprimez l’animation. mémorisées 1 Appuyez sur la touche numérique 2 Quittez le réglage. EX.: Si “LARGE” est choisi à l’étape 4 de la page 23 2 Appuyez sur la touche numérique 1 ) pour supprimer toutes les images mémorisées.
- Page 68 Mise en service des fichiers Réglage de la minuterie pour le téléchargés gradateur. Suivez les étapes 2 à 4 de la page 23. • Quand apparaît sur l’affichage, vous • À l’étape 3, choisissez “Set”. pouvez retourner à l’affichage précédent en appuyant sur la touche numérique 3.
- Page 69 Réglage la couleur de l’affichage Quittez le réglage. Suivez les étapes 1 à 3 de la page 19. • À l’étape 2, choisissez “COLOR”. • À l’étape 3, choisissez “Color Sel”. Création de votre propre couleur— User Color Vous pouvez créer vos propres couleurs—“Day Color”...
-
Page 70: Affectation D'un Titre
2 Tournez la molette de commande pour Affectation d’un titre choisir un caractère. • Pour connatre les caractères disponibles, référez-vous à la page 38. Vous pouvez affecter des titres aux CD (dans cet appareil et dans le changeur de CD) et aux 4/¢... - Page 71 Pour faire avancer ou reculer rapidement la Précautions: plage Assurez-vous de mettre cet appareil hors tension ou de couper le contact du véhicule avant de connecter ou déconnecter iPod ou le lecteur D. Pour aller aux plages suivantes ou précédentes Préparations: Assurez-vous que “Changer”...
-
Page 72: Utilisation D'un Autre Appareil Extérieur
7 Lecture aléatoire Validez le choix. Pour retourner au menu précédent, appuyez sur 5. • Si une plage est sélectionnée, la lecture démarre automatiquement. Mode Reproduit dans un ordre aléatoire • Si l’élément choisi a un autre niveau, ce niveau est affiché. Répétez les étapes 2 et Song: Fonctionne de la même façon 3 jusqu’à... -
Page 73: Fonctionnement Du Tuner Dab
DAB, consultez votre signal. Le DRC permet de renforcer les sons revendeur autoradio JVC. de faible niveau afin d’améliorer le confort • Référez-vous aussi aux Manuel d’instructions d’écoute. - Page 74 2 Choisissez un des niveaux de signal DRC Choisissez un ensemble (service (1, 2 ou 3). primaire). Le renforcement augmente de 1 à 3. 3 Quittez le réglage. Utilisation de la liste des services préréglés Suivez les étapes ci-dessus. apparaît sur l’affichage. •...
- Page 75 Mémorisez le service. Utilisation de l’attente de réception Vous pouvez utiliser trois types d’attente de réception. • Attente de réception d’informations routières —attente de réception TA (voir ci-après). • Attente de réception d’annonce (voir ce qui suit) • Attente de réception PTY (voir page 34). Accord d’un service DAB préréglé...
- Page 76 Sélection d’un type d’annonce. Poursuite du même programme— Recherche de fréquence alternative Vous pouvez continuer d’écouter le même programme en mettant en service la recherche de fréquence alternative. • Lors de la réception d’un service DAB: Quittez le réglage. Si vous conduisez dans une région ou un service ne peut pas être reçu, cet autoradio accorde automatiquement un autre ensemble ou une station FM RDS, diffusant le même...
-
Page 77: Pour En Savoir Plus À Propos De Cet Autoradio
• Quand la recherche de fréquence alternative Pour en savoir plus à est mise en service (avec AF choisi), la poursuite de réception en réseau est propos de cet autoradio aussi mise automatiquement en service. Inversement, la poursuite de réception en réseau ne peut pas être mise hors service sans Opérations de base mettre hors service la recherche de fréquence... - Page 78 • Cet autoradio peut reproduire les fichiers Lecture d’un CD-R ou CD-RW MP3/WMA respectant les conditions suivantes: • Utilisez uniquement des CD-R ou CD-RW – Débit binaire: 8 kbps à 320 kbps “finalisés”. – Fréquence d’échantillonnage: • Cet appareil peut uniquement reproduire les 48 kHz, 44,1 kHz, 32 kHz (pour MPEG-1) fichiers du même type que le premier fichier 24 kHz, 22,05 kHz, 16 kHz (pour MPEG-2)
- Page 79 • Si plus d’un fichier <jtw> se trouve dans un Lecture d’une plage MP3/WMA à partir d’une dossier, le fichier avec le numéro le plus bas mémoire USB est utilisé pour Image Link. • Lors de la lecture à partir d’une mémoire USB, l’ordre de lecture peut différer de celui d’autres Éjection d’un disque lecteurs.
- Page 80 • Si vous avez déjà transféré une animation, • Les titres affectés aux disques dans le transférer une nouvelle animation supprime changeur de CD peuvent aussi être affichés l’animation précédemment mémorisée. si vous reproduisez le même disque dans cet • Il faut un certain temps pour transférer une appareil et vice versa.
-
Page 81: Entretien
• Après le démarrage du chauffage dans la réalisées correctement ou comme prévues. voiture. Dans ce cas, consultez le site Web JVC suivant: • Si l’intérieur de la voiture devient très humide. Pour les utilisateurs de iPod: Si cela se produit, le lecteur CD risque de ne <http://www.jvc.co.jp/english/car/support/... -
Page 82: Guide De Dépannage
Guide de dépannage Ce qui apparaît être un problème n’est pas toujours sérieux. Vérifiez les points suivants avant d’appeler un centre de service. Symptôme Remèdes/Causes • Aucun son n’est entendu des • Ajustez le volume sur le niveau optimum. enceintes. •... - Page 83 Symptôme Remèdes/Causes • “Not Support” apparaît sur Saute à la plage codée suivante dans le format l’affichage et la plage est sautée. approprié ou à laplage WMA suivante non protégée contre la copie. • “NO MUSIC” apparaît sur Changez le disque par un disque contenant des l’affichage.
- Page 84 Symptôme Remèdes/Causes • Le transfert semble ne jamais se Il faut beaucoup de temps pour transférer une terminer. animation composée de beaucoup d’images (voir page 38). • L’animation ne bouge pas. Attendez que la température remonte à la • La fonction d’affichage graphique ne température de fonctionnement.
-
Page 85: Spécifications
Spécifications SECTION DE L’AMPLIFICATEUR AUDIO SECTION DU LECTEUR CD/MÉMOIRE USB Puissance de sortie maximum: Type: Lecteur de disque compact Avant: 50 W par canal Système de détection du signal: Capteur optique Arrière: 50 W par canal sans contact (laser semi-conducteur) Puissance de sortie en mode continu (RMS): Nombre de canaux: 2 canaux (stéréo) - Page 86 Having TROUBLE with operation? Please reset your unit Refer to page of How to reset your unit Vous avez des PROBLÈMES de fonctionnement? Réinitialisez votre appareil Référez-vous à la page intitulée Comment réinitialiser votre appareil EN, FR 0106DTSMDTJEIN © 2006 Victor Company of Japan, Limited...