Invacare Rea Assist Manual
Hide thumbs
Also See for Rea Assist:
- Service manual (9 pages) ,
- Assembly instructions manual (56 pages) ,
- User manual (60 pages)
Table of Contents
Advertisement
Quick Links
Advertisement
Table of Contents

Related Manuals for Invacare Rea Assist


Summary of Contents for Invacare Rea Assist
- Page 1 ® Assist Manual English...
-
Page 2: Table Of Contents
Contents Product description Delivery check Daily performance check Intended use Parts of the wheelchair Lifting the wheelchair Standard equipment Upholstery and frame colours Accessories Technical data Assembly 9-10 Adjustments 11-21 Seat Legrests/Footrests Footplates/Calf pads Central legrest 13-14 Backrest 15-16 Armrests Seat unit Carer-operated chair Electrically operated chair... -
Page 3: Product Description
Assist in everyday life. This manual includes a description of the parts of the chair, simple adjustment options, how to use the Rea Assist safely and how to transport it. The manual must be read thoroughly before the chair is used. - Page 4 Here below a number of points affecting your personal safety are shown. Read it carefully! ® Invacare is only responsible for product changes carried out by personnel who we authorise. We reserve the right to make any changes to equipment and specifi...
-
Page 5: Delivery Check
Delivery check Check that all components match the delivery note. Any transport damage must be reported immediately to the transport company. Remember to keep the packaging until the transport company has checked the goods and a sett- lement has been reached. Daily performance check Check that the following parts are still currently assembled on the wheel- chair:... -
Page 6: Parts Of The Wheelchair
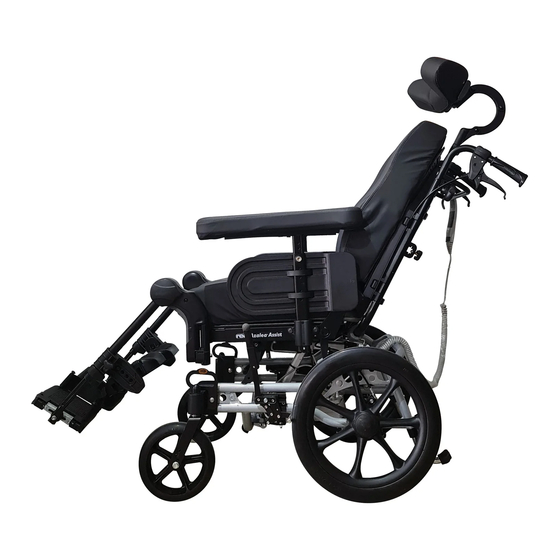
Parts of the wheelchair 1. Frame, lower section 2. Seat frame 3. Backrest 4. Push handles 5. Seat 6. Rear wheel 7. Brake handle 8. Castors 9. Step tube/Anti-tip device 10. Armrests 11. Legrests 12. Tools (behind the back rest cushion) Always lift the wheelchair by gripping the frame at the points shown in the diagram. -
Page 7: Standard Equipment
Standard equipment Seat width 40-50 cm, 45-55 cm Seat depth 42-52 cm Backrest height 62,5+20 cm without seat cushion Upholstery and frame colours Upholstery Grey plush, TR32 Grey dartex, TR23 Frame colours Pearl Grey Accessories ® The Rea Assist has a wide range of accessories and options. Some of the accessories may not be available in certain countries. -
Page 8: Technical Data
Rear wheels 16", pneumatic or solid Brakes Hand operated assistance brake Others Several types of hand rim Refl ectors Kit Table Tray Pump Cane holder Headrest Headrest with cheek support Neckrest Push bar Push handles braced Pelvic Belt Abduction cushion Incontinence cover Trunk support Technical data –... -
Page 9: Assembly
Assembly When you receive your wheelchair, you must fi t the backrest, armrests and legrests onto the chair. The assembly is simple and does not require any tools. 1. Backrest The backrest is fitted onto the wheelchair by feeding the shafts (A) of the backrest onto the tubes of the chair (B). - Page 10 3b Footrests Attach the footrests by pushing the tube at the upper part of the footrests down into the tubes on the wheelchair. You must angle the footrests outwards when inserting them. Lock the footrests by turning them inwards. The footrests are automatically locked so there is no risk of them coming off the wheelchair.
-
Page 11: Adjustments
Adjustments SEAT The seat depth of the chair can easily be adjusted to provide good support. The width between the armrests and the height of the armrests can also be 10 cm adjusted. 1. Depth adjustment Loosen the catches of the legrests and swing them outwards towards the sides. -
Page 12: Legrests/Footrests
LEGRESTS/FOOTRESTS It is important to adjust the legrests, footrests, foot- 1–2. plates and calf pads to obtain a good seating posi- tion. 1. Legrests height adjustment Adjust the height of the legrests by loosening the screw (A) one turn with an Allen key. Pull the legrest until you have obtained the correct height and the screw is caught by one of the recesses on the legrest tube. -
Page 13: Central Legrest
CENTRAL LEGREST 1. Adjust to the appropriate leg angle using knob (A). When adjusting the angle of the central legrest, loosen the adjustment knob with one hand and hold the foot plate with the other hand to avoid trapping yours or anyone else’s fi ngers etc. When the seat is tilted forwards on a chair with a long legrest length and low seat height, there is a risk of the legrest hitting the fl... - Page 14 3. Loosen the rear screw (D) on the side of the tube and adjust the legrest to the desired angle. Retighten the screw. Repeat this procedure to adjust the angle of the other legrest. 4. Loosen the frontal screw (E) on the side of the tube to adjust the depth of the legrest.
-
Page 15: Backrest
BACKREST Backrest plate 1. You can easily adjust the backrest plate (+ 10 cm) by loosening the two upper screws (A) with a 5-mm Allen key. Set at the required height and re-tighten. 2. The upper section has two height levels and is as well removable,( for lower backrest cushions). -
Page 16: Armrests
4. For shaping the form, loose the Velcro straps, tighten fi rst where you would like to have a fi rm support and follow with the others. Check that the cover/cushion do not "lock" the straps by the Velco attachment. Please ensure that the velcro straps are not too loose, as this will result in your back coming into contact with backrest bow (A), and could... -
Page 17: Seat Unit
Seat unit CARER-OPERATED ANGLE ADJUSTMENT The wheelchair is equipped with carer-operated controls. You can adjust the angle of the backrest forwards or backwards and tilt the whole seat unit including the backrest. These two functions can either be controlled manually or electrically. Be care- ful when adjusting the angle of the backrest so that you do not trap your or the user’s fi... -
Page 18: Electrically Operated Chair
ELECTRICALLY OPERATED CHAIR 1. Tilt adjustment Tilt the seat unit (seat and backrest) by using the lower part of the control panel. Press (B) to adjust the angle of the seat unit backwards or press (C) to adjust the angle forwards. The hand control should only be used by authorised personell. -
Page 19: Balance And Stability
BALANCE AND STABILITY Each attachment can be adjusted in three positions: Check the stability with the user in the chair when I = the chair becomes easy to propell, less stable the chair has been adjusted. Adjust the angle of the II = middle position seat and backrest backwards to their maximum set- III = the chair becomes stable, less easy to propel... -
Page 20: Carer-Operated Brakes
CARER-OPERATED BRAKES 1. Brake when the wheelchair is moving: squeeze both brake handles upwards and the brake will be applied. 2. Lock the brakes: squeeze the handle upwards and move the lock catch (A) upwards. Then release the handle. 3. Release the brakes: squeeze the handle upwards and the lock catch will release automatically. -
Page 21: Anti-Tip Devices
ANTI-TIP DEVICES The anti-tip devices also act as step tubes. They are height-adjustable and can easily be set in six different positions as well as a parking position. The parking position must be used when the wheelchair is pulled up a kerb or a step. This prevents the anti- tip devices catching the edge of the kerb or step. - Page 22 3. The sidewise adjustment is made by loosening screw (E). Adjust and re-tighten. 4. The angle of the wings is adjustable by loosening screws (D). Adjust and re-tighten. NECK REST 1. The height adjustment and the removal is oper- ated by the handwheel (A). The bar is equipped with a "memory"...
-
Page 23: Abduction Cushion
ABDUCTION CUSHION 1. The height adjustment and removal is operated by the handwheel (A). 2. The depth is adjusted in a forward or backward position. Loosen handwheel (A) and turn. TRUNK SUPPORT TRUNK SUPPORT Multi adjustable 1. You adjust their height by fi rst loosening the screws (A) whilst moving the attachment (B) upwards or downwards.Re-tighten the screws (A). - Page 24 • angle • small side support / large trunk support Alt.1 • large side support / small trunk support Alt.2 TRUNK SUPPORT The trunk supports can be adjusted in height,depth and sideways. 1. You adjust their height by fi rst loosening the screws (G)whilst moving the attachment (H)upwards or downwards.Re-tighten the screws (G).
- Page 25 TRUNKSUPPORT Swing away It is possible to adjust the height, depth and sideways position of the trunk support. 1. Adjust the height by fi rst slackening the Allen screws (A) while simultaneously mov ing bracket (B) up or down. Re-tighten Allen screws (A). Tool: 5 mm Allen Key 2.
-
Page 26: Transport
Transport The Rea ® Assist is easy to prepare for transport. 1. Backrest Remove the back cushion by pulling it forwards, thus separating the Velcro strops. Loosen both knobs (A) and pull the backrest directly upwards. Lay the backrest on the seat, where it can remain during transport of the wheelchair. - Page 27 4. Footrests The footrests are loosened by pushing the handle (D) forwards or sidewards whilst turning the footrests outwards. You can then simply lift off the footrests. 5. Armrests, Pull them staight up REA® ASSIST...
-
Page 28: Transport Of Wheelchairs In Vehicle
TEST REPORT FROM DYNAMIC SAFETY RESTRAINT TEST (ISO 7176-19:1999) ® ® Test no: 09KM02 Customer: Invacare Date: 00/03/07 ® ® Test no: P302416B Customer: Invacare... -
Page 29: Observations
• Alterations or substitutions are not to be made to points of the wheelchair or to structural and frame parts without the written consent of Invacare ® . • A wheelchair-anchored pelvic belt must be fi tted across the wheelchair occupant in addition to the lap and diagonal and restraint (3-point belt). -
Page 30: Restraint Methods
RESTRAINT METHODS A. Frontal restraints with straps 1. Connect the frontal straps around the lower frontal frame of the wheelchair, behind the castor attachments 2. Release brakes and tension front straps by pulling the wheelchair backwards from the rear. Re-apply wheelchair brakes. -
Page 31: Safety Instructions/Propelling Techniques
Safety instructions/propelling techniques We recommend that you have the chair tested by the qualifi ed person who has prescribed the wheelchair, after he or she has made the adjustments that you request, taking your build and needs into account. We hope that you have also received help in learning how best to use the wheelchair. - Page 32 Climbing a kerb This method is for when the assistant is always behind the wheelchair and it creates the greatest safety for the user. The following advice is for the assistant: Illustration 1) Adjust the anti-tip devices upwards. Ensure that the user’s feet rest securely on the footrests and cannot slide off.
-
Page 33: Guarantee
Accidents/Near-accidents Please inform your Invacare sales company (phone number is on the back cover) of any acci- dents/near-accidents that were caused by this wheelchair and that have led to/could have led to personal injury. -
Page 34: Recycling
Tyres and tubes are made of rubber and can be recycled according to above. Packing All Invacare Rea AB packing material is developed to fi t the products in an optimal way to reduce unnecessary material waste. All boxes are recyclable. - Page 35 Fax: (33) (0)2 47 42 12 24 Fax. +49 - 57 31 75 45 21 91 Nederland: Italy: Norway: Portugal: Invacare B.V. Invacare Mecc San s.r.l. Invacare AS Invacare Lda Celsiusstraat 46 / P.O. Box Via dei Pini, 62 Grensesvingen 9 Rua Senhora de Campanhâ 105...