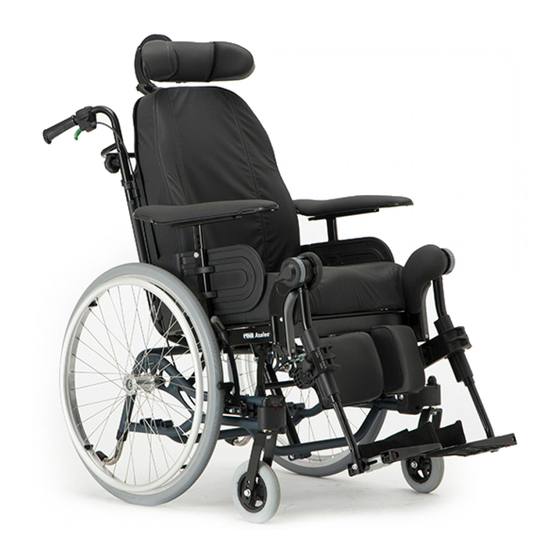
Invacare rea Azalea Assist Manual
Hide thumbs
Also See for rea Azalea Assist:
- User manual (60 pages) ,
- Service manual (40 pages) ,
- Manual (36 pages)
Table of Contents
Advertisement
Quick Links
Download this manual
See also:
User Manual
Advertisement
Table of Contents

Related Manuals for Invacare rea Azalea Assist


Summary of Contents for Invacare rea Azalea Assist
- Page 1 Manual English Assist Base Tall Minor...
- Page 2 Every effort has been made to ensure that the contents of this publication are updated at the time of printing. As part of the ongoing improvement of the products, Invacare Rea AB reserves the right to modify existing models at any time.
-
Page 3: Table Of Contents
CONTENTS 7. TRANSPORT 1. GENERAL 7.1 Transporting wheelchairs 1.1 Introduction with users in vehicles 1.2 Symbols 7.2 Restraint methods 1.3 Warranty 7.3 How to disassemble your 1.4 Limitation of liability Azalea® 1.5 Copyright protection 1.6 Customer service 1.7 Accidents/near accident 8. -
Page 4: General
1.1 INTRODUCTION 1.4 LIMITATION OF LIABILITY Rea ® Azalea is a wheelchair with many adjustment Invacare Rea AB accepts no liability for damage arising possibilities and accessories. To ensure that you from: benefit as much as possible from Rea ® Azalea, and •... -
Page 5: Intended Use
The Rea Azalea is intended for use both indoors The Rea Azalea Base has been crash tested together and outdoors with the Invacare standard back and seat, but no • Max. user weight is 135 kg. other combinations have been tested and Invacare •... -
Page 6: Safety
Below you will find a number of points affecting your personal safety. Read them carefully! Invacare is only responsible for product changes car- ried out by competent personnel. We reserve the right to make any changes to equipment and specifi- cations without prior notice. -
Page 7: Technical Data
3. Technical data 3.1 DIMENSIONS AND WEIGHT 2. Seat depth 3. Seat height* 4. Backrest height 5. Armrest height 1. Seat width 9. Total height 10. Total length 6. Legrest length 7. Tilt adjustment 8. Total width** 11. Weight 12. Maximum user 13. -
Page 8: Upholstery And Frame Colours
Grey Dartex TR23 Frame colour Pearl Grey 3.3 EQUIPMENT AND ACCESSORIES Invacare® Rea Azalea has a wide range of accessories and options. Some of the accessories may not be available in all markets or on all models. Backrest Rear wheels Tension adjustable 16”, 22", 24", pneumatic,puncture-proof or... -
Page 9: Seat Height Table
3.4 SEAT HEIGHT TABLES 3.4.1 Rea® Azalea & Rea® Azalea Assist 24" 24" 24" 22" 22" 16" 16" 16" 16" 16" 3.4.2 Rea® Azalea equipped with Tall-kit 24" 16" 3.4.3 Rea® Azalea Base 24" 24" 24" 22" 22" 16" 16" 16"... -
Page 10: Identification Label
3.4.4 Rea® Azalea Max 24’’ 22’’ 16’’ 3.5 IDENTIFICATION LABEL Manufacturing date Model INVACARE International SARL Serial No. Max. user weight Location Location of the identification label. Azalea... -
Page 11: Set-Up And Installation
4. Set-up and installation 4.1 DELIVERY CHECK 4.3 ASSEMBLY Any transport damage must be reported immediately When you receive your wheelchair, you must fit the to the transport company. Remember to keep the backrest, armrests and legrests onto the chair. The packaging until the transport company has checked assembly is simple and does not require any tools. - Page 12 4.3.2 Armrests 4.3.4 Angle adjustable legrests Attach the legrests by pushing the tube at the upper Attach the armrests by feeding them into the attach- part of the legrests down into the tubes on the whe- ment (D) at the sides of the wheelchair. Push them elchair.
-
Page 13: Components And Adjustments
5. Components and their adjustments 5.1 BACKREST 5.1.1 Backrest plate 5.1.2 Tension adjustable backrest 1. For raising the height (+12,5cm), loose screw (A) 1. You can easily adjust the backrest plate (+ 10 and lift the backrest frame up. cm) by loosening the two upper screws (A) with a 5-mm Allen key. -
Page 14: Backrest För Azalea Max
5.2 BACKREST FÖR AZALEA MAX The backrest for the Azalea Max is designed with different angles as shown in picture 1. This allows for different adjustments according to how the backrest is mounted. Position A (the part of the backrest with the longer angle turned upwards) gives the user more room for the shoulder area while position B gives more room for the bottom. -
Page 15: Angle Settings
5.3 ANGLE SETTINGS There is a possibility to change the range of avail- able angles for the seat by changing the position of the gas spring (A) on the chassi attachment (B). This procedure may only be performed by a service technician! Azalea Max can only use hole II (D). -
Page 16: Carer-Operated Angle Adjustment
5.4 CARER-OPERATED ANGLE ADJUST- MENT The wheelchair is equipped with carer-operated controls. You can adjust the angle of the backrest forwards or backwards and tilt the whole seat unit including the backrest. These two functions can either be controlled manually or electrically. Be careful when adjusting the angle of the backrest so that the assistant or user do not trap fingers between the backrest and the armrest. - Page 17 5.4.3 Locking device for angle adjustment The locking device (C) allows you to set the tilting of the seat unit and/or the angling of the backrest to a fixed position. Tilt and/or angle the seat and backrest to the desired position and insert the locking device. The position is now set and cannot be changed.
-
Page 18: Electric Tilt /Backrest Angle Adjustment
5.5 ELECTRIC TILT AND BACKREST ANGLE ADJUSTMENT 5.5.1 Charging the battery If your wheelchair has electrical angle adjustment the battery needs to be charged. If the angle adjustment function has been used during the day, it is a good idea to leave the charger on overnight. -
Page 19: Armrests
5.6 ARMRESTS 5.6.2 Armrest depth 5.6.1 Armrest height You can also adjust the depth of the armrest pad. Adjust the height of the armrests by turning the knob Loosen the knob (C), set the pad in the required or Allen key screw (A), setting the required height and position and re-tighten the knob. -
Page 20: Seat
5.7 SEAT 5.7.2 Width adjustment The seat depth of the chair can easily be adjusted to provide good support. The width between the legrests and armrests and the height of the armrests can also be adjusted. 1. The seat cushion is secured with Velcro strips on the seat plate. -
Page 21: Legrests
5.8 LEGRESTS 5.8.1 Angle adjustable legrests Angle adjustable legrests support the legs and reduce pressure. The legrests can be used for bandaged legs, but not for legs in plaster casts. The legrests must always be fitted with calf pads, footplates and heel straps. It is important to adjust the height and angle of the legrests to obtain a good seating position. - Page 22 5.8.2 Fixed legrests, height adjustment 5.8.3.2 Height adjustment You can adjust the height of the legrest in the fol- lowing two ways: Alternative 1: Loosen the Allen screw (B) using a 5 mm Allen key on the front of the telescopic tube, place the legrest in the desired position and secure it into place using the Allen screw.
-
Page 23: Foot Plate/Calf Pad/ Foot Rest
5.9 FOOT PLATE/CALF PAD/ FOOT REST 5.9.1 Angle-adjustable footplates 5.9.3 One-piece footrest Tool: 5 mm Allen key Adjust the angle and the depth by loosening the screw (A) at the footplate attachment with a 5 mm Allen key. Adjust the footplate to the correct position and retighten the screw. - Page 24 5.9.4 Legrest Azalea Max 5.9.5 Calf pads for Azalea Pull the lever (B) with one hand while support- The calf pads for the Azalea Max are adjustable in ing the legrest with your other hand. When a angle (A), depth (B) and sideways (C). suitable angle is obtained, let go of the lever A: Loosen the handwheel and adjust to the required and the legrest will lock into one the preset...
- Page 25 5.9.6 Footboard converter for Azalea Max The footboard converter is a sturdy construction that is easily dissassembled to allow for transfers into and out of the wheelchair. The middle part of the footboard converter is installed by inserting the fasteners into one of the footplates and then on the other side The footplates can be flipped up to further facilitate transfers.
-
Page 26: Push Handles/Push Bar/Push Bar
5.10 PUSH HANDLES/PUSH BAR/PUSH BAR AZALEA MAX 19 cm The push bar/push handles braced must not be pulled up so that it protrudes more than 19 cm over the top edge of the attachment. Do not trap your fingers between the pushhandles brace and the neckrest attachment. -
Page 27: Rear Wheels
5.11 REAR WHEELS 5.11.1 Adjustment 22’’ - 24’’ Tool: 24 mm fixed spanner You can adjust the height of the seat by moving the rear wheel attachment upwards or downwards.The 5.11.1.2 Height balance of the wheelchair can be adjusted by moving Loosen and remove the attachment (A) using a the rear wheel attachment forward or backward. - Page 28 5.11.2 Adjustment 16’’ The 16” transit wheel (A) can be placed in three dif- ferent positions. The middle position is the standard position. When accessories are mounted on the back of the wheelchair the tip risk increases and therefore the rear position should be used in this case. 5.11.2.1 Front position (B) Assemble the mounting as shown in picture 1.
-
Page 29: Brakes
5.12 BRAKES 5.12.2 Carer operated brake 5.12.1 User brake 5.12.1.1.Use Start by checking that the tyres have the correct air pressure (printed on the side of each tyre). The user brake is to be used when the chair is not moving, and is not intended for reducing speed when the chair is moving. -
Page 30: Anti-Tip Devices
5.13 ANTI-TIP DEVICES The anti-tip device also acts as a step tube. It is height- adjustable and easy to adjust. 1. Press the spring-loaded buttons (A), raise or lower the anti-tip device and ensure that the spring- loaded buttons (A) pop out into place properly in their new position. -
Page 31: Azalea Base
5.14 AZALEA BASE 5.14.1 Backrest angle 5.14.2 Seat attachment There are three options how to attach a seat to the Backrest angle Azalea base. 1. To adjust the angle of the backrest, first loosen nuts (A) on the rigging screw using a spanner. 1. -
Page 32: Accessories
5.15 ACCESSORIES 5.15.1 Head rest The height and the removal are operated by the handwheel (A). The bar is equiped with an adjustable stop block (B). 1. To adjust the height of the head rest, first loosen 3. The sidewise adjustment is made by loosening the screw (B) in the stop block, then loosen the screw (E). - Page 33 5.15.2 Neck rest 5.15.3 Abduction cushion 1. The height adjustment and removal is operated by 1. To adjust the height of the neckrest, first loosen the handwheel (A). the screw (B) in the stop block, then loosen the handwheel (A). Adjust the neckrest to the desired 2.
- Page 34 5.15.4 Trunk support Tool: 5 mm Allen Key screwdriver With multi adjustable cushion 1. You adjust the height by first loosening the screws (A) whilst moving the attachment (B) upwards or downwards. Re-tighten the screws (A). Trunk support with fixed cushion. The trunk supports can be adjusted in height, depth and sideways.
- Page 35 5.15.5 Pelvic belt 5.15.6 Harness The pelvic belt is used to prevent the risk of falling or sliding out of the chair and for providing the user with a good posture. The pelvic belt is mounted on the backrest brackets. Tool: 5 mm Allen Key Thread the belt through the mounting on the chair and then through the two plastic buckles...
-
Page 36: Using The Wheelchair
6. Using the wheelchair We recommend that you have the chair tested by the qualified person who has prescribed the wheelchair, after he or she has made the adjustments that you request, taking your build and needs into account. We hope that you have also received help in learning how best to use the wheelchair. -
Page 37: Propelling Down A Slope
6.4 PROPELLING DOWN A SLOPE 6.5 CLIMBING A KERB We recommend that you obtain the help of one or This method is for when the assistant is always behind more assistants when going down steep and wet the wheelchair and it creates the greatest safety for slopes. -
Page 38: Kerbs - Alternative Method
6.6 KERBS – ALTERNATIVE METHOD 6.7 ESCALATORS AND STAIRS This method is generally used by experienced assist- Do not use escalators when you are in the wheelchair. ants who are stronger than average. It can also be used Find out whether there is a lift nearby. when the kerb or step is low and only constitutes a minimal obstacle. -
Page 39: Transport
7. Transport Invacare has continuously worked to improve the safety in all our products for the users in different everyday situations. This has, among other things, meant that Invacare since the mid 1990’s has let accredited research institutes crash test several of the manual wheelchair models.We would like to inform you about the transport of wheelchairs with seated users in vehicles that are especially adapted for this purpose. - Page 40 Incorrect placement of safety belt 4. In order to be used as a seat during transport in 7. The 3-point safety belt must not be held away from a vehicle, the wheelchair must be equipped with the user's body by parts of the wheelchair such as a pelvic belt.
-
Page 41: Restraint Methods
7.2 RESTRAINT METHODS Frontal restraints with straps 1. Connect the frontal straps around the castor attachment. See pic A. 2. Release brakes and tension front straps by pulling the wheelchair backwards. Re-apply wheelchair brakes. Rear restraints 1. Attach the snap hooks on the rear straps to the vertical rear tube by the rear wheel attachment. 2. -
Page 42: How To Disassemble Your
7.3 HOW TO DISASSEMBLE YOUR AZALEA® TO TRANSPORT IT AS LUGGAGE The Rea ® Azalea is easy to prepare for transport. Backrest Remove the backrest cushion by pulling it forwards, Legrest fixed thus separating the Velcro straps. The footrests are loosened by pushing the handle (E) Loosen both knobs (A) and pull the backrest directly forwards or sidewards whilst turning the footrests upwards. - Page 43 Lifting the wheelchair Always lift the wheelchair by gripping the frame at the points shown in the diagram. Never lift the wheelchair by the removable armrests or the footrests. Azalea...
-
Page 44: Maintenance
8. Maintenance 8.1 SAFETY INFORMATION Regular checks and maintenance of the wheelchair ensure the user’s safety and the expected lifetime of the chair. 8.2 MAINTENANCE SCHEDULE Check... Weekly Montly 6 months Tyre pressure QR axles rear wheels X All fasteners for wear and tightness Castors Anti-tip devices... -
Page 45: Cleaning
8.3 CLEANING Wipe metal parts and the upholstery regularly with a damp cloth. A mild detergent may be used. If nec- essary, the upholstery can be washed at 40ºC. Nor- mal washing powder/liquid may be used. For disinfection only use alcohol based detergent. Washing and Disinfection 1. -
Page 46: After Use
Tyres and tubes are made of rubber and can be recycled according to above. Packing All Invacare Rea AB packing material is developed to fit the products in an optimal way to reduce unnecessary material waste. All boxes are recyclable. - Page 47 Notes Azalea...
- Page 48 Switchboard Tel: (44) (0)1656 776200, Fax: (44) (0)1656 776201 ireland@invacare.com Customer services Tel: (44) (0)1656 776222, Fax: (44) (0)1656 776220 Italia: UK@invacare.com Invacare Mecc San s.r.l., Via dei Pini 62, I-36016 Thiene (VI) Tel: (39) 0445 38 00 59, Fax: (39) 0445 38 00 34 italia@invacare.com...