IBM Aptiva Series Quick Start Manual
Hide thumbs
Also See for Aptiva Series:
- Hardware maintenance (206 pages) ,
- Handbook (164 pages) ,
- Quick start manual (2 pages)
Advertisement
Quick Links
1. Unpack your Aptiva PC
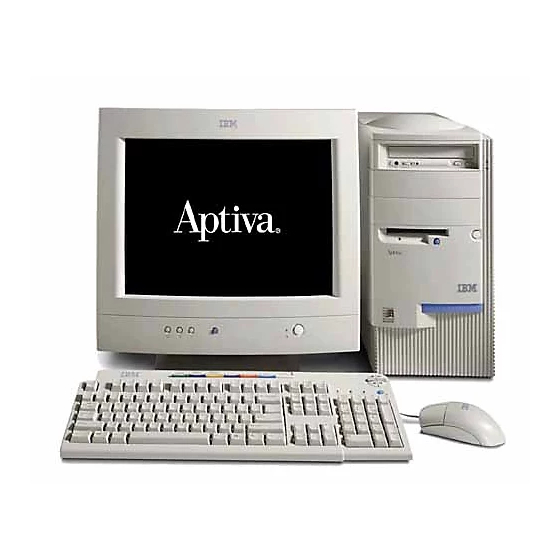
Locate the following items:
Locate the following items:
Locate the following items:
Locate the following items:
Locate the following items:
Modem Cord
Microtower
2. Connect the system components
Attach components to the computer as shown.
Attach components to the computer as shown.
Attach components to the computer as shown.
Attach components to the computer as shown.
Attach components to the computer as shown.
If you need setup instructions for components that are
If you need setup instructions for components that are
If you need setup instructions for components that are
If you need setup instructions for components that are
If you need setup instructions for components that are
not shown here, refer to the back of this sheet or the
not shown here, refer to the back of this sheet or the
not shown here, refer to the back of this sheet or the
not shown here, refer to the back of this sheet or the
not shown here, refer to the back of this sheet or the
instructions that came with the component.
instructions that came with the component.
instructions that came with the component.
instructions that came with the component.
instructions that came with the component.
Note:
Most cable connectors ar
Most cable connectors are color
Most cable connectors ar
e color
e color
e color-coded to match the
-coded to match the
-coded to match the
-coded to match the
Most cable connectors ar
Most cable connectors ar
e color
-coded to match the
location at the back of the system unit where you
location at the back of the system unit where you
location at the back of the system unit where you
location at the back of the system unit where you
location at the back of the system unit where you
connect the cable.
connect the cable.
connect the cable.
connect the cable.
connect the cable.
Read "Safety information" in the Aptiva Reference
Read "Safety information" in the Aptiva Reference
Read "Safety information" in the Aptiva Reference
Read "Safety information" in the Aptiva Reference
Read "Safety information" in the Aptiva Reference
Guide to learn about connecting cables.
Guide to learn about connecting cables.
Guide to learn about connecting cables.
Guide to learn about connecting cables.
Guide to learn about connecting cables.
For machine type 2158, incorrectly installing speakers
For machine type 2158, incorrectly installing speakers
For machine type 2158, incorrectly installing speakers
For machine type 2158, incorrectly installing speakers
For machine type 2158, incorrectly installing speakers
other than those originally shipped with your Aptiva
other than those originally shipped with your Aptiva
other than those originally shipped with your Aptiva
other than those originally shipped with your Aptiva
other than those originally shipped with your Aptiva
PC could cause permanent damage to your speakers.
PC could cause permanent damage to your speakers.
PC could cause permanent damage to your speakers.
PC could cause permanent damage to your speakers.
PC could cause permanent damage to your speakers.
3. Connect the power cables
The voltage selector switch should be pr
The voltage selector switch should be pr
The voltage selector switch should be preset for your ar
The voltage selector switch should be pr
The voltage selector switch should be pr
contact your local power company if you ar
contact your local power company if you ar
contact your local power company if you are uncer
contact your local power company if you ar
contact your local power company if you ar
for your area.
for your area.
for your area.
for your area.
for your area.
• If the voltage supply range in your area is 100-127V
• If the voltage supply range in your ar
• If the voltage supply range in your ar
• If the voltage supply range in your ar
• If the voltage supply range in your ar
selector switch so you can see 115V or 115.
selector switch so you can see 115V or 115.
selector switch so you can see 115V or 115.
selector switch so you can see 115V or 115.
selector switch so you can see 115V or 115.
• If the voltage supply range in your area is 200-240V
• If the voltage supply range in your ar
• If the voltage supply range in your ar
• If the voltage supply range in your ar
• If the voltage supply range in your ar
selector switch so you can see 230V or 230.
selector switch so you can see 230V or 230.
selector switch so you can see 230V or 230.
selector switch so you can see 230V or 230.
selector switch so you can see 230V or 230.
Plug the monitor and the computer into an electrical outlet. For clarity
Plug the monitor and the computer into an electrical outlet. For clarity, , , , ,
Plug the monitor and the computer into an electrical outlet. For clarity
Plug the monitor and the computer into an electrical outlet. For clarity
Plug the monitor and the computer into an electrical outlet. For clarity
only the power cords are shown in this picture.
only the power cords are shown in this picture.
only the power cords are shown in this picture.
only the power cords are shown in this picture.
only the power cords are shown in this picture.
Note:
If your computer has a power switch on the back of
If your computer has a power switch on the back of
If your computer has a power switch on the back of
If your computer has a power switch on the back of
If your computer has a power switch on the back of
the computer
the computer, pr
the computer
the computer
the computer
, pr
, pr
, pr
, press it in the on position (1=on).
ess it in the on position (1=on).
ess it in the on position (1=on).
ess it in the on position (1=on).
ess it in the on position (1=on).
Power Cord
Mouse
Speaker Power Adapter
(available with some models)
The back of your
The back of your
The back of your
The back of your
The back of your
speaker may look
speaker may look
speaker may look
speaker may look
speaker may look
like either of the
like either of the
like either of the
like either of the
like either of the
two speakers in
two speakers in
two speakers in
two speakers in
two speakers in
this picture.
this picture.
this picture.
this picture.
this picture.
eset for your ar
eset for your ar
ea; however
ea; however
ea; however, , , , ,
eset for your ar
eset for your area; however
ea; however
e uncer
e uncer
e uncer
e uncertain of the voltage
tain of the voltage
tain of the voltage
tain of the voltage
tain of the voltage
ea is 100-127V
ea is 100-127V
ea is 100-127V
ea is 100-127V, set the voltage
, set the voltage
, set the voltage
, set the voltage
, set the voltage
ea is 200-240V, set the voltage
ea is 200-240V
ea is 200-240V
ea is 200-240V
, set the voltage
, set the voltage
, set the voltage
, set the voltage
or
Either set of speakers
Keyboard
Monitor with stand you attached
(may be sold separately)
Publications and CD-ROMs
Printer
(sold separately)
V V V V V ideo connector
ideo connector
ideo connector
ideo connector
ideo connector
for machine type
for machine type
for machine type
for machine type
for machine type
2163
2163
2163
2163
2163
(Continued on next page)
(Continued on next page)
(Continued on next page)
(Continued on next page)
(Continued on next page)
Advertisement

Related Manuals for IBM Aptiva Series


Summary of Contents for IBM Aptiva Series
- Page 1 1. Unpack your Aptiva PC Locate the following items: Locate the following items: Locate the following items: Locate the following items: Locate the following items: Modem Cord Power Cord Either set of speakers Publications and CD-ROMs Microtower Mouse Speaker Power Adapter Keyboard Monitor with stand you attached Printer...
- Page 2 Joystick IBM and Aptiva are trademarks or registered trademarks of International Business Machines Corporation. Microsoft, Windows, and the Windows 98 logo are trademarks or registered trademarks of Microsoft Corporation. IBM and Aptiva are trademarks or registered trademarks of International Business Machines Corporation. Microsoft, Windows, and the Windows 98 logo are trademarks or registered trademarks of Microsoft Corporation.