Advertisement
Quick Links
GPS/chartplotter user guide – TD1
The GPS units contains waypoints for some sites that we regularly dive. If you
dive a site and find that the marks are not stored, please add and label
them. Also, please try and keep the waypoints organised. If you add a
temporary waypoint, please delete it afterwards. If you add a permanent
waypoint, please label it.
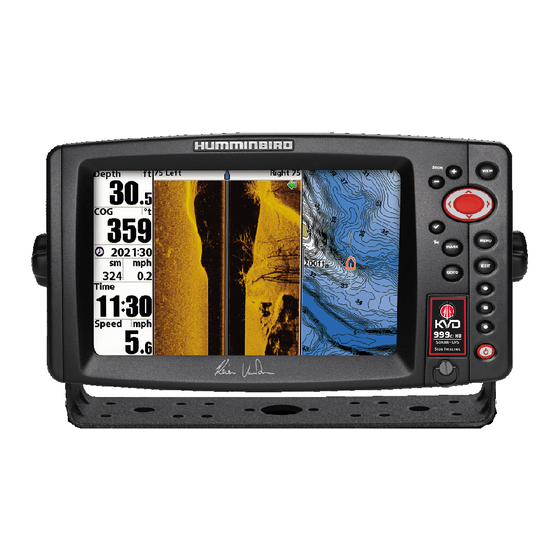
TD1 (the older, orange, boat) has a Humminbird1197c Combo chartplotter, which
combines GPS and echosounder functions in a single unit.
The chartplotter on the console of TD1
There is a switch panel on the console below the steering wheel – make sure the 2
switches on the right-hand side are down (on) – these provide power to the radio
(VHF) and chartplotter (GPS).
1
Humminbird user guide - V1b.docx
Advertisement

Related Manuals for Humminbird 1197c SI Combo


Summary of Contents for Humminbird 1197c SI Combo
- Page 1 There is a switch panel on the console below the steering wheel – make sure the 2 switches on the right-hand side are down (on) – these provide power to the radio (VHF) and chartplotter (GPS). Humminbird user guide - V1b.docx...
- Page 2 This is the display control panel. The functions are listed below: Zoom in (+) and zoom out (-) View (screen selection) Cursor control key Info Menu Mark (MOB/waypoint) Exit Go to Preset (or shortcut) buttons Power Press the power button to start the unit Humminbird user guide - V1b.docx...
- Page 3 When you first power up the unit this is the screen you will see After a few seconds or so it will change to the screen above Humminbird user guide - V1b.docx...
- Page 4 “view” button and press repeatedly to cycle through the screen options until you get the screen you want, or press the bottom shortcut button which should take you straight there (if it hasn’t been changed) Humminbird user guide - V1b.docx...
- Page 5 The last one is the one you are after – see enlarged view below (don’t worry about the screen images, the boat was in the shed when this picture was taken, so the echo sounder wasn’t giving a proper trace and the chartplotter was (correctly) just showing land!): Humminbird user guide - V1b.docx...
- Page 6 If cursor mode is not active (i.e. if you have the chart displayed and haven’t touched the cursor buttons) then pressing the GOTO key displays the list of saved waypoints and you can select the one you want Humminbird user guide - V1b.docx...
- Page 7 – you can also use this screen to select “go to” as shown above, which is useful if you have just entered a new waypoint and want to navigate to it (see below) Humminbird user guide - V1b.docx...
- Page 8 “cursor” mode in which case it will be created at the cursor location as described above) Another way to create a new waypoint is using the menu buttons described above: Humminbird user guide - V1b.docx...
- Page 9 If you prefer “north-up” such that north is always at the top then you can change that as shown below, but please return the unit to “course-up” when you finish and please, please don’t change any other settings! Humminbird user guide - V1b.docx...
- Page 10 Press the “menu” button twice to bring up the screen below: Then use the cursor button right arrow to move across to the “nav” screen: Scroll down to “Chart Orientation” and use the right arrow to select “North-Up” Humminbird user guide - V1b.docx...
- Page 11 At the end of the day, please power down the unit by pressing the power button - you will see this screen – just hold down the power button until the unit switches off Humminbird user guide - V1b.docx...