Stihl KMA 130 R Instruction Manual
Hide thumbs
Also See for KMA 130 R:
- Instruction manual (88 pages) ,
- Instruction manual (356 pages) ,
- Instruction manual (236 pages)
Table of Contents
Advertisement
Available languages
Available languages
Quick Links
Advertisement
Chapters
Table of Contents

Related Manuals for Stihl KMA 130 R


Summary of Contents for Stihl KMA 130 R
- Page 1 STIHL KMA 130 R Instruction Manual Notice d’emploi...
- Page 2 G Instruction Manual 1 - 43 F Notice d’emploi 44 - 90...
-
Page 3: Table Of Contents
5.1 KombiMotor ......... 5 12.2 STIHL AP Battery ........24 5.2 Battery . -
Page 4: Introduction
They must be used together. Keep them in a safe place for 25.1 STIHL KMA 130 R ....... . . 41 future reference. -
Page 5: Kombisystem
Refers to a designated chapter or sub-chapter in this instruction manual. In the STIHL KombiSystem, a KombiEngine (gas-powered) or KombiMotor (battery-powered) can be combined with an assortment of KombiTools to produce different power tools. In this instruction manual, "power tool" is used to designate the tool formed by the combination of the KMA 130 and the STIHL KombiTool. -
Page 6: Main Parts
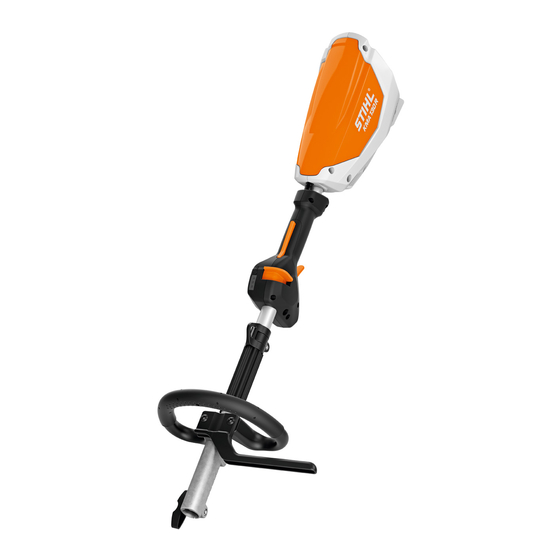
English 4 Main Parts 6 Trigger Switch 4 Main Parts Controls the activation and speed of the KombiMotor. 7 Carrying Ring For connecting a harness to the power tool. KombiMotor 8 Drive Tube Shaft of the KombiMotor. 9 Loop Handle Handle for the operator's front hand. -
Page 7: Battery Harness Options
The following safety symbols are found on the KombiMotor: To reduce the risk of injury, follow the specified safety precautions. The KMA 130 may be powered by a STIHL AR series backpack battery. Alternatively, it may be powered by a Read and follow all safety precautions in the STIHL AP series battery in combination with a STIHL AP instruction manual. -
Page 8: General Power Tool Safety Warnings And Instructions
To reduce the risk of personal injury or property damage from a short circuit, fire or explosion, ■ Recharge only with the charger specified by STIHL. A keep dry. Never immerse in water or other charger that is suitable for one type of battery may create liquids, @ 9. -
Page 9: General Safety Warnings And Instructions For The Following Stihl Kombitools: Fs-Km Trimmer / Brushcutter, Fcs-Km Lawn Edger And Bf-Km
■ Don’t Force Trimmer, Lawn Edger or Cultivator – It will do the job better and with less likelihood of a risk of injury at the Following STIHL KombiTools: FS-KM the rate for which it was designed. Trimmer / Brushcutter, FCS-KM Lawn Edger ■... -
Page 10: General Safety Warnings And Instructions For The Following Stihl Kombitools: Hl-Km Extended Reach Hedge Trimmer, Fh-Km Power Scythe
■ Store Trimmer, Lawn Edger or Cultivator Indoors – When not in use, trimmer, lawn edger and cultivator should be the Following STIHL KombiTools: HL-KM stored indoors in a dry, locked place out of reach of Extended Reach Hedge Trimmer, FH-KM children with the battery removed. - Page 11 English 6 General Power Tool Safety Warnings and Instructions 6.3.3 Electrical Safety d) Remove any adjusting key or wrench before turning the power tool on. A wrench or a key left attached to a rotating a) Power tool plugs must match the outlet. Never modify the part of the power tool may result in personal injury.
- Page 12 English 6 General Power Tool Safety Warnings and Instructions tool's operation. If damaged, have the power tool repaired f) Do not expose a battery pack or tool to fire or excessive before use. Many accidents are caused by poorly temperature. Exposure to fire or temperatures above maintained power tools.
-
Page 13: General Safety Warnings And Instructions For The Following Stihl Kombitool: Bg-Km Blower
6 General Power Tool Safety Warnings and Instructions General Safety Warnings and Instructions for General Safety Warnings and Instructions for the Following STIHL KombiTool: BG-KM Blower the Following STIHL KombiTools: KW-KM PowerSweep and KB-KM Bristle Brush This chapter contains the prescribed general safety... -
Page 14: Important Safety Instructions
Personal Protective Equipment charging or starting work. WARNING ■ This power tool may be powered by a STIHL AR series backpack battery. Alternatively, it may be powered by a ■ Loss of control and severe cut injuries may result if hair,... -
Page 15: Power Tool
CSA Z94". – Keep hands, feet and other parts of your body away – If there is a risk of facial injury, STIHL recommends from the KombiTool and its cutting/working that you also wear a face shield or face screen over attachment. - Page 16 STIHL may cause serious or fatal injury or property damage. – For a list of KombiTools authorized by STIHL for – STIHL recommends that only identical STIHL your unit, see Chapter @ 26 of this instruction replacement parts be used.
-
Page 17: Using The Power Tool
– If your KombiMotor or any part, including the battery, is damaged or does not function properly, take it to 7.5.1 Before Operation your authorized STIHL servicing dealer. Do not use the unit until the problem has been corrected. WARNING ■ Before inserting the battery connecting cord into the ■... - Page 18 English 7 IMPORTANT SAFETY INSTRUCTIONS ■ Before switching on your power tool, take the following ■ To reduce the risk of serious or fatal injuries to the steps to reduce the risk of personal injury from thrown operator or bystanders from loss of control: objects, loss of control or inadvertent contact with the –...
- Page 19 ■ Sparks generated from operation of the power tool may be capable of igniting combustible gases, liquids, vapors, – If working with the STIHL AP Battery Bag with dusts or other combustible materials and substances. To Connecting Cord, make sure it is attached securely...
- Page 20 WARNING – STIHL does not recommend the use of metal blades when cutting in rocky areas or in areas with debris or ■ In the event of an emergency, switch off the motor other objects that could create sparks.
-
Page 21: Maintenance, Repair And Storage
– Wear non-slip, heavy-duty work gloves when handling metal cutting/working attachments. – Never use a power tool with a loose or damaged KombiTool or cutting/working attachment. – STIHL recommends that all repair or replacement work be performed by authorized STIHL servicing DANGER dealers. -
Page 22: Battery Safety
English 9 Battery Safety ■ Use of parts that are not authorized or approved by STIHL ■ Use of unauthorized batteries can damage the power tool may cause serious or fatal injury or property damage. and result in fire, explosion and personal injury and property damage. -
Page 23: Before Starting Work
15 minutes and and other liquids. seek medical attention. – Attach the rain cover to the STIHL AR ■ A battery fire can be dangerous. To reduce the risk of series battery before starting work in rain severe personal injury and property damage in the event or in very damp conditions. -
Page 24: Charging The Battery
► Mount an approved STIHL KombiTool as described in its To set up the charger: instruction manual. ► Put on and adjust the STIHL AR backpack battery, STIHL Battery Belt or STIHL Battery Backpack, @ 14. ► Adjust the loop handle, @ 13.2. -
Page 25: Led Diagnostics And Acoustic Signals
► Charge STIHL AP series batteries only with genuine STIHL AL 101, AL 300 or AL 500 series chargers. ► Push the plug of the connecting cord (1) into the 12 LED Diagnostics and Acoustic Signals socket (2) of the AP Adapter (3) until it stops. -
Page 26: Stihl Ap Battery
If three LEDs flash red when you activate the trigger switch: the power tool has an electrical malfunction. Do not operate the power tool. Have it checked by an authorized STIHL servicing dealer before use or storage. For troubleshooting information, @ 24. -
Page 27: Assembling The Power Tool
Do not operate the loop handle and barrier bar are properly and securely the power tool. Have it checked by an authorized STIHL mounted before starting work. servicing dealer before use or storage. -
Page 28: Adjusting The Loop Handle
► Insert the screws (8) and tighten securely. Ensure that the handle and barrier bar are tight and will not move during 14.1 STIHL AR Backpack Battery operation. 14.1.1 Positioning and Adjusting the Connecting Cord 13.2 Adjusting the Loop Handle... -
Page 29: Stihl Battery Backpack
To avoid damage, ease the battery to the ground when practicing. Do not allow the battery to drop to the ground and do not throw it. 14.2 STIHL Battery Backpack 14.2.1 Mounting the AP Battery Bag with Connecting Cord inside the Battery Backpack... - Page 30 Never transport metallic, pointed or sharp objects in the battery bag or battery backpack. They may bridge the The STIHL Extra AP Battery Bag can be mounted at the electrical contacts in the battery and cause a short circuit top (Illustration D) or bottom (Illustration E) fastening points once a battery is inserted.
- Page 31 English 14 Using a Battery Harness To run the connecting cord through the guide in the shoulder strap: ► If you attach the battery bag at the bottom position, pull the horizontal belt strap (6) through the ring (5) and close the hook and eye fastener to secure it.
-
Page 32: Stihl Battery Belt
To ensure a proper fit: ground and do not throw it. 14.3 STIHL Battery Belt 14.3.1 Mounting the AP Battery Bag to the STIHL Battery Belt WARNING To reduce the risk of injury from tripping or losing control of the power tool, always secure the connecting cord with the hook and eye fasteners. - Page 33 ► Fasten the hook and eye fastener. ► Switch off the power tool, @ 16.2. ► Remove the connecting cord, @ 15.2. ► Put on the STIHL Battery Belt and AP Battery Bag with Connecting Cord. ► Put the power tool harness over your shoulder.
-
Page 34: Attaching The Hip Pad To The Ar Backpack Battery Harness Or Battery Backpack
English 15 Inserting and Removing the Connecting Cord 14.4 Attaching the Hip Pad to the AR Backpack Battery Harness or Battery Backpack A hip pad is used to convert a battery backpack into a harness for supporting the power tool. When working with an AR backpack battery or AP battery in a battery backpack, the hip pad must be used, for example, when operating an FS-KM KombiTool mounted with a metal cutting attachment. -
Page 35: Removing The Connecting Cord
English 16 Switching On and Off To insert the connecting cord: NOTICE Avoid exposing the battery to excessive heat or cold or prolonged periods of direct sunlight. Use or storage outside the recommended ambient temperature range can reduce the performance and/or service life of the battery. 16 Switching On and Off 16.1 Switching On WARNING... -
Page 36: Switching Off
English 17 Checking the KombiMotor To switch on: To switch off: ► Release the trigger switch and trigger switch lockout. Once the trigger switch and trigger switch lockout have been released, the retaining latch will return to its locked position and activation of the trigger switch will be blocked. -
Page 37: During Operation
The retaining latch, trigger switch lockout and trigger switch should return to their respective locked positions. If they do not, take the unit to an authorized STIHL servicing dealer to be repaired before use. If you can depress the trigger switch without first unlocking ►... -
Page 38: After Finishing Work
English 19 After Finishing Work Observe all applicable laws, regulations, standards and When transporting the power tool: ordinances. ► Always transport the power tool in accordance with the instructions found in this manual and the manual for the KombiTool being used. 19 After Finishing Work ►... -
Page 39: Cleaning
English 22 Cleaning ► Clean the contact surfaces (1) with a dry cloth. 22 Cleaning 22.1 Cleaning the KombiMotor WARNING To reduce the risk of personal injury from unintended activation, remove the connecting cord before carrying out any cleaning work, @ 8. Users of this KombiMotor should carry out only the cleaning described in this manual. -
Page 40: Inspection And Maintenance
@ 8. Carry out only the maintenance operations described in this manual. There are no user-authorized repairs. STIHL recommends that repair work be performed by authorized STIHL servicing dealers. To properly maintain the KombiMotor: ►... -
Page 41: Troubleshooting Guide
@ 22.2. 1 LED flashes Battery has low ► Charge the battery as described in its instruction manual. green. charge. STIHL AR only: Additionally, four long beeps are emitted. 1 LED glows Battery too hot / too ►... - Page 42 20 °C). Runtime is too short. Battery not fully ► Charge the battery as described in its instruction manual. charged. Useful life of battery ► Have the battery checked by an authorized STIHL servicing has been reached or dealer. exceeded. 0458-805-8221-A...
-
Page 43: Specifications
26.1 STIHL KMA 130 R For technical information regarding the STIHL AL 101, 300 The KMA 130 R is approved for use only with the following and 500 series chargers, see the product information KombiTools: accompanying your charger. -
Page 44: Replacement Parts And Equipment
27.1 Genuine STIHL Replacement Parts If used with an STIHL FS-KM KombiTool STIHL recommends the use of genuine STIHL replacement parts. Genuine STIHL parts can be identified by the STIHL WARNING part number, the logo and, in some cases, by the... - Page 45 STIHL lithium ion batteries in the United States and Canada. The RBRC seal indicates that STIHL has prepaid for battery recycling. RBRC has a toll free phone number (1-800-822- 8837) that connects you to information on battery recycling locations and information on battery disposal bans or restrictions in your area.
- Page 46 ... . 49 12.2 Batterie STIHL AP ....... . . 70 6.2 Avertissements et instructions générales de...
-
Page 47: Préface
être observées 25.1 STIHL KMA 130 R ....... . . 88 pour réduire le risque de blessures. -
Page 48: Combisystème
3 Indications concernant la présente ce manuel d'utilisation et dans le mode d'emploi de l’outil Notice d'emploi CombiSystème STIHL que vous utilisez. Ne l’utilisez pas à d’autres fins, un usage inadapté peut entraîner des lésions corporelles ou des dommages matériels, y compris des Mentions d’avertissement... -
Page 49: Principales Pièces
français 4 Principales pièces 5 Bouton de blocage de la gâchette 4 Principales pièces Doit être enfoncé pendant le déblocage du verrou de retenue pour permettre une activation de la gâchette. 6 Gâchette Moteur Combi Contrôle l'activation et la vitesse du moteur Combi 7 Anneau de transport Pour le raccordement d’un harnais à... -
Page 50: Options De Harnais De Batterie
Le KMA 130 peut être alimenté par une batterie en sac à dos Combi : STIHL série AR. Il peut également être alimenté par une Pour réduire le risque de blessure, respectez les batterie STIHL série AP en combinaison avec un sac de consignes de sécurité... -
Page 51: Batterie
électriques dans le manuel de l’outil électrique STIHL alimenté par cette batterie. Une utilisation incorrecte peut causer des blessures graves, Consignes et instructions de sécurité générales voire mortelles, ou des dommages matériels. -
Page 52: Avertissements Et Instructions Générales De
■ Rechargez uniquement avec le chargeur spécifié par le ■ Faites faire les réparations par un réparateur qualifié qui STIHL. Un chargeur qui convient à un type de batterie utilise uniquement des pièces de rechange autorisées. peut donner lieu à un risque d’incendie lorsqu’il est utilisé... - Page 53 ■ Utilisez les outils appropriés – Ne pas utiliser un outil pour ■ Examinez périodiquement le cordon de raccordement et une autre utilisation que celle pour lequel il est prévu. faites-le réparer par un distributeur agréé STIHL s’il est endommagé. ■ Évitez le démarrage involontaire – Ne portez pas le coupe-bordure, taille-bordure ou sarcleuse avec votre ■...
-
Page 54: Avertissements Et Instructions Générales De
Les fiches des outils électriques doivent correspondre à la prise murale. N’apportez jamais aucune modification à la STIHL suivants : HL-KM taille-haies à portée fiche. N’utilisez pas de fiches d’adaptation avec les outils étendue, FH-KM faucheuse and HT-KM perche électriques reliés à... - Page 55 français 6 Avertissements et instructions générales de sécurité concernant les outils médicaments. Lorsque vous utilisez un outil électrique, un 6.3.5 Utilisation et entretien des outils électriques moment d’inattention peut entraîner des blessures a) Ne forcez pas l’outil électrique. Utilisez l’outil électrique graves.
- Page 56 français 6 Avertissements et instructions générales de sécurité concernant les outils h) Gardez les poignées et les surfaces de préhension inadaptée ou à des températures hors de la plage sèches, propres et exemptes d’huile et de graisse. Les spécifiée peut endommager la batterie et augmenter le poignées et surfaces de préhension glissantes ne risque d’incendie.
-
Page 57: Avertissements Et Instructions Générales De
CombiSystème sécurité concernant les outils CombiSystème STIHL suivants : Souffleur BG-KM STIHL suivants : KW-KM rouleau de balayage et KB-KM balais brosse Ce chapitre contient les consignes et instructions de sécurité générales règlementaires pour souffleurs à moteur Ce chapitre contient les consignes et instructions de portatifs électriques contenu dans UL 1017. -
Page 58: Consignes De Sécurité Importantes
■ Cet outil électrique peut être alimenté par une batterie en mouvement ou leur happement par d’autres composants sac à dos STIHL série AR. Il peut également être alimenté de l’outil électrique peut entraîner une perte de contrôle et par une batterie STIHL série AP en combinaison avec un de graves coupures. -
Page 59: L'outil Électrique
Z94. – Entreposez l’outil électrique à l’intérieur. – S’il existe un risque de lésion au visage, STIHL vous recommande de porter également un écran facial ou ■ Le contact avec l’outil CombiSystème ou son outil de un masque de sécurité au-dessus de vos lunettes coupe/travail en mouvement peut entraîner de graves... -
Page 60: Utilisation De L'outil Électrique
STIHL pour votre appareil dans le chapitre @ 26 du présent manuel d’utilisation ou 7.5.1 Avant l’utilisation encore dans le catalogue STIHL « Outils de coupe, AVERTISSEMENT pièces détachées et accessoires », disponible auprès de votre distributeur ou sur le site Web ■... - Page 61 Gardez-la coupe/travail dans le mode d'emploi de l’outil propre. Si la prise est encrassée ou corrodée, CombiSystème. apportez l’appareil à votre distributeur agréé STIHL avant de l’utiliser. ■ L’utilisation d’un outil électrique modifié, endommagé, – N’utilisez jamais une batterie défectueuse, mal réglé...
- Page 62 français 7 CONSIGNES DE SÉCURITÉ IMPORTANTES ■ Avant de mettre votre outil électrique en marche, prenez ■ Pour réduire le risque de blessures graves ou mortelles à les mesures suivantes pour réduire le risque de blessures l’opérateur et aux spectateurs suite à une perte de par des objets projetés, de perte de contrôle ou de contact contrôle : accidentel avec l’outil de coupe :...
- Page 63 AP avec les sangles de transport sur une de vous. épaule. – Si vous travaillez avec le sac à batterie STIHL AP avec cordon de raccordement, assurez-vous qu’il soit solidement fixé à la ceinture à batterie STIHL, au sac à dos pour batterie STIHL ou à une ceinture de travail à...
- Page 64 7 CONSIGNES DE SÉCURITÉ IMPORTANTES ■ Pour réduire le risque de blessure aux spectateurs et – STIHL déconseille d’utiliser des couteaux utilisateurs non autorisés : métalliques lors des coupes dans des zones caillouteuses ou dans des zones qui contiennent des –...
- Page 65 français 7 CONSIGNES DE SÉCURITÉ IMPORTANTES ■ Si la végétation coupée ou la terre environnante est – Avant d'inspecter, de régler ou de recouverte d’une substance chimique comme un pesticide nettoyer un outil électrique encrassé, ou un herbicide : obstrué ou bloqué, toujours arrêter le moteur, s'assurer que l’outil –...
-
Page 66: Maintenance, Réparation Et Rangement
■ Lisez et observez les consignes de sécurité sur la batterie de travail des métaux. ainsi que les avertissements et les instructions qui – STIHL recommande de faire effectuer toutes les accompagnent ce produit. opérations de réparation ou de remplacement par un distributeur agréé... - Page 67 AP authentiques avec cet outil électrique. produire de la chaleur, se rompre, fuir, prendre feu ou ■ L’utilisation de batteries STIHL séries AR ou AP à des fins exploser, entraînant des blessures graves ou mortelles et autres que l’alimentation des outils électriques STIHL des dommages matériels.
-
Page 68: Avant D'entreprendre Le Travail
► Fixez et ajustez la batterie en sac à dos STIHL AR, la des yeux, des brûlures chimiques et d’autres blessures ceinture à batterie STIHL ou le sac à dos pour batterie graves. -
Page 69: Recharge De La Batterie
La capacité d’un circuit électrique domestique classique est Le chargeur exécute un auto-test immédiatement après de 15 à 20 A. Un seul chargeur STIHL AL 500 consomme avoir été branché. La DEL (1) du chargeur s’allumera en vert environ 4,8 A. Un seul chargeur AL 300 consomme environ pendant environ 1 seconde, puis s’allumera brièvement en... - Page 70 électrique. chargeur, il sera peut-être nécessaire de la laisser refroidir ► Chargez uniquement les batteries en sac à dos STIHL AR avant que la charge commence. Le processus de charge avec des chargeurs originaux de la série STIHL AL 300 ou commence seulement une fois que la batterie a AL 500.
-
Page 71: Del De Diagnostic Et Signaux Sonores
émise : la batterie est défaillante et doit être remplacée. N’essayez 12.1 Batterie en sac à dos STIHL AR pas de charger, d’utiliser ou d’entreposer la batterie. 12.1.1 État de la batterie ►... -
Page 72: Batterie Stihl Ap
Pour réduire les risques de blessures par perte de contrôle, N’utilisez pas l’outil électrique. Faites-la vérifier par un assurez-vous que la poignée de la boucle et la barre de distributeur agréé STIHL avant de l’utiliser ou de barrière sont correctement et solidement fixées avant de l’entreposer. -
Page 73: Ajuster La Poignée Tubulaire
La poignée tubulaire peut se régler en différentes positions pour s’adapter à la hauteur et la portée des bras de l’utilisateur. 14.1 Batterie en sac à dos STIHL AR Pour ajuster la position de la poignée tubulaire : 14.1.1 Positionnement et réglage du cordon de raccordement ►... - Page 74 français 14 Utilisation d’un harnais de batterie Positionnez et fixez le cordon de raccordement de façon à ce qu'il n'interfère pas avec la bonne technique de travail ou votre capacité à garder le contrôle de l'outil électrique. AVERTISSEMENT Arrangez le cordon de raccordement de manière appropriée pour l’empêcher d’entrer en contact avec l’outil de coupe ou d’être saisi par d’autres objets, ce qui risquerait de vous faire perdre l’équilibre ou le contrôle de votre outil électrique,...
-
Page 75: Sac À Dos Pour Batterie Stihl
Le sac à batterie AP avec cordon de raccordement peut être monté aux points d’attache en haut (illustration A) ou en bas (illustrations B et C) du sac à dos pour batterie STIHL. 0458-805-8221-A... - Page 76 ► Si vous fixez le sac de batterie en position basse, tirez la sangle de ceinture horizontale (6) à travers la bague (5) et Le sac à batterie STIHL Extra AP peut être monté au points fermez le crochet et l'attache à œillet pour le fixer.
- Page 77 français 14 Utilisation d’un harnais de batterie Pour faire passer le cordon de raccordement à travers le 14.2.3 Passage et ajustement du sac à dos pour batterie guide dans la bretelle : AVERTISSEMENT Pour réduire les risques de blessures corporelles, l'opérateur doit pouvoir retirer rapidement le sac à...
-
Page 78: Ceinture À Batterie Stihl
Ne laissez pas la batterie chuter au sol et ne la jetez pas. et retirer la sangle de la bague (2). ► Tirez la sangle à travers la ceinture à batterie (3). 14.3 Ceinture à batterie STIHL 14.3.1 Montage du sac à batterie AP sur la ceinture à batterie STIHL AVERTISSEMENT Pour réduire le risque de blessures par trébuchement ou... -
Page 79: Fixation Du Protège-Hanche Au Harnais De La
► Éteignez l’outil électrique, @ 16.2. ► Retirez le cordon de raccordement, @ 15.2. ► Passez la ceinture à batterie STIHL et le sac à batterie AP avec cordon de raccordement. ► Placez le harnais de l'outil électrique sur votre épaule. -
Page 80: Insertion Et Retrait Du Cordon De Raccordement
français 15 Insertion et retrait du cordon de raccordement Pour fixer le protège-hanche : ► Réglez la longueur de la sangle du protège-hanche (1) de sorte que le mousqueton (2) se trouve à environ la largeur ► Fixez l’attache rapide (5) fournie avec le protège-hanche d’une main au-dessous du sommet de votre hanche. -
Page 81: Retrait Du Cordon De Raccordement
français 16 Mise en marche et arrêt Pour insérer le cordon de raccordement : AVIS Évitez d’exposer la batterie à une chaleur ou un froid excessif ou encore les périodes prolongées d’exposition directe au soleil. L’utilisation ou l’entreposage hors de la plage de températures ambiante recommandée peut réduire les performances et/ou la durée de vie de la batterie. -
Page 82: Mise À L'arrêt
français 17 Vérification du moteur Combi ► Tenez et utilisez toujours l’outil électrique des deux mains, mouvement. Pour réduire tout risque de blessure résultant la main droite fermement sur la poignée arrière et la main d’une activation involontaire ou non autorisée, coupez le gauche fermement sur la poignée tubulaire. -
Page 83: Pendant L'utilisation
Le verrou de retenue, le bouton de blocage de la gâchette et la gâchette devraient retourner dans leurs positions bloquées respectives. Si ce n’est pas le cas, apportez l’appareil chez un distributeur agréé STIHL pour le faire réparer avant de l’utiliser. Si vous pouvez enfoncer la gâchette sans avoir débloqué... -
Page 84: Utilisation Du Moteur Combi
français 19 Après avoir terminé le travail 18.2 Utilisation du moteur Combi ► Si l’outil électrique devient humide pendant le fonctionnement, laissez-le sécher complètement avant la charge ou l’entreposage. AVERTISSEMENT Pour réduire le risque de coupures graves ou mortelles à l’opérateur ou aux spectateurs, tenez les mains, les pieds et 20 Transport les autres parties du corps éloignés de l’outil CombiSystème... -
Page 85: Rangement
français 21 Rangement Pour nettoyer le moteur Combi : 21 Rangement ► Nettoyez les composants polymères avec un chiffon légèrement humide. N’utilisez pas de détergents ou de solvants. Ils peuvent endommager les composants en 21.1 Entreposage du moteur Combi polymère. ►... - Page 86 français 22 Nettoyage ► Si une décoloration (flèche) est quand même visible sur les surfaces de contact : Poncez la décoloration avec un papier sablé fin P 600 jusqu'à ce que les surfaces de contact brillent à nouveau. 0458-805-8221-A...
-
Page 87: Inspection Et Maintenance
@ 8. Effectuez uniquement les opérations de maintenance décrites dans le présent manuel. Aucune réparation ne peut être effectuée par l’utilisateur. STIHL recommande de faire effectuer les opérations de réparation par un distributeur agréé STIHL. Pour une maintenance correcte du moteur Combi : ►... -
Page 88: Guide De Dépannage
1 DEL clignote La charge de la ► Chargez la batterie de la manière décrite dans le manuel en vert. batterie est d’utilisation. insuffisante. STIHL AR seulement : Quatre bips longs sont émis en plus. 1 DEL s’allume Batterie trop chaude ►... - Page 89 La batterie n’est pas ► Chargez la batterie de la manière décrite dans le manuel insuffisante. entièrement d’utilisation. chargée. La durée de vie utile ► Faites vérifier la batterie par un distributeur agréé STIHL. de la batterie est atteinte ou dépassée. 0458-805-8221-A...
-
Page 90: Spécifications
STIHL de votre région pour obtenir de l’assistance. – STIHL série AP en combinaison avec le sac à batterie STIHL AP avec cordon de raccordement – Poids sans outil CombiSystème : 7,1 lbs. (3,2 kg) 25.4 Déclaration de conformité... -
Page 91: Pièces De Rechange Et Équipement
STIHL. Les pièces STIHL authentiques peuvent harnais d'outil électrique approprié et toujours saisir la être identifiées par le numéro de référence STIHL, le logo poignée arrière avec votre main droite et la poignée avant et, dans certains cas, par le symbole des pièces avec votre main gauche, @ 14.3.2 et @ 14.4. - Page 92 États-Unis et au Canada. Le scellé de la RBRC indique que le recyclage de la batterie a été prépayé par STIHL. Le RBRC dispose d’un numéro d’appel gratuit (1-800-822-8837) qui vous permet d’obtenir des informations sur les centres de recyclage de batteries et ainsi que des informations sur les interdictions ou les restrictions relatives à...
- Page 93 français 28 Élimination 0458-805-8221-A...
- Page 94 français 28 Élimination 0458-805-8221-A...
- Page 96 0458-805-8221-A www.stihl.com *04588058221A* 0458-805-8221-A...