Table of Contents
Advertisement
Advertisement
Table of Contents

Related Manuals for Ryobi RLP1813


Summary of Contents for Ryobi RLP1813
- Page 1 ORIGINAL INSTRUCTIONS Cordless Lopper RLP1813 OLP1832B...
- Page 2 Important! It is essential that you read the instructions in this manual before assembling, operating, and maintaining the product. Subject to technical modification.
-
Page 3: Intended Use
Safety, performance, and dependability have been given switch or energising power tools that have the switch top priority in the design of your cordless lopper. on invites accidents. ■ Remove any adjusting key or wrench before turning INTENDED USE the power tool on. A wrench or a key left attached to a rotating part of the power tool may result in personal The cordless lopper is intended for outdoor use only. -
Page 4: Additional Safety Warnings
■ When battery pack is not in use, keep it away from result in serious injury. other metal objects, like paper clips, coins, keys, ■ Do not operate the lopper with a damaged or nails, screws or other small metal objects, that can excessively worn cutting device. -
Page 5: Transportation And Storage
back so that you will not be struck when the tension in ■ For transportation in a vehicle, secure the product the wood fibers is released. against movement or falling to prevent injury to persons or damage to the product. ■... -
Page 6: Residual Risks
of commercial solvents and may be damaged by their WARNING use. Use clean cloths to remove dirt, dust, oil, or grease. Injuries may be caused or aggravated by prolonged use ■ Do not at any time let brake fluids, gasoline, petroleum- of a tool. -
Page 7: Symbols In This Manual
Regulatory Compliance Mark (RCM). The product meets applicable regulatory requirements. Waste electrical products should not be disposed of with household waste. Please recycle where facilities exist. Check with your local authority or retailer for recycling advice. SYMBOLS IN THIS MANUAL Lock Unlock Parts or accessories sold separately... - Page 8 WHAT'S IN THE BOX RLP1813...
- Page 9 WHAT'S IN THE BOX OLP1832B...
-
Page 10: Know Your Product
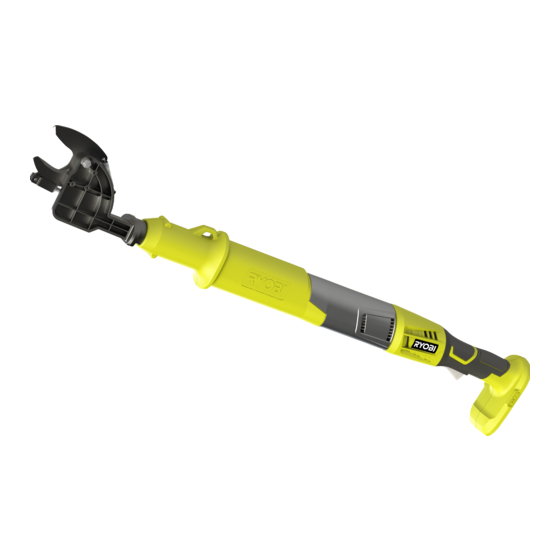
KNOW YOUR PRODUCT 1. Cutting blade 5. Battery Port 2. Branch hook 6. Trigger 3. Handle housing 7. Blade sheath 4. Lock out trigger... -
Page 11: Getting Started
GETTING STARTED Wear full eye and head protection while operating the Remove the blade sheath. product. When handling the blade assembly, wear non-slip, heavy-duty protective gloves. Wear nonskid, protective footwear that will protect your feet and improve your footing on slippery surfaces. Press and hold the lock out trigger and trigger. - Page 12 GETTING STARTED Install the battery pack in the product. Make sure the Install the hook. latches on each side of the battery pack snap in place and that the battery pack is securely attached before using the product.
- Page 15 OVERVIEW Maintenance Operation 32mm 28mm p.12 p.14 Blade replacement Storage p.15 p.18...
-
Page 16: Operation
OPERATION 32mm 28mm NOTE:The lopper has a 32 mm cutting capacity for softwood, and 28 mm cutting capacity for hardwood. OPERATING THE LOPPER NOTE: During operation, hold the product with both hands. 1. Remove the blade sheath. 2. Install the hook. 3. - Page 17 OPERATION 4. Press and hold the lock out trigger and trigger. 5. Use the product for cutting and pruning small limbs and branches. NOTE: Ensure to never stand directly underneath the branch in which you are cutting. NOTE: Use the hook for removing loose branches.
- Page 18 MAINTENANCE CLEANING THE LOPPER 1. Remove the battery pack. 2. Clean the product with a soft, dry cloth. NOTE: Do not use water and soap to clean the product. 3. Lubricate the blades lightly before and after use. NOTE: Use only warranty-approved lubricants (WD-40, INOX, and RP7).
-
Page 19: Blade Replacement
BLADE REPLACEMENT REPLACING THE BLADE 1. Remove the battery pack. 2. Loosen the nut using a wrench. 3. Remove the nut, spring washer, flat washer, and pivot bolt. 4. Remove the spring from the blade and from the spring hanger. - Page 20 BLADE REPLACEMENT 5. Remove the flat washer between the two blades. 6. Using a wrench, loosen the nut and the adjustment screw by turning it anticlockwise. 7. Remove the stamping connector from the steel wire, adjustment screw and nut by pulling the blade away. 8.
- Page 21 BLADE REPLACEMENT 9. Attach the spring to the spring hanger, then attach the other end to the blade hole. 10. Insert the pivot bolt through the cutting blades. Insert the flat washer, spring washer, and nut. NOTE: Align the square on the pivot bolt with the square slot on the blade.
- Page 22 BLADE REPLACEMENT 13. Tighten the adjustment screw and nut. Use a wrench to fix the adjustment screw, and then adjust the nut position to the correct opening size. Use the gauge that is included in the blade accessory pack to control the opening size of the blades.
- Page 23 STORAGE STORING THE LOPPER NOTE: Clean all foreign materials from the product before storing. 1. Remove the battery.. 2. Cover the blade with the blade sheath. 3. Store the product in a cool, dry, and well- ventilated place that is inaccessible to children and well away from sources of ignition.
-
Page 24: Product Specifications
PRODUCT SPECIFICATIONS VIBRATION LEVEL Cordless lopper WARNING Model RLP1813 / OLP1832B The declared vibration value has been measured with a standard test method and may be used to compare one Rated Voltage 18 V tool with another. Cutting capacity 32 mm (softwood), 28 mm... - Page 26 Imported by: Techtronic Industries Australia Pty Ltd 31 Gilby Road, Mount Waverley, VIC 3149 Melbourne, Australia Techtronic Industries N.Z. Limited 2 Landing Drive, Mangere Auckland, 2022, New Zealand 960994112-02...