Table of Contents
Advertisement
Available languages
Available languages
Operator's Manual
4-Cycle
CULTIVATOR / EDGER
Model No. 316.292711
with
CAUTION: Before using
this product, read this
manual and follow all
safety rules and operating
instructions.
Sears, Roebuck and Co., Hoffman Estates, IL 60179, U.S.A.
Visit our website: www.sears.com/craftsman
P/N 769-04006
• SAFETY
• ASSEMBLY
• OPERATION
• MAINTENANCE
• PARTS LIST
• ESPAÑOL, p. E1
(06/08)
Advertisement
Chapters
Table of Contents

Related Manuals for Craftsman 316.292711


Summary of Contents for Craftsman 316.292711
- Page 1 Operator’s Manual 4-Cycle CULTIVATOR / EDGER Model No. 316.292711 with CAUTION: Before using this product, read this manual and follow all safety rules and operating instructions. Sears, Roebuck and Co., Hoffman Estates, IL 60179, U.S.A. Visit our website: www.sears.com/craftsman P/N 769-04006 •...
-
Page 2: Table Of Contents
TABLE OF CONTENTS Warranty ....... . .2 Service Information ......2 Rules for Safe Operation . -
Page 3: Rules For Safe Operation
RULES FOR SAFE OPERATION The purpose of safety symbols is to attract your attention to possible dangers. The safety symbols, and their explanations, deserve your careful attention and understanding. The safety warnings do not by themselves eliminate any danger. The instructions or warnings they give are not substitutes for proper accident prevention measures. SPARK ARRESTOR NOTE NOTE: For users on U.S. - Page 4 • Avoid creating a source of ignition for spilled fuel. Do not start the engine until fuel vapors dissipate. • Always stop the engine and allow it to cool before filling the fuel tank. Never remove the cap of the fuel tank, or add fuel, when the engine is hot.
- Page 5 RULES FOR SAFE OPERATION SAFETY AND INTERNATIONAL SYMBOLS This operator's manual describes safety and international symbols and pictographs that may appear on this product. Read the operator's manual for complete safety, assembly, operating and maintenance and repair information. SYMBOL MEANING •...
-
Page 6: Parts List
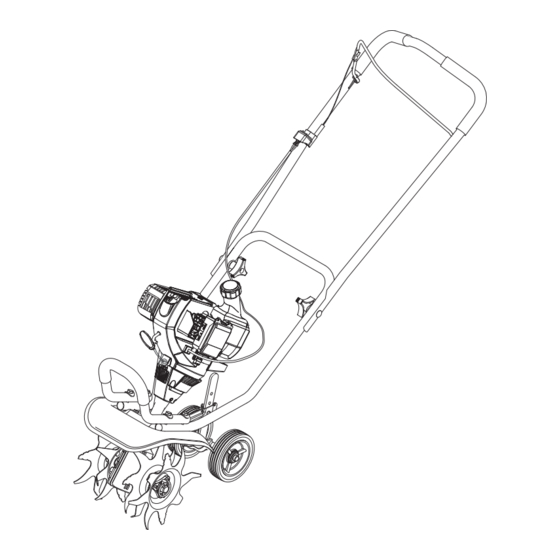
Applications • Cultivating sod and light to medium soil • Cultivating in garden areas, around trees, etc. • Edging Muffler Starter Rope Grip Front Handle Tine Guard Cultivator Tines KNOW YOUR UNIT Primer Bulb START/ON (I) Wheel Support Edger Wheel... -
Page 7: Assembly Instructions
NOTE: It may be necessary to lay the cultivator / edger 2. Remove the click pin from each end of the tine shaft and slide the tines off the shaft. -
Page 8: Oil And Fuel Information
SAE 30 SF, SG, SH oil (Fig. 5). NOTE: Save the bottle to measure the correct amount for future oil changes. See Changing the Oil. NOTE: Your new 4-Cycle cultivator is shipped for operation in conditions above 40°F (4°C). For cold weather operation, where temperatures fall below 40°F (4°C), use a high-quality SAE... - Page 9 FUELING THE UNIT NOTE: Fill or add fuel to the tank only when the cultivator is in a horizontal position (Fig. 9). 1. Remove fuel cap. Remove the tag from the fuel tank neck. 2. Place spout of gas container into the fill hole on the fuel tank and fill tank.
-
Page 10: Starting/Stopping Instructions
6. Hold the throttle and handlebar with one hand and grab the starter rope with your other hand. Use your foot to hold down the cultivator (Fig. 12). NOTE: Tilt the unit back slightly to bring the tines off the ground when starting. -
Page 11: Operating Instructions
Wear heavy long pants, boots and gloves. Do not wear short pants, sandals or operate barefoot. 1. Move the cultivator to the work area prior to starting the engine. Transport the cultivator by pushing or pulling it along on its wheels. -
Page 12: Maintenance And Repair Instructions
1. Put the On/Off Stop Control in the STOP (O) position and disconnect the spark plug wire. NOTE: It may be necessary to lay the cultivator back in a horizontal position on a flat level surface with the upper handle touching the ground. - Page 13 MAINTENANCE AND REPAIR INSTRUCTIONS CHECKING THE OIL LEVEL To prevent extensive CAUTION: engine wear and damage to the unit, always maintain the proper oil level in the crankcase. Never operate the unit with the oil level below the bottom of the dipstick. The importance of checking and maintaining the proper oil level in the crankcase cannot be overemphasized.
- Page 14 MAINTENANCE AND REPAIR INSTRUCTIONS AIR FILTER MAINTENANCE Cleaning the Air Filter Clean and re-oil the air filter every 10 hours of operation. It is an important item to maintain. Failure to maintain your air filter properly can result in poor performance or can cause permanent damage to your engine.
- Page 15 MAINTENANCE AND REPAIR INSTRUCTIONS 2. Release the throttle trigger and let the engine idle. If the engine stops, insert a small phillips or flat blade screwdriver into the hole in the air filter/muffler cover (Fig. 22). Turn the idle speed screw in, clockwise, 1/8 of a turn at a time (as needed) until the engine idles smoothly.
- Page 16 MAINTENANCE AND REPAIR INSTRUCTIONS ROCKER ARM CLEARANCE The rocker arm clearance may need adjustment if your unit suffers a loss of performance power or has trouble starting. Adjusting the rocker arm clearance requires disassembly of the engine. If you feel unsure or unqualified to perform this, take the unit to a Sears or other qualified service dealer.
- Page 17 MAINTENANCE AND REPAIR INSTRUCTIONS 7. Pull the starter rope slowly to bring the piston to the top of its travel, (known as top dead center). Check that: • The piston is at the top of its travel while looking in the spark plug hole (Fig.
-
Page 18: Cleaning And Storage
MAINTENANCE AND REPAIR INSTRUCTIONS Cleaning the Unit WARNING: always turn the unit off and allow it to cool before you clean or perform any maintenance on it. • Use a small brush to clean off the outside of the unit and to keep the air vents free of obstructions. -
Page 19: Troubleshooting Chart
Old fuel Fouled spark plug Plugged spark arrestor Low power Cultivator tines bound with dirt or grass SIGNS OF OIL AROUND OIL FILL PLUG/DIPSTICK C A U S E Oil fill plug/dipstick loose or missing o-ring UNIT OCCASIONALLY HESITATES AT HIGH SPEEDS... -
Page 20: Specifications
Fuel Tank Capacity ..............15 oz (444 ml) CULTIVATOR* Cultivating Path Width (Maximum) . - Page 21 CALIFORNIA / EPA EMISSION CONTROL WARRANTY STATEMENT The California Air Resources Board, the Environmental Protection Agency, and Sears Brands LLC (Sears) are pleased to explain the emission control system warranty on your 2007 and later small off-road engine. In California and the 49 states, new small off-road engines must be designed, built and equipped to meet the state’s stringent anti-smog standards.
- Page 22 CALIFORNIA EVAPORATIVE EMISSION CONTROL WARRANTY STATEMENT The California Air Resources Board and Sears Brands LLC (Sears) is pleased to explain the evaporative emission control system’s warranty on your 2007 model year and later small off-road (equipment type) engine. In California, new equipment that use small off- engines must be designed, built, and equipped to meet the State’s stringent anti-smog standards Sears must warrant the evaporative emission control system on your small off-road Lawn &...
- Page 23 Manual del Operador 4-Ciclos CULTIVADORA / BORDEADORA Modelo No. 316.292711 with PRECAUCION: Lea el manual del operador y siga todas las advertencias e instrucciones de seguridad. Sears, Roebuck and Co., Hoffman Estates, IL 60179, U.S.A. Vaya a: www.sears.com/craftsman P/N 769-04006 (06/08) •...
-
Page 24: Garantía
INDICE DE CONTENIDOS Garantía ....... . .E2 Llamadas a apoyo al cliente ....E2 Normas para una operación segura . -
Page 25: Normas Para Una Operación Segura
NORMAS PARA UNA OPERACION SEGURA Los símbolos de seguridad se utilizan para llamar su atención sobre posibles peligros. Los símbolos de seguridad y sus explicaciones merecen toda su atención y comprensión. Los símbolos de seguridad no eliminan ningún peligro por sí mismos. - Page 26 NORMAS PARA UNA OPERACION SEGURA espectadores a que usen protección para los ojos. Si se le acerca alguien apague la unidad de inmediato. • Oprima el control del estrangulador y compruebe que regresa automáticamente a la posición de marcha en vacío.
- Page 27 NORMAS PARA UNA OPERACION SEGURA SIMBOLOS DE SEGURIDAD DE INTERCACIONALES Este manual del operador describe los símbolos y figuras de seguridad e internacionales que pueden aparecer en este producto. Lea el manual del operador para obtener información completa acerca de la seguridad, ensamble, operación y mantenimiento y reparación. SIMBOLO SIGNIFICADO •...
-
Page 28: Conozca Su Unidad
APLICACION Use esta unidad para cultivar tierra herbosa y tierra negra ligera a mediana. También se utiliza para cultivar áreas de jardines, alrededor de árboles, etc. Silenciador Mango de la cuerda de arranque Protección de las púas Púas CONOZCA SU UNIDAD Bombilla del cebador ENCENDIDO (I) -
Page 29: Instrucciones De Ensamble
INSTRUCCIONES DE ENSAMBLE NOTE: Desde la posición de funcionamiento, se observa la referencia a la derecha o a la izquierda de la cultivadora / bordeadora. COLOCACIÓN DEL MANUBRIO 1. Afloje las dos perillas del lado interior del manubrio (Fig. 1). 2. -
Page 30: Información Del Aceite Y Del Combustible
INFORMACION DEL ACEITE Y DEL COMBUSTIBLE ADVERTENCIA: SIADO EL CÁRTER PUEDE CAUSAR LESIONES PERSONALES GRAVES No podemos exagerar la importancia del control y mantenimiento del nivel correcto de aceite en el cigüeñal. Verifique el aceite antes de cada uso y cámbielo cuando sea necesario según se indica en la sección de Cambio del aceite . - Page 31 INFORMACION DEL ACEITE Y DEL COMBUSTIBLE TIPO DE COMBUSTIBLE RECOMENDADO El combustible viejo es la causa principal del mal funcionamiento de la unidad. Asegúrese de usar combustible nuevo, limpio y sin plomo. NOTA: Este es un motor de cuatro ciclos. Para evitar dañar su unidad, no mezcle el aceite con la gasolina.
-
Page 32: Instrucciones De Arranque Y Apagado
INSTRUCCIONES DE ARRANQUE Y APAGADO ADVERTENCIA: exterior bien ventilada. Los gases de escape de monóxido de carbono pueden ser letales en un área cerrada. ADVERTENCIA: accidentales. Colóquese en posición de inicio cuando tire de la cuerda de arranque (Fig. 12). El operador y la unidad deben estar en una posición estable al arrancar la unidad para evitar graves lesiones personales. -
Page 33: Instrucciones De Operación
INSTRUCCIONES DE OPERACION CONSEJOS PARA LA OPERACIÓN ADVERTENCIA: adecuada para reducir el riesgo de lesiones cuando opere esta unidad. No use ropa holgada ni alhajas. Use protección ocular y auditiva. Use pantalones largos y gruesos, botas y guantes. No use pantalones cortos, sandalias ni trabaje descalzo. -
Page 34: Instrucciones De Mantenimiento Y Reparación
INSTRUCCIONES DE MANTENIMIENTO Y REPARACION NOTA: Algunos procedimientos de mantenimiento pueden requerir el uso de herramientas o habilidades especiales. Si no está seguro acerca de estos procedimientos, lleve su unidad a un establecimiento de reparación, persona o distribuidor de servicio autorizado que arregle motores para uso fuera de la carretera. - Page 35 INSTRUCCIONES DE MANTENIMIENTO Y REPARACION INSPECCIÓN DEL NIVEL DE ACEITE PRECAUCION: excesivo del motor y el daño de la unidad, mantenga siempre el nivel de aceite correcto en el cárter del cigüeñal. No opere nunca la unidad con el aceite debajo del extremo inferior de la varilla de medición.
- Page 36 INSTRUCCIONES DE MANTENIMIENTO Y REPARACION MANTENIMIENTO DEL FILTRO DE AIRE Limpieza del filtro de aire Limpie y vuelva a aceitar el filtro de aire cada 10 horas de operación. Es un elemento cuyo mantenimiento es importante. Si no realiza el mantenimiento del filtro de aire, su garantía será...
- Page 37 INSTRUCCIONES DE MANTENIMIENTO Y REPARACION 1. Arranque el motor y déjelo funcionar a una mínima alta durante un minuto para que se caliente. NOTA: Verifique que las púas no estén en contacto con el suelo cuando ajuste la marcha lenta. 2.
- Page 38 RESOLUCION DE PROBLEMAS HUELGO DEL BRAZO OSCILANTE El espacio libre del brazo oscilador pudiera necesitar ajuste si su unidad experimenta una pérdida de potencia de rendimiento o tiene problemas al arrancar. Para ajustar el espacio libre del brazo oscilador se requiere desarmar el motor.
- Page 39 RESOLUCION DE PROBLEMAS 7. Tire lentamente de la cuerda de arranque para traer el pistón hacia la parte superior de su recorrido (conocido como punto muerto superior). Verifique que: • El pistón se encuentre en la parte superior de su recorrido mientras mira dentro del orificio de la bujía de encendido (Fig.
- Page 40 INSTRUCCIONES DE MANTENIMIENTO Y REPARACION Limpieza de la Unidad ADVERTENCIA: lesiones personales, apague siempre su unidad y espere que se enfríe antes de limpiarla o realizar cualquier tipo de mantenimiento. • Use un cepillo pequeño para limpiar la parte exterior de la unidad y para mantener los respiraderos libres de obstrucciones.
- Page 41 RESOLUCION DE PROBLEMAS EL MOTOR NO ARRANCA C A U S A El interruptor de encendido está APAGADO El tanque de combustible está vacío La bombilla del cebador no fue oprimida lo suficiente El motor se ha inundado La gasolina es vieja La bujía de encendido está...
-
Page 42: Especificaciones
MOTOR* Tipo de motor ..............Enfriado por aire, 4 ciclos Desplazamiento . -
Page 43: Lista De Piezas
DECLARACIÓN DE GARANTÍA DE CONTROL DE EMISIONES EVAPORATIVAS DE LA EPA PARA Los Derechos y Obligaciones de Usted según la Garantía El Consejo de Recursos del Aire (Air Resources Board) de California, la Agencia de Protección del Medio Ambiente (EPA) y Sears Brands LLC (Sears) tienen el placer de explicar la garantía del sistema de control de emisiones en su motor “off-road”... - Page 44 DECLARACIÓN DE GARANTÍA DE CONTROL DE EMISIONES EVAPORATIVAS PARA CALIFORNIA Los Derechos y Obligaciones de Usted según la Garantía El Consejo de Recursos del Aire (Air Resources Board) de California y Sears Brands LLC (Sears) tienen el placer de explicar la garantía del sistema de control de emisiones evaporativas en su motor “off-road”...
-
Page 45: Parts List
Part Numbers On Following Page PARTS LIST REPLACEMENT PARTS - MODEL 316.292711 18 19 4-CYCLE GAS CULTIVATOR 24 25... - Page 46 REPLACEMENT PARTS - MODEL 316.292711 4-CYCLE GAS CULTIVATOR Item Part No. Description 753-04028 Engine Cover Assembly (includes 3 & 4) 791-181930 Engine Cover Screw 791-182651 Starter Rope Eyelet 791-182652 Eyelet Nut 791-181025 Valve Cover Screw 791-182098 Valve Cover 791-182099 Valve Cover Gasket...
- Page 47 753-04055 Front Handle 753-04056 Lock Nut 753-04057 Cotter Pin 753-04058 Tailpiece Bracket Assembly 753-04059 Clevis Pin PARTS LIST REPLACEMENT PARTS - MODEL 316.292711 Item Part No. 4-CYCLE GAS CULTIVATOR Description 753-04060 Cap Screw 753-04061 Lock Nut 753-04062 Cap Push 753-04063...
- Page 48 For expert troubleshooting and home solutions advice: For repair – in your home – of all major brand appliances, lawn and garden equipment, or heating and cooling systems, no matter who made it, no matter who sold it! For the replacement parts, accesspries and owner’s manuals that you need to do-it-yourself.