Table of Contents
Advertisement
Advertisement
Table of Contents
Troubleshooting

Related Manuals for Zeiss Cell Observer SD


Summary of Contents for Zeiss Cell Observer SD
- Page 2 Cell Observer SD. Subject to alterations in the interest of technical progress; the manual is not covered by an update service.
-
Page 3: Table Of Contents
2.3.7 Safety Kit for Customer-Provided Laser Module ..............29 System Overview Cell Observer SD ..................30 Suitability of Objectives for the Use ..................31 Suitability of Optical Fibers for Use in Cell Observer SD ............31 Technical Data ........................32 Start-Up..........................37 Installation Requirements ....................37 3.1.1 Space Requirements......................37... - Page 4 Carl Zeiss TABLE OF CONTENTS Cell Observer SD Connecting the Distribution Box for Laser Safety ..............45 Coupling a Customer-Provided Laser to the Cell Observer SD System ........47 3.10 Safety Check before Laser Start-up..................48 3.11 Laser Safety Check ......................49 Operation..........................
-
Page 5: Notes On Instrument Safety
NOTES ON INSTRUMENT SAFETY General Notes The Cell Observer SD consists of the following two main components: CSU-X1 spinning disc unit and Axio Observer.Z1. It has been designed and built to meet the requirements under DIN EN 61010-1 (IEC 61010-1) "Standard rules regarding the safety requirements for electrical equipment for measurement, control, and laboratory use", DIN EN 60825-1 (IEC publication 60825-1) "Safety of laser... - Page 6 NOTES ON INSTRUMENT SAFETY Carl Zeiss General Notes Cell Observer SD In addition to this manual of the Cell Observer SD, please observe the information given in detail in the following operating manuals: − Operating Manual for Axio Observer Mikroscope (B 46-0111) Operating Manual AxioVision (B 48-0019 e) −...
-
Page 7: Safety Instructions
1.2.1 Notes on Laser Radiation The Cell Observer SD relies on a class 3B laser device for operation and is labeled accordingly (maximum 300 mW of output power). Laser instruments must be operated and handled in accordance with the regulations concerning health and industrial labor protection. Furthermore, the operator must observe all provisions of statutory law. -
Page 8: Installation Instructions
Carl Zeiss MicroImaging GmbH Customer Service will provide such services on a chargeable basis. Do not install the Cell Observer SD near heat sources, e.g. radiators or direct sunlight. To avoid build-ups of heat, the ventilation slits at the microscope system must not be obstructed. - Page 9 Safety Instructions Carl Zeiss On completion of work for installation or retrofitting of the Cell Observer SD System, an authorized expert must perform a careful inspection to check for absence of defects. He/she must also make sure that all laser protection shields are properly mounted.
- Page 10 Cell Observer SD If it is determined that protective measures are no longer effective, the instrument must be switched off and secured against inadvertent operation. Please contact a Zeiss service agency or the Carl Zeiss Microscopy Service to have the instrument repaired.
-
Page 11: Service Interfaces
Service interfaces at the Axio Observer.Z1 – CSU-X1 spinning disc unit – multi laser module CAUTION The fiber connectors (Fig. 1-1/1 and 2) may only be detached by Carl Zeiss service technicians. If one fiber end is not firmly connected to the fiber mount, laser class 3B radiation will emerge! - Page 12 Service interface between transmitted light illumination carrier and HAL lamp CAUTION Only Carl Zeiss service personnel are allowed to release the clamping screw (Fig- 1-2/1). If the lamp housing is removed, laser class 3B radiation will emerge! Non-observance involves the risk of eye damage!
-
Page 13: Warning And Information Labels On The Instrument
1.2.4 Warning and Information Labels on the Instrument Follow all warning and information labels that are affixed to the Cell Observer SD and the Axio Observer microscope. Please check that all labels shown below are actually in place. Contact Carl Zeiss MicroImaging GmbH if a sign or label is found to be missing. You will receive replacement free of charge. - Page 14 NOTES ON INSTRUMENT SAFETY Carl Zeiss Safety Instructions Cell Observer SD Fig. 1-4 Warning and information labels at the Cell Observer SD 423638-7044-001 M60-2-0021 e 01/2009...
- Page 15 NOTES ON INSTRUMENT SAFETY Cell Observer SD Safety Instructions Carl Zeiss Fig. 1-5 Warning and information labels at the filter wheel M60-2-0021 e 01/2009 423638-7044-001...
- Page 16 NOTES ON INSTRUMENT SAFETY Carl Zeiss Safety Instructions Cell Observer SD Caution! Fuse in N-Line too. Fig. 1-6 Warning and information labels at the multi laser module 423638-7044-001 M60-2-0021 e 01/2009...
- Page 17 NOTES ON INSTRUMENT SAFETY Cell Observer SD Safety Instructions Carl Zeiss Fig. 1-7 Warning and information labels at the laser module, variant 1 Fig. 1-8 Warning and information labels at the laser module, variant 2 M60-2-0021 e 01/2009 423638-7044-001...
- Page 18 NOTES ON INSTRUMENT SAFETY Carl Zeiss Safety Instructions Cell Observer SD Fig. 1-9 Warning and information labels at the SVB 1 (optional component) 423638-7044-001 M60-2-0021 e 01/2009...
-
Page 19: Notes On Warranty
Except for action which is explicitly described in this operating manual, no maintenance or repair work to the Cell Observer SD is allowed. Repairs may only be carried out by the Carl Zeiss Service or by persons specifically authorized by it. Should any malfunction occur, please get in touch with your local Carl Zeiss agency. -
Page 20: Instrument Description
Cell Observer SD, unless combined with a basic safety kit for Z1 "Axio Observer" microscope stand (432927-9010-000). Use the Cell Observer SD only with laser class 3B laser modules up to 300 mW of output power. Carl Zeiss MicroImaging GmbH cannot warrant the proper function of microscope system components or the compliance with laser system safety requirements if lasers of a higher power rating are selected. -
Page 21: Functional Principle
INSTRUMENT DESCRIPTION Cell Observer SD Functional Principle Carl Zeiss Functional Principle The confocal CSU-X1 spinning disc unit scans hundreds image points simultaneously. Compared to conventional spot scanners, distinctly higher image rates can thus be achieved. For detection of fluorescence, EM CCD cameras of... -
Page 22: Instrument Description And Main Features
Carl Zeiss Instrument Description and Main Features Cell Observer SD Instrument Description and Main Features The following components are required for working with the Cell Observer SD with Axio Observer: − Microscope Axio Observer.Z1, − Laser safety device for microscope and peripheral units consisting of: eyepiece shutter (built into the... -
Page 23: Cell Observer Sd
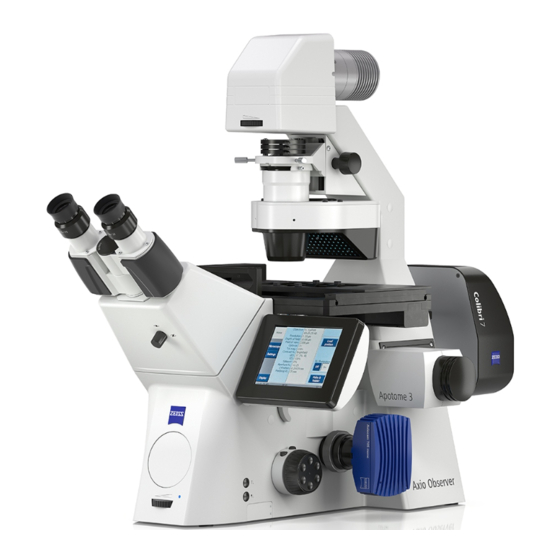
The optical set-up of the CSU-X1 spinning disc unit allows for confocal multi-point scanning of a specimen. The Cell Observer SD accepts camera adapters of 1.0x or 1.2x magnification as appropriate for the installed type of camera. - Page 24 INSTRUMENT DESCRIPTION Carl Zeiss Instrument Description and Main Features Cell Observer SD Fig. 2-2 Cell Observer SD (left) und Cell Observer SD with Dual Cam (right) 423638-7044-001 M60-2-0021 e 01/2009...
-
Page 25: Csu-X1 Control Box
INSTRUMENT DESCRIPTION Cell Observer SD Instrument Description and Main Features Carl Zeiss 2.3.2 CSU-X1 Control Box The CSU-X1 control box controls the scanning speed and the filter wheel actions. For compatibility issues, you should consult the system overview in section 2.4 (also refer to CSU-X1 Operating Manual). -
Page 26: Multi Laser Module
INSTRUMENT DESCRIPTION Carl Zeiss Instrument Description and Main Features Cell Observer SD 2.3.3 Multi Laser Module The multi laser module contains the laser units for the individual laser lines and the corresponding electronic system. The laser modules can be configured for a maximum of four laser lines (refer to section 2.7 Technical Data). -
Page 27: Signal Distribution Box Svb 1
INSTRUMENT DESCRIPTION Cell Observer SD Instrument Description and Main Features Carl Zeiss 2.3.4 Signal Distribution Box SVB 1 The signal distribution box is intended for connection of the various system components (refer to Signal Distribution Box SVB 1 operating manual). -
Page 28: Basic Laser Safety Kit
INSTRUMENT DESCRIPTION Carl Zeiss Instrument Description and Main Features Cell Observer SD 2.3.6 Basic Laser Safety Kit The basic laser safety kit includes an eyepiece shutter (factory-installed or retrofitted by service personnel), a laser safety board for the stand, a distribution box and sticker labels. -
Page 29: Safety Kit For Customer-Provided Laser Module
Customers using their own lasers will be solely responsible for overall laser safety of the Cell Observer SD system. They shall also check for further required laser safety precautions and validity of all laser warning labels that are affixed to the system, including the microscope. -
Page 30: System Overview Cell Observer Sd
INSTRUMENT DESCRIPTION Carl Zeiss System Overview Cell Observer SD Cell Observer SD System Overview Cell Observer SD Fig. 2-10 System overview 423638-7044-001 M60-2-0021 e 01/2009... -
Page 31: Suitability Of Objectives For The Use
Using the CSU-X1 with weakly magnifying objectives will result in specimen sections with a thickness by far greater than 1 AU (Airy Unit). Suitability of Optical Fibers for Use in Cell Observer SD For this application, the optical fiber cable is factory-shipped as an integral part of the spinning disc unit. -
Page 32: Technical Data
INSTRUMENT DESCRIPTION Carl Zeiss Technical Data Cell Observer SD Technical Data Dimensions (width x depth x height) CSU-X1M 1800/5000 spinning disc unit ......... approx. 324 mm x 213 mm x 175 mm CSU-X1M 1800/5000 Dual Cam spinning disc unit ......approx. 324 mm x 213 mm x 304 mm CSU X1A 5000 spinning disc unit ........... - Page 33 INSTRUMENT DESCRIPTION Cell Observer SD Technical Data Carl Zeiss Operating data Axio Observer.Z1, motorized with external VP 231 power supply: Intended site..........................closed rooms Protection class............................I Protection type ..........................IP 20 Electrical safety .............in compliance with DIN EN 61010-1 (IEC 61010-1) under consideration of CSA and UL directives Safety of laser devices...........in accordance with DIN EN 60825-1 (IEC 60825-1)
- Page 34 Advisory notice regarding work with your own laser: Use only a class 3B laser (with a total output power not greater than 300 mW). Contact Carl Zeiss MicroImaging GmbH if you intend to select a laser with a wavelength that is different from those specified above.
- Page 35 INSTRUMENT DESCRIPTION Cell Observer SD Technical Data Carl Zeiss SVB 1 (Signal distribution box) Line voltage .......................100 to 240 V ±10 % Change of instrument voltage setting is not necessary! Line frequency ..........................50/60 Hz Maximum power consumption ......................20 VA Fuses ............................2x T1.0 A/H...
- Page 36 INSTRUMENT DESCRIPTION Carl Zeiss Technical Data Cell Observer SD Definite Focus controller Line voltage.......................100 to 240 V ±10 % Change of instrument voltage setting is not necessary! Line frequency ..........................50/60 Hz Maximum power consumption ......................60 VA Fuses ............................2x T 2.0 A/H Intended site .........................closed rooms...
-
Page 37: Start-Up
Carl Zeiss START-UP The Cell Observer SD is a laser class 3B system. It is provided with respective labeling (total maximum output power of 300 mW). You are obliged to meet the provisions of health protection and workplace safety when handling laser devices. In addition, users must comply with all applicable provisions of statutory law. -
Page 38: Power Requirements
START-UP Carl Zeiss Installation Requirements Cell Observer SD 3.1.2 Power Requirements For line power supply, three wall sockets at a maximum distance of 1.5 m from the laser module are required. Use the three power strips (included in delivery) for connection of the system components (refer to Fig. -
Page 39: Environmental Requirements
START-UP Cell Observer SD Installation Requirements Carl Zeiss 3.1.3 Environmental Requirements 1. Operation at specified power T = 22 °C ±3 °C, uninterrupted (24 h per day, whether system is operational or in power off state) 2. Operation at reduced power T = 10 °C to 35 °C, with all operating details modified... -
Page 40: Requirements On Microscope Stand
Carl Zeiss Requirements on Microscope Stand Cell Observer SD Requirements on Microscope Stand The Cell Observer SD has been formally approved for combined operation with these types of microscope stand: Axio Observer.Z1 (431007-0000-000 or 431007-9901-000) − The manufacturer does not assume liability for any use that is unrelated to the intended use. -
Page 41: Basic Microscope Settings
Carl Zeiss Basic Microscope Settings Installation and commissioning of the Cell Observer SD system may not be performed by anyone other than service personnel of Carl Zeiss MicroImaging GmbH or technicians duly authorized to handle such work by the Manufacturer. -
Page 42: Mounting The Camera
START-UP Carl Zeiss Mounting the Camera Cell Observer SD Mounting the Camera The following cameras may be connected to the spinning disc unit: 1.0x camera adapter for: 1.2x camera adapter for: − AxioCam MRm, − Photometrics QuantEM or other EMCCD camera from Photometrics or AxioCam HRM, −... -
Page 43: Connection Of Spinning Disc Unit
START-UP Cell Observer SD Connection of Spinning Disc Unit Carl Zeiss Connection of Spinning Disc Unit 3.6.1 Connecting the CSU-X1M 1800/ 1800 Dual Cam Spinning Disc Unit • Connect the power supply unit of the spinning disc unit table to the power strip (refer to section 3.1.2 on page 38). -
Page 44: Connecting The Filter Wheel
START-UP Carl Zeiss Connecting the CSU-X1 Control Box Cell Observer SD 3.6.3 Connecting the Filter Wheel For operation with a filter wheel, the wheel must also be connected: • Connect control cable with filter wheel (Fig. 3-7/1). Secure connector with two screws. -
Page 45: Connecting The Distribution Box For Laser Safety
START-UP Cell Observer SD Connecting the Distribution Box for Laser Safety Carl Zeiss Connecting the Distribution Box for Laser Safety • Connect:Connection the 25-pole sub-D connector (Fig. 3-9/5) of the distribution box for laser safety (Fig. 3-9/6) to the safety jack on the rear of the stand. - Page 46 START-UP Carl Zeiss Connecting the Distribution Box for Laser Safety Cell Observer SD In addition to that, the distribution box for laser safety has an optional connection for a door interlock switch (Fig. 3-9/7). You are advised to contact your Laser Safety Officer for connection of the door switch.
-
Page 47: Coupling A Customer-Provided Laser To The Cell Observer Sd System
Note: This work step is only required for integration of a Customer laser. A special optical fiber cable is necessary for coupling a laser to the Cell Observer SD system (refer to section 2.6 on page 31). If you intend to mount your own laser, you should consult the related manufacturer manual for details and instructions regarding installation and alignment of the coupling device in front of the laser. -
Page 48: Safety Check Before Laser Start-Up
• Eyepiece shutter open If your safety device is not found to function as described above, shut the system down, mark it clearly as defective and contact the Service Department of Carl Zeiss MicroImaging GmbH immediately. Attach the microscope tube again after successful safety check. -
Page 49: Laser Safety Check
You are requested to contact Carl Zeiss MicroImaging GmbH if you intend to use a laser with wavelengths that differ from those quoted in section 2.7 Technical Data. If the safety device is found to function in a non-conforming manner, you should shut the system down, mark it clearly as defective and contact the Service Department of Carl Zeiss MicroImaging GmbH immediately. -
Page 50: Operation
Cell Observer SD OPERATION The Cell Observer SD is a class 3B laser device 3B and is labelled as such. WARNING: This risk category includes medium-power lasers. Make sure to prevent exposure to radiation from such lasers. Do not look directly into the laser beam! Control and Functional Components 4.1.1... -
Page 51: Csu-X1 Control Box
OPERATION Cell Observer SD Control and Functional Components Carl Zeiss 4.1.2 CSU-X1 Control Box Main power switch Automatic circuit breaker switch Fig. 4-2 Control and functional components of CSU-X1 control box (rear-side view) 4.1.3 Multi Laser Module Line power inlet port... -
Page 52: Switching The System On
Turning the CSU-X1 control box on 4.2.3). If the safety device is found to function in a non-conforming manner, you should shut the system down, clearly mark it as defective and contact the Service Department of Carl Zeiss MicroImaging GmbH immediately. 423638-7044-001... -
Page 53: Turning The Multiline Argon Laser On
The red LED will light (Fig. 4-5/5). If the safety device is found to function in a non-conforming manner, you should shut the system down, clearly mark it as defective and contact the Service Department of Carl Zeiss MicroImaging GmbH immediately. -
Page 54: Turning The Multi Laser Module On
OPERATION Carl Zeiss Switching the System on Cell Observer SD 4.2.3 Turning the Multi Laser Module On • Close laser protection cover or laser protection incubator. • Turn the power strip on to supply power to the multi laser module. -
Page 55: Switching The System Off
Switching the System off 4.3.1 Turning the Cell Observer SD Off • Press the Shutter key (Fig. 4-1/1) or use the related Axio Vision software tool to close the shutter. • Turn the laser off (refer to sections 4.3.2 and 4.3.3). -
Page 56: Operation Control Of Spinning Disc Unit Via Axiovision
Cell Observer SD Operation Control of Spinning Disc Unit via AxioVision Once electric power is available to the spinning disc unit, the Cell Observer SD can be completely controlled via AxioVision software tools. For information about AxioVision software control actions, you should consult the AxioVision Operating Manual. -
Page 57: Exchange Of Camera Adapter
OPERATION Cell Observer SD Exchange of Camera Adapter Carl Zeiss Exchange of Camera Adapter For operation with a Photometrics QuantEM camera, special EMCCD camera adapter (423638-9260-000) is required. • Use the key switch to turn the spinning disc unit off (Fig. 4-1/2). -
Page 58: Mounting The Filter Wheel
OPERATION Carl Zeiss Mounting the Filter Wheel Cell Observer SD Mounting the Filter Wheel • Use the key switch (Fig. 4-1/2) to turn the spinning disc unit off. • Remove the power plug from the power pack. • Release the clamping screw (2.5" Allen key) (Fig. -
Page 59: Dual Cam Option
The Dual Cam option allows you to connect two cameras to a spinning disc unit. The Dual Cam option may solely be retrofitted by Service Department personnel of Carl Zeiss MicroImaging GmbH or expert technicians specifically authorized to perform such work! To switch between the two camera channels, move the push rod in or out as necessary (Fig. -
Page 60: Care, Maintenance, Troubleshooting And Service
Axio Observer Operating Manual and the user manual of your computer system. There are no further Cell Observer SD system maintenance actions which may be performed by Customers. Please contact your appropriate Carl Zeiss service point for any kind of maintenance work. -
Page 61: Troubleshooting
/ safety vertical position shutter closed Reflector turret unlocked or fully extracted Lock or push reflector turret in Shutter at Cell Observer SD closed Open shutter by pressing the Shutter button (Fig. 4-1/1) Rotation speed of CSU-X1 control box not ON... -
Page 62: Replacement Of Fuses
Axio Observer, HBO, XBO, CTI-Controller, Tempcontrol, Definite Focus: consult pertaining manual. CSU-X1 spinning disc unit: There are no fuses with external access for replacement. Please contact the Service Department of Carl Zeiss MicroImaging GmbH. Signal distribution box: The fuse compartment is combined with the inlet connector. -
Page 63: Replacement Of Hal Halogen Lamp
Carl Zeiss MicroImaging GmbH or expert technicians specially authorized to handle such work! Laser Unit Retrofit Laser units may not be retrofitted by anyone other than personnel of Carl Zeiss MicroImaging GmbH! A retrofit procedure will incur additional cost. -
Page 64: Requesting Service
Any kind of work on mechanical, optical and electronic parts requiring intervention into the inner system space and work on electronic modules of the spinning disc unit may only be performed by service personnel of Carl Zeiss MicroImaging GmbH or specifically authorized expert technicians. -
Page 65: Appendix
APPENDIX Cell Observer SD List of Abbreviations Carl Zeiss APPENDIX List of Abbreviations AOTF Acousto-Optical Tunable Filter Canadian Standards Association Confocal Scan Unit German Institute for Standardization (Deutsches Institut für Normung) European Standard Electromagnetic Compatibility Mercury Vapor Short Arc Lamp for Fluorescence... -
Page 66: Index
APPENDIX Carl Zeiss Index Cell Observer SD Index Page Axio Observer............................22 Basic laser safety kit ..........................28 Basic settings............................41 Camera adapter ............................57 Care ..............................60 Control and functional components.......................50 CSU-X1 control box ...........................51 CSU-X1 spinning disc unit ........................50 Multi laser module ..........................51 CSU-X1 control box ........................25, 44, 51... - Page 67 APPENDIX Cell Observer SD Index Carl Zeiss Maintenance ............................60 Multi laser module...........................26, 51 Objectives..............................31 Operation ............................32, 50 Optical fibers ............................31 Safety ..............................5 Safety check ............................48 Safety kit ...............................29 Service..............................64 Service interfaces ...........................11 Signal distribution box SVB 1 .........................27 Start-up ..............................37 Switching the system off........................55...