Table of Contents
Advertisement
Quick Links
Advertisement
Table of Contents

Related Manuals for Bushnell IMAGEVIEW HD 118328


Summary of Contents for Bushnell IMAGEVIEW HD 118328
- Page 1 DIgItal CaMera bInoCular Instruction Manual Model#: 118328 Lit. #: 98-2384/11-12...
-
Page 2: Table Of Contents
Section Index Page # Camera and Binocular Parts Guide LCD Display Icon Guide Basic Setup Taking Still Photos Shooting Videos Using the Capture (Still Photo) Menu 10-12 The Video Output Menu The Play (Review) Menu 14-15 The Setup Menu 16-17 Transferring the Photos/Videos to Your PC 18-19 Using the Binocular... -
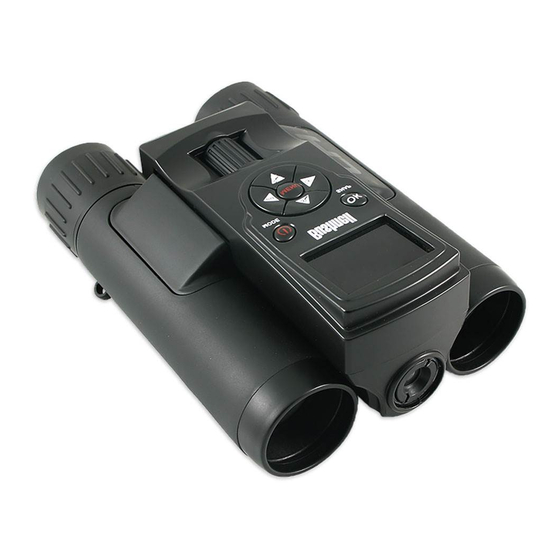
Page 3: Camera And Binocular Parts Guide
Camera and Binocular Parts Guide (H) Remote Jack (D) Up/Down/Left/Right (I) USB arrow keys & MENU Button Port (F) Binocular (C) POWER/MODE Focus Knob Button (B) Card Slot (A) Battery (L) LCD Display Compartment Slide down to open Battery polarity (G) Tripod Socket (E) OK/SNAP... -
Page 4: Lcd Display Icon Guide
LCD Display Icon Guide Icon Live Preview Screen (Still Battery Indicator (full battery shown) Photo Mode) Single Shot (Burst setting=Off ) Scene Setting (Auto shown) Photo Quality setting (3 stars=Fine) Photo Resolution setting (5 Megapixels) SD Card Inserted Live Preview Screen (Video # of Photos Remaining (based on unused card memory) Mode) -
Page 5: Basic Setup
BASIC SETUP Loading Batteries Slide the battery compartment cover (A) down, remove and set aside. Insert 3 AAA Alkaline or Lithium batteries into the compartment oriented as indicated by the polarity marks on the cover (both upper batteries “negative facing up”, lower battery “positive facing up”- see “Battery polarity” on pg. 3). Replace the cover, sliding it back into place until it clicks. - Page 6 The first item in the Setup menu is “Format”. Press the OK/SNAP (E) button, then press the DOWN arrow key to select “Execute”. Note: formatting the card will erase all files-make sure you have backed up any files you wanted to keep. Press OK/SNAP again to format the card (the display reads “One Moment”). Press the LEFT key twice to select and then exit the Capture menu.
-
Page 7: Taking Still Photos
After completing the basic setup as described in the previous pages, you are ready to take a photo. To turn on the camera, press the POWER/MODE button until the Bushnell logo screen appears. The “live preview” display shows the battery condition, number of photos remaining on the SD card, and the current setting of various options, along with the image from the camera lens located between the binocular objective lenses. - Page 8 The “remaining photos” indicator near the lower right corner of the display (see pg. 4, #7) will drop as photos are taken. Once you are out of memory (storage space on the SD card), you will need to download the photos you have taken so they can be deleted to make room on the card for new photos, or you may remove the filled up card and install another SD card if you are on a trip away from your computer.
-
Page 9: Shooting Videos
SHOOTING VIDEOS (USING VIDEO MODE) To enter Video mode (from Photo mode), briefly press the POWER/MODE button (C). The red movie camera icon appears at the top right corner of the display (pg. 4, #8). Start shooting the video at any time by pressing the OK/SNAP button. -
Page 10: Using The Capture (Still Photo) Menu
USING THE CAPTURE (STILL PHOTO MODE) MENU As mentioned earlier in this manual, your ImageView is already set for high resolution and quality right out of the box. Exposure, white balance, and other variables are set automatically. This means that you will get good results for most subjects and lighting without the need to go into the menu to change any settings. - Page 11 CAPTURE MENU Parameter Settings Function/Description (Bold=Default) Quality Fine, Standard, Sets the amount of .jpg file compression, which affects the quality of the photo and the size Economy of the file it creates. this can be used independently of Size to store more photos (with lower quality) if you choose.
- Page 12 CAPTURE MENU Parameter Settings Function/Description (Bold=Default) Auto, 100, 200, 400, Sets the sensor’s sensitivity to light. “Auto” will automatically select lower iSO in bright light, higher iSO in lower light. Lower iSO settings=better image quality Color Standard, Vivid, Standard=normal colors, Vivid=extra rich colors, Sepia=”antique” photo effect, Sepia, Monochrome Monochrome=black &...
-
Page 13: The Video Output Menu
THE VIDEO OUTPUT (VIDEO MODE) MENU Whenever the ImageView is switched to Video mode (see “Shooting Videos-Using Video Mode), pressing the MENU button will display the Video Output menu instead of the Capture menu. It is much shorter, providing only a Size (video resolution) option, along with EV and White Balance, which have the same functions as they do in the Capture menu. -
Page 14: The Play (Review) Menu
THE PLAY (REVIEW) MENU When you are in Still Photo or Video modes, pressing the RIGHT arrow key enters Play (Review) mode, which allows you to view previously captured photos or videos that are stored on the SD card. Once you are in Play (Review) mode, pressing the MENU button enters the Play menu, which offers the options shown below. - Page 15 PLAY (REVIEW) MENU Parameter Settings Function/Description (Bold=Default) Protect Single, All, Select Select “Single” then press OK to protect the currently displayed (last) photo or video from accidental deletion. Select “All” then press OK to protect all photos/videos stored on the SD card. Select “Select”...
-
Page 16: The Setup Menu
THE SETUP MENU ( available from Capture Menu, Video Output Menu or Play Menu) After you first enter any other menu screen, press the RIGHT arrow key to switch to the Setup menu. The Setup menu provides a variety of basic operating functions that are unrelated to capturing or reviewing photos and videos. - Page 17 SETUP MENU (Additional Menu Tab available from Capture Menu, Play Menu or Video Output Menu) Parameter Settings Function/Description (Bold=Default) Language English, French, Selects language used for all menu screens. German, italian, Spanish, Portuguese, Chinese 1, Chinese 2, Japanese Auto Off 1 Min, 3 Min, 5 Selects elapsed time after last button press before camera shuts off to conserve battery power.
-
Page 18: Transferring The Photos/Videos To Your Pc
TRANSFERRING THE PHOTOS & VIDEOS TO YOUR PC 1. Make sure the ImageView is powered off. Connect the supplied cable to the USB port above the SD card slot on the ImageView, then connect the other end directly to a main USB port on your computer-do not use front panel/keyboard USB ports or unpowered “hubs”. - Page 19 5. After the photos are transferred to your computer, you can disconnect the ImageView. (Mac Users: you should “eject” the “disk” that appeared on your desktop when the camera was connected-you can simply drag it to the Trash to eject it). 6.
-
Page 20: Using The Binocular
USING THE BINOCULAR Adjusting the Binocular IPD The distance between the eyes, called “interpupillary distance, ” varies from person to person. To set the hinge to the right spacing for your eyes: Hold the binocular in the normal viewing position, with a firm grip on each side. -
Page 21: General Care And Cleaning
GENERAL CARE AND CLEANING Caring for the ImageView Your Bushnell ImageView will provide years of trouble-free service if it receives the normal care you would give any fine optical instrument. • Avoid sharp impacts. Set the ImageView down gently on hard surfaces. - Page 22 of a coarse cloth or unnecessary rubbing may scratch the lens surface and eventually cause permanent damage. A washable “microfiber” cleaning cloth is ideal for the routine cleaning of your optics. Simply breathe lightly on the lens to provide a slight amount of moisture, then gently rub the lens with the microfiber cloth.
- Page 23 This warranty does not cover damages caused by misuse, improper handling, These limits are designed to provide reasonable protection against installation, or maintenance provided by someone other than a Bushnell Authorized Service Department. harmful interference in a residential installation.
- Page 24 For further questions or additional information please contact: Bushnell Outdoor Products 9200 Cody, Overland Park, Kansas 66214 (800) 423-3537 • www.bushnell.com ©2012 Bushnell Outdoor Products...