Table of Contents
Advertisement
Advertisement
Table of Contents

Related Manuals for Supermicro AOC-S3108L-H8iR


Summary of Contents for Supermicro AOC-S3108L-H8iR
- Page 1 AOC-S3108L-H8iR User's Guide Revision 1.0a...
- Page 2 Santa Clara County in the State of California, USA. The State of California, County of Santa Clara shall be the exclusive venue for the resolution of any such disputes. Supermicro's total liability for all claims will not exceed the price paid for the hardware product.
-
Page 3: An Important Note To The User
This user's guide is written for system integrators, IT professionals, and knowledgeable end users. It provides information for the installation and use of the AOC-S3108L-H8iR add-on card. An Important Note to the User All images and layouts shown in this user's guide are based upon the latest PCB revision available at the time of publishing of this user guide. -
Page 4: Important Links
Product safety info: http://www.supermicro.com/about/policies/safety_informa- tion.cfm • If you have any questions, please contact our support team at: support@ supermicro.com This manual may be periodically updated without notice. Please check the Supermicro website for possible updates to the manual revision level. -
Page 5: Contacting Supermicro
Preface Contacting Supermicro Headquarters Address: Super Micro Computer, Inc. 980 Rock Ave. San Jose, CA 95131 U.S.A. Tel: +1 (408) 503-8000 Fax: +1 (408) 503-8008 Email: marketing@supermicro.com (General Information) support@supermicro.com (Technical Support) Web Site: www.supermicro.com Europe Address: Super Micro Computer B.V. -
Page 6: Table Of Contents
Chapter 1 Introduction Overview ......................1-1 About this Add-on Card ................... 1-1 Key Features ....................1-1 Supermicro Motherboard Support ..............1-2 Chapter 2 Hardware Components Add-On Card Image and Layout ..............2-1 Major Onboard Components ................2-1 SAS 3.0 Ports and CPLD JTAG Header ............2-2 SAS Ports .................... - Page 7 Table of Contents Properties ......................4-9 Foreign View ....................4-10 Chapter 5 MegaRAID Controller Firmware Update Procedures Flashing Firmware Using MegaCLI under DOS ..........5-1 Flashing Firmware Using MegaRAID Storage Manager ........ 5-3 Chapter 6 MegaRAID CacheCade Configuration Enabling MegaRAID CacheCade Support ............6-1 Minimum System Configuration Requirements ..........
- Page 8 AOC-S3108L-H8iR User's Guide Notes...
-
Page 9: Chapter 1 Introduction
Introduction Overview Congratulations on purchasing your add-on card from an acknowledged leader in the industry. Supermicro products are designed with the utmost attention to detail to provide you with the highest standards in quality and performance. About this Add-on Card The Supermicro AOC-S3108L-H8iR is the most technological-advanced, cost- effective, and reliable SAS MegaRAID adapter in today's market. -
Page 10: Supermicro Motherboard Support
AOC-S3108L-H8iR User's Guide • 2GB DDR3 ECC Unbuffered on-card cache with a speed of up to 1866MHz for cached data protection • Advanced array configuration and management utilities • Automatically-negotiated PCI-E link widths • Port-independent auto-negotiation • Supports SSP, SMP, STP and SATA protocols •... - Page 11 Chapter 1: Overview • X10SRH-CF • X10SRH-CLN4F • X10SRi-F • X10SRL-F • X10SRW-F • X10DAi • X10DAC • X10DAX • X10DAL-i • X10DRC-T4+ • X10DRC-LN4+ • X10DRi-T4+ • X10DRi-LN4+ • X10DRD-iNTP • X10DRD-LTP • X10DRFF-C • X10DRFR-T • X10DRT-P • X10DRG-Q •...
- Page 12 AOC-S3108L-H8iR User's Guide • X10DRL-CT • X10DRL-i • X10DRT-L • X10DRT-LIBQ • X10DRT-LIBF • X10DRU-i+ • X10DRW-E • X10DRW-N • X10DRX...
-
Page 13: Chapter 2 Hardware Components
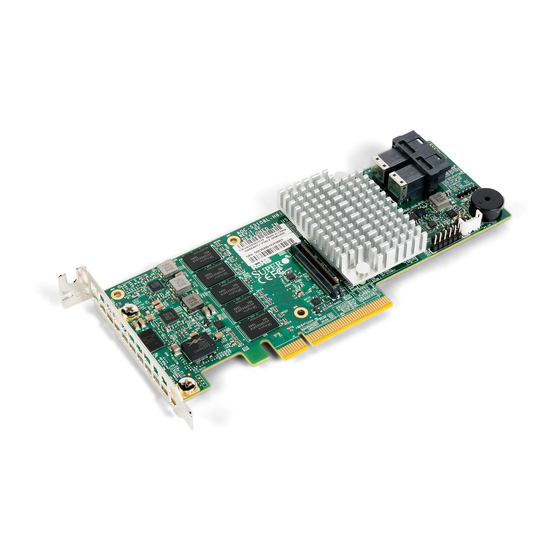
4 5 6 BUZZER1 AOC-S3108L-H8iR PCI-E 3.0 x8 Rev. 1.02 The AOC-S3108L-H8iR Image Major Onboard Components The following major components are installed on the AOC-S3108L-H8iR: Major Components Component Name Component Name Component Name 3108 SAS CTRL SAS ports 0~3 LED1: Activity LED... -
Page 14: Sas 3.0 Ports And Cpld Jtag Header
AOC-S3108L-H8iR User's Guide SAS 3.0 Ports and CPLD JTAG Header SAS Ports Eight SAS ports, supported by the Avago 3108 SAS controller, are located on the add-on card. SAS 0-3 and SAS 4-7 support SAS 3.0 connections. See the table below for pin definitions. -
Page 15: Led Indicators
Definition Green: Blinking System: Normal Off or Red System: Dis- abled or Failed 1. SAS Activity LED BAR CODE 2. SAS Fault LED SAS Controller SAS CODE 3. System Heartbeat 1 2 3 BUZZER1 AOC-S3108L-H8iR PCI-E 3.0 x8 Rev. 1.02... - Page 16 AOC-S3108L-H8iR User's Guide Notes...
-
Page 17: Chapter 3 Installation
Chapter 3: Installation Chapter 3 Installation Note: Your system came with the AOC-S3108L-H8iR adapter pre-in- stalled as a part of an integrated solution. We do not recommend that any part of your system components be removed and re-installed. However, if you do need to remove or re-install a system component, including this add-on card, please follow the instructions below to ensure proper system setup. -
Page 18: Before Installation
AOC-S3108L-H8iR User's Guide Before Installation To install the add-on card properly, be sure to follow the instructions below. 1. Power down the system. 2. Remove the power cord from the wall socket. 3. Use industry-standard anti-static equipment (such as gloves or wrist strap) and follow the instructions listed on Page 3-1 to avoid damage caused by ESD. -
Page 19: Chapter 4 Configuring The Avago Megaraid Setting
OS installation. RAID Minimum Drive Requirements The AOC-S3108L-H8iR add-on card supports up to 240 HDD with RAID 0, 1, 5, 6, 10, 50, and 60. Use the table below to determine the minimum number of hard drives needed to set up a RAID environment. -
Page 20: Using The Avagp Megaraid Configuration Utility
AOC-S3108L-H8iR User's Guide Using the Avagp MegaRAID Configuration Utility Follow the steps below to start the Avago MegaRAID Configuration Utility. 1. Power on the system. 2. Press <Ctrl><R> to enter the Avago MegaRAID Configuration Utility when the following screen displays. -
Page 21: The Avago Megaraid Main Screen
Chapter 4: Configuring the Avago MegaRAID Setting The Avago MegaRAID Main Screen On the top of the Avago MegaRAID main screen is a list of configurable menus. Press <Ctrl><N> or <Ctrl><P> to select the menu. The main screen includes the following menus: •... -
Page 22: Vd Mgmt (Virtual Drive Management)
AOC-S3108L-H8iR User's Guide VD Mgmt (Virtual Drive Management) When you enter the MegaRAID Configuration Utility, the VD Mgmt is the first menu screen that displays, as shown below. This screen provides information about the configuration of controllers, drive groups, and virtual drives. The right panel of the screen displays the information about the selected device. - Page 23 Chapter 4: Configuring the Avago MegaRAID Setting Move the cursor to select the controller and press <F2>, as shown below. Press <Enter> to create new virtual drives when the following screen displays. Note You can use the up arrow and down Arrow keys here to select enabled com- mands, which are highlighted in white, such as “Create Virtual Drive”...
- Page 24 AOC-S3108L-H8iR User's Guide Use the up arrow and down arrow keys to select the RAID level, as shown below, and press <Enter>. Note The corresponding RAID level(s) will display based on the number of hard drives connected to the selected controller.
-
Page 25: Pd Mgmt (Physical Drive Management)
Chapter 4: Configuring the Avago MegaRAID Setting PD Mgmt (Physical Drive Management) Press <Ctrl><N> or <Ctrl><P> to select the PD Mgmt menu, as shown below. This screen provides information about hard drives connected to the selected controller. The right panel of the screen shows the information about the selected device. PD Mgmt (Physical Management) Menu Screen To select a device, use the up arrow, down arrow or <Tab>... -
Page 26: Ctrl Mgmt (Control Management)
AOC-S3108L-H8iR User's Guide Ctrl Mgmt (Control Management) Press <Ctrl><N> or <Ctrl><P> to select the Ctrl Mgmt menu, as shown below. This menu provides information about the settings of the selected controller. On this screen, use the up arrow, down arrow or <Tab> keys to move the cursor. To apply changes, navigate to APPLY and press <Enter>. -
Page 27: Properties
Chapter 4: Configuring the Avago MegaRAID Setting Properties Press <Ctrl><N> or <Ctrl><P> to select the Properties menu, as shown below. This menu provides read-only information about the properties of the selected controller. Navigate to Next and press <Enter> to open the second screen to view more prop- erties, as shown below. -
Page 28: Foreign View
AOC-S3108L-H8iR User's Guide Foreign View Press <Ctrl><N> or <Ctrl><P> to select the Foreign View menu, as shown below. This menu provides information about the foreign configurations, such as drive groups, virtual drives, physical drives, and hot spare drives. Also, this menu al- lows you to import or clear the foreign configurations. -
Page 29: Flashing Firmware Using Megacli Under Dos
Chapter 5 MegaRAID Controller Firmware Update Procedures This chapter provides instructions on how to flash MegaRAID controller firmware. Please visit our website at www.supermicro.com for more information about firm- ware/utilities downloads. Flashing Firmware Using MegaCLI under DOS 1. You need the MegaCLI utility and ROM file (smc3108.rom) to flash the Mega- RAID firmware. - Page 30 AOC-S3108L-H8iR User's Guide 3. The screen below shows an example of flashing the MegaRAID firmware using the batch file (smc3108.bat). 4. Reboot the system and check the firmware version in the controller banner during boot up as shown below.
-
Page 31: Flashing Firmware Using Megaraid Storage Manager
Chapter 5: MegaRAID Controller Firmware Update Procedures Flashing Firmware Using MegaRAID Storage Manager You need the MegaRAID Storage Manager software and ROM file (smc3108.rom) to flash the MegaRAID firmware. Follow the steps below to use the MegaRAID Storage Manager software on the following platforms: Micorsoft Windows operating system and Linux operating system. - Page 32 AOC-S3108L-H8iR User's Guide MegaRAID Storage Manager Screen on a Linux Operating System...
- Page 33 Chapter 5: MegaRAID Controller Firmware Update Procedures 3. Press the Browse button to search for new firmware. 4. Select the new MegaRAID controller firmware as shown below. 5. Click OK to continue. MegaRAID Storage Manager Screen on a Microsoft Windows Operating System MegaRAID Storage Manager Screen on a Linux Operating System...
- Page 34 AOC-S3108L-H8iR User's Guide 6. Check Confirm in the dialog box and click Yes to continue, as shown below. MegaRAID Storage Manager Screen on a Microsoft Windows Operating System MegaRAID Storage Manager Screen on a Linux Operating System...
- Page 35 Chapter 5: MegaRAID Controller Firmware Update Procedures 7. Do not reboot the system until the following screen displays. 8. Click OK once the firmware update is completed as shown below. MegaRAID Storage Manager Screen on a Microsoft Windows Operating System MegaRAID Storage Manager Screen on a Linux Operating System...
- Page 36 AOC-S3108L-H8iR User's Guide 9. Reboot the system and check the firmware version using the MegaRAID Storage Manager application as shown below. MegaRAID Storage Manager Screen on a Microsoft Windows Operating System MegaRAID Storage Manager Screen on a Linux Operating System...
-
Page 37: Enabling Megaraid Cachecade Support
Chapter 6 MegaRAID CacheCade Configuration This chapter provides instructions on how to configure MegaRAID CacheCade set- tings in the Windows environment. Please refer to our website at www.supermicro. com for information on firmware/utilities downloads. Enabling MegaRAID CacheCade Support Minimum System Configuration Requirements You will need to have the following items pre-installed in your system before con- figuring MegaRAID CacheCade settings. -
Page 38: Cachecade Key Activation
AOC-S3108L-H8iR User's Guide CacheCade Key Activation The following section provides instructions on how to activate your CacheCade key for proper MegaRAID CacheCade support. 1. From the MegaRAID Storage Manager menu, select Dashboard by clicking on it. 2. Double-click on Manage MegaRAID Adanced Software Options as shown below. - Page 39 Chapter 6: CacheCade Configuration 4. When the following screen displays, click on the radio button "Enter an Activation Key" and then enter your Activation Key in the field provided as shown below.
-
Page 40: Configuring The Cachecade Raid Settings And Creating A Drive Group
AOC-S3108L-H8iR User's Guide Configuring the CacheCade RAID Settings and Creating a Drive Group To configure MegaCacheCade settings, please follow the instructions below. 1. From the MegaRAID Storage Manager menu, select Physical by clicking on 2. From the pull-down menu, select AVAGO 3108 MegaRAID by clicking on it. - Page 41 Chapter 6: CacheCade Configuration 5. When the following screen displays, click on Select to select the RAID setting to configure for your HDDs. 6. Select your desired RAID setting to the hard drive you want to configure. 7. Click on Drive to invoke the pull-down submenu. From the pull-down sub- menu, select the hard drives you want to configure the RAID setting.
- Page 42 AOC-S3108L-H8iR User's Guide 11. After adding all HDDs you want to use to create a drive group to the list, click on Create Drive Group to create a CacheCade drive group as shown below. 12. From the pull-down submenu, select the RAID setting you want to configure and click Next to assign the selected RAID setting to all HDDs included in the drive group list.
-
Page 43: Creating A Cachecade - Ssd Caching Virtual Drive
Chapter 6: CacheCade Configuration Creating a CacheCade - SSD Caching Virtual Drive To create a SSD caching virtual drive, please follow the instructions below. 1. From the MegaRAID Storage Manager menu, select Physical by clicking on 2. From the pull-down menu, select AVAGO 3108 MegaRAID by clicking on it. 3. - Page 44 AOC-S3108L-H8iR User's Guide 10. To remove a virtual drive from a virtual drive group, select the drive to remove and click on Remove Virtual Drive. 11. To cancel the deletion, click on Cancel. 12. To proceed to the next step to configure the virtual drive settings, click Next.
-
Page 45: Configuring Virtual Drive Settings
Chapter 6: CacheCade Configuration Configuring Virtual Drive Settings To configure the settings for a virtual drive, please follow the instructions below. 1. From the MegaRAID Storage Manager menu, select Logical by clicking on it. 2. From the Virtual Drive(s) pull-down menu, select the Virtual Drive you want to configure by clicking on it. -
Page 46: Enabling Ssd Caching Support On A Virtual Drive
AOC-S3108L-H8iR User's Guide Enabling SSD Caching Support on a Virtual Drive To enable SSD Caching support for a virtual drive, please follow the instructions below. 1. From the MegaRAID Storage Manager menu, select Logical by clicking on it. 2. From the Virtual Drive(s) pull-down menu, select the Virtual Drive for SSD Caching support by clicking on it. - Page 47 (Disclaimer Continued) The products sold by Supermicro are not intended for and will not be used in life support systems, medical equipment, nuclear facilities or systems, aircraft, aircraft devices, aircraft/emergency com- munication devices or other critical systems whose failure to perform be reasonably expected to result in significant injury or loss of life or catastrophic property damage.